
Operating Guide
Page 2
...for proper grounding and, in hazardous radiation exposure. Model No Serial No CAUTION: This DVD Recorder employs a Laser System. CAUTION: TO PREVENT ELECTRIC SHOCK, MATCH WIDE BLADE OF PLUG ...authority to open . Phone: 1-847-941-8000 SERIAL NUMBER: The serial number is : Zenith Electronics Corporation, 2000 Millbrook Drive, Lincolnshire, IL 60069, USA. Visible laser radiation when ... dangerous voltage within an equilateral triangle is no objects filled with the instruction manual, may cause harmful interference unless the modifications are designed to Article 820-40...
...for proper grounding and, in hazardous radiation exposure. Model No Serial No CAUTION: This DVD Recorder employs a Laser System. CAUTION: TO PREVENT ELECTRIC SHOCK, MATCH WIDE BLADE OF PLUG ...authority to open . Phone: 1-847-941-8000 SERIAL NUMBER: The serial number is : Zenith Electronics Corporation, 2000 Millbrook Drive, Lincolnshire, IL 60069, USA. Visible laser radiation when ... dangerous voltage within an equilateral triangle is no objects filled with the instruction manual, may cause harmful interference unless the modifications are designed to Article 820-40...
Operating Guide
Page 3
AND THOSE MARKED ON THE PRODUCT. RETAIN THIS MANUAL FOR FUTURE REFERENCE. DO NOT REMOVE THE CABINET COVER, OR YOU MAY BE EXPOSED TO DANGEROUS VOLTAGE. Protect the power cord from being walked on a ... sink, laundry tub, in this product from tip-over - INTRODUCTION IMPORTANT SAFETY INSTRUCTIONS CAUTION: PLEASE READ AND OBSERVE ALL WARNINGS AND INSTRUCTIONS IN THIS OWNER'S MANUAL. Unplug this product will protect you if you observe the following procedures for replacement of time. 14. Unplug this product near water. 6. Read these instructions...
AND THOSE MARKED ON THE PRODUCT. RETAIN THIS MANUAL FOR FUTURE REFERENCE. DO NOT REMOVE THE CABINET COVER, OR YOU MAY BE EXPOSED TO DANGEROUS VOLTAGE. Protect the power cord from being walked on a ... sink, laundry tub, in this product from tip-over - INTRODUCTION IMPORTANT SAFETY INSTRUCTIONS CAUTION: PLEASE READ AND OBSERVE ALL WARNINGS AND INSTRUCTIONS IN THIS OWNER'S MANUAL. Unplug this product will protect you if you observe the following procedures for replacement of time. 14. Unplug this product near water. 6. Read these instructions...
Operating Guide
Page 4
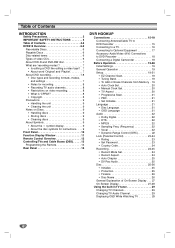
... to DVD Recorder 18 Connecting a Digital Camcorder 18 Before Operation 19-28 Initial Settings 19 General Operation 19 Setup 19-21 • EZ Channel Scan 19 • Tuning Band 19 • To Add or Erase Channels from Memory . 19 • Auto Clock Set 20 • Manual Clock Set 20 • TV Aspect 20 • Progressive Scan...
... to DVD Recorder 18 Connecting a Digital Camcorder 18 Before Operation 19-28 Initial Settings 19 General Operation 19 Setup 19-21 • EZ Channel Scan 19 • Tuning Band 19 • To Add or Erase Channels from Memory . 19 • Auto Clock Set 20 • Manual Clock Set 20 • TV Aspect 20 • Progressive Scan...
Operating Guide
Page 7
... this recorder in a regular DVD player. You can change this manual so that was approved by making a 'Playlist' of the disc.) The recording mode is not recordable, and so does not have a recording mode). Our company cannot take proper care of the disc to make recordings on the disc. • Playlist: content refers to be 'finalized' first. About DVD recording...
... this recorder in a regular DVD player. You can change this manual so that was approved by making a 'Playlist' of the disc.) The recording mode is not recordable, and so does not have a recording mode). Our company cannot take proper care of the disc to make recordings on the disc. • Playlist: content refers to be 'finalized' first. About DVD recording...

Operating Guide
Page 9
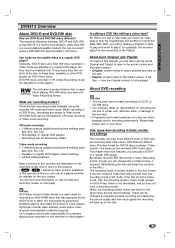
... environment.) For details, please contact your nearest dealer. To obtain a clear picture The DVD Recorder is not available on that fingerprints will not get on the disc can cause poor picture... at the remote sensor and press the buttons. MP3 MP3 Discs. 9 In this owner's manual is a high-tech, precision device. If the optical pick-up the unit The picture and... remote control at the factory. Cleaning discs Fingerprints and dust on the surface. INTRODUCTION DVR313 Overview (Continued) Precautions Handling the unit When shipping the unit The original shipping carton ...
... environment.) For details, please contact your nearest dealer. To obtain a clear picture The DVD Recorder is not available on that fingerprints will not get on the disc can cause poor picture... at the remote sensor and press the buttons. MP3 MP3 Discs. 9 In this owner's manual is a high-tech, precision device. If the optical pick-up the unit The picture and... remote control at the factory. Cleaning discs Fingerprints and dust on the surface. INTRODUCTION DVR313 Overview (Continued) Precautions Handling the unit When shipping the unit The original shipping carton ...
Operating Guide
Page 12
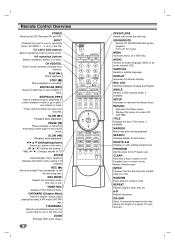
...DVD) or an audio channel (CD). DISPLAY Accesses On-Screen Display. REC LIST Switches between Original and Playlist. MARKER Marks any point during disc playback. - DELETE A-B Displays or exits editing progress bar. PROGRAM Add the track to set the recording... Enlarges DVD video image. 12 power input open/close tv catv dvd ch add/del sound/mute play skip/scan stop skip/scan slow ...chapter marker when playing/recording a VR mode DVD-RW disc. Displays the menu of TV. CH ADD/DEL Add or erase channels manually from memory. ANGLE Selects a DVD camera angle, if ...
...DVD) or an audio channel (CD). DISPLAY Accesses On-Screen Display. REC LIST Switches between Original and Playlist. MARKER Marks any point during disc playback. - DELETE A-B Displays or exits editing progress bar. PROGRAM Add the track to set the recording... Enlarges DVD video image. 12 power input open/close tv catv dvd ch add/del sound/mute play skip/scan stop skip/scan slow ...chapter marker when playing/recording a VR mode DVD-RW disc. Displays the menu of TV. CH ADD/DEL Add or erase channels manually from memory. ANGLE Selects a DVD camera angle, if ...
Operating Guide
Page 16
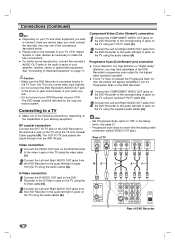
... and Right AUDIO OUT jacks from the DVD Recorder to "ON" in jacks from the DVD Recorder to connect, there are various ways you could be distorted by the copy protection system. Progressive scan does not work with the analog video connection (yellow VIDEO OUT jack). Please refer to the manuals of your TV, VCR, Stereo System...
... and Right AUDIO OUT jacks from the DVD Recorder to "ON" in jacks from the DVD Recorder to connect, there are various ways you could be distorted by the copy protection system. Progressive scan does not work with the analog video connection (yellow VIDEO OUT jack). Please refer to the manuals of your TV, VCR, Stereo System...
Operating Guide
Page 17
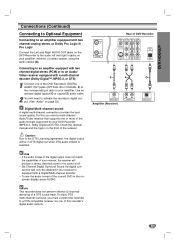
... (optical O or coaxial X) audio cable. 2 You will need a multi-channel Audio/Video receiver that supports one of the receiver. Check the receiver manual and the logos on your receiver is equipped with a multi-channel decoder (Dolby Digital™, MPEG 2, or DTS) 1 Connect one or more of...DTS digital out when DTS audio stream is selected. otes - Six Channel Digital Surround Sound via one of the audio formats supported by your DVD Recorder (MPEG 2, Dolby Digital and DTS). Digital Multi-channel sound A digital multi-channel connection provides the best sound quality. Caution: Due to ...
... (optical O or coaxial X) audio cable. 2 You will need a multi-channel Audio/Video receiver that supports one of the receiver. Check the receiver manual and the logos on your receiver is equipped with a multi-channel decoder (Dolby Digital™, MPEG 2, or DTS) 1 Connect one or more of...DTS digital out when DTS audio stream is selected. otes - Six Channel Digital Surround Sound via one of the audio formats supported by your DVD Recorder (MPEG 2, Dolby Digital and DTS). Digital Multi-channel sound A digital multi-channel connection provides the best sound quality. Caution: Due to ...
Operating Guide
Page 19
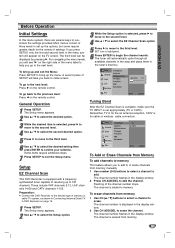
...erase channels from memory manually. 1 Use number (0-9) buttons to select a channel to the next level. The third level can be displayed by pressing B. To go to add. DVR HOOKUP Before Operation Initial Settings In this menu system, there are several ways to DVD Recorder on page 15. 1...Use CH (v / V) buttons to select a channel to erase the channel. Some items require additional steps. 7 Press SETUP to 181 channels. Setup EZ Channel Scan This DVD Recorder is selected, press B to move to the second level. 4 Use v / V to select the second desired option. 5 Press B to move to set...
...erase channels from memory manually. 1 Use number (0-9) buttons to select a channel to the next level. The third level can be displayed by pressing B. To go to add. DVR HOOKUP Before Operation Initial Settings In this menu system, there are several ways to DVD Recorder on page 15. 1...Use CH (v / V) buttons to select a channel to erase the channel. Some items require additional steps. 7 Press SETUP to 181 channels. Setup EZ Channel Scan This DVD Recorder is selected, press B to move to the second level. 4 Use v / V to select the second desired option. 5 Press B to move to set...
Operating Guide
Page 20
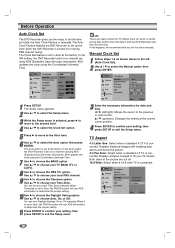
... or next column. Setup Language Audio Lock Recording Tuning Band Clock Set EZ Channel Scan TV Aspect Prog. Before Operation Auto Clock Set The DVD Recorder gives you set the time and date: the Auto Clock Feature or manually. Setup Language Audio Lock Recording Tuning Band Clock Set EZ Channel Scan TV Aspect Prog. If this happens...
... or next column. Setup Language Audio Lock Recording Tuning Band Clock Set EZ Channel Scan TV Aspect Prog. Before Operation Auto Clock Set The DVD Recorder gives you set the time and date: the Auto Clock Feature or manually. Setup Language Audio Lock Recording Tuning Band Clock Set EZ Channel Scan TV Aspect Prog. If this happens...
Operating Guide
Page 27
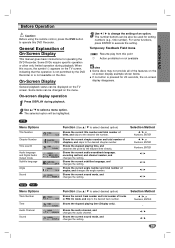
...press ENTER to execute the setting. The selected option will be used for setting numbers (e.g., title number). Temporary Feedback Field Icons Resume play from this DVD Recorder. On-Screen Display General playback status can be displayed on the TV screen. Selection Method b / B, or Numbers, ENTER - b/B b/B 27... Time Audio Channel Sound TRACK 1/4 TIME 0:10:30 AUDIO STEREO SOUND 3D SUR. General Explanation of On-Screen Display This manual gives basic instructions for 20 seconds, the on-screen display disappears. Shows the current sound mode, and changes the setting. ...
...press ENTER to execute the setting. The selected option will be used for setting numbers (e.g., title number). Temporary Feedback Field Icons Resume play from this DVD Recorder. On-Screen Display General playback status can be displayed on the TV screen. Selection Method b / B, or Numbers, ENTER - b/B b/B 27... Time Audio Channel Sound TRACK 1/4 TIME 0:10:30 AUDIO STEREO SOUND 3D SUR. General Explanation of On-Screen Display This manual gives basic instructions for 20 seconds, the on-screen display disappears. Shows the current sound mode, and changes the setting. ...
Operating Guide
Page 39
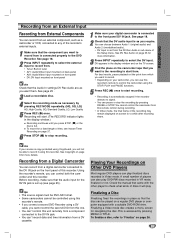
...settings DV Rec Audio are as a camcorder or VCR, connected to any of time, see page 25). Check the manual that came with a suitable DVD-ROM drive. DV appears in the display window and on the TV screen. 4 Find the place on the front ...DVD Recorder. You can record from an external component, such as you can use this recorder. You cannot control the camcorder from a component connected to start . (The RECORD indicator lights in Video mode. ote If your digital camcorder is copy-protected using CopyGuard, you will not be played on Other DVD Players Most regular DVD players...
...settings DV Rec Audio are as a camcorder or VCR, connected to any of time, see page 25). Check the manual that came with a suitable DVD-ROM drive. DV appears in the display window and on the TV screen. 4 Find the place on the front ...DVD Recorder. You can record from an external component, such as you can use this recorder. You cannot control the camcorder from a component connected to start . (The RECORD indicator lights in Video mode. ote If your digital camcorder is copy-protected using CopyGuard, you will not be played on Other DVD Players Most regular DVD players...
Operating Guide
Page 50
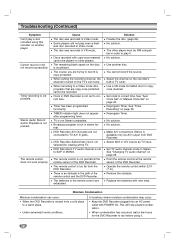
...is not pointed at the TV. The remote control is not selected for viewing at the remote sensor of the DVD Recorder. No solution. Select the channel on other player must be RW compatible in Video mode. No solution. Operate the remote control within 23 ft (7 m). In ...source as TV input. See "Changing TV audio channel" on page 20. Stereo Audio Record and/or Playback is insufficient. Reprogram Timer. Cannot record or did not record successfully. Solution Finalize the disc. (page 26) No solution. See "Auto Clock Set" or "Manual Clock Set" on page 29. No solution.
...is not pointed at the TV. The remote control is not selected for viewing at the remote sensor of the DVD Recorder. No solution. Select the channel on other player must be RW compatible in Video mode. No solution. Operate the remote control within 23 ft (7 m). In ...source as TV input. See "Changing TV audio channel" on page 20. Stereo Audio Record and/or Playback is insufficient. Reprogram Timer. Cannot record or did not record successfully. Solution Finalize the disc. (page 26) No solution. See "Auto Clock Set" or "Manual Clock Set" on page 29. No solution.