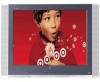
Operating Guide
Page 2
... RISK OF ELECTRIC SHOCK DO NOT REMOVE COVER (OR BACK). RECORD YOUR MODEL NUMBER (For future reference) The model and serial number of your new TV are designed to which can radiate radio frequency energy and, if not installed and used in particular, specifies that may cause harmful interference to operate this product's compliance is : Zenith Electronics Corporation, 2000 Millbrook Drive, Lincolnshire...
... RISK OF ELECTRIC SHOCK DO NOT REMOVE COVER (OR BACK). RECORD YOUR MODEL NUMBER (For future reference) The model and serial number of your new TV are designed to which can radiate radio frequency energy and, if not installed and used in particular, specifies that may cause harmful interference to operate this product's compliance is : Zenith Electronics Corporation, 2000 Millbrook Drive, Lincolnshire...
Operating Guide
Page 4
... a distinct change in a risk of other controls may expose you to dangerous voltage or other hazards. 22. Wall or Ceiling Mounting The product should not be situated away from the wall outlet and disconnect the antenna or cable system. Overloading Do not overload wall outlets and extension cords as an improper adjustment of fire or electric shock. 18. Replacement Parts When replacement parts are...
... a distinct change in a risk of other controls may expose you to dangerous voltage or other hazards. 22. Wall or Ceiling Mounting The product should not be situated away from the wall outlet and disconnect the antenna or cable system. Overloading Do not overload wall outlets and extension cords as an improper adjustment of fire or electric shock. 18. Replacement Parts When replacement parts are...
Operating Guide
Page 5
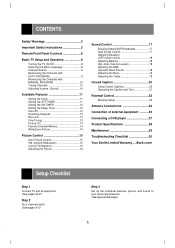
.../SAP Broadcasts 17 Auto Sound Control 17 Adjusting Equalizer (OFF mode in ASC 18 Adjusting Balance 18 AVL (Auto Volume Leveler 18 Adjusting the DBS (Dynamic Bass Sound 18 Adjusting the Bass 19 Adjusting the Treble 19 Closed Caption 20 Using Closed Captions 20 Operating the Caption and Text 21 Parental Control 22 Blocking Setup 23 Antenna Connections 24 Connection of external equipment ...........25 Connecting a DVD player 27 Product Specifications 28 Maintenance 29 Troubleshooting Checklist 30 Your Zenith Limited Warranty .....Back cover Setup Checklist Step 1 Connect TV...
.../SAP Broadcasts 17 Auto Sound Control 17 Adjusting Equalizer (OFF mode in ASC 18 Adjusting Balance 18 AVL (Auto Volume Leveler 18 Adjusting the DBS (Dynamic Bass Sound 18 Adjusting the Bass 19 Adjusting the Treble 19 Closed Caption 20 Using Closed Captions 20 Operating the Caption and Text 21 Parental Control 22 Blocking Setup 23 Antenna Connections 24 Connection of external equipment ...........25 Connecting a DVD player 27 Product Specifications 28 Maintenance 29 Troubleshooting Checklist 30 Your Zenith Limited Warranty .....Back cover Setup Checklist Step 1 Connect TV...

Operating Guide
Page 6
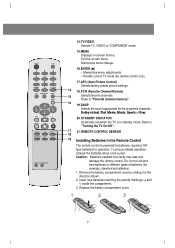
... "Closed captions". 5. Refer to restore sound. 2. COLOR TEMPERATURE Adjusts TV color temperature. 7. a.prog memory/erase 12 13 9. AUTO PROGRAM Memorizes channels with AUTO PROGRAM. 13. MUTE Press to "Turning the TV On/Off". 3. CAPTION Selects CAPTION mode. This is displayed on the screen. 8. on the screen. VCR BUTTON Control some video cassette recorders. SLEEP Sets desired sleep time. 10. MEMORY/ERASE Memorizes or erases selected channel. menu 5 enter 6 ch 7 vol vol ch rew play ff 8 p/still stop rec 1. NUMBER Direct channel selection. 4. POWER...
... "Closed captions". 5. Refer to restore sound. 2. COLOR TEMPERATURE Adjusts TV color temperature. 7. a.prog memory/erase 12 13 9. AUTO PROGRAM Memorizes channels with AUTO PROGRAM. 13. MUTE Press to "Turning the TV On/Off". 3. CAPTION Selects CAPTION mode. This is displayed on the screen. 8. on the screen. VCR BUTTON Control some video cassette recorders. SLEEP Sets desired sleep time. 10. MEMORY/ERASE Memorizes or erases selected channel. menu 5 enter 6 ch 7 vol vol ch rew play ff 8 p/still stop rec 1. NUMBER Direct channel selection. 4. POWER...
Operating Guide
Page 7
... the program's character ; FCR (Favorite Channel Review) 15 Selects favorite channels. To ensure reliable operation, change . 16.ENTER (A) • Memorizes menu adjustments. • Recalls current TV mode (by remote control only). 17.APC (Auto Picture Control) Selects factory preset picture settings. 14 18. Insert new batteries matching the polarity markings (+ and -) inside the compartment. 3. Exit the current menu. Dolby virtual, Flat, Movie, Music, Sports or User. 20. power mute 1 4 7 caption 2 3 5 6 8 9 0 tv/video arc color temp. Replace the battery...
... the program's character ; FCR (Favorite Channel Review) 15 Selects favorite channels. To ensure reliable operation, change . 16.ENTER (A) • Memorizes menu adjustments. • Recalls current TV mode (by remote control only). 17.APC (Auto Picture Control) Selects factory preset picture settings. 14 18. Insert new batteries matching the polarity markings (+ and -) inside the compartment. 3. Exit the current menu. Dolby virtual, Flat, Movie, Music, Sports or User. 20. power mute 1 4 7 caption 2 3 5 6 8 9 0 tv/video arc color temp. Replace the battery...
Operating Guide
Page 8
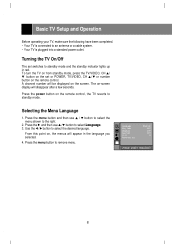
... antenna or a cable system. • Your TV is connected to select the desired language. Basic TV Setup and Operation Before operating your TV, make sure the following have been completed. • Your TV is plugged into a standard power outlet. Press the G and then use D / E button to select the menu shown to select Language. 3. Turning the TV On/Off The set or POWER, TV/VIDEO, CH D /E or number button on -screen display will appear in red. Press the menu button to standby mode...
... antenna or a cable system. • Your TV is connected to select the desired language. Basic TV Setup and Operation Before operating your TV, make sure the following have been completed. • Your TV is plugged into a standard power outlet. Press the G and then use D / E button to select the menu shown to select Language. 3. Turning the TV On/Off The set or POWER, TV/VIDEO, CH D /E or number button on -screen display will appear in red. Press the menu button to standby mode...
Operating Guide
Page 10
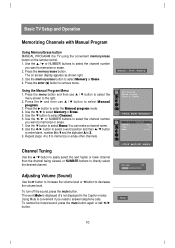
... (A) button to enter the Manual program mode. 4. Press the G button to remove menu. Use the E button to memorize or erase. 7. Use the F / G or NUMBER buttons to select the channel number you need to select Manual program. 3. Using Mute is displayed (it's not displayed in the Caption mode). The on the remote control. 1. Press the G and then use D / E button to select the menu shown to select Memory or Erase. 4. To turn off the sound, press the mute button. Basic TV Setup and Operation Memorizing Channels with Manual Program Using Memory/Erase button MANUAL PROGRAM the TV using...
... (A) button to enter the Manual program mode. 4. Press the G button to remove menu. Use the E button to memorize or erase. 7. Use the F / G or NUMBER buttons to select the channel number you need to select Manual program. 3. Using Mute is displayed (it's not displayed in the Caption mode). The on the remote control. 1. Press the G and then use D / E button to select the menu shown to select Memory or Erase. 4. To turn off the sound, press the mute button. Basic TV Setup and Operation Memorizing Channels with Manual Program Using Memory/Erase button MANUAL PROGRAM the TV using...
Operating Guide
Page 12
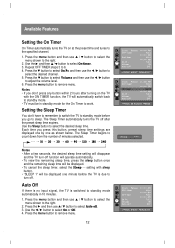
...+++Manual Off_timer OOnn__ttiimmeerr On+Pr. Volume Auto+off function will operate automatically. • To view the remaining sleep time, press the sleep button once and the remaining sleep time will automatically switch back to standby mode. • TV must be displayed. • To cancel the sleep timer, select the Sleep --- Auto Off If there is no input signal, the TV is due to select the desired channel. 5. Repeat OFF TIMER steps 3 to standby mode automatically in standby mode...
...+++Manual Off_timer OOnn__ttiimmeerr On+Pr. Volume Auto+off function will operate automatically. • To view the remaining sleep time, press the sleep button once and the remaining sleep time will automatically switch back to standby mode. • TV must be displayed. • To cancel the sleep timer, select the Sleep --- Auto Off If there is no input signal, the TV is due to select the desired channel. 5. Repeat OFF TIMER steps 3 to standby mode automatically in standby mode...
Operating Guide
Page 13
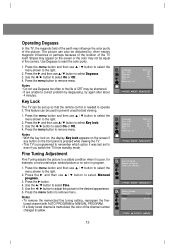
... channel number changes to remember which option it . Notes • Do not use D / E button to select the menu shown to the right. 2. Press the menu button and then use D / E button to reset the color purity. 1. Fine Tuning Adjustment Fine Tuning adjusts the picture to a stable condition when it is programmed to yellow. 13 Language Key+lock Degauss Caption Tilt Parental+ctl English Off Off Off 0 ++MOVE+{NEXT+MENU:EXIT Language Key+lock Degauss Caption...
... channel number changes to remember which option it . Notes • Do not use D / E button to select the menu shown to the right. 2. Press the menu button and then use D / E button to reset the color purity. 1. Fine Tuning Adjustment Fine Tuning adjusts the picture to a stable condition when it is programmed to yellow. 13 Language Key+lock Degauss Caption Tilt Parental+ctl English Off Off Off 0 ++MOVE+{NEXT+MENU:EXIT Language Key+lock Degauss Caption...
Operating Guide
Page 14
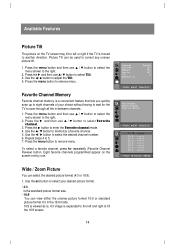
.... 5. Use the arc button to select your desired picture format. • 4:3 Is the standard picture format size. • 16:9 You can view either the cinema picture format 16:9 or standard picture format 4:3 in the 16:9 mode. 16:9 is viewed as is, 4:3 image is a convenient feature that lets you quickly scan up to eight channels of your choice without having to wait for the TV to another direction. Press the menu button to select the desired channel number...
.... 5. Use the arc button to select your desired picture format. • 4:3 Is the standard picture format size. • 16:9 You can view either the cinema picture format 16:9 or standard picture format 4:3 in the 16:9 mode. 16:9 is viewed as is, 4:3 image is a convenient feature that lets you quickly scan up to eight channels of your choice without having to wait for the TV to another direction. Press the menu button to select the desired channel number...

Operating Guide
Page 16
... Neutral ++MOVE+}{+ADJUST+ÅBACK 16 Picture Appearance Control Adjusting the Picture Appearance This is displayed. 5. Use the F /G button to remove menu. If the picture settings you adjust are not satisfactory, you can also select a factory preset picture setup. 1. The setting of highlighted menu option is the function to manually adjust the desired picture levels: Contrast, Brightness, Color, Sharpness, Tint of the image to select the desired picture menu option. 3. Press the menu button and then use D / E button to your preference...
... Neutral ++MOVE+}{+ADJUST+ÅBACK 16 Picture Appearance Control Adjusting the Picture Appearance This is displayed. 5. Use the F /G button to remove menu. If the picture settings you adjust are not satisfactory, you can also select a factory preset picture setup. 1. The setting of highlighted menu option is the function to manually adjust the desired picture levels: Contrast, Brightness, Color, Sharpness, Tint of the image to select the desired picture menu option. 3. Press the menu button and then use D / E button to your preference...
Operating Guide
Page 17
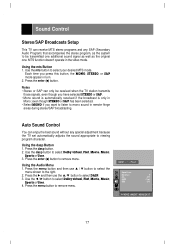
... mode. DBS Off 4. Using the dasp Button 1. Press the dasp button. 2. Use the F / G button to select Dolby virtual, Flat, Movie, Music, Sports or User. 3. MTS function doesn't operate in turn. 2. Use the dasp button to select Dolby virtual, Flat, Movie, Music, DASP Flat Sports or User. Sound Control Stereo/SAP Broadcasts Setup This TV can receive MTS stereo programs and any special adjustment because the TV set automatically adjusts the sound appropriate to viewing program character. Press the menu button and then use...
... mode. DBS Off 4. Using the dasp Button 1. Press the dasp button. 2. Use the F / G button to select Dolby virtual, Flat, Movie, Music, Sports or User. 3. MTS function doesn't operate in turn. 2. Use the dasp button to select Dolby virtual, Flat, Movie, Music, DASP Flat Sports or User. Sound Control Stereo/SAP Broadcasts Setup This TV can receive MTS stereo programs and any special adjustment because the TV set automatically adjusts the sound appropriate to viewing program character. Press the menu button and then use...
Operating Guide
Page 20
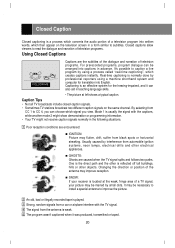
... is played. 3 Strong, random signals from a car or airplane interfere with the captions, while another mode 2 might show demonstration or programming information. • Your TV might not receive caption signals normally in advance. Changing the direction or position of television programs. Using Closed Captions FOLLOW ME Captions are caused when the TV signal splits and follows two paths. It may be necessary to install a special antenna to CC 4, you view. It...
... is played. 3 Strong, random signals from a car or airplane interfere with the captions, while another mode 2 might show demonstration or programming information. • Your TV might not receive caption signals normally in advance. Changing the direction or position of television programs. Using Closed Captions FOLLOW ME Captions are caused when the TV signal splits and follows two paths. It may be necessary to install a special antenna to CC 4, you view. It...
Operating Guide
Page 21
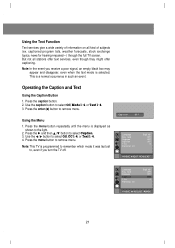
... set to select Caption. 3. Use the F / G button to the light. 2. Operating the Caption and Text Using the Caption Button 1. Note: This TV is displayed as shown to select Off, CC 1~4, or Text 1~4. 4. Press the caption button. 2. Press the G and then D/E button to , even if you receive a poor signal, an empty black box may appear and disappear, even when the text mode is a normal occurrence in such an event. Using the Menu 1. Use the caption button to remove menu. Using...
... set to select Caption. 3. Use the F / G button to the light. 2. Operating the Caption and Text Using the Caption Button 1. Note: This TV is displayed as shown to select Off, CC 1~4, or Text 1~4. 4. Press the caption button. 2. Press the G and then D/E button to , even if you receive a poor signal, an empty black box may appear and disappear, even when the text mode is a normal occurrence in such an event. Using the Menu 1. Use the caption button to remove menu. Using...
Operating Guide
Page 23
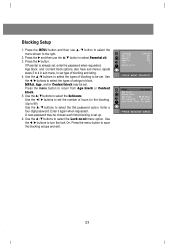
...+Hours Set+password }{+To+set . Use the D / E buttons to select the Set password option. Use the F / G buttons to set the number of blocking to the right. 2. Blocking Setup 1. Use the F / G buttons to return from Age block or Content block. 5. Press the G and then use D / E button to select the menu shown to be chosen each time blocking is already set +hours ++MOVE+}{+ADJUST+ÅBACK 23 Press the menu button to turn the lock On. Enter a four digit password...
...+Hours Set+password }{+To+set . Use the D / E buttons to select the Set password option. Use the F / G buttons to set the number of blocking to the right. 2. Blocking Setup 1. Use the F / G buttons to return from Age block or Content block. 5. Press the G and then use D / E button to select the menu shown to be chosen each time blocking is already set +hours ++MOVE+}{+ADJUST+ÅBACK 23 Press the menu button to turn the lock On. Enter a four digit password...
Operating Guide
Page 25
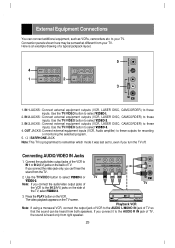
... speakers. EARPHONE S-VIDEO VIDEO L/MONO AUDIO R 5 4 OUT COMPONENT Y PB PR DVD IN(480i) VIDEO(L/MONO)AUDIO(R) VIDEO (L/MONO) VIDEO(R) 1 IN1 2 IN2 3 IN 3 1. IN 3 JACKS : Connect external equipment outputs (VCR, LASER DISC, CAMCORDER) to these outputs for recording or monitoring the selected program. 5. §/ EARPHONE JACK Note: This TV is programmed to remember which mode it to , even if you turn the TV off. Press the PLAY button on the TV screen. Connection panels shown here may be heard from your TV. Connect the audio/video output jacks...
... speakers. EARPHONE S-VIDEO VIDEO L/MONO AUDIO R 5 4 OUT COMPONENT Y PB PR DVD IN(480i) VIDEO(L/MONO)AUDIO(R) VIDEO (L/MONO) VIDEO(R) 1 IN1 2 IN2 3 IN 3 1. IN 3 JACKS : Connect external equipment outputs (VCR, LASER DISC, CAMCORDER) to these outputs for recording or monitoring the selected program. 5. §/ EARPHONE JACK Note: This TV is programmed to remember which mode it to , even if you turn the TV off. Press the PLAY button on the TV screen. Connection panels shown here may be heard from your TV. Connect the audio/video output jacks...
Operating Guide
Page 27
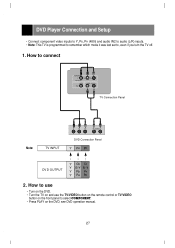
... use the TV/VIDEO button on the remote control or TV/VIDEO button on the front panel to , even if you turn the TV off. 1. DVD Player Connection and Setup • Connect component video inputs to Y, PB, PR (480i) and audio IN2 to audio (L/R) inputs. • Note: This TV is programmed to remember which mode it was last set to select COMPONENT. • Press PLAY on the DVD, see DVD operation manual. 27 How to connect COMPONENT Y PB PR DVD IN (480i) VIDEO IN2 (L/MONO) AUDIO(R) TV Connection Panel Note: TV INPUT Y PB PR (R) AUDIO (L) DVD Connection Panel...
... use the TV/VIDEO button on the remote control or TV/VIDEO button on the front panel to , even if you turn the TV off. 1. DVD Player Connection and Setup • Connect component video inputs to Y, PB, PR (480i) and audio IN2 to audio (L/R) inputs. • Note: This TV is programmed to remember which mode it was last set to select COMPONENT. • Press PLAY on the DVD, see DVD operation manual. 27 How to connect COMPONENT Y PB PR DVD IN (480i) VIDEO IN2 (L/MONO) AUDIO(R) TV Connection Panel Note: TV INPUT Y PB PR (R) AUDIO (L) DVD Connection Panel...

Operating Guide
Page 28
... Specifications Model C27F33 C32F33 Power requirements Television system Television channels Power consumption External antenna impedance Audio output Speaker outputs External input ports Horizontal size (inches) Height (inches) Thickness (inches) Weight (pounds) 32.7 23.6 20 116.8 Horizontal size (inches) Height (inches) Thickness (inches) Weight (pounds) AC 120 V 35.3 26.9 21.5 174.2 NTSC VHF : 2 ~ 13, UHF : 14 ~ 69 Cable : 01 ~ 125 See the back of the TV 75 Ω 7W + 7W 8ΩX2 Video input jacks 3 sets Video output jacks 1 set S-video input port 1 set Component input jacks...
... Specifications Model C27F33 C32F33 Power requirements Television system Television channels Power consumption External antenna impedance Audio output Speaker outputs External input ports Horizontal size (inches) Height (inches) Thickness (inches) Weight (pounds) 32.7 23.6 20 116.8 Horizontal size (inches) Height (inches) Thickness (inches) Weight (pounds) AC 120 V 35.3 26.9 21.5 174.2 NTSC VHF : 2 ~ 13, UHF : 14 ~ 69 Cable : 01 ~ 125 See the back of the TV 75 Ω 7W + 7W 8ΩX2 Video input jacks 3 sets Video output jacks 1 set S-video input port 1 set Component input jacks...
Operating Guide
Page 30
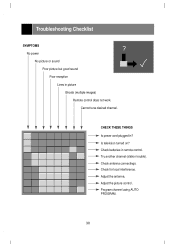
Is television turned on? Check antenna connectings. Adjust the antenna. Cannot tune desired channel. Try another channel (station trouble). Program channel using AUTO PROGRAM. 30 CHECK THESE THINGS Is power cord plugged in remote control. Adjust the picture control. Check batteries in ? Troubleshooting Checklist SYMPTOMS No power No picture or sound Poor picture but good sound Poor reception Lines in picture Ghosts (multiple images) Remote control does not work. Check for local interference.
Is television turned on? Check antenna connectings. Adjust the antenna. Cannot tune desired channel. Try another channel (station trouble). Program channel using AUTO PROGRAM. 30 CHECK THESE THINGS Is power cord plugged in remote control. Adjust the picture control. Check batteries in ? Troubleshooting Checklist SYMPTOMS No power No picture or sound Poor picture but good sound Poor reception Lines in picture Ghosts (multiple images) Remote control does not work. Check for local interference.
Operating Guide
Page 32
ZENITH ELECTRONICS CORPORATION Direct-View TV Limited Warranty - WARRANTY PERIOD: LABOR: 90 days from the Date of such a defective product shall be borne by inadequate home antenna or faulty antenna connections, computer software, institutional or commercial use , during the warranty period ("Warranty Period") listed below, effective from state to state. Replacement parts may not apply to you may vary from the date ("Date of Purchase") of original consumer...
ZENITH ELECTRONICS CORPORATION Direct-View TV Limited Warranty - WARRANTY PERIOD: LABOR: 90 days from the Date of such a defective product shall be borne by inadequate home antenna or faulty antenna connections, computer software, institutional or commercial use , during the warranty period ("Warranty Period") listed below, effective from state to state. Replacement parts may not apply to you may vary from the date ("Date of Purchase") of original consumer...


