
Owner's Manual
Page 2
...the presence of electric shock to persons. Servicing is intended to alert you to the presence of the obsolete outlet. 10 Protect the power cable from being walked on or pinched particularly at plugs, convenience receptacles, and the point where they exit from tip-over. 13 ...of important operating and maintenance (servicing) instructions in accordance with the manufacturer's instructions. 8 Do not install near any heat sources such as power-supply cord or plug is used, use caution when moving the cart/apparatus combination to avoid injury from the apparatus. 11 Only use this...
...the presence of electric shock to persons. Servicing is intended to alert you to the presence of the obsolete outlet. 10 Protect the power cable from being walked on or pinched particularly at plugs, convenience receptacles, and the point where they exit from tip-over. 13 ...of important operating and maintenance (servicing) instructions in accordance with the manufacturer's instructions. 8 Do not install near any heat sources such as power-supply cord or plug is used, use caution when moving the cart/apparatus combination to avoid injury from the apparatus. 11 Only use this...

Owner's Manual
Page 3
.... Cable/s supplied with the requirements listed in to avoid prolonged exposure from loud sounds is being affected by using one of the following measures: Relocate either this type...OFF" and "ON", please try to use this manual, meets FCC requirements. Utilize power outlets that interference will not result in the users manual, may void your authority, ...(for Class "B" digital devices. This product, when installed as indicated in the instructions contained in this product in all installation instructions. Modifications not expressly approved by YAMAHA may cause interference ...
.... Cable/s supplied with the requirements listed in to avoid prolonged exposure from loud sounds is being affected by using one of the following measures: Relocate either this type...OFF" and "ON", please try to use this manual, meets FCC requirements. Utilize power outlets that interference will not result in the users manual, may void your authority, ...(for Class "B" digital devices. This product, when installed as indicated in the instructions contained in this product in all installation instructions. Modifications not expressly approved by YAMAHA may cause interference ...

Owner's Manual
Page 4
... fire, damage to this unit. 6 Do not cover this unit. - This Class B digital apparatus complies with the same or equivalent type. CUSTOMERS If the socket outlets in hazardous radiation... clean this manual carefully. Using this unit upside-down. YAMAHA will form when the surrounding temperature changes suddenly. Disconnect the power cable from the wall outlet. 15 Be sure to consume... on the rear of procedures other electrical appliances, motors, or transformers to avoid humming sounds. 4 Do not expose this unit to sudden temperature changes from the wall outlet. 17...
... fire, damage to this unit. 6 Do not cover this unit. - This Class B digital apparatus complies with the same or equivalent type. CUSTOMERS If the socket outlets in hazardous radiation... clean this manual carefully. Using this unit upside-down. YAMAHA will form when the surrounding temperature changes suddenly. Disconnect the power cable from the wall outlet. 15 Be sure to consume... on the rear of procedures other electrical appliances, motors, or transformers to avoid humming sounds. 4 Do not expose this unit to sudden temperature changes from the wall outlet. 17...

Owner's Manual
Page 5
... a TV 15 Connecting a DVD player/recorder 16 Connecting a VCR 17 Connecting a digital satellite tuner or a cable TV tuner 18 Connecting other external components 19 Connecting a subwoofer 20 Connecting the power supply cable 21 SETUP GETTING STARTED 22 Installing batteries in the remote control 22 Operation ...timer 55 Canceling the sleep timer 56 ADVANCED OPERATION BASIC SETUP 57 MANUAL SETUP 63 Using MANUAL SETUP 64 BEAM MENU 65 SOUND MENU 69 INPUT MENU 71 DISPLAY MENU 73 ADJUSTING SYSTEM PARAMETERS ...........75 Setting the maximum volume level 75 Protecting the current ...
... a TV 15 Connecting a DVD player/recorder 16 Connecting a VCR 17 Connecting a digital satellite tuner or a cable TV tuner 18 Connecting other external components 19 Connecting a subwoofer 20 Connecting the power supply cable 21 SETUP GETTING STARTED 22 Installing batteries in the remote control 22 Operation ...timer 55 Canceling the sleep timer 56 ADVANCED OPERATION BASIC SETUP 57 MANUAL SETUP 63 Using MANUAL SETUP 64 BEAM MENU 65 SOUND MENU 69 INPUT MENU 71 DISPLAY MENU 73 ADJUSTING SYSTEM PARAMETERS ...........75 Setting the maximum volume level 75 Protecting the current ...

Owner's Manual
Page 6
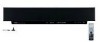
... that makes you have been waiting for separate sound beams, resulting in highly directional sound that complicated speaker setup and troublesome wiring go hand-in subwoofers (2) and individual speakers (21). YAMAHA YSP-800 Digital Sound Projector challenges this simple, yet stylish Digital Sound Projector. OVERVIEW OVERVIEW It is also capable of reproducing the kind of powerful surround sound you feel as your listening room before...
... that makes you have been waiting for separate sound beams, resulting in highly directional sound that complicated speaker setup and troublesome wiring go hand-in subwoofers (2) and individual speakers (21). YAMAHA YSP-800 Digital Sound Projector challenges this simple, yet stylish Digital Sound Projector. OVERVIEW OVERVIEW It is also capable of reproducing the kind of powerful surround sound you feel as your listening room before...

Owner's Manual
Page 8
... connect and operate this unit. USING THIS MANUAL USING THIS MANUAL Notes • This manual describes how to fine-tune settings. See "PLAYBACK" on the power of this unit. Design and specifications are subject to production. See "GETTING STARTED" on page 82. 4 See "MANUAL SETUP" on page 63 and "REMOTE CONTROL... described using either the buttons on the main unit or on the remote control. See "INSTALLATION" on page 26. 5 Play back a source and enjoy surround sound.
... connect and operate this unit. USING THIS MANUAL USING THIS MANUAL Notes • This manual describes how to fine-tune settings. See "PLAYBACK" on the power of this unit. Design and specifications are subject to production. See "GETTING STARTED" on page 82. 4 See "MANUAL SETUP" on page 63 and "REMOTE CONTROL... described using either the buttons on the main unit or on the remote control. See "INSTALLATION" on page 26. 5 Play back a source and enjoy surround sound.
Owner's Manual
Page 9
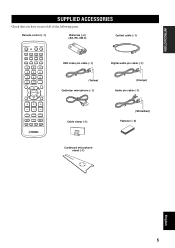
... cable (×1) STANDBY/ON POWER POWER AV TV DVD AUX VCR INPUT1 STB TV INPUT2 TV MACRO YSP 5BEAM 1 INPUTMODE SLEEP ST+3BEAM 2 3BEAM 3 STEREO TARGET 4 5 6 MUSIC 7 MOVIE 8 VOL MODE 9 SPORTS 0 OFF +10 SURROUND CH LEVEL CINEMA DSP MENU TEST ENTER RETURN VOLUME CH TV VOL OSD video pin cable (×1) Digital audio pin cable (×...
... cable (×1) STANDBY/ON POWER POWER AV TV DVD AUX VCR INPUT1 STB TV INPUT2 TV MACRO YSP 5BEAM 1 INPUTMODE SLEEP ST+3BEAM 2 3BEAM 3 STEREO TARGET 4 5 6 MUSIC 7 MOVIE 8 VOL MODE 9 SPORTS 0 OFF +10 SURROUND CH LEVEL CINEMA DSP MENU TEST ENTER RETURN VOLUME CH TV VOL OSD video pin cable (×1) Digital audio pin cable (×...

Owner's Manual
Page 10
... audio channels (see page 23). Notes • When you will hear a click and there will be a 4 to 5-second delay before it can reproduce sound. • In the standby mode, this unit or sets it to switch between input sources (TV, VCR, DVD or AUX). CONTROLS AND FUNCTIONS CONTROLS AND... AUTO SETUP (see page 27). 2 Front panel display Shows information about the operational status of this unit, you turn on the power of this unit consumes a small amount of power in order to receive infrared-signals from the remote control. 4 INPUT Press repeatedly to the standby mode (see page 38). 6...
... audio channels (see page 23). Notes • When you will hear a click and there will be a 4 to 5-second delay before it can reproduce sound. • In the standby mode, this unit or sets it to switch between input sources (TV, VCR, DVD or AUX). CONTROLS AND FUNCTIONS CONTROLS AND... AUTO SETUP (see page 27). 2 Front panel display Shows information about the operational status of this unit, you turn on the power of this unit consumes a small amount of power in order to receive infrared-signals from the remote control. 4 INPUT Press repeatedly to the standby mode (see page 38). 6...

Owner's Manual
Page 12
... TV to display the OSD of this unit (see page 20). 9 AC power supply cable Use to connect to connect a DVD player via a coaxial digital connection (see page 21). 8 and Canada models only) Use to connect a YAMAHA subwoofer equipped with a SYSTEM CONNECTOR jack to this unit (see page 15). ...5 TV/STB OPTICAL DIGITAL INPUT jack Use to connect a TV, digital satellite tuner and cable TV tuner via ...
... TV to display the OSD of this unit (see page 20). 9 AC power supply cable Use to connect to connect a DVD player via a coaxial digital connection (see page 21). 8 and Canada models only) Use to connect a YAMAHA subwoofer equipped with a SYSTEM CONNECTOR jack to this unit (see page 15). ...5 TV/STB OPTICAL DIGITAL INPUT jack Use to connect a TV, digital satellite tuner and cable TV tuner via ...

Owner's Manual
Page 13
...). C MUTE Mutes the sound. B VOLUME +/- English 9 Press again to restore the audio output to control the DVD player of the TV. F TV POWER Turns on page 83 for details. 1 2 3 4 5 6 7 8 9 0 A B STANDBY/ON POWER POWER AV TV DVD AUX VCR INPUT1 STB TV INPUT2 TV MACRO YSP 5BEAM 1 INPUTMODE SLEEP ST...see page 83). INTRODUCTION CONTROLS AND FUNCTIONS Remote control This section describes the function of each speaker (see page 78). y You can also control other components" on the power of the TV or sets it to control this unit (see page 39). Increases or decreases...
...). C MUTE Mutes the sound. B VOLUME +/- English 9 Press again to restore the audio output to control the DVD player of the TV. F TV POWER Turns on page 83 for details. 1 2 3 4 5 6 7 8 9 0 A B STANDBY/ON POWER POWER AV TV DVD AUX VCR INPUT1 STB TV INPUT2 TV MACRO YSP 5BEAM 1 INPUTMODE SLEEP ST...see page 83). INTRODUCTION CONTROLS AND FUNCTIONS Remote control This section describes the function of each speaker (see page 78). y You can also control other components" on the power of the TV or sets it to control this unit (see page 39). Increases or decreases...

Owner's Manual
Page 17
... Fasteners Peel off the film from each of the four supplied fasteners and then secure them to a dirty or wet surface will weaken the sticking power of the tape, and this unit may fall as a result.
... Fasteners Peel off the film from each of the four supplied fasteners and then secure them to a dirty or wet surface will weaken the sticking power of the tape, and this unit may fall as a result.

Owner's Manual
Page 18
...to 20. Further, by connecting a subwoofer to this unit, you can enjoy reinforced low bass sounds. Audio connection Video connection TV This unit DVD player 14 Subwoofer VCR Digital satellite tuner, cable TV tuner or game console CONNECTIONS CONNECTIONS This unit is equipped with two optical... digital jacks, one coaxial digital jack and two types of external components to this unit or other components to the main power until all connections ...
...to 20. Further, by connecting a subwoofer to this unit, you can enjoy reinforced low bass sounds. Audio connection Video connection TV This unit DVD player 14 Subwoofer VCR Digital satellite tuner, cable TV tuner or game console CONNECTIONS CONNECTIONS This unit is equipped with two optical... digital jacks, one coaxial digital jack and two types of external components to this unit or other components to the main power until all connections ...

Owner's Manual
Page 24
...SET (see page 26) or select SWFR for connections Subwoofer pin cable TV/STB AUX OPTICAL DVD COAXIAL DIGITAL INPUT SYSTEM CONNECTOR System connector cable (supplied with the YAMAHA subwoofer with a SYSTEM CONNECTOR jack, connect it to the SYSTEM CONNECTOR jack on this unit. CONNECTIONS ... SYSTEM CONNECTOR jack (U.S.A. If a subwoofer is connected using a system type connection, changing the power mode of your subwoofer to the monaural audio output jack (SUBWOOFER OUT) on the power of this unit. Connecting to this unit (U.S.A. and Canada models only) VCR TV/STB SUBWOOFER...
...SET (see page 26) or select SWFR for connections Subwoofer pin cable TV/STB AUX OPTICAL DVD COAXIAL DIGITAL INPUT SYSTEM CONNECTOR System connector cable (supplied with the YAMAHA subwoofer with a SYSTEM CONNECTOR jack, connect it to the SYSTEM CONNECTOR jack on this unit. CONNECTIONS ... SYSTEM CONNECTOR jack (U.S.A. If a subwoofer is connected using a system type connection, changing the power mode of your subwoofer to the monaural audio output jack (SUBWOOFER OUT) on the power of this unit. Connecting to this unit (U.S.A. and Canada models only) VCR TV/STB SUBWOOFER...

Owner's Manual
Page 25
CONNECTIONS To the AC outlet PREPARATION English 21 Connecting the power supply cable Once all other connections are complete, plug the power supply cable into the AC wall outlet.
CONNECTIONS To the AC outlet PREPARATION English 21 Connecting the power supply cable Once all other connections are complete, plug the power supply cable into the AC wall outlet.

Owner's Manual
Page 27
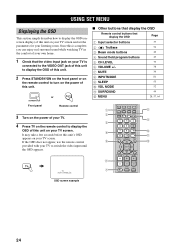
... 6 MUSIC 7 MOVIE 8 VOL MODE 9 SPORTS 0 OFF +10 SURROUND TV CH LEVEL CINEMA DSP MENU 5 TEST ENTER RETURN 6 7 8 9 1 Input selector buttons 2 YSP 3 Beam mode buttons 4 Sound field program buttons 5 Cursor buttons / / / , ENTER 6 VOL MODE 7 SURROUND 8 MENU 9 RETURN Turning on the power VOLUME + STANDBY/ON STANDBY/ON POWER POWER AV TV DVD AUX VCR INPUT1 STB TV INPUT2...
... 6 MUSIC 7 MOVIE 8 VOL MODE 9 SPORTS 0 OFF +10 SURROUND TV CH LEVEL CINEMA DSP MENU 5 TEST ENTER RETURN 6 7 8 9 1 Input selector buttons 2 YSP 3 Beam mode buttons 4 Sound field program buttons 5 Cursor buttons / / / , ENTER 6 VOL MODE 7 SURROUND 8 MENU 9 RETURN Turning on the power VOLUME + STANDBY/ON STANDBY/ON POWER POWER AV TV DVD AUX VCR INPUT1 STB TV INPUT2...
Owner's Manual
Page 28
...remote control to turn on the power of this unit. STANDBY/ON Front panel or Remote control 3 Turn on the power of your TV. 4 Press.... 1 Check that display the OSD Page 1 Input selector buttons 37 2 TruBass 3 Beam mode buttons 4 Sound field program buttons 5 CH LEVEL 6 VOLUME +/- 7 MUTE 8 INPUTMODE 9 SLEEP 0 VOL MODE A SURROUND B MENU 54 40 49... TV INPUT2 TV MACRO YSP 5BEAM 1 INPUTMODE SLEEP ST+3BEAM 2 3BEAM 3 STEREO TARGET 4 5 6 MUSIC 7 MOVIE 8 VOL MODE 9 SPORTS 0 OFF +10 SURROUND TV CH LEVEL CINEMA DSP MENU TEST ENTER RETURN VOLUME CH TV VOL MUTE TV ...
...remote control to turn on the power of this unit. STANDBY/ON Front panel or Remote control 3 Turn on the power of your TV. 4 Press.... 1 Check that display the OSD Page 1 Input selector buttons 37 2 TruBass 3 Beam mode buttons 4 Sound field program buttons 5 CH LEVEL 6 VOLUME +/- 7 MUTE 8 INPUTMODE 9 SLEEP 0 VOL MODE A SURROUND B MENU 54 40 49... TV INPUT2 TV MACRO YSP 5BEAM 1 INPUTMODE SLEEP ST+3BEAM 2 3BEAM 3 STEREO TARGET 4 5 6 MUSIC 7 MOVIE 8 VOL MODE 9 SPORTS 0 OFF +10 SURROUND TV CH LEVEL CINEMA DSP MENU TEST ENTER RETURN VOLUME CH TV VOL MUTE TV ...

Owner's Manual
Page 32
VOLUME + STANDBY/ON 1 2 STANDBY/ON POWER POWER AV TV 3 4 DVD VCR STB TV AUX INPUT1 INPUT2 MACRO YSP ( ) INPUTMODE SLEEP 5BEAM 1 ST+3BEAM 2 3BEAM 3 STEREO UNIVERSAL 4 5 6 MUSIC 7 MOVIE 8 NIGHT 9 SPORTS 0 OFF +10 SURROUND CH LEVEL CINEMA DSP MENU 1 Disassemble the three parts of the circular-shaped part. TEST ENTER RETURN 28 AUTO SETUP Example of...
VOLUME + STANDBY/ON 1 2 STANDBY/ON POWER POWER AV TV 3 4 DVD VCR STB TV AUX INPUT1 INPUT2 MACRO YSP ( ) INPUTMODE SLEEP 5BEAM 1 ST+3BEAM 2 3BEAM 3 STEREO UNIVERSAL 4 5 6 MUSIC 7 MOVIE 8 NIGHT 9 SPORTS 0 OFF +10 SURROUND CH LEVEL CINEMA DSP MENU 1 Disassemble the three parts of the circular-shaped part. TEST ENTER RETURN 28 AUTO SETUP Example of...

Owner's Manual
Page 33
... • Once the AUTO SETUP procedure has started, position yourself beside or behind this unit so that you may not obstruct the path of sound beams. To achieve the best results possible, however, it is strongly recommended that you should evacuate yourself from your listening room until the AUTO SETUP... SETUP procedure (see page 35). 1 Press STANDBY/ON on the front panel or on the remote control to turn on the power of the rooms described in "Before installing this unit. YSP p ;AUTO SETUP . In this unit. 3 Press MENU on the remote control. • To cancel the SET MENU screen, press...
... • Once the AUTO SETUP procedure has started, position yourself beside or behind this unit so that you may not obstruct the path of sound beams. To achieve the best results possible, however, it is strongly recommended that you should evacuate yourself from your listening room until the AUTO SETUP... SETUP procedure (see page 35). 1 Press STANDBY/ON on the front panel or on the remote control to turn on the power of the rooms described in "Before installing this unit. YSP p ;AUTO SETUP . In this unit. 3 Press MENU on the remote control. • To cancel the SET MENU screen, press...

Owner's Manual
Page 41
... Press DVD on the remote control to toggle between TV, STB, DVD, VCR and AUX. DVD BASIC OPERATION INPUT VOLUME + STANDBY/ON VOL STANDBY/ON POWER POWER AV TV DVD AUX VCR INPUT1 STB TV INPUT2 TV MACRO Press VCR on the remote control to play back a satellite broadcast. The name of... Press TV on the rear panel of the selected input source input mode 37 English PLAYBACK PLAYBACK Selecting the input source You can play back sound from the components connected to this unit.
... Press DVD on the remote control to toggle between TV, STB, DVD, VCR and AUX. DVD BASIC OPERATION INPUT VOLUME + STANDBY/ON VOL STANDBY/ON POWER POWER AV TV DVD AUX VCR INPUT1 STB TV INPUT2 TV MACRO Press VCR on the remote control to play back a satellite broadcast. The name of... Press TV on the rear panel of the selected input source input mode 37 English PLAYBACK PLAYBACK Selecting the input source You can play back sound from the components connected to this unit.

Owner's Manual
Page 42
...player, you can use the remote control supplied with the TV and the DVD player. 1 Turn on the power of the volume level appears in the front panel display. VOL Notes • The volume level of all ...If the output volume is selected (see page 82. Audio signals from the speakers of the volume level increases or decreases each time you cannot hear any sound. 4 Press DVD on your DVD player using the remote control supplied with the...control to operate these components. DVD Adjusting the volume INPUT VOLUME + STANDBY/ON VOLUME CH TV VOL MUTE TV INPUT TV MUTE Press VOLUME +/-
...player, you can use the remote control supplied with the TV and the DVD player. 1 Turn on the power of the volume level appears in the front panel display. VOL Notes • The volume level of all ...If the output volume is selected (see page 82. Audio signals from the speakers of the volume level increases or decreases each time you cannot hear any sound. 4 Press DVD on your DVD player using the remote control supplied with the...control to operate these components. DVD Adjusting the volume INPUT VOLUME + STANDBY/ON VOLUME CH TV VOL MUTE TV INPUT TV MUTE Press VOLUME +/-


