

Owner's Manual
Page 3
... (for Class "B" digital devices. Follow all installations. Compliance with these corrective measures do not produce satisfactory results, please contact the local retailer authorized to distribute this type of other electronic devices. We Want You Listening For A Lifetime Yamaha and the Electronic Industries...the instructions contained in the USA. 3. NOTE: This product has been tested and found to be used according to the instructions found in is found to avoid prolonged exposure from loud sounds is often undetectable until it at a safe level. Compliance with this...
... (for Class "B" digital devices. Follow all installations. Compliance with these corrective measures do not produce satisfactory results, please contact the local retailer authorized to distribute this type of other electronic devices. We Want You Listening For A Lifetime Yamaha and the Electronic Industries...the instructions contained in the USA. 3. NOTE: This product has been tested and found to be used according to the instructions found in is found to avoid prolonged exposure from loud sounds is often undetectable until it at a safe level. Compliance with this...
Owner's Manual
Page 5
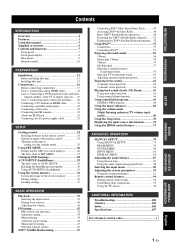
... using HDMI cables 18 Case 2: Connecting a DVD player/recorder and tuner (digital satellite, cable TV or digital airwave)..... 19 Case 3: Connecting other connection methods........ 20 Connecting a TV without... 46 XM™ Satellite Radio tuning 47 Connecting XM™ Mini-Tuner Home Dock 47 Activating XM™ Satellite Radio 48 Basic XM™ Satellite Radio...SOUND MENU 80 INPUT MENU 82 DISPLAY MENU 86 Adjusting the audio balance 87 Using the test tone 87 Using the audio output being played back 88 Selecting the input mode 90 Adjusting the system parameters 91 Using the system...
... using HDMI cables 18 Case 2: Connecting a DVD player/recorder and tuner (digital satellite, cable TV or digital airwave)..... 19 Case 3: Connecting other connection methods........ 20 Connecting a TV without... 46 XM™ Satellite Radio tuning 47 Connecting XM™ Mini-Tuner Home Dock 47 Activating XM™ Satellite Radio 48 Basic XM™ Satellite Radio...SOUND MENU 80 INPUT MENU 82 DISPLAY MENU 86 Adjusting the audio balance 87 Using the test tone 87 Using the audio output being played back 88 Selecting the input mode 90 Adjusting the system parameters 91 Using the system...

Owner's Manual
Page 10
...MUSIC 7 MOVIE 8 SPORTS 9 OFF SUR. DECODE 0 +10 ENHANCER ENTRY MENU CAT/ A-E DISPLAY ENTER TV/AV YSP RETURN VOLUME CH TV VOL Cable clamp (×1) IntelliBeam microphone (×1) Digital audio pin cable (×1) (Orange) Audio pin cable (×1) MUTE TV INPUT TV MUTE CODE SET CH LEVEL... TEST Cardboard microphone stand (×1) (White/Red) QUICK REFERENCE GUIDE Batteries (×2) (AA, R6...
...MUSIC 7 MOVIE 8 SPORTS 9 OFF SUR. DECODE 0 +10 ENHANCER ENTRY MENU CAT/ A-E DISPLAY ENTER TV/AV YSP RETURN VOLUME CH TV VOL Cable clamp (×1) IntelliBeam microphone (×1) Digital audio pin cable (×1) (Orange) Audio pin cable (×1) MUTE TV INPUT TV MUTE CODE SET CH LEVEL... TEST Cardboard microphone stand (×1) (White/Red) QUICK REFERENCE GUIDE Batteries (×2) (AA, R6...

Owner's Manual
Page 14
... TV/AV operation modes (S). DECODE 0 +10 ENHANCER ENTRY MENU CAT/ A-E DISPLAY ENTER TV/AV YSP RETURN VOLUME CH TV VOL MUTE TV INPUT TV MUTE CODE SET CH LEVEL TEST G H I * * J* K L M N O P Q R S t U* V W * *...MUSIC 7 MOVIE 8 SPORTS 9 OFF SUR. D CH LEVEL Adjusts the volume level of this system to the standby mode (see page 25). 3 Transmission indicator Lights up when infrared control signals are...page 29). 7 Sound field program buttons Select the sound field programs (see page 65). 8 ENHANCER Turns on your TV (see page 41). B MUTE Mutes the sound. Aim this window ...
... TV/AV operation modes (S). DECODE 0 +10 ENHANCER ENTRY MENU CAT/ A-E DISPLAY ENTER TV/AV YSP RETURN VOLUME CH TV VOL MUTE TV INPUT TV MUTE CODE SET CH LEVEL TEST G H I * * J* K L M N O P Q R S t U* V W * *...MUSIC 7 MOVIE 8 SPORTS 9 OFF SUR. D CH LEVEL Adjusts the volume level of this system to the standby mode (see page 25). 3 Transmission indicator Lights up when infrared control signals are...page 29). 7 Sound field program buttons Select the sound field programs (see page 65). 8 ENHANCER Turns on your TV (see page 41). B MUTE Mutes the sound. Aim this window ...
Owner's Manual
Page 15
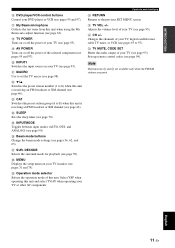
...70). Adjusts the volume level of your TV (see pages 95 to 97). Changes the channels of your TV, digital satellite tuner, cable TV tuner, or VCR (see page 95). W TV MUTE, CODE SET Mutes the audio ... TV VOL +/- O INPUTMODE Toggles between input modes (AUTO, DTS, and ANALOG) (see pages 95 and 97). Select YSP when operating this unit when using the My Beam auto-adjust function (see pages 95 and 97). K MACRO Use to... set the TV macro (see page 95). G My Beam microphone Collects the test tones from this unit and select TV/AV when operating your DVD player or VCR (see page 90).
...70). Adjusts the volume level of your TV (see pages 95 to 97). Changes the channels of your TV, digital satellite tuner, cable TV tuner, or VCR (see page 95). W TV MUTE, CODE SET Mutes the audio ... TV VOL +/- O INPUTMODE Toggles between input modes (AUTO, DTS, and ANALOG) (see pages 95 and 97). Select YSP when operating this unit when using the My Beam auto-adjust function (see pages 95 and 97). K MACRO Use to... set the TV macro (see page 95). G My Beam microphone Collects the test tones from this unit and select TV/AV when operating your DVD player or VCR (see page 90).

Owner's Manual
Page 16
Select YSP when operating this unit is selected with the operation mode selector (7). 1 2 3 4 STANDBY/ON POWER POWER AV TV DOCK DVD AUX1 AUX2 AUX3 TV INPUT1 MACRO ... ( / ) to change the preset station group (A to 46). DECODE 0 +10 ENHANCER ENTRY MENU CAT/ A-E DISPLAY ENTER TV/AV YSP RETURN VOLUME CH TV VOL 5 6 7 MUTE TV INPUT TV MUTE CODE SET CH LEVEL TEST 1 PRESET/TUNE FM: Switches between automatic and manual tuning (see pages 43 to E) (see pages 45 and 46...
Select YSP when operating this unit is selected with the operation mode selector (7). 1 2 3 4 STANDBY/ON POWER POWER AV TV DOCK DVD AUX1 AUX2 AUX3 TV INPUT1 MACRO ... ( / ) to change the preset station group (A to 46). DECODE 0 +10 ENHANCER ENTRY MENU CAT/ A-E DISPLAY ENTER TV/AV YSP RETURN VOLUME CH TV VOL 5 6 7 MUTE TV INPUT TV MUTE CODE SET CH LEVEL TEST 1 PRESET/TUNE FM: Switches between automatic and manual tuning (see pages 43 to E) (see pages 45 and 46...

Owner's Manual
Page 36
...your TV. Steps 4 and 5 are curtains in one of the subwoofer. ENTER ENTER ;AUTO SETUP . 1)BEAM+SOUND OPTIMZ 2)BEAM OPTIMZ only 3)SOUND OPTIMZ only [ ]/[ ]:Up/Down [ENTER]:Enter p p TV/AV YSP 32 En A set of settings optimized according to the specific conditions of your listening environment can start the BEAM...your listening room until the AUTO SETUP procedure is completed so that you may not obstruct the path of sound beams. • Be advised that it is normal for loud test tones to be output during the AUTO SETUP procedure. • The AUTO SETUP procedure may not be recalled...
...your TV. Steps 4 and 5 are curtains in one of the subwoofer. ENTER ENTER ;AUTO SETUP . 1)BEAM+SOUND OPTIMZ 2)BEAM OPTIMZ only 3)SOUND OPTIMZ only [ ]/[ ]:Up/Down [ENTER]:Enter p p TV/AV YSP 32 En A set of settings optimized according to the specific conditions of your listening environment can start the BEAM...your listening room until the AUTO SETUP procedure is completed so that you may not obstruct the path of sound beams. • Be advised that it is normal for loud test tones to be output during the AUTO SETUP procedure. • The AUTO SETUP procedure may not be recalled...
Owner's Manual
Page 39
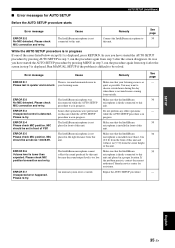
...test in progress. If the problem persists, contact the nearest authorized Yamaha... service center for AUTO SETUP AUTO SETUP (IntelliBeam) Before the AUTO SETUP procedure starts Error message ERROR E-2 No MIC detected. Remedy Connect the IntelliBeam microphone to choose certain hours during the day when there is installed more than expected. Error message Cause Remedy ERROR E-1 There is installed in front of YSP...IntelliBeam microphone cannot collect the sound produced by pressing AUTO SETUP...your listening room. An internal system error occurred. Please check MIC ...
...test in progress. If the problem persists, contact the nearest authorized Yamaha... service center for AUTO SETUP AUTO SETUP (IntelliBeam) Before the AUTO SETUP procedure starts Error message ERROR E-2 No MIC detected. Remedy Connect the IntelliBeam microphone to choose certain hours during the day when there is installed more than expected. Error message Cause Remedy ERROR E-1 There is installed in front of YSP...IntelliBeam microphone cannot collect the sound produced by pressing AUTO SETUP...your listening room. An internal system error occurred. Please check MIC ...

Owner's Manual
Page 57
... in the Yamaha iPod universal dock, and use the supplied remote control to the DOCK terminal of this unit at the same time, and when the DOCK indicator is lit in the Simple Remote mode. DECODE +10 ENHANCER ENTRY MENU CAT/ A-E DISPLAY ENTER TV/AV YSP RETURN VOLUME... CH TV VOL 3 4 5 6 Yamaha iPod universal dock (such as YDS-10, sold separately) MUTE TV INPUT TV MUTE CODE SET CH LEVEL TEST 7 8 9 0 A y When your iPod. Notes • Only iPod (Click and Wheel...
... in the Yamaha iPod universal dock, and use the supplied remote control to the DOCK terminal of this unit at the same time, and when the DOCK indicator is lit in the Simple Remote mode. DECODE +10 ENHANCER ENTRY MENU CAT/ A-E DISPLAY ENTER TV/AV YSP RETURN VOLUME... CH TV VOL 3 4 5 6 Yamaha iPod universal dock (such as YDS-10, sold separately) MUTE TV INPUT TV MUTE CODE SET CH LEVEL TEST 7 8 9 0 A y When your iPod. Notes • Only iPod (Click and Wheel...

Owner's Manual
Page 67
... (My Beam) You can improve listenability in a noisy environment by changing the beam mode to My Beam, which outputs sound beams directly toward this unit while the test tones are being output. • Do not cover the My Beam microphone on the walls in your listening room or when you do not... with 64 kHz, 88.2 kHz or 96 kHz of sampling frequency is also ideal when you do not want to YSP. DECODE 0 +10 ENHANCER ENTRY MENU CAT/ A-E DISPLAY ENTER TV/AV YSP RETURN Note If My Beam is noisy. My Beam microphone STANDBY/ON POWER POWER AV TV 5BEAM 1 ST+3BEAM 2 3BEAM...
... (My Beam) You can improve listenability in a noisy environment by changing the beam mode to My Beam, which outputs sound beams directly toward this unit while the test tones are being output. • Do not cover the My Beam microphone on the walls in your listening room or when you do not... with 64 kHz, 88.2 kHz or 96 kHz of sampling frequency is also ideal when you do not want to YSP. DECODE 0 +10 ENHANCER ENTRY MENU CAT/ A-E DISPLAY ENTER TV/AV YSP RETURN Note If My Beam is noisy. My Beam microphone STANDBY/ON POWER POWER AV TV 5BEAM 1 ST+3BEAM 2 3BEAM...

Owner's Manual
Page 81
... We recommend that you select 5 Beam as the distance of your listening room. By adjusting the horizontal angle of the sound beams, you set the INSTALLED POSITION parameter in MANUAL SETUP (see pages 56, 57, 62 and 63), some channel ... [ENTER]:Return ADVANCED OPERATION English 77 En • Select ANGLE TO WALL OR CORNER if this unit is displayed. A test tone is automatically set for selection. Note When you can optimize the sound beam paths. Listening position from the unit p p A)SETTING PARAMETERS 3/3 \ [ 2.5m ] \ p [ ]/[ ]:Up/Down [ ]/[ ]:Sel [ENTER]:Return ( ) (+) ...
... We recommend that you select 5 Beam as the distance of your listening room. By adjusting the horizontal angle of the sound beams, you set the INSTALLED POSITION parameter in MANUAL SETUP (see pages 56, 57, 62 and 63), some channel ... [ENTER]:Return ADVANCED OPERATION English 77 En • Select ANGLE TO WALL OR CORNER if this unit is displayed. A test tone is automatically set for selection. Note When you can optimize the sound beam paths. Listening position from the unit p p A)SETTING PARAMETERS 3/3 \ [ 2.5m ] \ p [ ]/[ ]:Up/Down [ ]/[ ]:Sel [ENTER]:Return ( ) (+) ...

Owner's Manual
Page 91
... TV INPUT TV MUTE CODE SET CH LEVEL TEST 1 Set the operation mode selector to adjust. TEST ENTER Control range: -10.0 dB to adjust the channel volume. 2 Press TEST. TV/AV YSP TEST SUBWOOFER Note "TEST SUBWOOFER" is only available when a subwoofer is connected to this to -life surround sound experience. Use this unit and SUBWOOFER is...
... TV INPUT TV MUTE CODE SET CH LEVEL TEST 1 Set the operation mode selector to adjust. TEST ENTER Control range: -10.0 dB to adjust the channel volume. 2 Press TEST. TV/AV YSP TEST SUBWOOFER Note "TEST SUBWOOFER" is only available when a subwoofer is connected to this to -life surround sound experience. Use this unit and SUBWOOFER is...

Owner's Manual
Page 92
...Stereo plus 3 Beam or stereo playback is connected to YSP. CH LEVEL or CH LEVEL ENTER Using the audio ... A-E DISPLAY ENTER TV/AV YSP RETURN VOLUME CH TV VOL MUTE TV INPUT TV MUTE CODE SET CH LEVEL TEST FRONT L +1.0dB CENTER ...-2.5dB FRONT R +1.0dB SUR.R +2.0dB SUR.L +2.0dB SWFR --dB Note "SWFR" is available only when a subwoofer is selected as the beam mode (see page 80). 88 En TV/AV YSP... all your adjustments. Adjusting the audio balance 5 Press TEST when you want to adjust. TEST 1 Set the operation mode selector to this unit and...
...Stereo plus 3 Beam or stereo playback is connected to YSP. CH LEVEL or CH LEVEL ENTER Using the audio ... A-E DISPLAY ENTER TV/AV YSP RETURN VOLUME CH TV VOL MUTE TV INPUT TV MUTE CODE SET CH LEVEL TEST FRONT L +1.0dB CENTER ...-2.5dB FRONT R +1.0dB SUR.R +2.0dB SUR.L +2.0dB SWFR --dB Note "SWFR" is available only when a subwoofer is selected as the beam mode (see page 80). 88 En TV/AV YSP... all your adjustments. Adjusting the audio balance 5 Press TEST when you want to adjust. TEST 1 Set the operation mode selector to this unit and...

Owner's Manual
Page 96
... unit from being accidentally erased or unwantedly changed and front panel display MEMORY PROTECT You can test the sound beam output from the video monitor connected via HDMI (see page 18). MONITOR CHECK DEMO... ON VOLUME You can disable the front panel keys except when you adjust the system parameters. Parameter settings ON, OFF MEMORY PROTECT MAX VOLUME You can disable the INPUT on the front... panel when you adjust the system parameters. If your TV monitor is turned on the available video signal resolutions from this...
... unit from being accidentally erased or unwantedly changed and front panel display MEMORY PROTECT You can test the sound beam output from the video monitor connected via HDMI (see page 18). MONITOR CHECK DEMO... ON VOLUME You can disable the front panel keys except when you adjust the system parameters. Parameter settings ON, OFF MEMORY PROTECT MAX VOLUME You can disable the INPUT on the front... panel when you adjust the system parameters. If your TV monitor is turned on the available video signal resolutions from this...

Owner's Manual
Page 97
Adjusting the system parameters Parameter settings RESET, CANCEL Note After performing the following procedure you turn on the power of this unit to the standby mode. Press ENTER again to stop shuttling. FACTORY PRESET 7 Press STANDBY/ON on , restart the unit, then press ENTER while playing back sources to test the sound beam. y When...
Adjusting the system parameters Parameter settings RESET, CANCEL Note After performing the following procedure you turn on the power of this unit to the standby mode. Press ENTER again to stop shuttling. FACTORY PRESET 7 Press STANDBY/ON on , restart the unit, then press ENTER while playing back sources to test the sound beam. y When...

Owner's Manual
Page 98
.../AV to change the control area. Note Depending on the remote control. DECODE 0 +10 ENHANCER MUTE TV INPUT TV MUTE CODE SET CH LEVEL TEST 1 Write down CODE SET. TV MUTE CODE SET While holding down, press DVD AUX1 AUX2 STB TV 3 Press the numeric buttons to enter the... remote control code while holding down the code of the memory. When the memory is successful. Setting example: Yamaha DVD input area MY SUR. 6 TV MUTE CODE SET While holding down CODE SET. Transmission indicator AV TV DOCK DVD AUX1 AUX2 AUX3 TV INPUT1...
.../AV to change the control area. Note Depending on the remote control. DECODE 0 +10 ENHANCER MUTE TV INPUT TV MUTE CODE SET CH LEVEL TEST 1 Write down CODE SET. TV MUTE CODE SET While holding down, press DVD AUX1 AUX2 STB TV 3 Press the numeric buttons to enter the... remote control code while holding down the code of the memory. When the memory is successful. Setting example: Yamaha DVD input area MY SUR. 6 TV MUTE CODE SET While holding down CODE SET. Transmission indicator AV TV DOCK DVD AUX1 AUX2 AUX3 TV INPUT1...

Owner's Manual
Page 99
...INPUT Switches the input source for playback. 2 CH +/- DECODE 0 +10 ENHANCER ENTRY MENU CAT/ A-E DISPLAY ENTER TV/AV YSP RETURN VOLUME CH TV VOL MUTE TV INPUT TV MUTE CODE SET CH LEVEL TEST 4 5 6 7 1 Numeric buttons Selects a TV channel for your TV. 4 TV POWER Turns on this unit when ...the TV connected to the TV operation mode. When using the HDMI jacks is connected to select TV as the input source. ADVANCED OPERATION English 95 En TV/AV TV YSP 1 2 ...
...INPUT Switches the input source for playback. 2 CH +/- DECODE 0 +10 ENHANCER ENTRY MENU CAT/ A-E DISPLAY ENTER TV/AV YSP RETURN VOLUME CH TV VOL MUTE TV INPUT TV MUTE CODE SET CH LEVEL TEST 4 5 6 7 1 Numeric buttons Selects a TV channel for your TV. 4 TV POWER Turns on this unit when ...the TV connected to the TV operation mode. When using the HDMI jacks is connected to select TV as the input source. ADVANCED OPERATION English 95 En TV/AV TV YSP 1 2 ...

Owner's Manual
Page 100
DECODE 0 +10 ENHANCER ENTRY MENU CAT/ A-E DISPLAY ENTER TV/AV YSP RETURN VOLUME CH TV VOL 4 5 6 3 MUTE TV INPUT TV MUTE CODE SET CH LEVEL TEST ■ Operating your STB (CATV/Satellite tuner) Set the operation mode selector to TV/AV and press STB to select...MUSIC 7 MOVIE 8 SPORTS 9 OFF SUR. DECODE 0 +10 ENHANCER ENTRY MENU CAT/ A-E DISPLAY ENTER TV/AV YSP RETURN VOLUME CH TV VOL 3 MUTE TV INPUT TV MUTE CODE SET 1 Numeric buttons Enter numeric digits. 2 Cursor buttons / / / , ENTER Use to select DVD menu items. 3 Operation buttons for DVD players Operate...
DECODE 0 +10 ENHANCER ENTRY MENU CAT/ A-E DISPLAY ENTER TV/AV YSP RETURN VOLUME CH TV VOL 4 5 6 3 MUTE TV INPUT TV MUTE CODE SET CH LEVEL TEST ■ Operating your STB (CATV/Satellite tuner) Set the operation mode selector to TV/AV and press STB to select...MUSIC 7 MOVIE 8 SPORTS 9 OFF SUR. DECODE 0 +10 ENHANCER ENTRY MENU CAT/ A-E DISPLAY ENTER TV/AV YSP RETURN VOLUME CH TV VOL 3 MUTE TV INPUT TV MUTE CODE SET 1 Numeric buttons Enter numeric digits. 2 Cursor buttons / / / , ENTER Use to select DVD menu items. 3 Operation buttons for DVD players Operate...

Owner's Manual
Page 101
TV/AV YSP AUX1 1 2 3 STANDBY/ON POWER POWER AV TV DOCK DVD AUX1 AUX2 AUX3 TV INPUT1 MACRO STB TV PRESET/TUNE SEARCH MEMORY FM/XM CAT AUTO ... features 97 En English ADVANCED OPERATION DECODE 0 +10 ENHANCER ENTRY MENU CAT/ A-E DISPLAY ENTER TV/AV YSP RETURN VOLUME CH TV VOL 4 MUTE TV INPUT TV MUTE CODE SET CH LEVEL TEST 1 Numeric buttons Enter numeric digits. 2 CH +/- ■ Operating your VCR Set the operation mode selector to TV/AV and press AUX1...
TV/AV YSP AUX1 1 2 3 STANDBY/ON POWER POWER AV TV DOCK DVD AUX1 AUX2 AUX3 TV INPUT1 MACRO STB TV PRESET/TUNE SEARCH MEMORY FM/XM CAT AUTO ... features 97 En English ADVANCED OPERATION DECODE 0 +10 ENHANCER ENTRY MENU CAT/ A-E DISPLAY ENTER TV/AV YSP RETURN VOLUME CH TV VOL 4 MUTE TV INPUT TV MUTE CODE SET CH LEVEL TEST 1 Numeric buttons Enter numeric digits. 2 CH +/- ■ Operating your VCR Set the operation mode selector to TV/AV and press AUX1...
Owner's Manual
Page 102
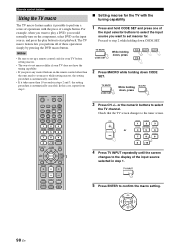
... +/- In this case, repeat from step 1. TV INPUT MUTE TV INPUT TV MUTE CODE SET CH LEVEL TEST 5 Press ENTER to set macros for. DECODE 0 +10 ENHANCER ENTRY MENU CAT/ A-E DISPLAY ENTER TV/AV YSP RETURN VOLUME CH TV VOL ■ Setting macros for your TV does not have the tuning capability...
... +/- In this case, repeat from step 1. TV INPUT MUTE TV INPUT TV MUTE CODE SET CH LEVEL TEST 5 Press ENTER to set macros for. DECODE 0 +10 ENHANCER ENTRY MENU CAT/ A-E DISPLAY ENTER TV/AV YSP RETURN VOLUME CH TV VOL ■ Setting macros for your TV does not have the tuning capability...