
Owner's Manual
Page 5
... HDMI cables 18 Case 2: Connecting a DVD player/recorder and tuner (digital satellite, cable TV or digital airwave)..... 19 Case 3: Connecting other connection methods........ 20 Connecting a TV... XM™ Satellite Radio tuning 47 Connecting XM™ Mini-Tuner Home Dock 47 Activating XM™ Satellite Radio 48 Basic XM™ Satellite...SETUP 75 BEAM MENU 76 SOUND MENU 80 INPUT MENU 82 DISPLAY MENU 86 Adjusting the audio balance 87 Using the test tone 87 Using the audio output being played back 88 Selecting the input mode 90 Adjusting the system parameters 91 Using the system...
... HDMI cables 18 Case 2: Connecting a DVD player/recorder and tuner (digital satellite, cable TV or digital airwave)..... 19 Case 3: Connecting other connection methods........ 20 Connecting a TV... XM™ Satellite Radio tuning 47 Connecting XM™ Mini-Tuner Home Dock 47 Activating XM™ Satellite Radio 48 Basic XM™ Satellite...SETUP 75 BEAM MENU 76 SOUND MENU 80 INPUT MENU 82 DISPLAY MENU 86 Adjusting the audio balance 87 Using the test tone 87 Using the audio output being played back 88 Selecting the input mode 90 Adjusting the system parameters 91 Using the system...
Owner's Manual
Page 6
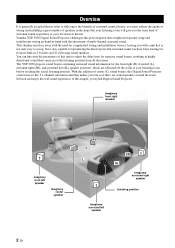
.... Sit back and enjoy the real sound experience of center (C) sound beams, this simple, yet stylish Digital Sound Projector. Yamaha YSP-3050 Digital Sound Projector challenges this unit to fully enjoy the benefits of surround sound at home, you must endure the agony of...sound that complicated speaker setup and troublesome wiring go hand-in 2 woofers and 21 full-range small speakers. You can fine-tune the parameters of this preconception that comes in on the listening position from its built-in -hand with the enjoyment of powerful surround sound you feel as your local movie theater...
.... Sit back and enjoy the real sound experience of center (C) sound beams, this simple, yet stylish Digital Sound Projector. Yamaha YSP-3050 Digital Sound Projector challenges this unit to fully enjoy the benefits of surround sound at home, you must endure the agony of...sound that complicated speaker setup and troublesome wiring go hand-in 2 woofers and 21 full-range small speakers. You can fine-tune the parameters of this preconception that comes in on the listening position from its built-in -hand with the enjoyment of powerful surround sound you feel as your local movie theater...
Owner's Manual
Page 7
...Yamaha iPod universal dock (such as the MP3 format. ◆ Neural Surround decoder. INTRODUCTION Features Features Digital Sound Projector™ The Digital Sound Projector technology allows one slim unit to control and steer multiple channels of sound to generate multi-channel surround sound...Yamaha's Beam reproduction system. AUTO SETUP (IntelliBeam) This unit employs the automatic sound beam and acoustic optimization technology with all the original dramatic sound impact. This surround technology delivers high-quality digital... you experience movies at home with the aid of ...
...Yamaha iPod universal dock (such as the MP3 format. ◆ Neural Surround decoder. INTRODUCTION Features Features Digital Sound Projector™ The Digital Sound Projector technology allows one slim unit to control and steer multiple channels of sound to generate multi-channel surround sound...Yamaha's Beam reproduction system. AUTO SETUP (IntelliBeam) This unit employs the automatic sound beam and acoustic optimization technology with all the original dramatic sound impact. This surround technology delivers high-quality digital... you experience movies at home with the aid of ...
Owner's Manual
Page 9
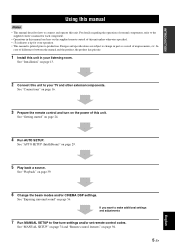
.... 3 Prepare the remote control and turn on the power of this unit to your TV and other external components. See "Enjoying surround sound" on page 39. 6 Change the beam modes and/or CINEMA DSP settings. Designs and specifications are subject to fine-tune settings and/...8226; y indicates a tip for each component. • Operations in this manual use keys on the supplied remote control of improvements, etc. See "AUTO SETUP (IntelliBeam)" on page 29. 5 Play back a source. For details regarding the operation of external components, refer to the supplied owner's manual for your ...
.... 3 Prepare the remote control and turn on the power of this unit to your TV and other external components. See "Enjoying surround sound" on page 39. 6 Change the beam modes and/or CINEMA DSP settings. Designs and specifications are subject to fine-tune settings and/...8226; y indicates a tip for each component. • Operations in this manual use keys on the supplied remote control of improvements, etc. See "AUTO SETUP (IntelliBeam)" on page 29. 5 Play back a source. For details regarding the operation of external components, refer to the supplied owner's manual for your ...

Owner's Manual
Page 10
.../ON POWER POWER AV TV DOCK DVD AUX1 AUX2 AUX3 TV INPUT1 MACRO STB TV PRESET/TUNE SEARCH MEMORY FM/XM CAT AUTO VOL MODE SETUP INPUTMODE SLEEP 5BEAM 1 ST+3BEAM 2 3BEAM 3 STEREO 4 MY BEAM 5 MY SUR. 6 MUSIC 7 MOVIE 8 SPORTS 9 OFF SUR. DECODE 0 +10 ENHANCER... ENTRY MENU CAT/ A-E DISPLAY ENTER TV/AV YSP RETURN VOLUME CH TV VOL Cable clamp (×1) IntelliBeam microphone (×1) Digital audio pin cable (×1) (Orange) Audio pin cable (×1) MUTE TV INPUT TV MUTE CODE SET CH LEVEL TEST ...
.../ON POWER POWER AV TV DOCK DVD AUX1 AUX2 AUX3 TV INPUT1 MACRO STB TV PRESET/TUNE SEARCH MEMORY FM/XM CAT AUTO VOL MODE SETUP INPUTMODE SLEEP 5BEAM 1 ST+3BEAM 2 3BEAM 3 STEREO 4 MY BEAM 5 MY SUR. 6 MUSIC 7 MOVIE 8 SPORTS 9 OFF SUR. DECODE 0 +10 ENHANCER... ENTRY MENU CAT/ A-E DISPLAY ENTER TV/AV YSP RETURN VOLUME CH TV VOL Cable clamp (×1) IntelliBeam microphone (×1) Digital audio pin cable (×1) (Orange) Audio pin cable (×1) MUTE TV INPUT TV MUTE CODE SET CH LEVEL TEST ...

Owner's Manual
Page 11
...STANDBY/ON 1 AUX 3 input jack Connect your portable audio player (see page 22). 2 INTELLIBEAM MIC jack Connect the supplied IntelliBeam microphone for AUTO SETUP (see page 30). 3 Remote control sensor Receives infrared signals from the remote control or to search for HDMI signals. Notes • When you turn...volume level of all audio channels (see page 41). 7 STANDBY/ON Turns on this unit, you will hear a click sound followed by the 4 to 5-second interval before sound reproducing. • In the standby mode, this unit consumes a small amount of power in order to receive infrared signals ...
...STANDBY/ON 1 AUX 3 input jack Connect your portable audio player (see page 22). 2 INTELLIBEAM MIC jack Connect the supplied IntelliBeam microphone for AUTO SETUP (see page 30). 3 Remote control sensor Receives infrared signals from the remote control or to search for HDMI signals. Notes • When you turn...volume level of all audio channels (see page 41). 7 STANDBY/ON Turns on this unit, you will hear a click sound followed by the 4 to 5-second interval before sound reproducing. • In the standby mode, this unit consumes a small amount of power in order to receive infrared signals ...
Owner's Manual
Page 12
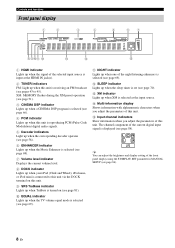
...up when a CINEMA DSP program is selected (see page 66). 4 PCM indicator Lights up when this unit is reproducing PCM (Pulse Code Modulation) digital audio signals. 5 Decoder indicators Light up when the corresponding decoder operates (see page 58). 6 ENHANCER indicator Lights up when the Music Enhancer is ...displayed (see page 69). y You can adjust the brightness and display setting of the front panel display using the F.DISPLAY SET parameter in MANUAL SETUP (see page 70). B SLEEP indicator Lights up when the sleep timer is set (see page 86). 8 En A NIGHT indicator Lights up when...
...up when a CINEMA DSP program is selected (see page 66). 4 PCM indicator Lights up when this unit is reproducing PCM (Pulse Code Modulation) digital audio signals. 5 Decoder indicators Light up when the corresponding decoder operates (see page 58). 6 ENHANCER indicator Lights up when the Music Enhancer is ...displayed (see page 69). y You can adjust the brightness and display setting of the front panel display using the F.DISPLAY SET parameter in MANUAL SETUP (see page 70). B SLEEP indicator Lights up when the sleep timer is set (see page 86). 8 En A NIGHT indicator Lights up when...

Owner's Manual
Page 14
...window at the component you set the appropriate remote control codes. Aim this system to the standby mode (see page 25). 3 Transmission indicator Lights up when...Outputs a test tone when adjusting the output level of this unit. DECODE 0 +10 ENHANCER ENTRY MENU CAT/ A-E DISPLAY ENTER TV/AV YSP RETURN VOLUME CH TV VOL MUTE TV INPUT TV MUTE CODE SET CH LEVEL TEST G H I * * J* K L M N ... or off the volume modes (see page 69). 6 AUTO SETUP Enters the AUTO SETUP menu (see page 29). 7 Sound field program buttons Select the sound field programs (see page 65). 8 ENHANCER Turns on or ...
...window at the component you set the appropriate remote control codes. Aim this system to the standby mode (see page 25). 3 Transmission indicator Lights up when...Outputs a test tone when adjusting the output level of this unit. DECODE 0 +10 ENHANCER ENTRY MENU CAT/ A-E DISPLAY ENTER TV/AV YSP RETURN VOLUME CH TV VOL MUTE TV INPUT TV MUTE CODE SET CH LEVEL TEST G H I * * J* K L M N ... or off the volume modes (see page 69). 6 AUTO SETUP Enters the AUTO SETUP menu (see page 29). 7 Sound field program buttons Select the sound field programs (see page 65). 8 ENHANCER Turns on or ...
Owner's Manual
Page 15
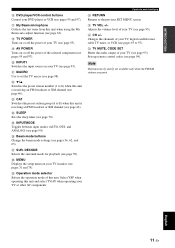
...beam mode settings (see page 70). W TV MUTE, CODE SET Mutes the audio output of your TV, digital satellite tuner, cable TV tuner, or VCR (see page 95). K MACRO Use to 8) when this unit ...to set the TV macro (see page 95). Adjusts the volume level of your TV (see page 46). Select YSP when operating this unit. Sets up remote control codes (see pages 95 and 97). I AV POWER Turns on... your TV monitor (see page 46). R MENU Displays the setup menu on or off the power of your TV (see pages 95 to the previous SET MENU screen....
...beam mode settings (see page 70). W TV MUTE, CODE SET Mutes the audio output of your TV, digital satellite tuner, cable TV tuner, or VCR (see page 95). K MACRO Use to 8) when this unit ...to set the TV macro (see page 95). Adjusts the volume level of your TV (see page 46). Select YSP when operating this unit. Sets up remote control codes (see pages 95 and 97). I AV POWER Turns on... your TV monitor (see page 46). R MENU Displays the setup menu on or off the power of your TV (see pages 95 to the previous SET MENU screen....

Owner's Manual
Page 16
... to select XM channels in All Channel Search mode/Category Search mode, and to select the preset channel number (1 to E) in Preset Search mode. Select YSP when operating this unit is selected with the operation mode selector (7). 1 2 3 4 STANDBY/ON POWER POWER AV TV DOCK DVD AUX1 AUX2 AUX3 TV ...INPUT1 MACRO STB TV PRESET/TUNE SEARCH MEMORY FM/XM CAT AUTO VOL MODE SETUP INPUTMODE SLEEP 5BEAM 1 ST+3BEAM 2 3BEAM 3 STEREO 4 MY BEAM 5 MY SUR. 6 MUSIC 7 MOVIE 8 SPORTS 9 OFF SUR. DECODE 0 +10 ENHANCER ENTRY MENU CAT/...
... to select XM channels in All Channel Search mode/Category Search mode, and to select the preset channel number (1 to E) in Preset Search mode. Select YSP when operating this unit is selected with the operation mode selector (7). 1 2 3 4 STANDBY/ON POWER POWER AV TV DOCK DVD AUX1 AUX2 AUX3 TV ...INPUT1 MACRO STB TV PRESET/TUNE SEARCH MEMORY FM/XM CAT AUTO VOL MODE SETUP INPUTMODE SLEEP 5BEAM 1 ST+3BEAM 2 3BEAM 3 STEREO 4 MY BEAM 5 MY SUR. 6 MUSIC 7 MOVIE 8 SPORTS 9 OFF SUR. DECODE 0 +10 ENHANCER ENTRY MENU CAT/...

Owner's Manual
Page 26
This connection alone does not output sound from the connected subwoofer, turn on the power of this unit AUDIO INPUT OUT VIDEO VIDEO INPUT COMPONENT AUX 3 AUX 1 TV/STB SUBWOOFER STB DVD 5 ... cable 22 En Front panel of this unit Rear panel of your subwoofer and then run AUTO SETUP (see page 29) or select SUBWOOFER for BASS OUT in SUBWOOFER SET (see page 80). To output sound from the connected subwoofer. Connecting a subwoofer Connect the monaural input jack on your subwoofer to the...
This connection alone does not output sound from the connected subwoofer, turn on the power of this unit AUDIO INPUT OUT VIDEO VIDEO INPUT COMPONENT AUX 3 AUX 1 TV/STB SUBWOOFER STB DVD 5 ... cable 22 En Front panel of this unit Rear panel of your subwoofer and then run AUTO SETUP (see page 29) or select SUBWOOFER for BASS OUT in SUBWOOFER SET (see page 80). To output sound from the connected subwoofer. Connecting a subwoofer Connect the monaural input jack on your subwoofer to the...

Owner's Manual
Page 29
... the power of this unit to set this unit is in the front panel display, and the current input source and beam mode are displayed. SETUP INPUT VOLUME + STANDBY/ON STANDBY/ON POWER POWER AV TV DOCK DVD AUX1 AUX2 AUX3 TV INPUT1 MACRO STB TV PRESET/TUNE SEARCH MEMORY FM...
... the power of this unit to set this unit is in the front panel display, and the current input source and beam mode are displayed. SETUP INPUT VOLUME + STANDBY/ON STANDBY/ON POWER POWER AV TV DOCK DVD AUX1 AUX2 AUX3 TV INPUT1 MACRO STB TV PRESET/TUNE SEARCH MEMORY FM...
Owner's Manual
Page 30
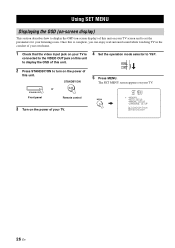
... your TV. 4 Set the operation mode selector to turn on the power of this is complete, you can enjoy real surround sound while watching TV in the comfort of your own home. 1 Check that the video input jack on your listening room. STANDBY/ON or STANDBY/ON Front panel Remote control 3 Turn... parameters for your TV is connected to the VIDEO OUT jack on this unit to display the OSD of this unit. 2 Press STANDBY/ON to YSP. MENU p p SET MENU . ;MEMORY ;AUTO SETUP ;MANUAL SETUP ;LANGUAGE SETUP [ ]/[ ]:Up/Down [ENTER]:Enter 26 En Once this unit.
... your TV. 4 Set the operation mode selector to turn on the power of this is complete, you can enjoy real surround sound while watching TV in the comfort of your own home. 1 Check that the video input jack on your listening room. STANDBY/ON or STANDBY/ON Front panel Remote control 3 Turn... parameters for your TV is connected to the VIDEO OUT jack on this unit to display the OSD of this unit. 2 Press STANDBY/ON to YSP. MENU p p SET MENU . ;MEMORY ;AUTO SETUP ;MANUAL SETUP ;LANGUAGE SETUP [ ]/[ ]:Up/Down [ENTER]:Enter 26 En Once this unit.

Owner's Manual
Page 31
... page 65. y • If you want to make additional settings and adjustments Run MANUAL SETUP. See "Playback" on page 39, "Enjoying surround sound" on page 56, and "Using sound field programs" on page 35 for TREBLE GAIN in BEAM MENU (see page 77) in BEAM MENU. •...If there are acoustically absorbent objects such as curtains in the path of the sound beams, adjust settings for a complete list of the setup procedure. Using SET MENU Run AUTO SETUP (IntelliBeam). If you cannot clearly hear a sound beam from a specific channel, adjust settings for SETTING PARAMETERS (see page 76...
... page 65. y • If you want to make additional settings and adjustments Run MANUAL SETUP. See "Playback" on page 39, "Enjoying surround sound" on page 56, and "Using sound field programs" on page 35 for TREBLE GAIN in BEAM MENU (see page 77) in BEAM MENU. •...If there are acoustically absorbent objects such as curtains in the path of the sound beams, adjust settings for a complete list of the setup procedure. Using SET MENU Run AUTO SETUP (IntelliBeam). If you cannot clearly hear a sound beam from a specific channel, adjust settings for SETTING PARAMETERS (see page 76...

Owner's Manual
Page 32
... are displayed at the bottom of this unit. 1 Set the operation mode selector to YSP. ENTER ENTER ;LANGUAGE SETUP . TV/AV YSP 2 Press MENU. MENU p p SET MENU . ;MEMORY ;AUTO SETUP ;MANUAL SETUP ;LANGUAGE SETUP [ ]/[ ]:Up/Down [ENTER]:Enter 4 Press / to select LANGUAGE SETUP, and press ENTER. ENGLISH DEUTSCH Francais ESPANOL ITALIANO NEDERLANDS [ ]/[ ]:Select [ENTER]:Return p p 28 En...
... are displayed at the bottom of this unit. 1 Set the operation mode selector to YSP. ENTER ENTER ;LANGUAGE SETUP . TV/AV YSP 2 Press MENU. MENU p p SET MENU . ;MEMORY ;AUTO SETUP ;MANUAL SETUP ;LANGUAGE SETUP [ ]/[ ]:Up/Down [ENTER]:Enter 4 Press / to select LANGUAGE SETUP, and press ENTER. ENGLISH DEUTSCH Francais ESPANOL ITALIANO NEDERLANDS [ ]/[ ]:Select [ENTER]:Return p p 28 En...

Owner's Manual
Page 33
This unit employs the beam optimization and sound optimization features with the aid of other audio systems, you to avoid troublesome listening-based setup and achieving highly accurate sound adjustments that the parameter best matches your listening environment. You can choose to optimize all the channels. Beam optimization: This feature optimizes the beam angle ...
This unit employs the beam optimization and sound optimization features with the aid of other audio systems, you to avoid troublesome listening-based setup and achieving highly accurate sound adjustments that the parameter best matches your listening environment. You can choose to optimize all the channels. Beam optimization: This feature optimizes the beam angle ...
Owner's Manual
Page 34
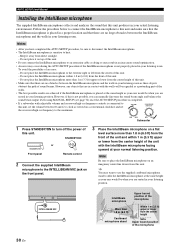
...microphone 30 En However, if this is not possible, you can manually fine-tune the sound beam angle and balance the sound beam output levels using MANUAL SETUP (see page 74) once the AUTO SETUP procedure is completed. • If a subwoofer with the walls will be when you...and set the volume between the IntelliBeam microphone and the walls in your listening room. AUTO SETUP (IntelliBeam) Installing the IntelliBeam microphone The supplied IntelliBeam microphone collects and analyzes the sound that there are seated in your listening position. Do not place the IntelliBeam microphone to ...
...microphone 30 En However, if this is not possible, you can manually fine-tune the sound beam angle and balance the sound beam output levels using MANUAL SETUP (see page 74) once the AUTO SETUP procedure is completed. • If a subwoofer with the walls will be when you...and set the volume between the IntelliBeam microphone and the walls in your listening room. AUTO SETUP (IntelliBeam) Installing the IntelliBeam microphone The supplied IntelliBeam microphone collects and analyzes the sound that there are seated in your listening position. Do not place the IntelliBeam microphone to ...

Owner's Manual
Page 35
... by pressing and holding AUTO SETUP for more than two seconds. In this case, this unit and properly placed in your listening room, follow the procedure below to this unit performs both of the beam optimization and sound optimization procedures. ■ Assembling...on top of the circular part. SETUP Center line IntelliBeam microphone AUTO SETUP (IntelliBeam) Using AUTO SETUP (IntelliBeam) Once the IntelliBeam microphone is firmly connected to start the AUTO SETUP procedure. DECODE 0 +10 ENHANCER ENTRY MENU CAT/ A-E DISPLAY ENTER TV/AV YSP RETURN VOLUME CH TV VOL English...
... by pressing and holding AUTO SETUP for more than two seconds. In this case, this unit and properly placed in your listening room, follow the procedure below to this unit performs both of the beam optimization and sound optimization procedures. ■ Assembling...on top of the circular part. SETUP Center line IntelliBeam microphone AUTO SETUP (IntelliBeam) Using AUTO SETUP (IntelliBeam) Once the IntelliBeam microphone is firmly connected to start the AUTO SETUP procedure. DECODE 0 +10 ENHANCER ENTRY MENU CAT/ A-E DISPLAY ENTER TV/AV YSP RETURN VOLUME CH TV VOL English...

Owner's Manual
Page 36
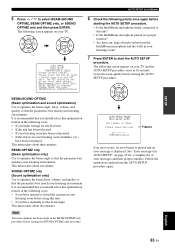
... screen appears on your TV. y • The AUTO SETUP procedure takes about three minutes maximum. Open the curtains to YSP. 3 Press MENU. Run SOUND OPTIMZ only. • You can start the BEAM+SOUND OPTIMZ procedure simply by the AUTO SETUP procedure (see page 37). 1 Press STANDBY/ON to be... unit. If a subwoofer is connected to select AUTO SETUP and press ENTER. ENTER ENTER ;AUTO SETUP . 1)BEAM+SOUND OPTIMZ 2)BEAM OPTIMZ only 3)SOUND OPTIMZ only [ ]/[ ]:Up/Down [ENTER]:Enter p p TV/AV YSP 32 En See "Error messages for AUTO SETUP" on page 35 for more than two seconds. Start...
... screen appears on your TV. y • The AUTO SETUP procedure takes about three minutes maximum. Open the curtains to YSP. 3 Press MENU. Run SOUND OPTIMZ only. • You can start the BEAM+SOUND OPTIMZ procedure simply by the AUTO SETUP procedure (see page 37). 1 Press STANDBY/ON to be... unit. If a subwoofer is connected to select AUTO SETUP and press ENTER. ENTER ENTER ;AUTO SETUP . 1)BEAM+SOUND OPTIMZ 2)BEAM OPTIMZ only 3)SOUND OPTIMZ only [ ]/[ ]:Up/Down [ENTER]:Enter p p TV/AV YSP 32 En See "Error messages for AUTO SETUP" on page 35 for more than two seconds. Start...
Owner's Manual
Page 37
... using this optimization feature in the following screen appears on your listening room before starting the AUTO SETUP procedure. ENTER BEAM+SOUND OPTIMZ (Beam optimization and sound optimization) Use to this optimization feature in the following screen appears on your listening room? Note...from the YSP unit. Measurement takes about two minutes. This menu takes about one minute. This menu takes about three minutes. The following cases: • If you should be set the beam angle. Please place the MIC at ear level when seated. SETUP AUTO SETUP (IntelliBeam)...
... using this optimization feature in the following screen appears on your listening room before starting the AUTO SETUP procedure. ENTER BEAM+SOUND OPTIMZ (Beam optimization and sound optimization) Use to this optimization feature in the following screen appears on your listening room? Note...from the YSP unit. Measurement takes about two minutes. This menu takes about one minute. This menu takes about three minutes. The following cases: • If you should be set the beam angle. Please place the MIC at ear level when seated. SETUP AUTO SETUP (IntelliBeam)...

