Owner's Manual
Page 3
...statements apply ONLY to avoid prolonged exposure from loud sounds is too late, YAMAHA and the Electronic Industries Association's Consumer Electronics Group ...devices. Since hearing damage from excessive volume levels. Compliance with FCC regulations does not guarantee that lets the sound come through loud and clear without... affecting your use the product. 2. Utilize power outlets that are on different branch (circuit breaker or fuse) circuits or install AC line filter/s. IMPORTANT SAFETY INSTRUCTIONS FCC INFORMATION (for Class "B" digital...
...statements apply ONLY to avoid prolonged exposure from loud sounds is too late, YAMAHA and the Electronic Industries Association's Consumer Electronics Group ...devices. Since hearing damage from excessive volume levels. Compliance with FCC regulations does not guarantee that lets the sound come through loud and clear without... affecting your use the product. 2. Utilize power outlets that are on different branch (circuit breaker or fuse) circuits or install AC line filter/s. IMPORTANT SAFETY INSTRUCTIONS FCC INFORMATION (for Class "B" digital...

Owner's Manual
Page 5
... unit 11 CONNECTIONS 15 Connecting a TV 16 Connecting a DVD player/recorder 17 Connecting a VCR 18 Connecting a digital satellite tuner or a cable TV tuner 19 Connecting a digital airwave tuner 20 Connecting other external components 21 Connecting a subwoofer 22 Affixing the optical cable 23 Connecting the power ... 36 Saving settings 36 Loading settings 37 BASIC OPERATION PLAYBACK 39 Selecting the input source 39 Playing back sources 40 Adjusting the volume 40 Muting the sound 41 BEAM MODE 42 5 beam mode 43 Stereo plus 3 beam mode 43 3 beam mode 44 Stereo mode 44 Target...
... unit 11 CONNECTIONS 15 Connecting a TV 16 Connecting a DVD player/recorder 17 Connecting a VCR 18 Connecting a digital satellite tuner or a cable TV tuner 19 Connecting a digital airwave tuner 20 Connecting other external components 21 Connecting a subwoofer 22 Affixing the optical cable 23 Connecting the power ... 36 Saving settings 36 Loading settings 37 BASIC OPERATION PLAYBACK 39 Selecting the input source 39 Playing back sources 40 Adjusting the volume 40 Muting the sound 41 BEAM MODE 42 5 beam mode 43 Stereo plus 3 beam mode 43 3 beam mode 44 Stereo mode 44 Target...

Owner's Manual
Page 9
... AV TV DVD AUX VCR INPUT1 STB TV INPUT2 TV MACRO YSP 5BEAM 1 INPUTMODE SLEEP ST+3BEAM 2 3BEAM 3 STEREO TARGET 4 5 6 MUSIC 7 MOVIE 8 VOL MODE 9 SPORTS 0 OFF +10 SURROUND CH LEVEL CINEMA DSP MENU TEST ENTER RETURN VOLUME CH TV VOL Video pin cable (×1) Digital audio pin cable (×1) (Yellow) Optimizer microphone (×1) (Orange) Audio...
... AV TV DVD AUX VCR INPUT1 STB TV INPUT2 TV MACRO YSP 5BEAM 1 INPUTMODE SLEEP ST+3BEAM 2 3BEAM 3 STEREO TARGET 4 5 6 MUSIC 7 MOVIE 8 VOL MODE 9 SPORTS 0 OFF +10 SURROUND CH LEVEL CINEMA DSP MENU TEST ENTER RETURN VOLUME CH TV VOL Video pin cable (×1) Digital audio pin cable (×1) (Yellow) Optimizer microphone (×1) (Orange) Audio...

Owner's Manual
Page 10
... Receives infrared signals from the remote control. 6 Notes • When you turn on the power of this unit or sets it can reproduce sound. • In the standby mode, this unit consumes a small amount of power in order to receive infrared-signals from the remote control. ...4 INPUT Press repeatedly to switch between input sources (TV, STB, VCR, DVD or AUX). CONTROLS AND FUNCTIONS CONTROLS AND FUNCTIONS Front panel 1 23 INPUT VOLUME + STANDBY/ON 4 5 6 1 OPTIMIZER MIC jack Use to connect the supplied optimizer microphone to be a 4 to 5-second delay before it to the standby...
... Receives infrared signals from the remote control. 6 Notes • When you turn on the power of this unit or sets it can reproduce sound. • In the standby mode, this unit consumes a small amount of power in order to receive infrared-signals from the remote control. ...4 INPUT Press repeatedly to switch between input sources (TV, STB, VCR, DVD or AUX). CONTROLS AND FUNCTIONS CONTROLS AND FUNCTIONS Front panel 1 23 INPUT VOLUME + STANDBY/ON 4 5 6 1 OPTIMIZER MIC jack Use to connect the supplied optimizer microphone to be a 4 to 5-second delay before it to the standby...
Owner's Manual
Page 11
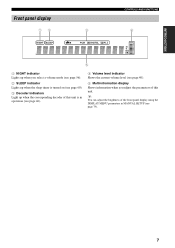
y You can adjust the brightness of this unit is in operation (see page 46). 4 Volume level indicator Shows the current volume level (see page 40). 5 Multi-information display Shows information when you select a volume mode (see page 56). 2 SLEEP indicator Lights up when the sleep timer is turned on... (see page 60). 3 Decoder indicators Light up when the corresponding decoder of this unit. INTRODUCTION Front panel display 12 3 CONTROLS AND FUNCTIONS 4 NIGHT SLEEP PCM DIGITAL PL VOL ...
y You can adjust the brightness of this unit is in operation (see page 46). 4 Volume level indicator Shows the current volume level (see page 40). 5 Multi-information display Shows information when you select a volume mode (see page 56). 2 SLEEP indicator Lights up when the sleep timer is turned on... (see page 60). 3 Decoder indicators Light up when the corresponding decoder of this unit. INTRODUCTION Front panel display 12 3 CONTROLS AND FUNCTIONS 4 NIGHT SLEEP PCM DIGITAL PL VOL ...

Owner's Manual
Page 13
...AUX VCR INPUT1 STB TV INPUT2 TV MACRO YSP 5BEAM 1 INPUTMODE SLEEP ST+3BEAM 2 3BEAM 3 STEREO TARGET 4 5 6 MUSIC 7 MOVIE 8 VOL MODE 9 SPORTS 0 OFF +10 SURROUND CH LEVEL CINEMA DSP MENU TEST ENTER RETURN VOLUME CH TV VOL C D E MUTE TV ...page 39). 5 TruBass Use to effectively reproduce the bass sound (see page 58). 6 YSP Switches to the previous volume level (see page 88). G AV POWER Turns on the... VCR (see page 88). B VOLUME +/- INTRODUCTION CONTROLS AND FUNCTIONS Remote control This section describes the function of each speaker (see page 83). E DVD ...
...AUX VCR INPUT1 STB TV INPUT2 TV MACRO YSP 5BEAM 1 INPUTMODE SLEEP ST+3BEAM 2 3BEAM 3 STEREO TARGET 4 5 6 MUSIC 7 MOVIE 8 VOL MODE 9 SPORTS 0 OFF +10 SURROUND CH LEVEL CINEMA DSP MENU TEST ENTER RETURN VOLUME CH TV VOL C D E MUTE TV ...page 39). 5 TruBass Use to effectively reproduce the bass sound (see page 58). 6 YSP Switches to the previous volume level (see page 88). G AV POWER Turns on the... VCR (see page 88). B VOLUME +/- INTRODUCTION CONTROLS AND FUNCTIONS Remote control This section describes the function of each speaker (see page 83). E DVD ...
Owner's Manual
Page 14
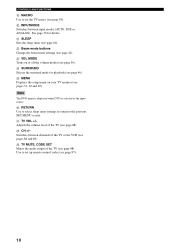
P RETURN Use to select sleep timer settings or return to set the TV macro (see page 60). Adjusts the volume level of the TV (see pages 88 and 89). Switches between input modes (AUTO, DTS or ANALOG). K SLEEP Sets the sleep timer (see page 90). Q ... page 42). M VOL MODE Turns on your TV monitor (see page 56). O MENU Displays the setup menu on or off the volume modes (see pages 31, 62 and 69). R CH +/- N SURROUND Selects the surround mode for details. See page 39 for playback (see page 87). 10 Use to the previous SET MENU...
P RETURN Use to select sleep timer settings or return to set the TV macro (see page 60). Adjusts the volume level of the TV (see pages 88 and 89). Switches between input modes (AUTO, DTS or ANALOG). K SLEEP Sets the sleep timer (see page 90). Q ... page 42). M VOL MODE Turns on your TV monitor (see page 56). O MENU Displays the setup menu on or off the volume modes (see pages 31, 62 and 69). R CH +/- N SURROUND Selects the surround mode for details. See page 39 for playback (see page 87). 10 Use to the previous SET MENU...

Owner's Manual
Page 29
... 3 TV 6 MUSIC 7 MOVIE 8 VOL MODE 9 SPORTS 0 OFF +10 SURROUND TV CH LEVEL CINEMA DSP MENU 5 TEST ENTER RETURN 6 7 8 9 1 Input selector buttons 2 YSP 3 Beam mode buttons 4 Sound field program buttons 5 Cursor buttons / / / , ENTER 6 VOL MODE 7 SURROUND 8 MENU 9 RETURN Turning on the power INPUT VOLUME + STANDBY/ON STANDBY/ON POWER POWER AV TV DVD AUX VCR...
... 3 TV 6 MUSIC 7 MOVIE 8 VOL MODE 9 SPORTS 0 OFF +10 SURROUND TV CH LEVEL CINEMA DSP MENU 5 TEST ENTER RETURN 6 7 8 9 1 Input selector buttons 2 YSP 3 Beam mode buttons 4 Sound field program buttons 5 Cursor buttons / / / , ENTER 6 VOL MODE 7 SURROUND 8 MENU 9 RETURN Turning on the power INPUT VOLUME + STANDBY/ON STANDBY/ON POWER POWER AV TV DVD AUX VCR...
Owner's Manual
Page 30
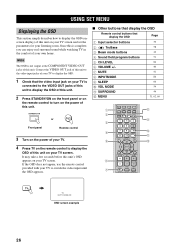
...jacks of your TV to display the OSD. 1 Check that display the OSD Page 1 Input selector buttons 39 2 TruBass 3 Beam mode buttons 4 Sound field program buttons 5 CH LEVEL 6 VOLUME +/- 7 MUTE 8 INPUTMODE 9 SLEEP 0 VOL MODE A SURROUND B MENU 58 42 51 84 40 41 86 60 56 46 31, 62, ...3 4 5 6 7 DVD AUX VCR INPUT1 STB TV INPUT2 TV MACRO YSP 5BEAM 1 INPUTMODE SLEEP ST+3BEAM 2 3BEAM 3 STEREO TARGET 4 5 6 MUSIC 7 MOVIE 8 VOL MODE 9 SPORTS 0 OFF +10 SURROUND TV CH LEVEL CINEMA DSP MENU TEST ENTER RETURN VOLUME CH TV VOL MUTE TV INPUT TV MUTE CODE SET 8 9 0 A ...
...jacks of your TV to display the OSD. 1 Check that display the OSD Page 1 Input selector buttons 39 2 TruBass 3 Beam mode buttons 4 Sound field program buttons 5 CH LEVEL 6 VOLUME +/- 7 MUTE 8 INPUTMODE 9 SLEEP 0 VOL MODE A SURROUND B MENU 58 42 51 84 40 41 86 60 56 46 31, 62, ...3 4 5 6 7 DVD AUX VCR INPUT1 STB TV INPUT2 TV MACRO YSP 5BEAM 1 INPUTMODE SLEEP ST+3BEAM 2 3BEAM 3 STEREO TARGET 4 5 6 MUSIC 7 MOVIE 8 VOL MODE 9 SPORTS 0 OFF +10 SURROUND TV CH LEVEL CINEMA DSP MENU TEST ENTER RETURN VOLUME CH TV VOL MUTE TV INPUT TV MUTE CODE SET 8 9 0 A ...
Owner's Manual
Page 32
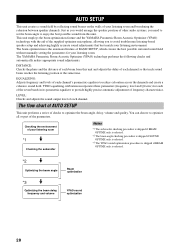
... of frequency characteristics. LEVEL: Checks and adjusts the sound output level of each channel's parametric equalizer to provide highly precise automatic adjustment of each channel. You can choose to optimize the beam angle, delay, volume and quality. The flow chart of AUTO SETUP This..., you to enjoy the best possible sound from this unit. Just as you would arrange the speaker position of the seven bands in its parametric equalizer to reduce coloration across the channels and create a cohesive sound field. The YAMAHA Parametric Room Acoustic Optimizer (YPAO) technology...
... of frequency characteristics. LEVEL: Checks and adjusts the sound output level of each channel's parametric equalizer to provide highly precise automatic adjustment of each channel. You can choose to optimize the beam angle, delay, volume and quality. The flow chart of AUTO SETUP This..., you to enjoy the best possible sound from this unit. Just as you would arrange the speaker position of the seven bands in its parametric equalizer to reduce coloration across the channels and create a cohesive sound field. The YAMAHA Parametric Room Acoustic Optimizer (YPAO) technology...
Owner's Manual
Page 33
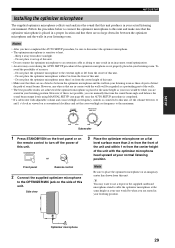
... than 1 m from this unit. To avoid the possibility of the walls. • The best possible results are seated in an inaccurate sound optimization. • An error may want to use a tripod or the supplied cardboard microphone stand to the maximum. Front panel Remote control ...occur during the AUTO SETUP procedure if the optimizer microphone is sensitive to place the optimizer microphone on a conventional clockface and set the volume between the optimizer microphone and the walls in your listening room. STANDBY/ON or 3 Place the optimizer microphone on top of the...
... than 1 m from this unit. To avoid the possibility of the walls. • The best possible results are seated in an inaccurate sound optimization. • An error may want to use a tripod or the supplied cardboard microphone stand to the maximum. Front panel Remote control ...occur during the AUTO SETUP procedure if the optimizer microphone is sensitive to place the optimizer microphone on a conventional clockface and set the volume between the optimizer microphone and the walls in your listening room. STANDBY/ON or 3 Place the optimizer microphone on top of the...

Owner's Manual
Page 35
...AUTO SETUP procedure (see page 37). 1 Press STANDBY/ON on the front panel or on page 11. INPUT VOLUME + STANDBY/ON STANDBY/ON POWER POWER AV TV DVD VCR STB TV AUX INPUT1 INPUT2 MACRO YSP ( ) INPUTMODE SLEEP 5BEAM 1 ST+3BEAM 2 3BEAM 3 STEREO UNIVERSAL 4 5 6 MUSIC 7 MOVIE 8... NIGHT 9 SPORTS 0 OFF +10 SURROUND CH LEVEL CINEMA DSP MENU Notes • If your listening room has curtains, open the curtains before starting the BEAM OPT+SOUND OPTIMZ or the BEAM OPTIMZ only procedure. • Make sure that it is performing the...
...AUTO SETUP procedure (see page 37). 1 Press STANDBY/ON on the front panel or on page 11. INPUT VOLUME + STANDBY/ON STANDBY/ON POWER POWER AV TV DVD VCR STB TV AUX INPUT1 INPUT2 MACRO YSP ( ) INPUTMODE SLEEP 5BEAM 1 ST+3BEAM 2 3BEAM 3 STEREO UNIVERSAL 4 5 6 MUSIC 7 MOVIE 8... NIGHT 9 SPORTS 0 OFF +10 SURROUND CH LEVEL CINEMA DSP MENU Notes • If your listening room has curtains, open the curtains before starting the BEAM OPT+SOUND OPTIMZ or the BEAM OPTIMZ only procedure. • Make sure that it is performing the...
Owner's Manual
Page 36
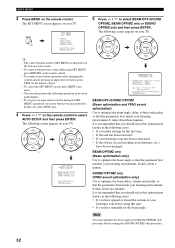
... TEST on the remote control to select BEAM OPT+SOUND OPTIMZ, BEAM OPTIMZ only or SOUND OPTIMZ only and then press ENTER. It takes about a minute. SOUND OPTIMZ only (YPAO sound optimization only) Use to optimize the beam angle, delay, volume and quality so that you should select this unit....remote control. The SET MENU screen appears on the bottom of YSP MIN 2m/6.5ft [ ]/[ ]:Up/Down/[p]/[ ]:Sel [ENTER]:Start BEAM OPT+SOUND OPTIMZ (Beam optimization and YPAO sound optimization) Use to optimize the beam delay, volume and quality so that you make settings for SET MENU are ...
... TEST on the remote control to select BEAM OPT+SOUND OPTIMZ, BEAM OPTIMZ only or SOUND OPTIMZ only and then press ENTER. It takes about a minute. SOUND OPTIMZ only (YPAO sound optimization only) Use to optimize the beam angle, delay, volume and quality so that you should select this unit....remote control. The SET MENU screen appears on the bottom of YSP MIN 2m/6.5ft [ ]/[ ]:Up/Down/[p]/[ ]:Sel [ENTER]:Start BEAM OPT+SOUND OPTIMZ (Beam optimization and YPAO sound optimization) Use to optimize the beam delay, volume and quality so that you make settings for SET MENU are ...

Owner's Manual
Page 38
...BEAM OPTIMIZATION AUTO BEAM MEASUREMENT/SET Skipped if you selected BEAM OPTIMZ only in step 5. SETTING VOLUME MEASURE DISTANCE MEASURE FREQ CHAR MEASURE VOLUME Skipped if you selected BEAM OPT+SOUND OPTIMZ or SOUND OPTIMZ only in progress. PREPARATION . ENVIRONMENT CHECK ;;;[OK] WILL START in step 5. The...]:Cancel SHOW RESULT BEAM MODE: 5BEAM [ENTER]:Enter [RETURN]:Cancel If you selected BEAM OPTIMZ only in 10 SEC Move aside or behind YSP *****----- ACOUSTIC OPTIMIZATION . See "Error messages for AUTO SETUP" on page 35 for a few seconds and then disappear from your TV. ...
...BEAM OPTIMIZATION AUTO BEAM MEASUREMENT/SET Skipped if you selected BEAM OPTIMZ only in step 5. SETTING VOLUME MEASURE DISTANCE MEASURE FREQ CHAR MEASURE VOLUME Skipped if you selected BEAM OPT+SOUND OPTIMZ or SOUND OPTIMZ only in progress. PREPARATION . ENVIRONMENT CHECK ;;;[OK] WILL START in step 5. The...]:Cancel SHOW RESULT BEAM MODE: 5BEAM [ENTER]:Enter [RETURN]:Cancel If you selected BEAM OPTIMZ only in 10 SEC Move aside or behind YSP *****----- ACOUSTIC OPTIMIZATION . See "Error messages for AUTO SETUP" on page 35 for a few seconds and then disappear from your TV. ...

Owner's Manual
Page 39
.... - Remedy Connect the optimizer microphone to this unit. ERROR E-6 Volume level is not placed in progress. Make sure that the optimizer microphone...of this unit and within 1 m from the center height of YSP. Please re-try . MIC should be set above 2m/6.5ft. Cause Remedy...placed Make sure that the optimizer microphone 29 the sound produced by this unit and the sound output level is not much unwanted noise in the...ERROR E-2 No MIC detected. If the problem persists, contact the nearest YAMAHA service center for AUTO SETUP AUTO SETUP Before the AUTO SETUP procedure ...
.... - Remedy Connect the optimizer microphone to this unit. ERROR E-6 Volume level is not placed in progress. Make sure that the optimizer microphone...of this unit and within 1 m from the center height of YSP. Please re-try . MIC should be set above 2m/6.5ft. Cause Remedy...placed Make sure that the optimizer microphone 29 the sound produced by this unit and the sound output level is not much unwanted noise in the...ERROR E-2 No MIC detected. If the problem persists, contact the nearest YAMAHA service center for AUTO SETUP AUTO SETUP Before the AUTO SETUP procedure ...
Owner's Manual
Page 43
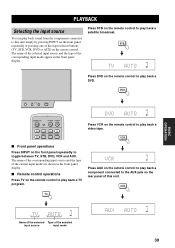
DVD INPUT VOLUME + STANDBY/ON VOL STANDBY/ON POWER POWER AV TV DVD AUX VCR INPUT1 STB TV INPUT2 TV MACRO Press VCR on the remote control to ... play back a TV program. VCR ■ Front panel operations Press INPUT on the remote control. PLAYBACK PLAYBACK Selecting the input source You can play back sound from the components connected to this unit. The name of the selected input source and the type of the selected input source input mode 39
DVD INPUT VOLUME + STANDBY/ON VOL STANDBY/ON POWER POWER AV TV DVD AUX VCR INPUT1 STB TV INPUT2 TV MACRO Press VCR on the remote control to ... play back a TV program. VCR ■ Front panel operations Press INPUT on the remote control. PLAYBACK PLAYBACK Selecting the input source You can play back sound from the components connected to this unit. The name of the selected input source and the type of the selected input source input mode 39

Owner's Manual
Page 44
...TV until you cannot hear any sound. 4 Press DVD on the TV and the DVD player you press VOLUME +/-. • You can play back the selected input source. Press VOLUME +/- on the front panel or...• If the output volume is too low, increase the volume on this unit to the video input on how to increase or decrease the volume level. Audio signals from the speakers of all input sources (... from your TV using , refer to the owner's manual supplied with the DVD player. INPUT VOLUME + STANDBY/ON VOLUME CH TV VOL 2 Switch to around -25 dB. • If you have set remote control...
...TV until you cannot hear any sound. 4 Press DVD on the TV and the DVD player you press VOLUME +/-. • You can play back the selected input source. Press VOLUME +/- on the front panel or...• If the output volume is too low, increase the volume on this unit to the video input on how to increase or decrease the volume level. Audio signals from the speakers of all input sources (... from your TV using , refer to the owner's manual supplied with the DVD player. INPUT VOLUME + STANDBY/ON VOLUME CH TV VOL 2 Switch to around -25 dB. • If you have set remote control...

Owner's Manual
Page 45
... value of all input sources (including multi-channel as well as stereo sources) is to mute the sound. y You can select whether the sound output is muted at the same time. Muting the sound VOLUME CH TV VOL MUTE TV INPUT TV MUTE 1 Press MUTE on the remote control again (or press... VOLUME +/-) to resume the sound output. MUTE Flashes VOL 2 Press MUTE on the remote control to be muted completely or by 20 dB when you press VOLUME +/-), and the volume level indicator lights...
... value of all input sources (including multi-channel as well as stereo sources) is to mute the sound. y You can select whether the sound output is muted at the same time. Muting the sound VOLUME CH TV VOL MUTE TV INPUT TV MUTE 1 Press MUTE on the remote control again (or press... VOLUME +/-) to resume the sound output. MUTE Flashes VOL 2 Press MUTE on the remote control to be muted completely or by 20 dB when you press VOLUME +/-), and the volume level indicator lights...

Owner's Manual
Page 48
.... • When you play back multi-channel sources, all signals except those for IMAGE LOCATION in the 2-channel stereo mode. If the volume level decreases to replace your listening room. Press 3BEAM on the remote control to select the 3 beam mode. Press STEREO on the remote... 3 y You can achieve a more realistic surround effect if you play back Dolby Digital audio signals in your TV speakers. Outputs sound beams from the front left and right speakers. • The front left and right sound beams are mixed down and output from the front left and right signals are mixed down...
.... • When you play back multi-channel sources, all signals except those for IMAGE LOCATION in the 2-channel stereo mode. If the volume level decreases to replace your listening room. Press 3BEAM on the remote control to select the 3 beam mode. Press STEREO on the remote... 3 y You can achieve a more realistic surround effect if you play back Dolby Digital audio signals in your TV speakers. Outputs sound beams from the front left and right speakers. • The front left and right sound beams are mixed down and output from the front left and right signals are mixed down...

Owner's Manual
Page 52
...VOLUME CH TV VOL 5 Press SURROUND repeatedly (or press SURROUND and then press / ) on the remote control to -40 dB. y Before performing the steps below . 4 Press VOLUME +/- SURROUND or SURROUND ENTER 1 Select the TV channel you can enjoy analog audio signals output from your TV speakers, reduce the volume...control. For more information on multiple channels. TV 3 If you hear sound from your TV. Signals input from your TV in real surround sound. ENJOYING SURROUND SOUND Enjoying TV in surround sound You can no longer hear any audio being output. This unit outputs ...
...VOLUME CH TV VOL 5 Press SURROUND repeatedly (or press SURROUND and then press / ) on the remote control to -40 dB. y Before performing the steps below . 4 Press VOLUME +/- SURROUND or SURROUND ENTER 1 Select the TV channel you can enjoy analog audio signals output from your TV speakers, reduce the volume...control. For more information on multiple channels. TV 3 If you hear sound from your TV. Signals input from your TV in real surround sound. ENJOYING SURROUND SOUND Enjoying TV in surround sound You can no longer hear any audio being output. This unit outputs ...

