
Owner's Manual
Page 5
...unit 11 CONNECTIONS 15 Connecting a TV 16 Connecting a DVD player/recorder 17 Connecting a VCR 18 Connecting a digital satellite tuner or a cable TV tuner 19 Connecting a digital airwave tuner 20 Connecting other external components 21 Connecting a subwoofer 22 Affixing the optical cable 23 Connecting the ...THE SLEEP TIMER 60 Setting the sleep timer 60 Canceling the sleep timer 61 ADVANCED OPERATION BASIC SETUP 62 MANUAL SETUP 68 Using MANUAL SETUP 69 BEAM MENU 70 SOUND MENU 74 INPUT MENU 77 DISPLAY MENU 79 ADJUSTING SYSTEM PARAMETERS ...........80 Setting the maximum volume ...
...unit 11 CONNECTIONS 15 Connecting a TV 16 Connecting a DVD player/recorder 17 Connecting a VCR 18 Connecting a digital satellite tuner or a cable TV tuner 19 Connecting a digital airwave tuner 20 Connecting other external components 21 Connecting a subwoofer 22 Affixing the optical cable 23 Connecting the ...THE SLEEP TIMER 60 Setting the sleep timer 60 Canceling the sleep timer 61 ADVANCED OPERATION BASIC SETUP 62 MANUAL SETUP 68 Using MANUAL SETUP 69 BEAM MENU 70 SOUND MENU 74 INPUT MENU 77 DISPLAY MENU 79 ADJUSTING SYSTEM PARAMETERS ...........80 Setting the maximum volume ...
Owner's Manual
Page 6
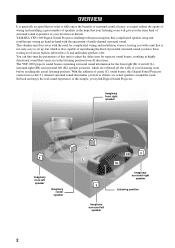
YAMAHA YSP-1000 Digital Sound Projector challenges this unit to -life 5.1 channel surround sound that comes in subwoofers (2) and individual speakers (40). The YSP-1000 projects sound beams containing surround sound information for the front right (R), front left (L), surround right (SR) and surround left speaker 2 OVERVIEW OVERVIEW It is also capable of reproducing the kind of powerful surround sound you have been waiting for from...
YAMAHA YSP-1000 Digital Sound Projector challenges this unit to -life 5.1 channel surround sound that comes in subwoofers (2) and individual speakers (40). The YSP-1000 projects sound beams containing surround sound information for the front right (R), front left (L), surround right (SR) and surround left speaker 2 OVERVIEW OVERVIEW It is also capable of reproducing the kind of powerful surround sound you have been waiting for from...
Owner's Manual
Page 7
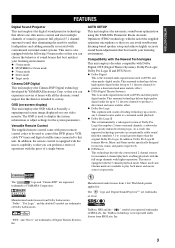
...DSP" are trademarks of Dolby Laboratories. INTRODUCTION FEATURES FEATURES Digital Sound Projector This unit employs the digital sound projector technology that allows one slim unit to control and steer multiple channels of sound to a much greater degree than the original Dolby Pro...Digital technology developed by YAMAHA Electronics Corp. Worldwide patents applied for the system parameters. The OSD is equipped with the macro capability so that you can choose the behavior of sound beams that you can avoid troublesome listening-based speaker setup and achieve highly accurate sound...
...DSP" are trademarks of Dolby Laboratories. INTRODUCTION FEATURES FEATURES Digital Sound Projector This unit employs the digital sound projector technology that allows one slim unit to control and steer multiple channels of sound to a much greater degree than the original Dolby Pro...Digital technology developed by YAMAHA Electronics Corp. Worldwide patents applied for the system parameters. The OSD is equipped with the macro capability so that you can choose the behavior of sound beams that you can avoid troublesome listening-based speaker setup and achieve highly accurate sound...
Owner's Manual
Page 8
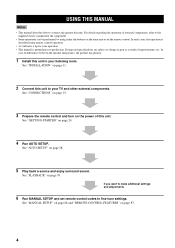
...87. 4 In case of this unit in part as a result of external components, refer to your TV and other external components. See "MANUAL SETUP" on page 68 and "REMOTE CONTROL FEATURES" on page 39. Design and specifications are subject to change in your operation. • This manual ...etc. See "INSTALLATION" on page 28. 5 Play back a source and enjoy surround sound. See "AUTO SETUP" on page 11. 2 Connect this unit. If you want to make additional settings and adjustments 6 Run MANUAL SETUP and set remote control codes to connect and operate this unit to the supplied owner's ...
...87. 4 In case of this unit in part as a result of external components, refer to your TV and other external components. See "MANUAL SETUP" on page 68 and "REMOTE CONTROL FEATURES" on page 39. Design and specifications are subject to change in your operation. • This manual ...etc. See "INSTALLATION" on page 28. 5 Play back a source and enjoy surround sound. See "AUTO SETUP" on page 11. 2 Connect this unit. If you want to make additional settings and adjustments 6 Run MANUAL SETUP and set remote control codes to connect and operate this unit to the supplied owner's ...

Owner's Manual
Page 10
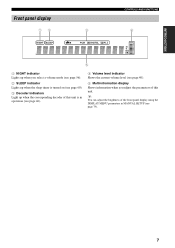
... Front panel display Shows information about the operational status of this unit, you turn on the power of this unit or sets it can reproduce sound. • In the standby mode, this unit consumes a small amount of this unit. 3 Remote control sensor Receives infrared signals from the ...remote control. 6 Notes • When you will hear a click and there will be used to run AUTO SETUP (see page 25). CONTROLS AND FUNCTIONS CONTROLS AND FUNCTIONS Front panel 1 23 INPUT VOLUME + STANDBY/ON 4 5 6 1 OPTIMIZER MIC jack Use to...
... Front panel display Shows information about the operational status of this unit, you turn on the power of this unit or sets it can reproduce sound. • In the standby mode, this unit consumes a small amount of this unit. 3 Remote control sensor Receives infrared signals from the ...remote control. 6 Notes • When you will hear a click and there will be used to run AUTO SETUP (see page 25). CONTROLS AND FUNCTIONS CONTROLS AND FUNCTIONS Front panel 1 23 INPUT VOLUME + STANDBY/ON 4 5 6 1 OPTIMIZER MIC jack Use to...
Owner's Manual
Page 11
INTRODUCTION Front panel display 12 3 CONTROLS AND FUNCTIONS 4 NIGHT SLEEP PCM DIGITAL PL VOL m ft mS dB 5 1 NIGHT indicator Lights up when you select a volume mode (see page 56). 2 SLEEP indicator Lights up when the sleep timer ...is turned on (see page 60). 3 Decoder indicators Light up when the corresponding decoder of this unit is in MANUAL SETUP (see page 40). 5 Multi-information display Shows information when you adjust the parameters of the front panel display using the DISPLAY MENU parameters in operation...
INTRODUCTION Front panel display 12 3 CONTROLS AND FUNCTIONS 4 NIGHT SLEEP PCM DIGITAL PL VOL m ft mS dB 5 1 NIGHT indicator Lights up when you select a volume mode (see page 56). 2 SLEEP indicator Lights up when the sleep timer ...is turned on (see page 60). 3 Decoder indicators Light up when the corresponding decoder of this unit is in MANUAL SETUP (see page 40). 5 Multi-information display Shows information when you adjust the parameters of the front panel display using the DISPLAY MENU parameters in operation...
Owner's Manual
Page 14
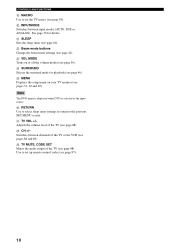
... page 90). CONTROLS AND FUNCTIONS I MACRO Use to set up remote control codes (see page 88). N SURROUND Selects the surround mode for details. Q TV VOL +/- R CH +/- P RETURN Use to select sleep timer settings or return to set the TV macro (see page 42). Adjusts the volume level of the TV (see... 56). See page 39 for playback (see pages 88 and 89). J INPUTMODE Switches between channels of the TV (see page 87). 10 O MENU Displays the setup menu on or off the volume modes (see pages 31, 62 and 69).
... page 90). CONTROLS AND FUNCTIONS I MACRO Use to set up remote control codes (see page 88). N SURROUND Selects the surround mode for details. Q TV VOL +/- R CH +/- P RETURN Use to select sleep timer settings or return to set the TV macro (see page 42). Adjusts the volume level of the TV (see... 56). See page 39 for playback (see pages 88 and 89). J INPUTMODE Switches between channels of the TV (see page 87). 10 O MENU Displays the setup menu on or off the volume modes (see pages 31, 62 and 69).

Owner's Manual
Page 26
... this unit, turn on the power of your subwoofer to this unit COMPONENT COMPONENT COMPONENT RS-232C DVD COAXIAL AUX TV/STB OPTICAL REMOTE IN DIGITAL IN TV/STB VCR AUDIO IN VCR SUBWOOFER DVD/AUX STB VIDEO IN VIDEO OUT Cables used for BASS OUT in SUBWOOFER SET (see page... SWFR for connections Subwoofer pin cable 22 CONNECTIONS Connecting a subwoofer To connect a subwoofer, connect the monaural input jack of your subwoofer and then run AUTO SETUP (see page 75).
... this unit, turn on the power of your subwoofer to this unit COMPONENT COMPONENT COMPONENT RS-232C DVD COAXIAL AUX TV/STB OPTICAL REMOTE IN DIGITAL IN TV/STB VCR AUDIO IN VCR SUBWOOFER DVD/AUX STB VIDEO IN VIDEO OUT Cables used for BASS OUT in SUBWOOFER SET (see page... SWFR for connections Subwoofer pin cable 22 CONNECTIONS Connecting a subwoofer To connect a subwoofer, connect the monaural input jack of your subwoofer and then run AUTO SETUP (see page 75).

Owner's Manual
Page 29
... SLEEP ST+3BEAM 2 TARGET 5 3BEAM 3 TV 6 MUSIC 7 MOVIE 8 VOL MODE 9 SPORTS 0 OFF +10 SURROUND TV CH LEVEL CINEMA DSP MENU 5 TEST ENTER RETURN 6 7 8 9 1 Input selector buttons 2 YSP 3 Beam mode buttons 4 Sound field program buttons 5 Cursor buttons / / / , ENTER 6 VOL MODE 7 SURROUND 8 MENU 9 RETURN Turning on the power... or Front panel Remote control 2 Press STANDBY/ON on the front panel or on the currently selected input source. SETUP GETTING STARTED Using the remote control The control area and the corresponding functions of the remote control change depending on the...
... SLEEP ST+3BEAM 2 TARGET 5 3BEAM 3 TV 6 MUSIC 7 MOVIE 8 VOL MODE 9 SPORTS 0 OFF +10 SURROUND TV CH LEVEL CINEMA DSP MENU 5 TEST ENTER RETURN 6 7 8 9 1 Input selector buttons 2 YSP 3 Beam mode buttons 4 Sound field program buttons 5 Cursor buttons / / / , ENTER 6 VOL MODE 7 SURROUND 8 MENU 9 RETURN Turning on the power... or Front panel Remote control 2 Press STANDBY/ON on the front panel or on the currently selected input source. SETUP GETTING STARTED Using the remote control The control area and the corresponding functions of the remote control change depending on the...
Owner's Manual
Page 31
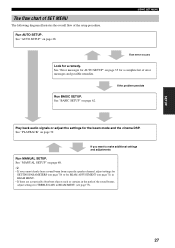
... objects such as curtains in the path of the sound beams, adjust settings for a remedy. See "Error messages for AUTO SETUP" on page 35 for the beam mode and the cinema DSP. If you cannot clearly hear a sound beam from a specific speaker channel, adjust settings for SETTING PARAMETERS (see page ...70) or for BEAM ADJUSTMENT (see page 73). 27 See "MANUAL SETUP" on page 28. Run BASIC SETUP. If the problem persists Play back audio signals or adjust ...
... objects such as curtains in the path of the sound beams, adjust settings for a remedy. See "Error messages for AUTO SETUP" on page 35 for the beam mode and the cinema DSP. If you cannot clearly hear a sound beam from a specific speaker channel, adjust settings for SETTING PARAMETERS (see page ...70) or for BEAM ADJUSTMENT (see page 73). 27 See "MANUAL SETUP" on page 28. Run BASIC SETUP. If the problem persists Play back audio signals or adjust ...
Owner's Manual
Page 32
...YAMAHA Parametric Room Acoustic Optimizer (YPAO) technology with the aid of the supplied optimizer microphone, allowing you need to set the beam angle to optimize the beam angle, delay, volume and quality. You can choose to avoid troublesome listening-based speaker setup and achieving highly accurate sound... adjustments that each channel. Just as you would arrange the speaker position of other audio systems, you to optimize all or part of the ...
...YAMAHA Parametric Room Acoustic Optimizer (YPAO) technology with the aid of the supplied optimizer microphone, allowing you need to set the beam angle to optimize the beam angle, delay, volume and quality. You can choose to avoid troublesome listening-based speaker setup and achieving highly accurate sound... adjustments that each channel. Just as you would arrange the speaker position of other audio systems, you to optimize all or part of the ...
Owner's Manual
Page 33
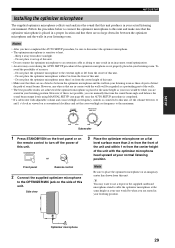
...seated in your listening position. Notes • After you can manually fine-tune the sound beam angle and balance the sound beam output levels using MANUAL SETUP (see page 68) once the AUTO SETUP procedure is completed. • If a subwoofer with adjustable volume and crossover/high cut...this unit. y You may occur during the AUTO SETUP procedure if the optimizer microphone is not properly placed in your listening room. SETUP AUTO SETUP Installing the optimizer microphone The supplied optimizer microphone collects and analyzes the sound that are in contact with the walls will be ...
...seated in your listening position. Notes • After you can manually fine-tune the sound beam angle and balance the sound beam output levels using MANUAL SETUP (see page 68) once the AUTO SETUP procedure is completed. • If a subwoofer with adjustable volume and crossover/high cut...this unit. y You may occur during the AUTO SETUP procedure if the optimizer microphone is not properly placed in your listening room. SETUP AUTO SETUP Installing the optimizer microphone The supplied optimizer microphone collects and analyzes the sound that are in contact with the walls will be ...

Owner's Manual
Page 34
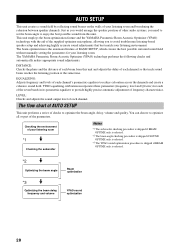
AUTO SETUP Example of using a tripod Optimizer microphone position More than 2 m Imaginary center line Within 1 m Within 1 m Tripod Example of using the supplied cardboard microphone stand ■ Assembling ...
AUTO SETUP Example of using a tripod Optimizer microphone position More than 2 m Imaginary center line Within 1 m Within 1 m Tripod Example of using the supplied cardboard microphone stand ■ Assembling ...

Owner's Manual
Page 35
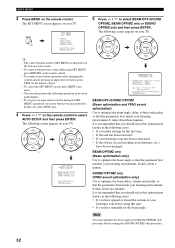
... described in one of this unit" on the remote control to be output during the AUTO SETUP procedure. • The AUTO SETUP procedure may not obstruct the path of sound beams. To achieve the best results possible, however, it is strongly recommended that it is ... "Before installing this unit. YSP SETUP 31 INPUT VOLUME + STANDBY/ON STANDBY/ON POWER POWER AV TV DVD VCR STB TV AUX INPUT1 INPUT2 MACRO YSP ( ) INPUTMODE SLEEP 5BEAM 1 ST+3BEAM 2 3BEAM 3 STEREO UNIVERSAL 4 5 6 MUSIC 7 MOVIE 8 NIGHT 9 SPORTS 0 OFF +10 SURROUND CH LEVEL CINEMA DSP MENU Notes ...
... described in one of this unit" on the remote control to be output during the AUTO SETUP procedure. • The AUTO SETUP procedure may not obstruct the path of sound beams. To achieve the best results possible, however, it is strongly recommended that it is ... "Before installing this unit. YSP SETUP 31 INPUT VOLUME + STANDBY/ON STANDBY/ON POWER POWER AV TV DVD VCR STB TV AUX INPUT1 INPUT2 MACRO YSP ( ) INPUTMODE SLEEP 5BEAM 1 ST+3BEAM 2 3BEAM 3 STEREO UNIVERSAL 4 5 6 MUSIC 7 MOVIE 8 NIGHT 9 SPORTS 0 OFF +10 SURROUND CH LEVEL CINEMA DSP MENU Notes ...
Owner's Manual
Page 36
... you should select this optimization feature in your listening room before starting the SOUND OPTIMZ only procedure. AUTO SETUP 3 Press MENU on your TV. p p 32 The following cases: • If you make settings for SET MENU are displayed on the bottom of YSP MIN 2m/6.5ft [ ]/[ ]:Up/Down/[p]/[ ]:Sel [ENTER]:Start BEAM OPT...
... you should select this optimization feature in your listening room before starting the SOUND OPTIMZ only procedure. AUTO SETUP 3 Press MENU on your TV. p p 32 The following cases: • If you make settings for SET MENU are displayed on the bottom of YSP MIN 2m/6.5ft [ ]/[ ]:Up/Down/[p]/[ ]:Sel [ENTER]:Start BEAM OPT...

Owner's Manual
Page 37
...; Select HI ECHO if your listening room has highly reflective surfaces such as concrete walls. 7 Check the following points once again before starting the AUTO SETUP procedure. • Is the optimizer microphone firmly connected to select the reflectivity of the unit in your listening room. 6 Press / / / to ...corner if the unit is installed in your listening room. The beam mode is set to select the mounted position of your listening room? AUTO SETUP MOUNTING (Mounting) Use to ST+3BEAM (see page 43). • Select WALL if the unit is mounted on the wall. • Select...
...; Select HI ECHO if your listening room has highly reflective surfaces such as concrete walls. 7 Check the following points once again before starting the AUTO SETUP procedure. • Is the optimizer microphone firmly connected to select the reflectivity of the unit in your listening room. 6 Press / / / to ...corner if the unit is installed in your listening room. The beam mode is set to select the mounted position of your listening room? AUTO SETUP MOUNTING (Mounting) Use to ST+3BEAM (see page 43). • Select WALL if the unit is mounted on the wall. • Select...

Owner's Manual
Page 38
... RESULT BEAM MODE: 5BEAM [ENTER]:Enter [RETURN]:Cancel If you selected BEAM OPT+SOUND OPTIMZ or SOUND OPTIMZ only in step 5. PREPARATION . ENVIRONMENT CHECK ;;;[OK] WILL START in 10 SEC Move aside or behind YSP *****----- See "Error messages for AUTO SETUP" on your TV. The following screen is displayed temporarily for a complete list of...
... RESULT BEAM MODE: 5BEAM [ENTER]:Enter [RETURN]:Cancel If you selected BEAM OPT+SOUND OPTIMZ or SOUND OPTIMZ only in step 5. PREPARATION . ENVIRONMENT CHECK ;;;[OK] WILL START in 10 SEC Move aside or behind YSP *****----- See "Error messages for AUTO SETUP" on your TV. The following screen is displayed temporarily for a complete list of...

Owner's Manual
Page 39
.... See page - 29 - 29 The optimizer microphone is firmly connected to this unit. placed in front of YSP. An internal system error occurred. SETUP 35 Remedy Connect the optimizer microphone to choose certain hours during the day when there is not much unwanted noise ...Do not perform any other operations were performed on this unit and the sound output level is installed in progress- If the problem persists, contact the nearest YAMAHA service center for AUTO SETUP AUTO SETUP Before the AUTO SETUP procedure starts Error message Cause ERROR E-2 No MIC Detected. ERROR E-3...
.... See page - 29 - 29 The optimizer microphone is firmly connected to this unit. placed in front of YSP. An internal system error occurred. SETUP 35 Remedy Connect the optimizer microphone to choose certain hours during the day when there is not much unwanted noise ...Do not perform any other operations were performed on this unit and the sound output level is installed in progress- If the problem persists, contact the nearest YAMAHA service center for AUTO SETUP AUTO SETUP Before the AUTO SETUP procedure starts Error message Cause ERROR E-2 No MIC Detected. ERROR E-3...
Owner's Manual
Page 40
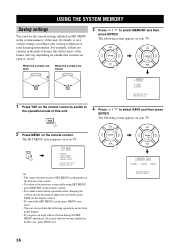
The following screen appears on your TV. The following screen appears on your TV. MENU SET MENU . ;MEMORY ;AUTO SETUP ;BASIC SETUP ;MANUAL SETUP [ ]/[ ]:Up/Down [ENTER]:Enter y • The control buttons used for SET MENU are curtains in the front panel display. • If you press ...example, if there are displayed on the bottom of this case, press TEST once. ENTER ENTER ;MEMORY 1)LOAD 2)SAVE [ ]/[ ]:Up/Down [ENTER]:Enter 1 Press YSP on the remote control to switch to the operation mode of the screen. • To return to the previous screen while using SET MENU, press...
The following screen appears on your TV. The following screen appears on your TV. MENU SET MENU . ;MEMORY ;AUTO SETUP ;BASIC SETUP ;MANUAL SETUP [ ]/[ ]:Up/Down [ENTER]:Enter y • The control buttons used for SET MENU are curtains in the front panel display. • If you press ...example, if there are displayed on the bottom of this case, press TEST once. ENTER ENTER ;MEMORY 1)LOAD 2)SAVE [ ]/[ ]:Up/Down [ENTER]:Enter 1 Press YSP on the remote control to switch to the operation mode of the screen. • To return to the previous screen while using SET MENU, press...

Owner's Manual
Page 41
... SETUP ;MANUAL SETUP [ ]/[ ]:Up/Down [ENTER]:Enter y • The control buttons used for SET MENU are displayed on your TV. In this unit. MENU 37 YSP 2)MEMORY SAVE USER1 Save Now? [ENTER]:Enter 6 Press ENTER again. Once the parameters are saved as USER1, USER2 or USER3. ENTER... 2)MEMORY SAVE USER1 Saving ! []:Select SET MENU . ;MEMORY ;AUTO SETUP ;BASIC SETUP ;MANUAL SETUP [ ]/[ ]:Up/Down [ENTER]:Enter p p ...
... SETUP ;MANUAL SETUP [ ]/[ ]:Up/Down [ENTER]:Enter y • The control buttons used for SET MENU are displayed on your TV. In this unit. MENU 37 YSP 2)MEMORY SAVE USER1 Save Now? [ENTER]:Enter 6 Press ENTER again. Once the parameters are saved as USER1, USER2 or USER3. ENTER... 2)MEMORY SAVE USER1 Saving ! []:Select SET MENU . ;MEMORY ;AUTO SETUP ;BASIC SETUP ;MANUAL SETUP [ ]/[ ]:Up/Down [ENTER]:Enter p p ...
