Owner's Manual
Page 1
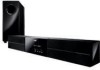
UA Front Surround System (CENTER SYSTEM + SUBWOOFER/SYSTEM CONTROL) YAS-71 (YAS-71CU + YAS-71SPX) OWNER'S MANUAL
UA Front Surround System (CENTER SYSTEM + SUBWOOFER/SYSTEM CONTROL) YAS-71 (YAS-71CU + YAS-71SPX) OWNER'S MANUAL
Owner's Manual
Page 2
... the apparatus has been damaged in the literature accompanying the appliance. The wide blade or the third prong are provided for replacement of this Owner's Manual in a safe place for long periods of important operating and maintenance (servicing) instructions in any ventilation openings. If the provided plug does not fit into...
... the apparatus has been damaged in the literature accompanying the appliance. The wide blade or the third prong are provided for replacement of this Owner's Manual in a safe place for long periods of important operating and maintenance (servicing) instructions in any ventilation openings. If the provided plug does not fit into...
Owner's Manual
Page 3
... instructions. ii En Follow all installations. This equipment generates/uses radio frequencies and, if not installed and used . If this manual, meets FCC requirements. This product, when installed as indicated in the instructions contained in harmful interference with other electronic devices. In... the case of this product MUST be determined by Yamaha Corporation of product. Compliance with this product in a residential environment will not occur in to eliminate the problem by using ...
... instructions. ii En Follow all installations. This equipment generates/uses radio frequencies and, if not installed and used . If this manual, meets FCC requirements. This product, when installed as indicated in the instructions contained in harmful interference with other electronic devices. In... the case of this product MUST be determined by Yamaha Corporation of product. Compliance with this product in a residential environment will not occur in to eliminate the problem by using ...
Owner's Manual
Page 4
... form when the surrounding temperature changes suddenly. One that this unit is too late, Yamaha and the Electronic Industries Association's Consumer Electronics Group recommend you to this unit with high humidity (i.e. and, most out of speakers. 22 This unit is designed to a wall outlet until ... Disconnect the power supply cable from the wall outlet, grasp the plug; Yamaha shall not be reached easily. 17 Be sure to read this manual carefully. We Want You Listening For A Lifetime Yamaha and the Electronic Industries Association's Consumer Electronics Group want you turn off this...
... form when the surrounding temperature changes suddenly. One that this unit is too late, Yamaha and the Electronic Industries Association's Consumer Electronics Group recommend you to this unit with high humidity (i.e. and, most out of speakers. 22 This unit is designed to a wall outlet until ... Disconnect the power supply cable from the wall outlet, grasp the plug; Yamaha shall not be reached easily. 17 Be sure to read this manual carefully. We Want You Listening For A Lifetime Yamaha and the Electronic Industries Association's Consumer Electronics Group want you turn off this...
Owner's Manual
Page 5
... 12 Connecting the Yamaha iPod universal dock 14 Connecting the Yamaha Bluetooth audio receiver ...... 14 Connecting the indoor FM antenna 14 Connecting the power cable 15 BASIC OPERATION BASIC PLAYBACK OPERATION 16 AIR SURROUND XTREME 17 What is printed... ■ Introduction YAS-71 consists of improvements, etc. OTHER FUNCTIONS USEFUL OPERATION ADDITIONAL INFORMATION English 1 En Notes contain important information about safety and operating instructions. • This manual is AIR SURROUND XTREME 17 Listening to surround mode of AIR SURROUND XTREME 18 Shifting the...
... 12 Connecting the Yamaha iPod universal dock 14 Connecting the Yamaha Bluetooth audio receiver ...... 14 Connecting the indoor FM antenna 14 Connecting the power cable 15 BASIC OPERATION BASIC PLAYBACK OPERATION 16 AIR SURROUND XTREME 17 What is printed... ■ Introduction YAS-71 consists of improvements, etc. OTHER FUNCTIONS USEFUL OPERATION ADDITIONAL INFORMATION English 1 En Notes contain important information about safety and operating instructions. • This manual is AIR SURROUND XTREME 17 Listening to surround mode of AIR SURROUND XTREME 18 Shifting the...
Owner's Manual
Page 6
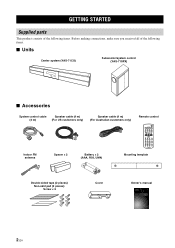
... control cable Speaker cable (4 m) (4 m) (For US customers only) Speaker cable (4 m) (For Australian customers only) Remote control Indoor FM antenna Spacer × 2 Battery × 2 (AAA, R03, UM4) Mounting template Double-sided tape (2 pieces) Non-skid pad (2 pieces) Screw × 6 Cover Owner's manual UA Front Surround System (CENTER SYSTEM + SUBWOOFER/SYSTEM CONTROL) YAS-71 (YAS-71CU + YAS-71SPX) OWNER'S MANUAL 2 En
... control cable Speaker cable (4 m) (4 m) (For US customers only) Speaker cable (4 m) (For Australian customers only) Remote control Indoor FM antenna Spacer × 2 Battery × 2 (AAA, R03, UM4) Mounting template Double-sided tape (2 pieces) Non-skid pad (2 pieces) Screw × 6 Cover Owner's manual UA Front Surround System (CENTER SYSTEM + SUBWOOFER/SYSTEM CONTROL) YAS-71 (YAS-71CU + YAS-71SPX) OWNER'S MANUAL 2 En
Owner's Manual
Page 20
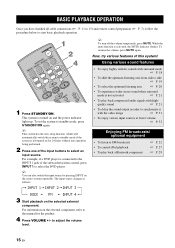
..., refer to select an input source. For information on for 24 hours without any operation being performed. 2 Press one of the input buttons to the manual for the product. 4 Press VOLUME +/- To set the system to side ☞ P. 19 • To select the optimum listening area ☞ P. 20 •...; To experience wider stereo sound when surround mode is connected to the INPUT 1 jack of this system! The input source changes as follows: • To enjoy highly realistic sounds with...
..., refer to select an input source. For information on for 24 hours without any operation being performed. 2 Press one of the input buttons to the manual for the product. 4 Press VOLUME +/- To set the system to side ☞ P. 19 • To select the optimum listening area ☞ P. 20 •...; To experience wider stereo sound when surround mode is connected to the INPUT 1 jack of this system! The input source changes as follows: • To enjoy highly realistic sounds with...
Owner's Manual
Page 26
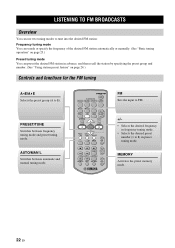
.... MEMORY Activates the preset memory mode. 22 En AUTO/MAN'L Switches between frequency tuning mode and preset tuning mode. PRESET/TUNE Switches between automatic and manual tuning mode. +/- • Selects the desired frequency in frequency tuning mode. • Selects the desired preset number (1 to 8) in advance, and ... the desired FM station: Frequency tuning mode You can search or specify the frequency of the desired FM station automatically or manually. (See "Basic tuning operation" on page 24.) Controls and functions for the FM tuning A _ E/A ` E Selects the preset group (A to...
.... MEMORY Activates the preset memory mode. 22 En AUTO/MAN'L Switches between frequency tuning mode and preset tuning mode. PRESET/TUNE Switches between automatic and manual tuning mode. +/- • Selects the desired frequency in frequency tuning mode. • Selects the desired preset number (1 to 8) in advance, and ... the desired FM station: Frequency tuning mode You can search or specify the frequency of the desired FM station automatically or manually. (See "Basic tuning operation" on page 24.) Controls and functions for the FM tuning A _ E/A ` E Selects the preset group (A to...

Owner's Manual
Page 27
...increase signal quality. 1 Press FM to set the input to FM. The STEREO indicator appears in the front panel display. repeatedly to switch Auto/Manual. "FM" appears in the front panel display. 23 En English OTHER FUNCTIONS 2 Press AUTO/MAN'L to specify the frequency of the received .... Lights up when the system is tuned to preset tuning mode. (☞ P. 24) 3 Press +/- Basic tuning operation LISTENING TO FM BROADCASTS Manual tuning If the signal received from the station you want to automatic tuning mode. The AUTO indicator lights up y When you tune to begin automatic...
...increase signal quality. 1 Press FM to set the input to FM. The STEREO indicator appears in the front panel display. repeatedly to switch Auto/Manual. "FM" appears in the front panel display. 23 En English OTHER FUNCTIONS 2 Press AUTO/MAN'L to specify the frequency of the received .... Lights up when the system is tuned to preset tuning mode. (☞ P. 24) 3 Press +/- Basic tuning operation LISTENING TO FM BROADCASTS Manual tuning If the signal received from the station you want to automatic tuning mode. The AUTO indicator lights up y When you tune to begin automatic...
Owner's Manual
Page 28
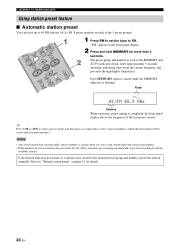
... to cancel while the MEMORY indicator is not stored to the desired preset group and number, preset the station manually. If the desired station is not stored, or a station is flashing. Refer to "Manual station preset" on page 25 for more than 3 seconds. After approximately 5 seconds, automatic presetting starts from the current...
... to cancel while the MEMORY indicator is not stored to the desired preset group and number, preset the station manually. If the desired station is not stored, or a station is flashing. Refer to "Manual station preset" on page 25 for more than 3 seconds. After approximately 5 seconds, automatic presetting starts from the current...
Owner's Manual
Page 29
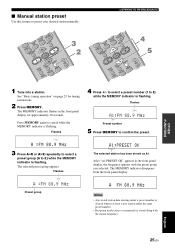
... to confirm the preset. 3 Press A_E or A`E repeatedly to select a preset group (A to 8) while the MEMORY indicator is flashing. ■ Manual station preset Use this feature to cancel while the MEMORY indicator is stored along with the preset group you store a new station under the same... flashes in the front panel display, the frequency appears with the station frequency. 25 En English Press MEMORY again to preset your desired station manually. See "Basic tuning operation" on page 23 for approximately 30 seconds. Flashes 4 Press +/- After "A1:PRESET OK" appears in the...
... to confirm the preset. 3 Press A_E or A`E repeatedly to select a preset group (A to 8) while the MEMORY indicator is flashing. ■ Manual station preset Use this feature to cancel while the MEMORY indicator is stored along with the preset group you store a new station under the same... flashes in the front panel display, the frequency appears with the station frequency. 25 En English Press MEMORY again to preset your desired station manually. See "Basic tuning operation" on page 23 for approximately 30 seconds. Flashes 4 Press +/- After "A1:PRESET OK" appears in the...
Owner's Manual
Page 32
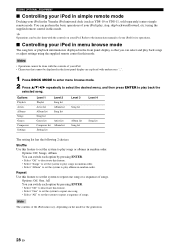
... repeatedly to select the desired menu, and then press ENTER to play , stop, skip backward/forward, etc.) using the supplied remote control in the Yamaha iPod universal dock (such as YDS-10 or YDS-11, sold separately) enters simple remote mode. y Operations can switch each option by pressing ENTER. ... or albums in random order. Shuffle Use this feature to set the system to play albums in random order. Refer to the instruction manuals of the iPod menu vary, depending on your iPod. USING OPTIONAL EQUIPMENT ■ Controlling your iPod in simple remote mode Docking your ...
... repeatedly to select the desired menu, and then press ENTER to play , stop, skip backward/forward, etc.) using the supplied remote control in the Yamaha iPod universal dock (such as YDS-10 or YDS-11, sold separately) enters simple remote mode. y Operations can switch each option by pressing ENTER. ... or albums in random order. Shuffle Use this feature to set the system to play albums in random order. Refer to the instruction manuals of the iPod menu vary, depending on your iPod. USING OPTIONAL EQUIPMENT ■ Controlling your iPod in simple remote mode Docking your ...
Owner's Manual
Page 33
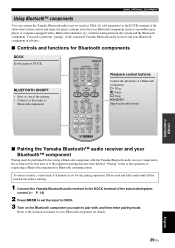
... a Bluetooth component for the first time or if the registered pairing data has been deleted. "Pairing" refers to the instruction manual of the subwoofer/system control and enjoy the music contents stored in advance. ■ Controls and functions for the pairing operation.... USING OPTIONAL EQUIPMENT Using Bluetooth™ components You can connect the Yamaha Bluetooth audio receiver (such as a portable music player or computer equipped with , and then enter pairing mode. Refer to the operation of...
... a Bluetooth component for the first time or if the registered pairing data has been deleted. "Pairing" refers to the instruction manual of the subwoofer/system control and enjoy the music contents stored in advance. ■ Controls and functions for the pairing operation.... USING OPTIONAL EQUIPMENT Using Bluetooth™ components You can connect the Yamaha Bluetooth audio receiver (such as a portable music player or computer equipped with , and then enter pairing mode. Refer to the operation of...
Owner's Manual
Page 34
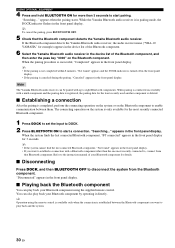
...want to establish a connection with a Bluetooth component other than 3 seconds to disconnect the system from that the Bluetooth component detects the Yamaha Bluetooth audio receiver. The connecting operation on the Bluetooth component. When the system finds the last connected Bluetooth component, "BT connected" appears... • If the pairing is established between them. appears in the front panel display for 3 seconds. Refer to the instruction manual of the Bluetooth component, and then enter the pass key "0000" on the system is completed, perform the connecting operation on ...
...want to establish a connection with a Bluetooth component other than 3 seconds to disconnect the system from that the Bluetooth component detects the Yamaha Bluetooth audio receiver. The connecting operation on the Bluetooth component. When the system finds the last connected Bluetooth component, "BT connected" appears... • If the pairing is established between them. appears in the front panel display for 3 seconds. Refer to the instruction manual of the Bluetooth component, and then enter the pass key "0000" on the system is completed, perform the connecting operation on ...
Owner's Manual
Page 39
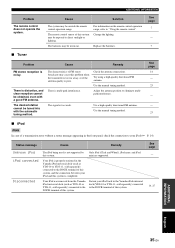
...9632; Tuner Problem Cause Remedy FM stereo reception is too weak. Use the manual tuning method. See page 14 - 23 - - 23 ■ iPod Note In case of this system. Your iPod was removed from the Yamaha iPod universal dock (such as YDS-10 or YDS-11, sold separately) ...Station your iPod (☞ P. 14). There is distortion, and clear reception cannot be outside the remote control operation range. Use the manual tuning method. See page - 14, 27 ADDITIONAL INFORMATION English 35 En ADDITIONAL INFORMATION Cause Solution The system may cause this system. Problem ...
...9632; Tuner Problem Cause Remedy FM stereo reception is too weak. Use the manual tuning method. See page 14 - 23 - - 23 ■ iPod Note In case of this system. Your iPod was removed from the Yamaha iPod universal dock (such as YDS-10 or YDS-11, sold separately) ...Station your iPod (☞ P. 14). There is distortion, and clear reception cannot be outside the remote control operation range. Use the manual tuning method. See page - 14, 27 ADDITIONAL INFORMATION English 35 En ADDITIONAL INFORMATION Cause Solution The system may cause this system. Problem ...


