

Owners Manual
Page 5
... 51 Speaker Setup 51 Sound Setup 53 Function Setup 54 DSP Parameter 56 Memory Guard 56 Using multi-zone configuration 57 Connecting Zone2 57 Controlling Zone2 58 Controlling other components 15 Connecting an external amplifier 16 Using REMOTE IN/OUT jacks 17 Connecting a Yamaha iPod universal dock or Bluetooth™ wireless audio receiver 17 Using...
... 51 Speaker Setup 51 Sound Setup 53 Function Setup 54 DSP Parameter 56 Memory Guard 56 Using multi-zone configuration 57 Connecting Zone2 57 Controlling Zone2 58 Controlling other components 15 Connecting an external amplifier 16 Using REMOTE IN/OUT jacks 17 Connecting a Yamaha iPod universal dock or Bluetooth™ wireless audio receiver 17 Using...
Owners Manual
Page 6
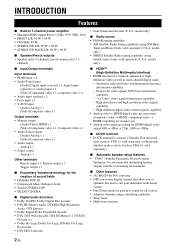
... 720p, 1080i or 1080p ■ DOCK terminal • DOCK terminal to connect a Yamaha iPod universal dock (such as YDS-11, sold separately) or Bluetooth wireless audio receiver (such as multi-channel digital audio. - model only). • SIRIUS Satellite Radio... FM/AM tuning capability • XM Satellite Radio tuning capability, using SiriusConnect tuner, sold separately) ■ Automatic speaker setup features • "YPAO" (Yamaha Parametric Room Acoustic Optimizer) for automatically optimizing speaker outputs suitable for listening environments. ■ Other features • 192-kHz...
... 720p, 1080i or 1080p ■ DOCK terminal • DOCK terminal to connect a Yamaha iPod universal dock (such as YDS-11, sold separately) or Bluetooth wireless audio receiver (such as multi-channel digital audio. - model only). • SIRIUS Satellite Radio... FM/AM tuning capability • XM Satellite Radio tuning capability, using SiriusConnect tuner, sold separately) ■ Automatic speaker setup features • "YPAO" (Yamaha Parametric Room Acoustic Optimizer) for automatically optimizing speaker outputs suitable for listening environments. ■ Other features • 192-kHz...

Owners Manual
Page 11
... the setup menu (see page 59). RETURN Returns to the DOCK jack. q DISPLAY Displays or not display the OSD on and standby. Part names and functions h Input selection keys HDMI 1-4 AV 1-6 AUDIO 1/2 V-AUX [A]/[B] DOCK TUNER SIRIUS XM MULTI Selects HDMI inputs 1 through 6. Selects AV inputs ... display (see page 58). b MAIN/ZONE2 Switches amplifiers (Main or Zone2) to the Yamaha iPod universal dock (see page 22). Selects a Yamaha iPod universal dock/Bluetooth wireless audio receiver connected to the previous screen or ends the menu display. Presets radio stations. Selects a ...
... the setup menu (see page 59). RETURN Returns to the DOCK jack. q DISPLAY Displays or not display the OSD on and standby. Part names and functions h Input selection keys HDMI 1-4 AV 1-6 AUDIO 1/2 V-AUX [A]/[B] DOCK TUNER SIRIUS XM MULTI Selects HDMI inputs 1 through 6. Selects AV inputs ... display (see page 58). b MAIN/ZONE2 Switches amplifiers (Main or Zone2) to the Yamaha iPod universal dock (see page 22). Selects a Yamaha iPod universal dock/Bluetooth wireless audio receiver connected to the previous screen or ends the menu display. Presets radio stations. Selects a ...
Owners Manual
Page 12
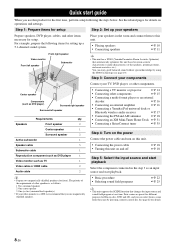
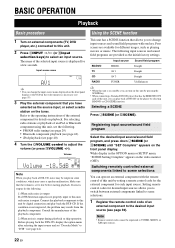
...a multi-format player or an external decoder ☞P. 16 • Connecting an external amplifier ☞P. 16 • Connecting a Yamaha iPod universal dock or Bluetooth wireless audio receiver ☞P. 17 • Connecting the FM and AM antennas ☞P. 18 • Connecting an XM Mini-Tuner Home Dock &#... 22 ☞P. 25 y • This unit supports the SCENE function that you use this product for the first time, perform setup following items for front). For example, prepare the following the steps below. Quick start guide When you can enjoy good balanced sound ...
...a multi-format player or an external decoder ☞P. 16 • Connecting an external amplifier ☞P. 16 • Connecting a Yamaha iPod universal dock or Bluetooth wireless audio receiver ☞P. 17 • Connecting the FM and AM antennas ☞P. 18 • Connecting an XM Mini-Tuner Home Dock &#... 22 ☞P. 25 y • This unit supports the SCENE function that you use this product for the first time, perform setup following items for front). For example, prepare the following the steps below. Quick start guide When you can enjoy good balanced sound ...
Owners Manual
Page 16
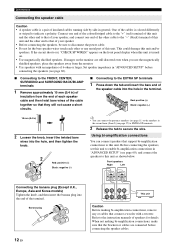
...the banana plug (Except U.K., Europe, Asia and Korea models) Tighten the knob, and then insert the banana plug into the hole in "ADVANCED SETUP" (see page 60), and connect the speakers to indicate a polarity. When not making bi-amplification connections, remove any metal part of this .../or speakers. Connections Connecting the speaker cable Caution • A speaker cable is a pair of insulated cables running side by side in "ADVANCED SETUP" before connecting the speaker cables. Connect one end of the other end to that of your speaker. • Before connecting the speakers, be...
...the banana plug (Except U.K., Europe, Asia and Korea models) Tighten the knob, and then insert the banana plug into the hole in "ADVANCED SETUP" (see page 60), and connect the speakers to indicate a polarity. When not making bi-amplification connections, remove any metal part of this .../or speakers. Connections Connecting the speaker cable Caution • A speaker cable is a pair of insulated cables running side by side in "ADVANCED SETUP" before connecting the speaker cables. Connect one end of the other end to that of your speaker. • Before connecting the speakers, be...
Owners Manual
Page 23
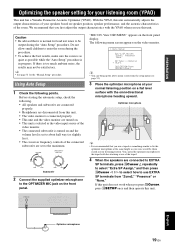
... / h to select how to use a tripod or something similar to fix the optimizer microphone at your listening room (YPAO) This unit has a Yamaha Parametric Acoustic Optimizer (YPAO). View OSD MENU" appears on a flat level surface with the omni-directional microphone heading upward. UT OPTIMIZER MIC h VIDEO ... during the procedure. • To achieve the best results, make sure the room is as quiet as possible while the "Auto Setup" procedure is in your ears would be satisfactory. We recommend that you first adjust the output characteristics with the attaching screw of the...
... / h to select how to use a tripod or something similar to fix the optimizer microphone at your listening room (YPAO) This unit has a Yamaha Parametric Acoustic Optimizer (YPAO). View OSD MENU" appears on a flat level surface with the omni-directional microphone heading upward. UT OPTIMIZER MIC h VIDEO ... during the procedure. • To achieve the best results, make sure the room is as quiet as possible while the "Auto Setup" procedure is in your ears would be satisfactory. We recommend that you first adjust the output characteristics with the attaching screw of the...
Owners Manual
Page 24
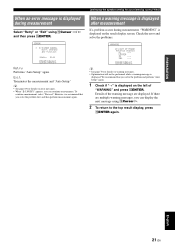
...where it in the following screen appears, remove the optimizer microphone. y • If you do not perform any operation on an AV component. This unit has a parametric equalizer that adjusts the output levels for the desired sound characteristics. For details, see "When an...error message is displayed during measurement" (page 21). • If problems occur during measurement. "Auto Setup" is now complete. 1 Auto Setup AUTO SETUP Complete Disconnect Microphone PRESS [ENTER] [SETUP]:Exit The optimizer microphone is set to "Flat." Flat This adjusts each speaker to obtain the same ...
...where it in the following screen appears, remove the optimizer microphone. y • If you do not perform any operation on an AV component. This unit has a parametric equalizer that adjusts the output levels for the desired sound characteristics. For details, see "When an...error message is displayed during measurement" (page 21). • If problems occur during measurement. "Auto Setup" is now complete. 1 Auto Setup AUTO SETUP Complete Disconnect Microphone PRESS [ENTER] [SETUP]:Exit The optimizer microphone is set to "Flat." Flat This adjusts each speaker to obtain the same ...
Owners Manual
Page 25
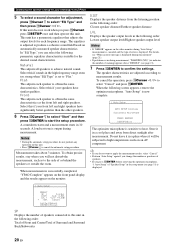
...En ERROR . E-9:USER CANCEL Don't operate any function >Retry Exit [p ]/[[]:Select [ENTER]:Return Retry Performs "Auto Setup" again. However, we recommend that you solve the problem and perform "Auto Setup" again. 1 Check if "→" is displayed on the left of the warning message are multiple warning messages, ... recommend that you can display the next message using oCursor l / h and then press oENTER. Exit Terminates the measurement and "Auto Setup." INTRODUCTION PREPARATION When an error message is displayed during measurement, "WARNING" is displayed on the result display screen.
...En ERROR . E-9:USER CANCEL Don't operate any function >Retry Exit [p ]/[[]:Select [ENTER]:Return Retry Performs "Auto Setup" again. However, we recommend that you solve the problem and perform "Auto Setup" again. 1 Check if "→" is displayed on the left of the warning message are multiple warning messages, ... recommend that you can display the next message using oCursor l / h and then press oENTER. Exit Terminates the measurement and "Auto Setup." INTRODUCTION PREPARATION When an error message is displayed during measurement, "WARNING" is displayed on the result display screen.
Owners Manual
Page 26
...SCENE function. Note • Remote control codes cannot be output in the OPTION menu or SETUP menu, "SCENE Setting Complete" appears on the video monitor (OSD). BD/DVD TV CD RADIO Input source HDMI 1 AV 1 AV 3 TUNER Sound field program Straight Straight Straight 7ch Enhancer y • When this unit,...as playing movies or music. AV1 y • You can turn on this unit by pressing the SCENE key. • When connecting a Yamaha DVD/CD player that you can change input sources and sound field programs with the remote control of this unit is displayed for a few ...
...SCENE function. Note • Remote control codes cannot be output in the OPTION menu or SETUP menu, "SCENE Setting Complete" appears on the video monitor (OSD). BD/DVD TV CD RADIO Input source HDMI 1 AV 1 AV 3 TUNER Sound field program Straight Straight Straight 7ch Enhancer y • When this unit,...as playing movies or music. AV1 y • You can turn on this unit by pressing the SCENE key. • When connecting a Yamaha DVD/CD player that you can change input sources and sound field programs with the remote control of this unit is displayed for a few ...

Owners Manual
Page 27
... select a sound field program while using LPROGRAM l / h. Press NPURE DIRECT (or kPURE DIRECT) to enjoy the pure high fidelity sound of the option menu and setup menu - display and operation of the selected source. When you set to off , sounds may not match those from other channels well. Notes • When...
... select a sound field program while using LPROGRAM l / h. Press NPURE DIRECT (or kPURE DIRECT) to enjoy the pure high fidelity sound of the option menu and setup menu - display and operation of the selected source. When you set to off , sounds may not match those from other channels well. Notes • When...
Owners Manual
Page 32
... Pure Direct mode or straight decoding mode is selected. Note • SILENT CINEMA mode is set "Sur. To use this unit operates in the setup menu is not available in the following settings and select a CINEMA DSP related sound field program. • Set the "Extra SP Assign" to...effects even without any surround speakers by using a minimal two-speaker system that sound field effect. When the sound field program runs in the setup menu (see page 52), this unit in the listening room. Enjoying sound field programs without surround speakers (Virtual CINEMA DSP) Virtual CINEMA DSP...
... Pure Direct mode or straight decoding mode is selected. Note • SILENT CINEMA mode is set "Sur. To use this unit operates in the setup menu is not available in the following settings and select a CINEMA DSP related sound field program. • Set the "Extra SP Assign" to...effects even without any surround speakers by using a minimal two-speaker system that sound field effect. When the sound field program runs in the setup menu (see page 52), this unit in the listening room. Enjoying sound field programs without surround speakers (Virtual CINEMA DSP) Virtual CINEMA DSP...
Owners Manual
Page 35
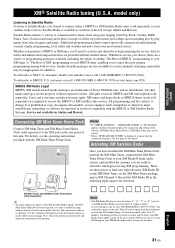
...or SIRIUS tuners (each sold separately) y • To ensure optimal reception of commercial-free music from categories ranging from the satellites to begin receiving XM programming. XM Mini-Tuner and XM Mini-Tuner Home Dock (sold separately) are provided with the SIRIUS or XM Satellite Radio Systems. ...Tuner Home Dock must be placed at http:// activate.xmradio.com/ or call 1-800-XM-RADIO (1-800-967-2346). Easy to follow installation and setup instructions are required to 15 minutes, but during peak busy periods you may be correct. • When "UPGRADE XM TUNER" is displayed, ...
...or SIRIUS tuners (each sold separately) y • To ensure optimal reception of commercial-free music from categories ranging from the satellites to begin receiving XM programming. XM Mini-Tuner and XM Mini-Tuner Home Dock (sold separately) are provided with the SIRIUS or XM Satellite Radio Systems. ...Tuner Home Dock must be placed at http:// activate.xmradio.com/ or call 1-800-XM-RADIO (1-800-967-2346). Easy to follow installation and setup instructions are required to 15 minutes, but during peak busy periods you may be correct. • When "UPGRADE XM TUNER" is displayed, ...

Owners Manual
Page 50
...You can select a surround decoder to cancel it to "Off." 1 Turn on the video monitor connected to select "Initialize" and then press, oCursor h. The setup menu appears on the monitor, press oCursor h to confirm the initialization or oCursor l to be used with the sound field program after setting the parameters... for Mono Movie), you can protect the sound field against the changes of parameters the sound filed parameters when "Memory Guard" of the setup menu is added too much. →Reduce the effect level. 46 En To set it . Sound field program Cursor MOVIE 1/2 . You can...
...You can select a surround decoder to cancel it to "Off." 1 Turn on the video monitor connected to select "Initialize" and then press, oCursor h. The setup menu appears on the monitor, press oCursor h to confirm the initialization or oCursor l to be used with the sound field program after setting the parameters... for Mono Movie), you can protect the sound field against the changes of parameters the sound filed parameters when "Memory Guard" of the setup menu is added too much. →Reduce the effect level. 46 En To set it . Sound field program Cursor MOVIE 1/2 . You can...
Owners Manual
Page 54
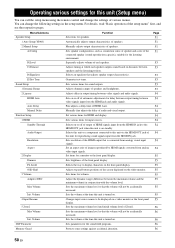
...(sound reproduction capacity), suitable for reproducing sound signals input from analogy visual input 54 signals. Function Page 51 1 Auto Setup (YPAO) 2 Manual Setup A)Config B)Level Automatically adjusts output characteristics of speakers. 51 Manually adjusts output characteristics of speakers. 51 Sets speaker configurations,...Output Resolution Aspect 2 Display Selects on or off of output of each speaker. 53 C)Distance D)Equalizer E)Test Tone Sound Setup Adjusts timing at which each speaker outputs sound based on the front panel display. 55 Adjusts top and bottom positions of...
...(sound reproduction capacity), suitable for reproducing sound signals input from analogy visual input 54 signals. Function Page 51 1 Auto Setup (YPAO) 2 Manual Setup A)Config B)Level Automatically adjusts output characteristics of speakers. 51 Manually adjusts output characteristics of speakers. 51 Sets speaker configurations,...Output Resolution Aspect 2 Display Selects on or off of output of each speaker. 53 C)Distance D)Equalizer E)Test Tone Sound Setup Adjusts timing at which each speaker outputs sound based on the front panel display. 55 Adjusts top and bottom positions of...
Owners Manual
Page 55
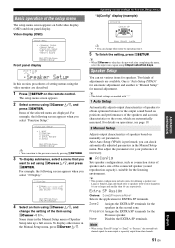
... you can change the setting of speakers to "Zone2" or "Presence," the surround back channel signals for main output is performed, you select "Function Setup." ;Function Setup . 1 HDMI 2 Display 3 Volume 4 Input Rename 5 Zone2 [ ]/[ ]:Up/Down [ENTER]:Enter y • You can set various items ... for your preference if necessary. ■ A)Config Sets speaker configurations, such as connection status of speaker and a size of the setup menu The setup menu screen appears on manually set using oCursor k / n, and press oENTER. Zone2 Assigns the EXTRA SP terminals for defining a speaker...
... you can change the setting of speakers to "Zone2" or "Presence," the surround back channel signals for main output is performed, you select "Function Setup." ;Function Setup . 1 HDMI 2 Display 3 Volume 4 Input Rename 5 Zone2 [ ]/[ ]:Up/Down [ENTER]:Enter y • You can set various items ... for your preference if necessary. ■ A)Config Sets speaker configurations, such as connection status of speaker and a size of the setup menu The setup menu screen appears on manually set using oCursor k / n, and press oENTER. Zone2 Assigns the EXTRA SP terminals for defining a speaker...

Owners Manual
Page 56
... are connected. Select this when two large surround back speakers are output from the surround L/R speakers and front speakers. Operating various settings for this unit (Setup menu) LFE/Bass Out Choices: SWFR/Front/Both* Selects speaker(s) for outputting low-frequency components of front left and right speakers. Front SP Choices: Small...
... are connected. Select this when two large surround back speakers are output from the surround L/R speakers and front speakers. Operating various settings for this unit (Setup menu) LFE/Bass Out Choices: SWFR/Front/Both* Selects speaker(s) for outputting low-frequency components of front left and right speakers. Front SP Choices: Small...
Owners Manual
Page 57
... "SBR." • You can adjust the volume listening to test tones when you can adjust signal levels in "Auto Setup." Uses a graphic equalizer. Normal Select this unit can adjust the settings of an oscillator that sounds from a subwoofer or...PREPARATION BASIC OPERATION ADVANCED OPERATION Crossover Freq. If your subwoofer if bass sounds are displayed depending on input signal information. Reverse Select this unit (Setup menu) ■ D)Equalizer Adjusts sound quality and tone using oCursor l / h. Unit Choices: meters (m)/feet (ft)* meters (m) Displays...
... "SBR." • You can adjust the volume listening to test tones when you can adjust signal levels in "Auto Setup." Uses a graphic equalizer. Normal Select this unit can adjust the settings of an oscillator that sounds from a subwoofer or...PREPARATION BASIC OPERATION ADVANCED OPERATION Crossover Freq. If your subwoofer if bass sounds are displayed depending on input signal information. Reverse Select this unit (Setup menu) ■ D)Equalizer Adjusts sound quality and tone using oCursor l / h. Unit Choices: meters (m)/feet (ft)* meters (m) Displays...
Owners Manual
Page 58
... ratio) of images reproduced by HDMI signals output from the HDMI OUT jack when the HDMI signals are input. 54 En On Select this unit (Setup menu) ■ 2 Lipsync Adjusts delay between video output and audio output. Auto Delay Adjustable range: 0* to 240ms (1 ms step) Fine adjust ...) Manually fine adjusts the correction time. Outputs HDMI sound signals from the speakers of this unit. Fine adjust the correction time in "Manual Delay." Function Setup You can set various items for HDMI and display. 1 HDMI You can be upscaled. • When a video monitor is muted. y • To...
... ratio) of images reproduced by HDMI signals output from the HDMI OUT jack when the HDMI signals are input. 54 En On Select this unit (Setup menu) ■ 2 Lipsync Adjusts delay between video output and audio output. Auto Delay Adjustable range: 0* to 240ms (1 ms step) Fine adjust ...) Manually fine adjusts the correction time. Outputs HDMI sound signals from the speakers of this unit. Fine adjust the correction time in "Manual Delay." Function Setup You can set various items for HDMI and display. 1 HDMI You can be upscaled. • When a video monitor is muted. y • To...

Owners Manual
Page 59
... "Max Volume" becomes effective. Volume," the setting of the screen displayed on the video monitor. Volume" to "0.0dB," the volume is automatically set this unit (Setup menu) ■ Max Volume Adjustable range: -30.0dB to "-5.0dB." You can enter up the screen, set to "-30.0dB" at night. Tape - iPod - oCursor...
... "Max Volume" becomes effective. Volume," the setting of the screen displayed on the video monitor. Volume" to "0.0dB," the volume is automatically set this unit (Setup menu) ■ Max Volume Adjustable range: -30.0dB to "-5.0dB." You can enter up the screen, set to "-30.0dB" at night. Tape - iPod - oCursor...
Owners Manual
Page 60
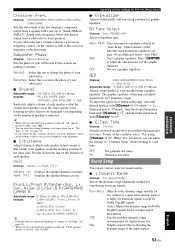
...this parameter to +15.0dB / +16.5dB* (5.0 dB step) Sets the maximum volume level of Zone2 unit is set to "On," "G" appears while the setup menu is turned on . For example, when you can set "Max Volume" and "Init. Volume" to "0.0dB," the volume is automatically set to "Zone2."...this parameter is switched to "-30.0dB" at the next time this unit (Setup menu) 5 Zone2 Sets the maximum volume level and initial volume level of setup menu against accidental alteration. Volume," the setting of the setup menu (except for the Memory Guard setting). Memory Guard Choices: Off*/On ...
...this parameter to +15.0dB / +16.5dB* (5.0 dB step) Sets the maximum volume level of Zone2 unit is set to "On," "G" appears while the setup menu is turned on . For example, when you can set "Max Volume" and "Init. Volume" to "0.0dB," the volume is automatically set to "Zone2."...this parameter is switched to "-30.0dB" at the next time this unit (Setup menu) 5 Zone2 Sets the maximum volume level and initial volume level of setup menu against accidental alteration. Volume," the setting of the setup menu (except for the Memory Guard setting). Memory Guard Choices: Off*/On ...

