

Owner's Manual
Page 3
Den indbyggede netdel er derfor tilsluttet til lysnettet så længe netstikket sidder i stikkontakten. Den inbyggda nätdelen är därför ansluten till elnätet så länge stickproppen sitter i vägguttaget. Laite ei saa olla alttiina tippu-ja roiskevedelle. VARO! The wire which is coloured BROWN must be destroyed, as follows: The wire which is coloured BLUE must be connected to the terminal which is connected to the earth terminal of this appliance, it should be connected to the instructions described below. DK Advarsel: Usynlig ...
Den indbyggede netdel er derfor tilsluttet til lysnettet så længe netstikket sidder i stikkontakten. Den inbyggda nätdelen är därför ansluten till elnätet så länge stickproppen sitter i vägguttaget. Laite ei saa olla alttiina tippu-ja roiskevedelle. VARO! The wire which is coloured BROWN must be destroyed, as follows: The wire which is coloured BLUE must be connected to the terminal which is connected to the earth terminal of this appliance, it should be connected to the instructions described below. DK Advarsel: Usynlig ...
Owner's Manual
Page 4
...a qualified service person should be opened for any service is dangerous and may cause damage and/or discoloration on switches, knobs and/or cords. 10 When disconnecting the power cable from a wall outlet or this unit during a lightning storm. 14 Do not attempt to modify or fix this unit.... do not place: - It may cause fire, damage to the wall outlet, even if this unit, and/or personal injury. Contact qualified Yamaha service personnel when any damage resulting from use this device. When this unit is plugged into inside this unit rises, it is connected to this...
...a qualified service person should be opened for any service is dangerous and may cause damage and/or discoloration on switches, knobs and/or cords. 10 When disconnecting the power cable from a wall outlet or this unit during a lightning storm. 14 Do not attempt to modify or fix this unit.... do not place: - It may cause fire, damage to the wall outlet, even if this unit, and/or personal injury. Contact qualified Yamaha service personnel when any damage resulting from use this device. When this unit is plugged into inside this unit rises, it is connected to this...
Owner's Manual
Page 5
... 6 Turning on the power 6 Adjusting the clock 7 OPERATION Basic operation 8 Selecting the input source 8 Adjusting the volume level 8 Adjusting sounds 9 Useful operations for the display 10 Listening to CDs, MP3/WMA files, and external sources 11 Listening to CDs 11 Listening to MP3/WMA files stored on your USB device 12...
... 6 Turning on the power 6 Adjusting the clock 7 OPERATION Basic operation 8 Selecting the input source 8 Adjusting the volume level 8 Adjusting sounds 9 Useful operations for the display 10 Listening to CDs, MP3/WMA files, and external sources 11 Listening to CDs 11 Listening to MP3/WMA files stored on your USB device 12...
Owner's Manual
Page 6
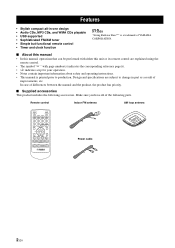
...; USB supported • Sophisticated FM/AM tuner • Simple but functional remote control • Timer and clock function "Swing Radiator Bass™" is a trademark of YAMAHA CORPORATION. ■ About this manual • In this manual, operations that can be performed with either this unit or its remote control are subject to...
...; USB supported • Sophisticated FM/AM tuner • Simple but functional remote control • Timer and clock function "Swing Radiator Bass™" is a trademark of YAMAHA CORPORATION. ■ About this manual • In this manual, operations that can be performed with either this unit or its remote control are subject to...
Owner's Manual
Page 7
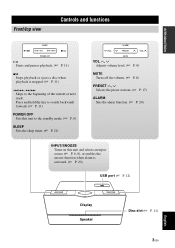
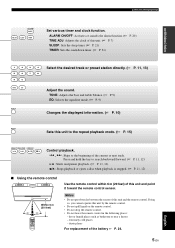
Press and hold the key to search backward/ forward. (☞ P. 11) POWER OFF Sets this unit to the standby mode. (☞ P. 6) SLEEP Sets the sleep timer. (☞ P. 21) ALARM VOL PRESET VOL MUTE VOL u, d Adjusts volume level. (☞ P. 8) MUTE Turns off the volume. (☞ P. 8) PRESET u, d Selects the preset stations. (☞ P. 17) ALARM Sets the alarm function. (☞ P. 20) INPUT/SNOOZE Turns on this unit and selects an input source (☞ P. 6, 8), or enables the snooze function when alarm is stopped. (☞ P. 11) 4/1 , ¡/¢ Skips to the beginning of ...
Press and hold the key to search backward/ forward. (☞ P. 11) POWER OFF Sets this unit to the standby mode. (☞ P. 6) SLEEP Sets the sleep timer. (☞ P. 21) ALARM VOL PRESET VOL MUTE VOL u, d Adjusts volume level. (☞ P. 8) MUTE Turns off the volume. (☞ P. 8) PRESET u, d Selects the preset stations. (☞ P. 17) ALARM Sets the alarm function. (☞ P. 20) INPUT/SNOOZE Turns on this unit and selects an input source (☞ P. 6, 8), or enables the snooze function when alarm is stopped. (☞ P. 11) 4/1 , ¡/¢ Skips to the beginning of ...

Owner's Manual
Page 8
... Remove the insulation sheet before using the remote control. Controls and functions Remote control STANDBY/ON Turns on the rear panel of the display. (☞ P. 10) TIME/INFO Displays the disc/USB information. (☞ P. 14) Cursor (S/T/W/X) and ENTER RANDOM Sets this unit. (☞ P. 15) Press USB to listen to the source...
... Remove the insulation sheet before using the remote control. Controls and functions Remote control STANDBY/ON Turns on the rear panel of the display. (☞ P. 10) TIME/INFO Displays the disc/USB information. (☞ P. 14) Cursor (S/T/W/X) and ENTER RANDOM Sets this unit. (☞ P. 15) Press USB to listen to the source...
Owner's Manual
Page 9
... the current or next track. TONE: Adjusts the bass and treble balance. (☞ P. 9) EQ: Selects the equalizer mode. (☞ P. 9) DISPLAY Changes the displayed information. (☞ P. 10) REPEAT Sets this unit by the remote control. • Do not spill liquid on the remote control. • Do not drop the remote control. •...
... the current or next track. TONE: Adjusts the bass and treble balance. (☞ P. 9) EQ: Selects the equalizer mode. (☞ P. 9) DISPLAY Changes the displayed information. (☞ P. 10) REPEAT Sets this unit by the remote control. • Do not spill liquid on the remote control. • Do not drop the remote control. •...
Owner's Manual
Page 10
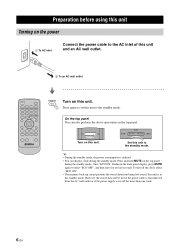
POWER OFF Set this unit. Once "ECO ON" flashes in the standby mode. To turn off the clock, select "ECO ON". • The memory back-up circuit prevents the stored data from the AC wall outlet or if the power supply is cut off for several seconds. PREPARATION BEFORE USING THIS UNIT Preparation before using this unit Turning on the power 1 To AC inlet Connect the power cable to the AC inlet of this unit and an AC wall outlet. 2 To an AC wall outlet STANDBY/ON STANDBY/ON Turn on this unit to the standby mode. SLEEP INPUT/SNOOZE Turn on this unit to set this unit. However, ...
POWER OFF Set this unit. Once "ECO ON" flashes in the standby mode. To turn off the clock, select "ECO ON". • The memory back-up circuit prevents the stored data from the AC wall outlet or if the power supply is cut off for several seconds. PREPARATION BEFORE USING THIS UNIT Preparation before using this unit Turning on the power 1 To AC inlet Connect the power cable to the AC inlet of this unit and an AC wall outlet. 2 To an AC wall outlet STANDBY/ON STANDBY/ON Turn on this unit to the standby mode. SLEEP INPUT/SNOOZE Turn on this unit to set this unit. However, ...
Owner's Manual
Page 11
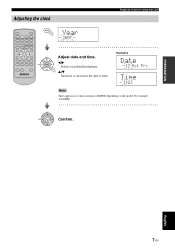
PREPARATION Adjusting the clock Preparation before using this unit TIME ADJ Year TIME ADJ 2007 PRESET TUNE ENTER PRESET TUNE ENTER Adjust date and time. W/X Selects year/date/hour/minute. Examples Date 12 Oct Fri Time 1:23 Note Time appears in 12-hour notation (AM/PM) depending on the model. For example, "04:00PM". PRESET TUNE ENTER Confirm. English 7 En S/T Increases or decreases the date or time.
PREPARATION Adjusting the clock Preparation before using this unit TIME ADJ Year TIME ADJ 2007 PRESET TUNE ENTER PRESET TUNE ENTER Adjust date and time. W/X Selects year/date/hour/minute. Examples Date 12 Oct Fri Time 1:23 Note Time appears in 12-hour notation (AM/PM) depending on the model. For example, "04:00PM". PRESET TUNE ENTER Confirm. English 7 En S/T Increases or decreases the date or time.
Owner's Manual
Page 12
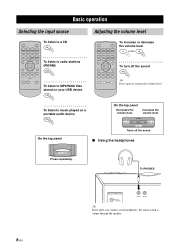
On the top panel ■ Using the headphones INPUT/SNOOZE Press repeatedly. ALARM VOL PRESET VOL MUTE Turns off the sound MUTE y Press again to resume the volume level. To listen to music played on your headphones, the alarm sound is output through the speaker. 8 En Increases the volume level. To PHONES TUNER FM ANT 75 UNBAL. PHONES PORTABLE y Even when you connect your USB device USB MUTE VOLUME To turn off the sound. Basic operation Basic operation Selecting the input source To listen to a CD CD Adjusting the volume level To increase or decrease the ...
On the top panel ■ Using the headphones INPUT/SNOOZE Press repeatedly. ALARM VOL PRESET VOL MUTE Turns off the sound MUTE y Press again to resume the volume level. To listen to music played on your headphones, the alarm sound is output through the speaker. 8 En Increases the volume level. To PHONES TUNER FM ANT 75 UNBAL. PHONES PORTABLE y Even when you connect your USB device USB MUTE VOLUME To turn off the sound. Basic operation Basic operation Selecting the input source To listen to a CD CD Adjusting the volume level To increase or decrease the ...

Owner's Manual
Page 13
PRESET TUNE ENTER OPERATION English 9 En PRESET TUNE ENTER BASS +02 Adjust the level (-10 to +10 dB). BASS 0 Select "BASS" (low frequency range) or "TREBLE" (high frequency range). Adjusting sounds ■ Adjusting the total sound balance TONE EQ EQ Press repeatedly. ROCK POP JAZZ For rock music For popular music For jazz ENTER CLASSIC For classical music STRAIGHT For various music Basic operation ■ Adjusting bass/treble balance TONE Press repeatedly.
PRESET TUNE ENTER OPERATION English 9 En PRESET TUNE ENTER BASS +02 Adjust the level (-10 to +10 dB). BASS 0 Select "BASS" (low frequency range) or "TREBLE" (high frequency range). Adjusting sounds ■ Adjusting the total sound balance TONE EQ EQ Press repeatedly. ROCK POP JAZZ For rock music For popular music For jazz ENTER CLASSIC For classical music STRAIGHT For various music Basic operation ■ Adjusting bass/treble balance TONE Press repeatedly.
Owner's Manual
Page 14
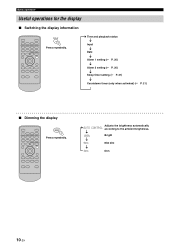
DISPLAY Time and playback status Input Date Alarm 1 setting (☞ P. 20) Alarm 2 setting (☞ P. 20) Sleep timer setting (☞ P. 21) Countdown timer (only when activated) (☞ P. 21) ■ Dimming the display DIMMER DIMMER Press repeatedly. DISPLAY Adjusts the brightness automatically AUTO CONTROL according to the ambient brightness. 100% Bright 50% Mid dim 30% Dim 10 En Basic operation Useful operations for the display ■ Switching the display information DISPLAY Press repeatedly.
DISPLAY Time and playback status Input Date Alarm 1 setting (☞ P. 20) Alarm 2 setting (☞ P. 20) Sleep timer setting (☞ P. 21) Countdown timer (only when activated) (☞ P. 21) ■ Dimming the display DIMMER DIMMER Press repeatedly. DISPLAY Adjusts the brightness automatically AUTO CONTROL according to the ambient brightness. 100% Bright 50% Mid dim 30% Dim 10 En Basic operation Useful operations for the display ■ Switching the display information DISPLAY Press repeatedly.
Owner's Manual
Page 15
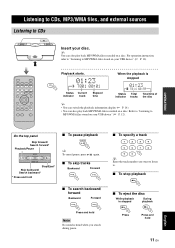
Listening to CDs, MP3/WMA files, and external sources Listening to CDs, MP3/WMA files, and external sources Listening to CDs 1 2 3 4 5 6 7 8 9 0 / / CD Insert your USB device" (☞ P. 12). y You can also play back MP3/WMA files recorded on your disc. For operation instruction, refer to "Listening to MP3/WMA files stored on a disc. Playback starts. 01:23 CD T001 00:01 Status Current indicator track Elapsed time When the playback is stopped Status indicator 01:23 T014 60:59 Total Total time of tracks the disc y • You can switch the playback ...
Listening to CDs, MP3/WMA files, and external sources Listening to CDs, MP3/WMA files, and external sources Listening to CDs 1 2 3 4 5 6 7 8 9 0 / / CD Insert your USB device" (☞ P. 12). y You can also play back MP3/WMA files recorded on your disc. For operation instruction, refer to "Listening to MP3/WMA files stored on a disc. Playback starts. 01:23 CD T001 00:01 Status Current indicator track Elapsed time When the playback is stopped Status indicator 01:23 T014 60:59 Total Total time of tracks the disc y • You can switch the playback ...

Owner's Manual
Page 16
...; Do not connect devices other than USB mass storage class devices (such as USB chargers or USB hubs), PCs, card readers, external HDD, etc. • Yamaha will be held responsible for any damage to or data loss on the number of USB devices are not guaranteed. 1 2 3 4 5 6 7 8 9 0 PRESET TUNE ENTER / USB Playback...
...; Do not connect devices other than USB mass storage class devices (such as USB chargers or USB hubs), PCs, card readers, external HDD, etc. • Yamaha will be held responsible for any damage to or data loss on the number of USB devices are not guaranteed. 1 2 3 4 5 6 7 8 9 0 PRESET TUNE ENTER / USB Playback...
Owner's Manual
Page 17
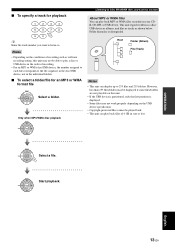
This unit regards folders in a disc/ USB device as albums, and files as tracks as software recording setting, this unit. • If the USB device is partitioned, only the first partition is disregarded. However, less than 255 files/folders may be displayed if some files/folders are not playable on this unit may not work properly depending on the USB device specification. • Copyright-protected files cannot be able to play a disc or USB device in the order of recording. • For an MP3 or WMA disc/USB device, the number assigned to each file corresponds to the file ...
This unit regards folders in a disc/ USB device as albums, and files as tracks as software recording setting, this unit. • If the USB device is partitioned, only the first partition is disregarded. However, less than 255 files/folders may be displayed if some files/folders are not playable on this unit may not work properly depending on the USB device specification. • Copyright-protected files cannot be able to play a disc or USB device in the order of recording. • For an MP3 or WMA disc/USB device, the number assigned to each file corresponds to the file ...
Owner's Manual
Page 18
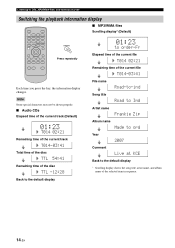
Listening to CDs, MP3/WMA files, and external sources Switching the playback information display ■ MP3/WMA files Scrolling display* (Default) DIMMER TIME/INFO TIME/INFO 01:23 to order-Fr Press repeatedly Elapsed time of the current file T014 02:21 Remaining time of the selected item in sequence. Note Some special characters may not be shown properly. ■ Audio CDs Elapsed time of the current track (Default) 01:23 T014 02:21 Remaining time of the current track T014-03:41 Total time of the disc TTL 54:41 Remaining time of the disc TTL -12:28 File name Road-to-ind Song ...
Listening to CDs, MP3/WMA files, and external sources Switching the playback information display ■ MP3/WMA files Scrolling display* (Default) DIMMER TIME/INFO TIME/INFO 01:23 to order-Fr Press repeatedly Elapsed time of the current file T014 02:21 Remaining time of the selected item in sequence. Note Some special characters may not be shown properly. ■ Audio CDs Elapsed time of the current track (Default) 01:23 T014 02:21 Remaining time of the current track T014-03:41 Total time of the disc TTL 54:41 Remaining time of the disc TTL -12:28 File name Road-to-ind Song ...

Owner's Manual
Page 19
Portable audio device PORTABLE PORTABLE PORTABLE Start playback on the connected portable audio device. y For operations of the portable audio device, refer to CDs, MP3/WMA files, and external sources Playing back external sources ■ Random playback RANDOM Press repeatedly Normal playback RANDOM REPEAT Rd (Random playback) Note Turn down the volume of the device. GND AM ANT PHONES PORTABLE 3.5 mm mini plug Normal playback Press repeatedly R1 (Single repeat) Rf (Folder repeat, MP3/WMA disc/USB only) Ra (Full repeat) Note Repeat and random play modes are canceled ...
Portable audio device PORTABLE PORTABLE PORTABLE Start playback on the connected portable audio device. y For operations of the portable audio device, refer to CDs, MP3/WMA files, and external sources Playing back external sources ■ Random playback RANDOM Press repeatedly Normal playback RANDOM REPEAT Rd (Random playback) Note Turn down the volume of the device. GND AM ANT PHONES PORTABLE 3.5 mm mini plug Normal playback Press repeatedly R1 (Single repeat) Rf (Folder repeat, MP3/WMA disc/USB only) Ra (Full repeat) Note Repeat and random play modes are canceled ...
Owner's Manual
Page 20
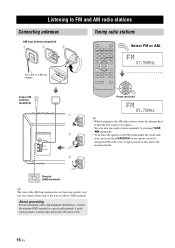
About grounding For the maximum safety and minimum interference, connect the antenna GND terminal to AM or GND terminal. A good earth ground is a metal stake driven into the moist earth. 16 En Ground (GND terminal) y The wire of the AM loop antenna does not have any polarity and you can also tune radio stations manually by pressing TUNE W/X repeatedly. • To increase the quality of the FM sound under the weak radio wave, press and hold RANDOM on the remote control to change the FM radio wave reception mode of this unit to FM and AM radio stations Connecting antennas AM loop...
About grounding For the maximum safety and minimum interference, connect the antenna GND terminal to AM or GND terminal. A good earth ground is a metal stake driven into the moist earth. 16 En Ground (GND terminal) y The wire of the AM loop antenna does not have any polarity and you can also tune radio stations manually by pressing TUNE W/X repeatedly. • To increase the quality of the FM sound under the weak radio wave, press and hold RANDOM on the remote control to change the FM radio wave reception mode of this unit to FM and AM radio stations Connecting antennas AM loop...

Owner's Manual
Page 21
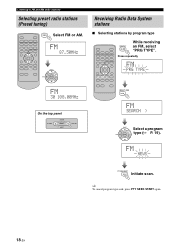
Press and hold When finished FM COMPLETE y • You can delete a preset station by pressing 7/0 . • You can delete all the preset stations by pressing and holding 7/0 for 3 seconds or longer. PRESET TUNE ENTER Select the desired preset number. FM 04 89.70MHz PRESET TUNE ENTER Confirm. Press and hold FM 01 89.70MHz FREQ/TEXT / Press and hold FM 01 87.50MHz Listening to 30 FM stations and 20 AM stations. • You can delete a preset station by pressing 7/0 . • You can delete all the preset stations by pressing and holding 7/0 for 3 seconds ...
Press and hold When finished FM COMPLETE y • You can delete a preset station by pressing 7/0 . • You can delete all the preset stations by pressing and holding 7/0 for 3 seconds or longer. PRESET TUNE ENTER Select the desired preset number. FM 04 89.70MHz PRESET TUNE ENTER Confirm. Press and hold FM 01 89.70MHz FREQ/TEXT / Press and hold FM 01 87.50MHz Listening to 30 FM stations and 20 AM stations. • You can delete a preset station by pressing 7/0 . • You can delete all the preset stations by pressing and holding 7/0 for 3 seconds ...
Owner's Manual
Page 22
FM PRESET 87.50MHz TUNER PRESET TUNE ENTER Receiving Radio Data System stations ■ Selecting stations by program type PRESET MODE-PTY SEEK-START FREQ/TEXT / FREQ/TEXT / While receiving an FM, select "PRG TYPE". FM NEWS PTY SEEK-START Initiate scan. Press repeatedly FM PRG TYPE FM 30 108.00MHz On the top panel VOL ALARM PRESET MUTE VOL MODE-PTY SEEK FM SEARCH > PRESET TUNE ENTER Select a program type (☞ P. 19). y To cancel program type seek, press PTY SEEK START again. 18 En Listening to FM and AM radio stations Selecting preset radio stations (Preset ...
FM PRESET 87.50MHz TUNER PRESET TUNE ENTER Receiving Radio Data System stations ■ Selecting stations by program type PRESET MODE-PTY SEEK-START FREQ/TEXT / FREQ/TEXT / While receiving an FM, select "PRG TYPE". FM NEWS PTY SEEK-START Initiate scan. Press repeatedly FM PRG TYPE FM 30 108.00MHz On the top panel VOL ALARM PRESET MUTE VOL MODE-PTY SEEK FM SEARCH > PRESET TUNE ENTER Select a program type (☞ P. 19). y To cancel program type seek, press PTY SEEK START again. 18 En Listening to FM and AM radio stations Selecting preset radio stations (Preset ...