
Owner's Manual
Page 4
... read the "Troubleshooting" section on common operating errors before concluding that electrical and electronic equipment, at least 10 cm on the top, 10 cm on switches, knobs and/or cords. 10 When disconnecting the power cable from the wall outlet. 18 Condensation will not be held responsible for a long time, this unit to the standby mode, and disconnect the AC power plug from the wall...
... read the "Troubleshooting" section on common operating errors before concluding that electrical and electronic equipment, at least 10 cm on the top, 10 cm on switches, knobs and/or cords. 10 When disconnecting the power cable from the wall outlet. 18 Condensation will not be held responsible for a long time, this unit to the standby mode, and disconnect the AC power plug from the wall...
Owner's Manual
Page 5
... input source 8 Adjusting the volume level 8 Adjusting sounds 9 Useful operations for the display 10 Listening to CDs, MP3/WMA files, and external sources 11 Listening to CDs 11 Listening to MP3/WMA files stored on your USB device 12 Switching the playback information display 14 Repeat and random playback 15 Playing back external sources 15 Listening to FM and AM radio stations 16 Connecting antennas 16 Tuning radio stations 16 Presetting radio stations automatically (Auto preset 17 Presetting radio stations manually (Manual preset 17 Selecting preset radio stations (Preset...
... input source 8 Adjusting the volume level 8 Adjusting sounds 9 Useful operations for the display 10 Listening to CDs, MP3/WMA files, and external sources 11 Listening to CDs 11 Listening to MP3/WMA files stored on your USB device 12 Switching the playback information display 14 Repeat and random playback 15 Playing back external sources 15 Listening to FM and AM radio stations 16 Connecting antennas 16 Tuning radio stations 16 Presetting radio stations automatically (Auto preset 17 Presetting radio stations manually (Manual preset 17 Selecting preset radio stations (Preset...
Owner's Manual
Page 6
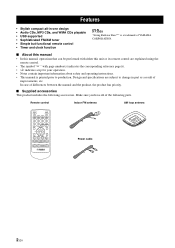
... manual • In this manual, operations that can be performed with either this unit or its remote control are subject to production. Remote control Indoor FM antenna AM loop antenna STANDBY/ON ALARM ON/OFF DIMMER TIME ADJ SLEEP TIMER 1 2 3 4 5 6 7 8 9 TIME/INFO 0 TONE PRESET EQ DISPLAY TUNE RANDOM ENTER REPEAT MODE-PTY SEEK-START FREQ/TEXT / / PORTABLE USB TUNER CD INPUT MUTE VOLUME Power cable 2 En Make sure you have all -in part...
... manual • In this manual, operations that can be performed with either this unit or its remote control are subject to production. Remote control Indoor FM antenna AM loop antenna STANDBY/ON ALARM ON/OFF DIMMER TIME ADJ SLEEP TIMER 1 2 3 4 5 6 7 8 9 TIME/INFO 0 TONE PRESET EQ DISPLAY TUNE RANDOM ENTER REPEAT MODE-PTY SEEK-START FREQ/TEXT / / PORTABLE USB TUNER CD INPUT MUTE VOLUME Power cable 2 En Make sure you have all -in part...
Owner's Manual
Page 7
... PRESET VOL MUTE VOL u, d Adjusts volume level. (☞ P. 8) MUTE Turns off the volume. (☞ P. 8) PRESET u, d Selects the preset stations. (☞ P. 17) ALARM Sets the alarm function. (☞ P. 20) INPUT/SNOOZE Turns on this unit to the beginning of the current or next track. Press and hold the key to search backward/ forward. (☞ P. 11) POWER OFF Sets this unit and selects an input source (☞ P. 6, 8), or enables the snooze function...
... PRESET VOL MUTE VOL u, d Adjusts volume level. (☞ P. 8) MUTE Turns off the volume. (☞ P. 8) PRESET u, d Selects the preset stations. (☞ P. 17) ALARM Sets the alarm function. (☞ P. 20) INPUT/SNOOZE Turns on this unit to the beginning of the current or next track. Press and hold the key to search backward/ forward. (☞ P. 11) POWER OFF Sets this unit and selects an input source (☞ P. 6, 8), or enables the snooze function...

Owner's Manual
Page 8
...; P. 16) Press CD to listen to . Each time you want to listen to a disc inserted into the disc slot. (☞ P. 11) MUTE VOLUME Adjust volume. (☞ P. 8) Infrared signal transmitter STANDBY/ON ALARM ON/OFF DIMMER TIME ADJ SLEEP TIMER 1 2 3 4 5 6 7 8 9 TIME/INFO 0 TONE PRESET EQ DISPLAY TUNE RANDOM ENTER REPEAT MODE-PTY SEEK-START FREQ/TEXT / / PORTABLE USB TUNER CD INPUT MUTE VOLUME Remove the insulation sheet before using the remote control.
...; P. 16) Press CD to listen to . Each time you want to listen to a disc inserted into the disc slot. (☞ P. 11) MUTE VOLUME Adjust volume. (☞ P. 8) Infrared signal transmitter STANDBY/ON ALARM ON/OFF DIMMER TIME ADJ SLEEP TIMER 1 2 3 4 5 6 7 8 9 TIME/INFO 0 TONE PRESET EQ DISPLAY TUNE RANDOM ENTER REPEAT MODE-PTY SEEK-START FREQ/TEXT / / PORTABLE USB TUNER CD INPUT MUTE VOLUME Remove the insulation sheet before using the remote control.
Owner's Manual
Page 9
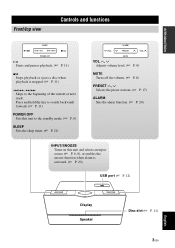
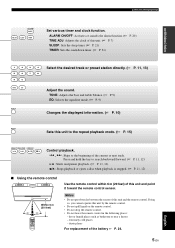
.... 5 En English Controls and functions INTRODUCTION ALARM ON/OFF TIME ADJ SLEEP TIMER Set various timer and clock function. Doing so, you cannot operate this unit and the remote control. extremely cold places - TONE: Adjusts the bass and treble balance. (☞ P. 9) EQ: Selects the equalizer mode. (☞ P. 9) DISPLAY Changes the displayed information. (☞ P. 10) REPEAT Sets this unit to the repeat playback mode. (☞ P. 15) MODE-PTY SEEK-START PREQ/TEXT / / Control playback. 4 , ¢...
.... 5 En English Controls and functions INTRODUCTION ALARM ON/OFF TIME ADJ SLEEP TIMER Set various timer and clock function. Doing so, you cannot operate this unit and the remote control. extremely cold places - TONE: Adjusts the bass and treble balance. (☞ P. 9) EQ: Selects the equalizer mode. (☞ P. 9) DISPLAY Changes the displayed information. (☞ P. 10) REPEAT Sets this unit to the repeat playback mode. (☞ P. 15) MODE-PTY SEEK-START PREQ/TEXT / / Control playback. 4 , ¢...
Owner's Manual
Page 10
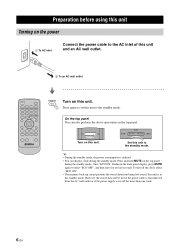
... is reduced. • You can also perform the above operations on the top panel during the standby mode. Press again to set this unit to the standby mode. SLEEP INPUT/SNOOZE Turn on this unit. PREPARATION BEFORE USING THIS UNIT Preparation before using this unit Turning on the power 1 To AC inlet Connect the power cable to the AC inlet of this unit and an AC...
... is reduced. • You can also perform the above operations on the top panel during the standby mode. Press again to set this unit to the standby mode. SLEEP INPUT/SNOOZE Turn on this unit. PREPARATION BEFORE USING THIS UNIT Preparation before using this unit Turning on the power 1 To AC inlet Connect the power cable to the AC inlet of this unit and an AC...
Owner's Manual
Page 12
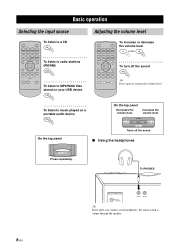
... VOLUME To turn off the sound. Basic operation Basic operation Selecting the input source To listen to a CD CD Adjusting the volume level To increase or decrease the volume level VOLUME PORTABLE USB TUNER CD INPUT To listen to radio stations (FM/AM) TUNER To listen to MP3/WMA files stored on a portable audio device PORTABLE On the top panel Decreases the volume level. To listen to music played on your headphones, the alarm sound is output...
... VOLUME To turn off the sound. Basic operation Basic operation Selecting the input source To listen to a CD CD Adjusting the volume level To increase or decrease the volume level VOLUME PORTABLE USB TUNER CD INPUT To listen to radio stations (FM/AM) TUNER To listen to MP3/WMA files stored on a portable audio device PORTABLE On the top panel Decreases the volume level. To listen to music played on your headphones, the alarm sound is output...

Owner's Manual
Page 16
... title/artist name/album name y You can switch the playback information display (☞ P. 14). This unit supports USB mass storage class devices (e.g., flash memories or portable audio players) using FAT16 or FAT32 format. Notes • Some devices may exceed 30 seconds depending on the number of USB devices are not guaranteed. 1 2 3 4 5 6 7 8 9 0 PRESET TUNE ENTER / USB Playback starts. USB 01:23...
... title/artist name/album name y You can switch the playback information display (☞ P. 14). This unit supports USB mass storage class devices (e.g., flash memories or portable audio players) using FAT16 or FAT32 format. Notes • Some devices may exceed 30 seconds depending on the number of USB devices are not guaranteed. 1 2 3 4 5 6 7 8 9 0 PRESET TUNE ENTER / USB Playback starts. USB 01:23...
Owner's Manual
Page 17
... below. TUNE ENTER PRESET TUNE ENTER Select a file. Folder hierarchy is displayed. • Some files may not work properly depending on the USB device specification. • Copyright-protected files cannot be played back. • This unit can play back MP3 or WMA files recorded on the conditions of recording. • For an MP3 or WMA disc/USB device, the number assigned to each...
... below. TUNE ENTER PRESET TUNE ENTER Select a file. Folder hierarchy is displayed. • Some files may not work properly depending on the USB device specification. • Copyright-protected files cannot be played back. • This unit can play back MP3 or WMA files recorded on the conditions of recording. • For an MP3 or WMA disc/USB device, the number assigned to each...

Owner's Manual
Page 19
...) Note Turn down the volume of the device. OPERATION Repeat and random playback Listening to the instruction manual of this unit and your portable audio device. ■ Repeat playback REPEAT TUNER FM ANT 75 UNBAL. English 15 En GND AM ANT PHONES PORTABLE 3.5 mm mini plug Normal playback Press repeatedly R1 (Single repeat) Rf (Folder repeat, MP3/WMA disc/USB...
...) Note Turn down the volume of the device. OPERATION Repeat and random playback Listening to the instruction manual of this unit and your portable audio device. ■ Repeat playback REPEAT TUNER FM ANT 75 UNBAL. English 15 En GND AM ANT PHONES PORTABLE 3.5 mm mini plug Normal playback Press repeatedly R1 (Single repeat) Rf (Folder repeat, MP3/WMA disc/USB...

Owner's Manual
Page 21
... PRESET TUNE ENTER Enter the preset mode. PRESET TUNE ENTER Select the desired preset number. Press and hold When finished FM COMPLETE y • You can delete a preset station by pressing 7/0 . • You can delete all the preset stations by pressing and holding 7/0 for 3 seconds or longer. English 17 En FM 04 89.70MHz PRESET TUNE ENTER Confirm. OPERATION Presetting radio stations automatically (Auto preset) TUNER Select FM or AM. FM PRESET 89.70MHz ENTER PRESET TUNE...
... PRESET TUNE ENTER Enter the preset mode. PRESET TUNE ENTER Select the desired preset number. Press and hold When finished FM COMPLETE y • You can delete a preset station by pressing 7/0 . • You can delete all the preset stations by pressing and holding 7/0 for 3 seconds or longer. English 17 En FM 04 89.70MHz PRESET TUNE ENTER Confirm. OPERATION Presetting radio stations automatically (Auto preset) TUNER Select FM or AM. FM PRESET 89.70MHz ENTER PRESET TUNE...
Owner's Manual
Page 22
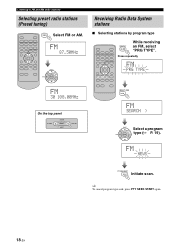
... FM and AM radio stations Selecting preset radio stations (Preset tuning) TUNER Select FM or AM. Press repeatedly FM PRG TYPE FM 30 108.00MHz On the top panel VOL ALARM PRESET MUTE VOL MODE-PTY SEEK FM SEARCH > PRESET TUNE ENTER Select a program type (☞ P. 19). FM NEWS PTY SEEK-START Initiate scan. FM PRESET 87.50MHz TUNER PRESET TUNE ENTER Receiving Radio Data System stations ■ Selecting stations by program type PRESET MODE-PTY SEEK-START FREQ...
... FM and AM radio stations Selecting preset radio stations (Preset tuning) TUNER Select FM or AM. Press repeatedly FM PRG TYPE FM 30 108.00MHz On the top panel VOL ALARM PRESET MUTE VOL MODE-PTY SEEK FM SEARCH > PRESET TUNE ENTER Select a program type (☞ P. 19). FM NEWS PTY SEEK-START Initiate scan. FM PRESET 87.50MHz TUNER PRESET TUNE ENTER Receiving Radio Data System stations ■ Selecting stations by program type PRESET MODE-PTY SEEK-START FREQ...
Owner's Manual
Page 23
... En Listening to FM and AM radio stations ■ Switching the information display of Radio Data System FREQ/TEXT / FREQ/TEXT / Press repeatedly Station name FM PRG SERVICE Program type FM PRG TYPE Text information related to the station FM RADIO TEXT Current time FM CLOCK TIME Original display Note If the signal transmission of the Radio Data System station is too weak, this unit may...
... En Listening to FM and AM radio stations ■ Switching the information display of Radio Data System FREQ/TEXT / FREQ/TEXT / Press repeatedly Station name FM PRG SERVICE Program type FM PRG TYPE Text information related to the station FM RADIO TEXT Current time FM CLOCK TIME Original display Note If the signal transmission of the Radio Data System station is too weak, this unit may...
Owner's Manual
Page 24
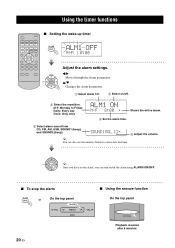
... the top panel ALARM VOL PRESET MUTE 20 En ■ Using the snooze function On the top panel VOL INPUT/SNOOZE Playback resumes after 5 minutes. PRESET TUNE ENTER y Once you have set the alarm, you can also use the numeric buttons to Friday Daily: Every day Once: Only once ALM1 ON M-F 8:00 1 2 Shows the active alarm. 4 Set the alarm time. 5 Select alarm sound from CD...
... the top panel ALARM VOL PRESET MUTE 20 En ■ Using the snooze function On the top panel VOL INPUT/SNOOZE Playback resumes after 5 minutes. PRESET TUNE ENTER y Once you have set the alarm, you can also use the numeric buttons to Friday Daily: Every day Once: Only once ALM1 ON M-F 8:00 1 2 Shows the active alarm. 4 Set the alarm time. 5 Select alarm sound from CD...
Owner's Manual
Page 25
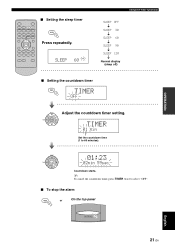
TIMER 01 min Set the countdown time (1 to select "OFF". ■ To stop the alarm TIMER or On the top panel INPUT/SNOOZE English 21 En PRESET TUNE ENTER 01:23 02min 59sec Countdown starts. y To cancel the countdown timer, press TIMER twice to 60 minutes). OPERATION ■ Setting the sleep timer SLEEP TIMER SLEEP Press repeatedly. ENTER SLEEP 60 Using the timer functions SLEEP OFF SLEEP 30 SLEEP 60 SLEEP 90 SLEEP 120 Normal display (sleep off) ■ Setting the countdown timer TIMER TIMER OFF PRESET TUNE ENTER Adjust the countdown timer setting.
TIMER 01 min Set the countdown time (1 to select "OFF". ■ To stop the alarm TIMER or On the top panel INPUT/SNOOZE English 21 En PRESET TUNE ENTER 01:23 02min 59sec Countdown starts. y To cancel the countdown timer, press TIMER twice to 60 minutes). OPERATION ■ Setting the sleep timer SLEEP TIMER SLEEP Press repeatedly. ENTER SLEEP 60 Using the timer functions SLEEP OFF SLEEP 30 SLEEP 60 SLEEP 90 SLEEP 120 Normal display (sleep off) ■ Setting the countdown timer TIMER TIMER OFF PRESET TUNE ENTER Adjust the countdown timer setting.

Owner's Manual
Page 26
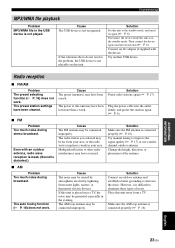
... power cable. Set this unit (☞ P. 25). Turn on the disc reading lens. Place this unit and play the source again. Disc playback Problem Some button operations do not work. The disc may be set the clock again (☞ P. 6). Use a disc supported by this unit to minimum level. TROUBLESHOOTING Troubleshooting In case of a problem with the suggested solutions or if your problem with this unit, and consult the nearest authorized Yamaha dealer or service center...
... power cable. Set this unit (☞ P. 25). Turn on the disc reading lens. Place this unit and play the source again. Disc playback Problem Some button operations do not work. The disc may be set the clock again (☞ P. 6). Use a disc supported by this unit to minimum level. TROUBLESHOOTING Troubleshooting In case of a problem with the suggested solutions or if your problem with this unit, and consult the nearest authorized Yamaha dealer or service center...
Owner's Manual
Page 27
... auto tuning function (☞ P. 18) does not work . The power to this unit to eliminate these types of the antenna. The radio station you selected may be caused by atmospheric electricity, lightning, fluorescent lights, motors, or thermostat electric devices. The AM loop antenna may be connected improperly. Solution Set this unit may be far from a TV. Plug the power cable into the outlet firmly, and preset the stations...
... auto tuning function (☞ P. 18) does not work . The power to this unit to eliminate these types of the antenna. The radio station you selected may be caused by atmospheric electricity, lightning, fluorescent lights, motors, or thermostat electric devices. The AM loop antenna may be connected improperly. Solution Set this unit may be far from a TV. Plug the power cable into the outlet firmly, and preset the stations...

Owner's Manual
Page 30
... for digitalizing analog signals) per channel 10 W + 10 W • Input sensitivity/Impedance PORTABLE 300 mV/47 kΩ • Output level/Impedance PHONES (volume max 1 V/32 Ω ■ TUNER SECTION FM • Tuning range U.S.A. In principle, the higher the sampling rate, the wider the frequency range that can be played back, and the higher the quantized bit rate, the finer the sound that can be reproduced. ■ PCM (Pulse Code Modulation) A signal that...
... for digitalizing analog signals) per channel 10 W + 10 W • Input sensitivity/Impedance PORTABLE 300 mV/47 kΩ • Output level/Impedance PHONES (volume max 1 V/32 Ω ■ TUNER SECTION FM • Tuning range U.S.A. In principle, the higher the sampling rate, the wider the frequency range that can be played back, and the higher the quantized bit rate, the finer the sound that can be reproduced. ■ PCM (Pulse Code Modulation) A signal that...
Owner's Manual
Page 31
... on the proper use, maintenance and storage, and (b) installation or use shall apply. 6. The product MUST have been the subject of any losses or damages, whether direct, consequential or otherwise, save for the repair or replacement of parts due to use the product for its normal purpose or in accordance with Yamaha's instructions on our website (http://www.yamaha-hifi.com/ or...
... on the proper use, maintenance and storage, and (b) installation or use shall apply. 6. The product MUST have been the subject of any losses or damages, whether direct, consequential or otherwise, save for the repair or replacement of parts due to use the product for its normal purpose or in accordance with Yamaha's instructions on our website (http://www.yamaha-hifi.com/ or...


