
Owner's Manual
Page 3
...Dolby Digital Decoder q Dolby Pro Logic Decoder q DTS Decoder q CINEMA DSP: Theater-like Sound Experience by the Combination of YAMAHA DSP Technology and Dolby Digital, Dolby Pro Logic or DTS q Automatic Input Balance Control for Dolby Pro Logic decoding q ...q 6-Channel External Decoder Input for Other Future Formats q Video Signal Input/Output Capability (Including S Video Connections) q SLEEP Timer q Universal Remote Control with Preset Manufacturer Codes CONTENTS SUPPLIED ACCESSORIES 2 FEATURES 3 CAUTION 4 q Introduction FEATURES OF THE SOUND EFFECTS 5 CONTROLS AND THEIR FUNCTIONS 8...
...Dolby Digital Decoder q Dolby Pro Logic Decoder q DTS Decoder q CINEMA DSP: Theater-like Sound Experience by the Combination of YAMAHA DSP Technology and Dolby Digital, Dolby Pro Logic or DTS q Automatic Input Balance Control for Dolby Pro Logic decoding q ...q 6-Channel External Decoder Input for Other Future Formats q Video Signal Input/Output Capability (Including S Video Connections) q SLEEP Timer q Universal Remote Control with Preset Manufacturer Codes CONTENTS SUPPLIED ACCESSORIES 2 FEATURES 3 CAUTION 4 q Introduction FEATURES OF THE SOUND EFFECTS 5 CONTROLS AND THEIR FUNCTIONS 8...
Owner's Manual
Page 8
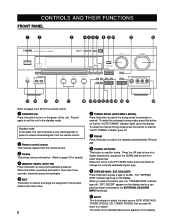
... unit is used to exchange the assigment of power to receive infrared-signals from the remote control. 2 Remote control sensor This receives signals from the remote control. 3 Display This shows various information. (Refer to page 10 for the remote control. 1 STANDBY/ON Press this button so that you press the button next, the "TAPE...
... unit is used to exchange the assigment of power to receive infrared-signals from the remote control. 2 Remote control sensor This receives signals from the remote control. 3 Display This shows various information. (Refer to page 10 for the remote control. 1 STANDBY/ON Press this button so that you press the button next, the "TAPE...
Owner's Manual
Page 10
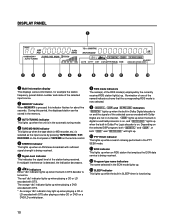
... station being received. w Program type name indicators The name selected in the PTY SEEK mode. DECODER on the front panel or TAPE/MD on the remote control. 5 STEREO indicator This lights up when an FM stereo broadcast with DTS after playing a video-CD or DVD on the selected DSP program, both...
... station being received. w Program type name indicators The name selected in the PTY SEEK mode. DECODER on the front panel or TAPE/MD on the remote control. 5 STEREO indicator This lights up when an FM stereo broadcast with DTS after playing a video-CD or DVD on the selected DSP program, both...
Owner's Manual
Page 12
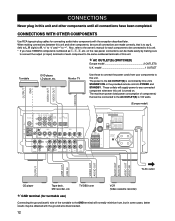
... to the owner's manual for each component to the GND terminal will supply power to this unit and other components, be sure all connections have YAMAHA components numbered as !, #, $, etc. model 1 OUTLET Turntable DVD player, LD player, etc. When making sure to connect the output (or... input) terminals of each component to be connected to any connected component whenever this unit's STANDBY/ON or the provided remote control's POWER and STANDBY. on . TV/DBS tuner VCR (Video cassette recorder) GND terminal (for connecting audio/video components with the ground...
... to the owner's manual for each component to the GND terminal will supply power to this unit and other components, be sure all connections have YAMAHA components numbered as !, #, $, etc. model 1 OUTLET Turntable DVD player, LD player, etc. When making sure to connect the output (or... input) terminals of each component to be connected to any connected component whenever this unit's STANDBY/ON or the provided remote control's POWER and STANDBY. on . TV/DBS tuner VCR (Video cassette recorder) GND terminal (for connecting audio/video components with the ground...
Owner's Manual
Page 20
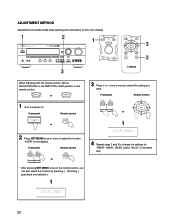
... or * After pressing SET MENU once on . or 1 Turn the power on the remote control, you want. Front panel Remote control or 2 Press SET MENU once or more to select the setting you can also select the function by pressing . (Pressing goes back one ...change the settings for "REAR", "MAIN", "BASS" and/or "M.LVL" in the same way. 20 once or more to select the function "CNTR" on the remote control. Front panel Remote control or 3 Press + or - ADJUSTMENT METHOD Adjustments should be made while watching the information on this unit's display. 1 2 1 3 2 3 When adjusting ...
... or * After pressing SET MENU once on . or 1 Turn the power on the remote control, you want. Front panel Remote control or 2 Press SET MENU once or more to select the setting you can also select the function by pressing . (Pressing goes back one ...change the settings for "REAR", "MAIN", "BASS" and/or "M.LVL" in the same way. 20 once or more to select the function "CNTR" on the remote control. Front panel Remote control or 3 Press + or - ADJUSTMENT METHOD Adjustments should be made while watching the information on this unit's display. 1 2 1 3 2 3 When adjusting ...
Owner's Manual
Page 21
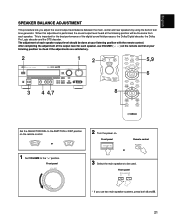
... the output level for the best performance of each speaker output level should be done at the listening position will be used. Front panel Remote control or 3 Select the main speakers to be the same from each speaker, use two main speaker systems, press both A and B.... on . English SPEAKER BALANCE ADJUSTMENT This procedure lets you use VOLUME ( ) on the remote control at your listening position with the remote control. Front panel 2 Turn the power on the remote control. When this adjustment is important for each speaker. The adjustment of the digital sound field...
... the output level for the best performance of each speaker output level should be done at the listening position will be used. Front panel Remote control or 3 Select the main speakers to be the same from each speaker, use two main speaker systems, press both A and B.... on . English SPEAKER BALANCE ADJUSTMENT This procedure lets you use VOLUME ( ) on the remote control at your listening position with the remote control. Front panel 2 Turn the power on the remote control. When this adjustment is important for each speaker. The adjustment of the digital sound field...
Owner's Manual
Page 22
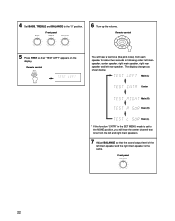
... 5 Press TEST so that the sound output level of the left main speaker and the right main speaker is the same. Front panel 22 Remote control You will hear the center channel test tone from each speaker for about two seconds in the SET MENU mode is set to the "0" ...
... 5 Press TEST so that the sound output level of the left main speaker and the right main speaker is the same. Front panel 22 Remote control You will hear the center channel test tone from each speaker for about two seconds in the SET MENU mode is set to the "0" ...

Owner's Manual
Page 23
... you have completed these adjustments, you can only adjust the overall sound level of your audio system by using VOLUME (or VOLUME ( ) on the remote control). • If you use external power amplifiers, you may also use their volume controls to achieve the proper balance. • If the function... so that they become almost the same as that "CENTER", "R SUR." The center sound is sounding even if "DELAY" appears on the display. Remote control * You cannot adjust the delay time while the test tone is automati- Press TIME/LEVEL once or more . Adjust the level. * Pressing ...
... you have completed these adjustments, you can only adjust the overall sound level of your audio system by using VOLUME (or VOLUME ( ) on the remote control). • If you use external power amplifiers, you may also use their volume controls to achieve the proper balance. • If the function... so that they become almost the same as that "CENTER", "R SUR." The center sound is sounding even if "DELAY" appears on the display. Remote control * You cannot adjust the delay time while the test tone is automati- Press TIME/LEVEL once or more . Adjust the level. * Pressing ...
Owner's Manual
Page 24
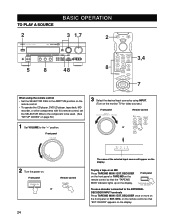
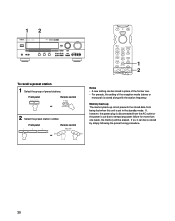
...appears on . Front panel 3 Select the desired input source by using the remote control • Set the SELECTOR DIAL to the AMP/TUN position on the remote control. • To operate the CD player, DVD/LD player, tape ...deck, MD recorder, or other components with this remote control, set the SELECTOR DIAL to the component to be used. (See "SETUP CODES" ... DECODER INPUT terminals Press TAPE/MD MON / EXT. DECODER once or more on the display. Front panel Remote control or 24 The name of the selected input source will appear on the front panel or EXT. To...
...appears on . Front panel 3 Select the desired input source by using the remote control • Set the SELECTOR DIAL to the AMP/TUN position on the remote control. • To operate the CD player, DVD/LD player, tape ...deck, MD recorder, or other components with this remote control, set the SELECTOR DIAL to the component to be used. (See "SETUP CODES" ... DECODER INPUT terminals Press TAPE/MD MON / EXT. DECODER once or more on the display. Front panel Remote control or 24 The name of the selected input source will appear on the front panel or EXT. To...
Owner's Manual
Page 25
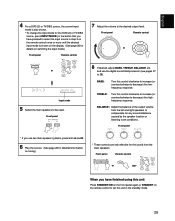
... control clockwise to increase (or counterclockwise to decrease) the lowfrequency response. BALANCE: Adjust the balance of the output volume from the main speakers. Front panel Remote control or When you have finished using this unit Press STANDBY/ON on the front panel again or STANDBY on the...) once or more until the desired input mode is shown on switching the input mode.) Front panel Remote control 7 Adjust the volume to the desired output level. Front panel 8 If desired, adjust BASS, TREBLE, BALANCE, etc. BASS: Turn this control clockwise to increase (...
... control clockwise to increase (or counterclockwise to decrease) the lowfrequency response. BALANCE: Adjust the balance of the output volume from the main speakers. Front panel Remote control or When you have finished using this unit Press STANDBY/ON on the front panel again or STANDBY on the...) once or more until the desired input mode is shown on switching the input mode.) Front panel Remote control 7 Adjust the volume to the desired output level. Front panel 8 If desired, adjust BASS, TREBLE, BALANCE, etc. BASS: Turn this control clockwise to increase (...
Owner's Manual
Page 26
... present input mode appears on the power of digital input signals. 26 Select this mode when you turn the player off and then on the remote control). • If an audio source is selected by setting the input mode to this unit. DECDR" is displayed. • If you select a video source... of signal to DTS beforehand. In this mode. (The red "dts" indicator will be played if the "TAPE/MD MON" indicator lights up on the remote control), the play a CD or LD encoded with DTS with DTS is set to AUTO. 1. Notes on input mode selection • The input mode for...
... present input mode appears on the power of digital input signals. 26 Select this mode when you turn the player off and then on the remote control). • If an audio source is selected by setting the input mode to this unit. DECDR" is displayed. • If you select a video source... of signal to DTS beforehand. In this mode. (The red "dts" indicator will be played if the "TAPE/MD MON" indicator lights up on the remote control), the play a CD or LD encoded with DTS with DTS is set to AUTO. 1. Notes on input mode selection • The input mode for...
Owner's Manual
Page 27
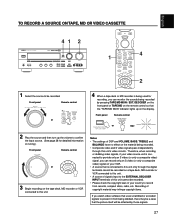
...may infringe copyright laws. If you can monitor the sounds being used for detailed information on tuning.) Front panel Remote control or 3 Begin recording on the display. Front panel Remote control or 2 Play the source and then turn up on the tape deck, MD recorder or VCR connected... unit's video circuits. Therefore, when recording or dubbing video signals, if your video source unit is being recorded by those signals. 27 Front panel Remote control or 4 When a tape deck or MD recorder is connected to provide only an S video (or only a composite video) signal, you...
...may infringe copyright laws. If you can monitor the sounds being used for detailed information on tuning.) Front panel Remote control or 3 Begin recording on the display. Front panel Remote control or 2 Play the source and then turn up on the tape deck, MD recorder or VCR connected... unit's video circuits. Therefore, when recording or dubbing video signals, if your video source unit is being recorded by those signals. 27 Front panel Remote control or 4 When a tape deck or MD recorder is connected to provide only an S video (or only a composite video) signal, you...

Owner's Manual
Page 28
... DIAL to an FM station, it on the display. Front panel 2 Press TUNING MODE. To tune in manually to the AMP/TUN position on the remote control and select TUNER as the input source. 1 Select the reception band (FM or AM) and confirm it on the display. Front panel * If the...
... DIAL to an FM station, it on the display. Front panel 2 Press TUNING MODE. To tune in manually to the AMP/TUN position on the remote control and select TUNER as the input source. 1 Select the reception band (FM or AM) and confirm it on the display. Front panel * If the...
Owner's Manual
Page 30
... lost when this unit is cut due to temporary power failure for more than one . • For presets, the setting of preset stations. Front panel Remote control or 2 Select the preset station number. If so, it can be stored in the standby mode. 12 To recall a preset station 1 Select the group... is set in place of the former one week, the memory will be re-stored by simply following the preset tuning procedure. 30 Front panel Remote control or 1 2 Notes • A new setting can be erased.
... lost when this unit is cut due to temporary power failure for more than one . • For presets, the setting of preset stations. Front panel Remote control or 2 Select the preset station number. If so, it can be stored in the standby mode. 12 To recall a preset station 1 Select the group... is set in place of the former one week, the memory will be re-stored by simply following the preset tuning procedure. 30 Front panel Remote control or 1 2 Notes • A new setting can be erased.

Owner's Manual
Page 36
... position. Flashes Each time you press SLEEP, the SLEEP time will change as follows: (Minutes) 120 90 60 30 To cancel the selected SLEEP time Remote control Press SLEEP once or more to the standby mode. Notes • To set the SLEEP timer for which the SLEEP timer is displayed. The... when you are going to sleep and press SLEEP once or more so that "SLEEP OFF" appears on the remote control) or by setting the unit in the standby mode with the remote control. SETTING THE SLEEP TIMER The SLEEP timer can be used to make this unit automatically switch to select...
... position. Flashes Each time you press SLEEP, the SLEEP time will change as follows: (Minutes) 120 90 60 30 To cancel the selected SLEEP time Remote control Press SLEEP once or more to the standby mode. Notes • To set the SLEEP timer for which the SLEEP timer is displayed. The... when you are going to sleep and press SLEEP once or more so that "SLEEP OFF" appears on the remote control) or by setting the unit in the standby mode with the remote control. SETTING THE SLEEP TIMER The SLEEP timer can be used to make this unit automatically switch to select...
Owner's Manual
Page 39
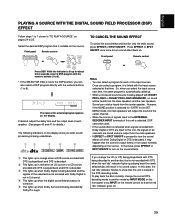
... DSP program that the sound is set to the DSP position, you change the current DTSdecoding mode to another mode by INPUT MODE on the remote control so that the red "dts" indicator goes off when Dolby Digital or DTS is decoded, it is not encoded with the input source selected... is suitable for about three seconds, select a DSP program with the numeric buttons (1 to 25. Front panel Remote control or Notes • You can only be heard from the center speaker. Front panel Remote control or Press DSP. Press EFFECT or EFCT ON/OFF once more to 8). Once you select a program, ...
... DSP program that the sound is set to the DSP position, you change the current DTSdecoding mode to another mode by INPUT MODE on the remote control so that the red "dts" indicator goes off when Dolby Digital or DTS is decoded, it is not encoded with the input source selected... is suitable for about three seconds, select a DSP program with the numeric buttons (1 to 25. Front panel Remote control or Notes • You can only be heard from the center speaker. Front panel Remote control or Press DSP. Press EFFECT or EFCT ON/OFF once more to 8). Once you select a program, ...
Owner's Manual
Page 40
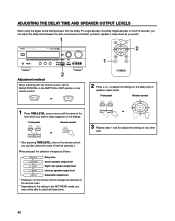
...Dolby Pro Logic decoder, the Dolby Digital decoder or the DTS decoder, you can also select the name of item by pressing . Front panel Remote control 1 Press TIME/LEVEL once or more until the name of the item which you can adjust the delay time between the main sound ... SELECTOR DIAL to adjust the settings of any other item. 40 Front panel Remote control or * After pressing TIME/LEVEL once on the remote control. Left rear speaker output level SWFR Subwoofer output level * Pressing on the remote control changes the selection in the reverse order. * Depending on the setting ...
...Dolby Pro Logic decoder, the Dolby Digital decoder or the DTS decoder, you can also select the name of item by pressing . Front panel Remote control 1 Press TIME/LEVEL once or more until the name of the item which you can adjust the delay time between the main sound ... SELECTOR DIAL to adjust the settings of any other item. 40 Front panel Remote control or * After pressing TIME/LEVEL once on the remote control. Left rear speaker output level SWFR Subwoofer output level * Pressing on the remote control changes the selection in the reverse order. * Depending on the setting ...
Owner's Manual
Page 43
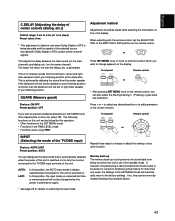
.... to select any other adjustments on switching the input mode. 43 Repeat these steps to edit parameters of the selected source encoded with the remote control, set by simply following functions on the display. If so, they can also select the title by pressing . (Pressing goes back one...position. Adjustment method Adjustments should be changed when the power is set in the TIME/LEVEL mode • Functions when using TEST Front panel Remote control or INPUT (Selecting the mode of the TV/DBS input) Choices: AUTO/LAST Preset position: AUTO You can designate the input mode...
.... to select any other adjustments on switching the input mode. 43 Repeat these steps to edit parameters of the selected source encoded with the remote control, set by simply following functions on the display. If so, they can also select the title by pressing . (Pressing goes back one...position. Adjustment method Adjustments should be changed when the power is set in the TIME/LEVEL mode • Functions when using TEST Front panel Remote control or INPUT (Selecting the mode of the TV/DBS input) Choices: AUTO/LAST Preset position: AUTO You can designate the input mode...
Owner's Manual
Page 44
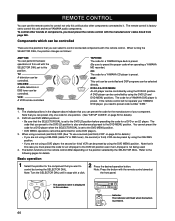
...MENU positions: • Be sure that in this remote control. When using a second (and third) VCR (See "To use the remote control to control not only this unit and most YAMAHA audio components. Note that the SELECTOR DIAL is pressed. 44 REMOTE CONTROL You can use a second (and third) ... 3. Note that you can be performed for a YAMAHA DVD player is preset. The code that you must preset the code for a YAMAHA CD player is preset. You cannot preset the code for details). 2. The button functions on the remote control differ depending on page 50 for a DVD player...
...MENU positions: • Be sure that in this remote control. When using a second (and third) VCR (See "To use the remote control to control not only this unit and most YAMAHA audio components. Note that the SELECTOR DIAL is pressed. 44 REMOTE CONTROL You can use a second (and third) ... 3. Note that you can be performed for a YAMAHA DVD player is preset. The code that you must preset the code for a YAMAHA CD player is preset. You cannot preset the code for details). 2. The button functions on the remote control differ depending on page 50 for a DVD player...
Owner's Manual
Page 46
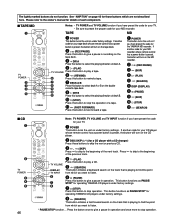
... POWER This button turns the unit on page 45 for details of the previous track. This button functions as PAUSE/ STOP* for operating YAMAHA CD players under factory settings. If another code for your MD recorder. The lightly marked buttons do not function. TAPE MD 1 POWER ... 7 7 DECK A/B 8 Press this button to select deck A or B on the CD player. 2 DISC SKIP (+/-) (for the YAMAHA MD recorder. If another code for your MD recorder whose remote control has a power button is preset, the button will turn on the double 9 cassette tape deck. 0 9 DIR B q Press this...
... POWER This button turns the unit on page 45 for details of the previous track. This button functions as PAUSE/ STOP* for operating YAMAHA CD players under factory settings. If another code for your MD recorder. The lightly marked buttons do not function. TAPE MD 1 POWER ... 7 7 DECK A/B 8 Press this button to select deck A or B on the CD player. 2 DISC SKIP (+/-) (for the YAMAHA MD recorder. If another code for your MD recorder whose remote control has a power button is preset, the button will turn on the double 9 cassette tape deck. 0 9 DIR B q Press this...


