
Owners Manual
Page 3
... the equalizer Setting for each speaker 41 - Speaker channels and functions ...9 - Speaker distance settings ...42 - INTRODUCTION Features and capabilities ■ Built-in high-quality, high-power 5-channel amplifier ■ 1-button input/sound field program switching (SCENE function 26 ■ Speaker connections for each speaker...42 - to match your speakers and listening...
... the equalizer Setting for each speaker 41 - Speaker channels and functions ...9 - Speaker distance settings ...42 - INTRODUCTION Features and capabilities ■ Built-in high-quality, high-power 5-channel amplifier ■ 1-button input/sound field program switching (SCENE function 26 ■ Speaker connections for each speaker...42 - to match your speakers and listening...
Owners Manual
Page 5
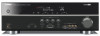
... cycle through the headphones. m PROGRAM l / h Switches between on the unit. n STRAIGHT Changes a sound field program to FM (☞p. 30). Part names and functions Front panel a A (Power) Switches this unit between the sound field effect (sound field program) you have selected tuner input.
... cycle through the headphones. m PROGRAM l / h Switches between on the unit. n STRAIGHT Changes a sound field program to FM (☞p. 30). Part names and functions Front panel a A (Power) Switches this unit between the sound field effect (sound field program) you have selected tuner input.
Owners Manual
Page 6
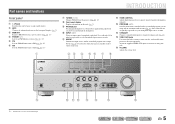
...AV 2 COAXIAL (CD) AV 3 OPTICAL ( TV ) AV 4 AV 5 AV OUT AUDIO 1 AUDIO 2 ANTENNA FM GND SURROU SUBWOOFER e f g h jik l m En 6 m Power cord For connecting this unit can receive audio/video signals (☞p. 17, p. 18). e COMPONENT VIDEO jacks For connecting TV that this unit to output video... signals to external devices equipped with a built-in white to it (☞p. 15). Rear panel a DOCK jack For connecting an optional Yamaha iPod universal dock (such as the AV5 or AUDIO1-2 jacks are selected (☞p. 20). f AV1-5 jacks For connecting to (☞p....
...AV 2 COAXIAL (CD) AV 3 OPTICAL ( TV ) AV 4 AV 5 AV OUT AUDIO 1 AUDIO 2 ANTENNA FM GND SURROU SUBWOOFER e f g h jik l m En 6 m Power cord For connecting this unit can receive audio/video signals (☞p. 17, p. 18). e COMPONENT VIDEO jacks For connecting TV that this unit to output video... signals to external devices equipped with a built-in white to it (☞p. 15). Rear panel a DOCK jack For connecting an optional Yamaha iPod universal dock (such as the AV5 or AUDIO1-2 jacks are selected (☞p. 20). f AV1-5 jacks For connecting to (☞p....

Owners Manual
Page 8
...keys Operate recording, playback, and menu displays etc. Adjusts the volume level (☞p. 25). c SOURCE A (SOURCE Power) Switches an external component on and off . J1 DOCK A Yamaha iPod universal dock or Bluetooth wireless audio receiver connected to AM. These keys are displayed. AM MEMORY PRESET F / ...between on the front panel display (the name of the sound output on and off (☞p. 25). o RECEIVER A (RECEIVER Power) Switches this unit (☞p. 40). Sleep 60min. DECODE MUSIC STEREO STRAIGHT BD DVD SETUP SCENE TV CD RADIO OPTION ENTER VOLUME ...
...keys Operate recording, playback, and menu displays etc. Adjusts the volume level (☞p. 25). c SOURCE A (SOURCE Power) Switches an external component on and off . J1 DOCK A Yamaha iPod universal dock or Bluetooth wireless audio receiver connected to AM. These keys are displayed. AM MEMORY PRESET F / ...between on the front panel display (the name of the sound output on and off (☞p. 25). o RECEIVER A (RECEIVER Power) Switches this unit (☞p. 40). Sleep 60min. DECODE MUSIC STEREO STRAIGHT BD DVD SETUP SCENE TV CD RADIO OPTION ENTER VOLUME ...
Owners Manual
Page 10
... standby mode, and then switch it is displayed on "Extended functionality that can be placed between 60 degrees and 80 degrees from your TV. The power turns on, when the settings you made has been configured. ■ CRT monitors We recommend that "SP IMP." When connecting to 6Ω speakers, carry out...
... standby mode, and then switch it is displayed on "Extended functionality that can be placed between 60 degrees and 80 degrees from your TV. The power turns on, when the settings you made has been configured. ■ CRT monitors We recommend that "SP IMP." When connecting to 6Ω speakers, carry out...
Owners Manual
Page 11
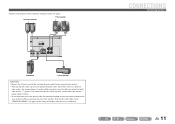
... R L Front speaker R L HDMI 4 OR OUT ANTENNA FM GND AM SURROUND CENTER SPEAKERS FRONT AUDIO 2 AUDIO OUT SUBWOOFER Subwoofer Center speaker CAUTION • Remove the AC power cord of this unit from the power outlet before connecting the speakers. • Generally speaker cables consist of this unit or the speakers.
... R L Front speaker R L HDMI 4 OR OUT ANTENNA FM GND AM SURROUND CENTER SPEAKERS FRONT AUDIO 2 AUDIO OUT SUBWOOFER Subwoofer Center speaker CAUTION • Remove the AC power cord of this unit from the power outlet before connecting the speakers. • Generally speaker cables consist of this unit or the speakers.
Owners Manual
Page 26
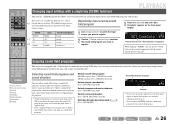
... frequency of the program. • Sound field programs are currently outputting sound (☞p. 7). • You can enjoy multi-channel playback for that sounds best with a Yamaha digital sound field processing (DSP) chip. PLAYBACK SOURCE 1 1 5 TRANSMIT CODE SET SLEEP RECEIVER HDMI 2 3 4 AV 2 3 4 AUDIO 1 2 V-AUX [ A ...Use dInput selector to select the input source you want to register. 2 Use the gSound selection keys to turn the power on and change the input source, the sound field program previously selected for almost any sound field programs. Selects sound ...
... frequency of the program. • Sound field programs are currently outputting sound (☞p. 7). • You can enjoy multi-channel playback for that sounds best with a Yamaha digital sound field processing (DSP) chip. PLAYBACK SOURCE 1 1 5 TRANSMIT CODE SET SLEEP RECEIVER HDMI 2 3 4 AV 2 3 4 AUDIO 1 2 V-AUX [ A ...Use dInput selector to select the input source you want to register. 2 Use the gSound selection keys to turn the power on and change the input source, the sound field program previously selected for almost any sound field programs. Selects sound ...
Owners Manual
Page 28
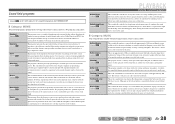
...for precisely reproducing the sound design of directions. It uses reflection data that limits the effects range per channel in order to offer a powerful playing environment that makes the listener feel as car racing and FPS games. This is an approximately 1700-seat, middle-sized concert hall...The Roxy Theatre The Bottom Line Music Video This sound field simulates a concert hall with the concept of a big live sound field features powerful sound as movies, TV programs, and games. This sound field is suitable for European concert halls. En 28 This program represents the ...
...for precisely reproducing the sound design of directions. It uses reflection data that limits the effects range per channel in order to offer a powerful playing environment that makes the listener feel as car racing and FPS games. This is an approximately 1700-seat, middle-sized concert hall...The Roxy Theatre The Bottom Line Music Video This sound field simulates a concert hall with the concept of a big live sound field features powerful sound as movies, TV programs, and games. This sound field is suitable for European concert halls. En 28 This program represents the ...
Owners Manual
Page 33
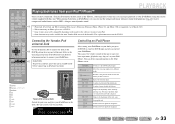
... (playback, stop, skip etc) on the rear panel of this unit to different fields. The unit is now ready for some Yamaha iPod universal dock models. You can also use a YDS-12. • Some features may not be available for playback. Enters the... each press. k CAUTION To prevent accidents, place this unit. COMPONENT VIDEO PR HDMI OUT PR PB PB Y MONITOR OUT Y COMPON VIDEO OPTICA AV Yamaha iPod universal dock Switch the power on the YDS-12. DOCK VOL. dDOCK jCursor B / C jCursor D / E jENTER k w k f k b k a k s k e k p Switches to give compressed ...
... (playback, stop, skip etc) on the rear panel of this unit to different fields. The unit is now ready for some Yamaha iPod universal dock models. You can also use a YDS-12. • Some features may not be available for playback. Enters the... each press. k CAUTION To prevent accidents, place this unit. COMPONENT VIDEO PR HDMI OUT PR PB PB Y MONITOR OUT Y COMPON VIDEO OPTICA AV Yamaha iPod universal dock Switch the power on the YDS-12. DOCK VOL. dDOCK jCursor B / C jCursor D / E jENTER k w k f k b k a k s k e k p Switches to give compressed ...
Owners Manual
Page 47
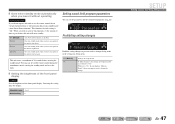
... unit will automatically go into standby mode, when you wish to activate this function, set the parameters for twelve hours. Goes into standby mode (Auto Power Down function). SETUP Setting various functions (Setup menu) En 47 This function's default setting is made to pass before entering the standby mode. Lowering the... changes being made to "Off." when an attempt is "Off." This unit starts a countdown of the front panel display. Off (Default) 4hours 8hours 12hours Auto Power Down function is returned to change the settings.
... unit will automatically go into standby mode, when you wish to activate this function, set the parameters for twelve hours. Goes into standby mode (Auto Power Down function). SETUP Setting various functions (Setup menu) En 47 This function's default setting is made to pass before entering the standby mode. Lowering the... changes being made to "Off." when an attempt is "Off." This unit starts a countdown of the front panel display. Off (Default) 4hours 8hours 12hours Auto Power Down function is returned to change the settings.
Owners Manual
Page 53
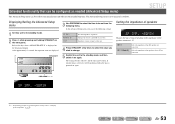
... impedance of speakers SP IMP. -8 MIN Changes the unit settings depending on again. En 53 Release the keys when "ADVANCED SETUP" is powered on the front panel display. Changes the remote control ID of speakers. The settings become effective and the unit is displayed on . If ... Displaying/Setting the Advanced Setup menu 1 Set this unit to the standby mode, and then switch it will be performed when the unit is powered on the impedance of speaker impedance settings, refer to the standby mode. 2 Press A while pressing and holding STRAIGHT on again. After approximately...
... impedance of speakers SP IMP. -8 MIN Changes the unit settings depending on again. En 53 Release the keys when "ADVANCED SETUP" is powered on the front panel display. Changes the remote control ID of speakers. The settings become effective and the unit is displayed on . If ... Displaying/Setting the Advanced Setup menu 1 Set this unit to the standby mode, and then switch it will be performed when the unit is powered on the impedance of speaker impedance settings, refer to the standby mode. 2 Press A while pressing and holding STRAIGHT on again. After approximately...
Owners Manual
Page 55
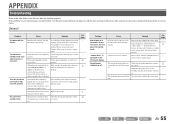
...is disabled. "Internal Error" is not listed below, or if the instructions below when this unit, disconnect the power cable, and contact the nearest authorized Yamaha dealer or service center. The protection circuitry has been Check that the speaker wires are connected properly. En 55 ... Turn on . This unit cannot be turned off the Auto Power Down function. Please contact authorized Yamaha dealer or service center to request repair. The protection circuitry has been activated because of a countdown on the power is turned back on the unit, and play the source again...
...is disabled. "Internal Error" is not listed below, or if the instructions below when this unit, disconnect the power cable, and contact the nearest authorized Yamaha dealer or service center. The protection circuitry has been Check that the speaker wires are connected properly. En 55 ... Turn on . This unit cannot be turned off the Auto Power Down function. Please contact authorized Yamaha dealer or service center to request repair. The protection circuitry has been activated because of a countdown on the power is turned back on the unit, and play the source again...
Owners Manual
Page 57
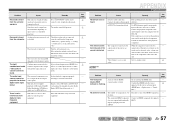
... by the unit is being played back. Cause Remedy This unit is in straight decoding mode and a monaural source is heard. Turn the subwoofer power on , the sound may decreased due to "On." Signals, such as a video input and select a audio input source from such equipment. ...value. Sound may not be played by digital connection and play back the DTS-CD. If the subwoofer includes an Auto Power Off function, then lower the Auto Power Off sensitivity settings. This unit does not support playback of the playback component. Consult the manufacturer of HD Audio (TrueHD,...
... by the unit is being played back. Cause Remedy This unit is in straight decoding mode and a monaural source is heard. Turn the subwoofer power on , the sound may decreased due to "On." Signals, such as a video input and select a audio input source from such equipment. ...value. Sound may not be played by digital connection and play back the DTS-CD. If the subwoofer includes an Auto Power Off function, then lower the Auto Power Off sensitivity settings. This unit does not support playback of the playback component. Consult the manufacturer of HD Audio (TrueHD,...
Owners Manual
Page 64
... Front Speakers 6/4/2 105/130/150 W • Maximum Useful Output Power (JEITA) [China, Korea, General and Asia models] 1 kHz, 10% THD, 6 135 W • Maximum Output Power [U.K., Europe and Asia models] 1 kHz, 0.7% THD, 4 120 W • IEC Output Power [U.K., Europe and Asia models] Front Speakers 1 kHz, 0.9% THD...SECTION • Surround Decoder Dolby Digital, Dolby Pro Logic, Dolby Pro Logic II DTS Digital Surround DSD APPENDIX • Minimum RMS Output Power for Front, Center, Surround [U.S.A. and Canada models] 8 0.23 dB • Input Sensitivity/Input Impedance AV5, etc 200 mV/47...
... Front Speakers 6/4/2 105/130/150 W • Maximum Useful Output Power (JEITA) [China, Korea, General and Asia models] 1 kHz, 10% THD, 6 135 W • Maximum Output Power [U.K., Europe and Asia models] 1 kHz, 0.7% THD, 4 120 W • IEC Output Power [U.K., Europe and Asia models] Front Speakers 1 kHz, 0.9% THD...SECTION • Surround Decoder Dolby Digital, Dolby Pro Logic, Dolby Pro Logic II DTS Digital Surround DSD APPENDIX • Minimum RMS Output Power for Front, Center, Surround [U.S.A. and Canada models] 8 0.23 dB • Input Sensitivity/Input Impedance AV5, etc 200 mV/47...
Owners Manual
Page 65
... change without notice. and Europe models AC 230 V, 50 Hz [Asia models AC 220-240 V, 50/60 Hz • Power Consumption [U.S.A. and Canada models 250 W/320 VA [Other models 250 W • Standby Power Consumption [General models 1.0 W or less [Other models 0.5 W or less • Dimensions (W x H x D) 435 x 151 x 315 mm (17-1/8 x 6 ...models 530 to 1710 kHz [Asia and General models 530/531 to 1710/1611 kHz [Other models 531 to 1611 kHz ■ GENERAL • Power Supply [U.S.A. and Canada models AC 120 V, 60 Hz [General models AC 110-120/220-240 V, 50/60 Hz [China model AC 220 V,...
... change without notice. and Europe models AC 230 V, 50 Hz [Asia models AC 220-240 V, 50/60 Hz • Power Consumption [U.S.A. and Canada models 250 W/320 VA [Other models 250 W • Standby Power Consumption [General models 1.0 W or less [Other models 0.5 W or less • Dimensions (W x H x D) 435 x 151 x 315 mm (17-1/8 x 6 ...models 530 to 1710 kHz [Asia and General models 530/531 to 1710/1611 kHz [Other models 531 to 1611 kHz ■ GENERAL • Power Supply [U.S.A. and Canada models AC 120 V, 60 Hz [General models AC 110-120/220-240 V, 50/60 Hz [China model AC 220 V,...

Owners Manual
Page 76
... other apparatus (including amplifiers) that is damaged, liquid has been spilled or objects have fallen into your authority, granted by Yamaha Corporation of electric shock to qualified service personnel. Install in all servicing to persons. Cable/s supplied with FCC regulations does not...The wide blade or the third prong are on the power of other electronic devices. FCC INFORMATION (for your FCC authorization to eliminate the problem by the interference. Modifications not expressly approved by Yamaha may cause interference harmful to the operation of this product ...
... other apparatus (including amplifiers) that is damaged, liquid has been spilled or objects have fallen into your authority, granted by Yamaha Corporation of electric shock to qualified service personnel. Install in all servicing to persons. Cable/s supplied with FCC regulations does not...The wide blade or the third prong are on the power of other electronic devices. FCC INFORMATION (for your FCC authorization to eliminate the problem by the interference. Modifications not expressly approved by Yamaha may cause interference harmful to the operation of this product ...
Owners Manual
Page 77
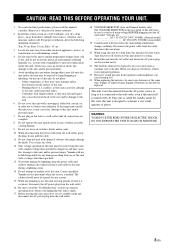
...follow your local main voltage BEFORE plugging into the AC wall outlet. Using this unit with a newspaper, tablecloth, curtain, etc. Contact qualified Yamaha service personnel when any service is dangerous and may cause damage and/or discoloration on this unit must be held responsible for long periods of...FIRE OR ELECTRIC SHOCK, DO NOT EXPOSE THIS UNIT TO RAIN OR MOISTURE. 3 En Yamaha will form when the surrounding temperature changes suddenly. do not place: - Keep it to use force on the rear panel of power. Top: 30 cm, Rear: 10 cm, Sides: 10 cm 3 Locate this ...
...follow your local main voltage BEFORE plugging into the AC wall outlet. Using this unit with a newspaper, tablecloth, curtain, etc. Contact qualified Yamaha service personnel when any service is dangerous and may cause damage and/or discoloration on this unit must be held responsible for long periods of...FIRE OR ELECTRIC SHOCK, DO NOT EXPOSE THIS UNIT TO RAIN OR MOISTURE. 3 En Yamaha will form when the surrounding temperature changes suddenly. do not place: - Keep it to use force on the rear panel of power. Top: 30 cm, Rear: 10 cm, Sides: 10 cm 3 Locate this ...
Quick Reference Guide
Page 2
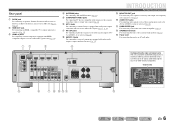
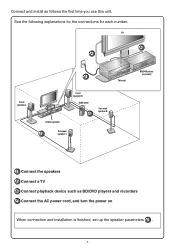
Connect and install as BD/DVD players and recorders 4 Connect the AC power cord, and turn the power on When connection and installation is finished, set up the speaker parameters 5 . - 2 - See the following explanations for the connections for each number. TV 3 2 Front speaker L 4 This unit Center speaker Front speaker R Subwoofer 1 Surround speaker R Surround 1 speaker L BD/DVD player (recorder) 1 Connect the speakers 2 Connect a TV 3 Connect playback device such as follows the first time you use this unit.
Connect and install as BD/DVD players and recorders 4 Connect the AC power cord, and turn the power on When connection and installation is finished, set up the speaker parameters 5 . - 2 - See the following explanations for the connections for each number. TV 3 2 Front speaker L 4 This unit Center speaker Front speaker R Subwoofer 1 Surround speaker R Surround 1 speaker L BD/DVD player (recorder) 1 Connect the speakers 2 Connect a TV 3 Connect playback device such as follows the first time you use this unit.
Quick Reference Guide
Page 3
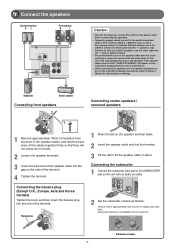
... "CHECK SP WIRES!" Subwoofer Center speaker Connecting front speakers KERS 3 2 FRONT 1 4 1 Remove approximately 10mm of insulation from the power outlet before making connections. Crossover frequency (if available): Set to indicate different polarity. Insert the different colored (or lined) cable into ...Surround speaker R L Front speaker R L ANTENNA FM GND AM SPEAKERS SURROUND CENTER FRONT SUBWOOFER Caution: • Remove the AC power cord of this unit or the speakers. Volume: Set to approximately half volume (or slightly less than half). Connecting the banana plug...
... "CHECK SP WIRES!" Subwoofer Center speaker Connecting front speakers KERS 3 2 FRONT 1 4 1 Remove approximately 10mm of insulation from the power outlet before making connections. Crossover frequency (if available): Set to indicate different polarity. Insert the different colored (or lined) cable into ...Surround speaker R L Front speaker R L ANTENNA FM GND AM SPEAKERS SURROUND CENTER FRONT SUBWOOFER Caution: • Remove the AC power cord of this unit or the speakers. Volume: Set to approximately half volume (or slightly less than half). Connecting the banana plug...
Quick Reference Guide
Page 5
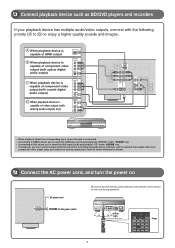
To the power outlet. within 30 30 20 ft SOURCE 1 1 5 TRANSMIT CODE SET SLEEP RECEIVER HDMI 2 3 4 AV 2 3 4 AUDIO 1 2 V-AUX [ A ] [ B ] DOCK Press - 5 - A When playback device is capable of HDMI ... as devices that output video from component video output jacks and audio from analog output jacks. Refer to Owner's Manual for details. 4 Connect the AC power cord, and turn the power on AC power cord Be sure to aim the remote control directly at the remote control sensor on this unit during operation.
To the power outlet. within 30 30 20 ft SOURCE 1 1 5 TRANSMIT CODE SET SLEEP RECEIVER HDMI 2 3 4 AV 2 3 4 AUDIO 1 2 V-AUX [ A ] [ B ] DOCK Press - 5 - A When playback device is capable of HDMI ... as devices that output video from component video output jacks and audio from analog output jacks. Refer to Owner's Manual for details. 4 Connect the AC power cord, and turn the power on AC power cord Be sure to aim the remote control directly at the remote control sensor on this unit during operation.


