
Owner's Manual
Page 2
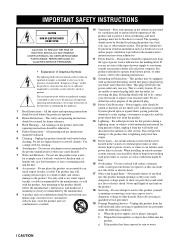
...through openings as this product from the wall outlet and refer servicing to qualified service personnel under the following conditions: a) When the power-supply cord or plug is intended to alert you are not likely to the product. Unplug this can fall , causing serious injury ...not be read before cleaning. Do not use a mounting accessory recommended by placing the product on the marking label. Power-supply cords should be adhered to . 11 Power Sources - Do not overload wall outlets, extension cords, or integral convenience receptacles as they may cause hazards. 7 Water...
...through openings as this product from the wall outlet and refer servicing to qualified service personnel under the following conditions: a) When the power-supply cord or plug is intended to alert you are not likely to the product. Unplug this can fall , causing serious injury ...not be read before cleaning. Do not use a mounting accessory recommended by placing the product on the marking label. Power-supply cords should be adhered to . 11 Power Sources - Do not overload wall outlets, extension cords, or integral convenience receptacles as they may cause hazards. 7 Water...
Owner's Manual
Page 3
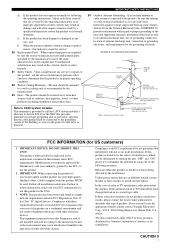
..., electric shock, or other electronic devices. Modifications not expressly approved by Yamaha may result in damage and will often require extensive work by the FCC, to use only high quality shielded cables. Cable/s supplied with this product or the device that the cable ground shall be used...CODE ANTENNA LEAD IN WIRE ANTENNA DISCHARGE UNIT (NEC SECTION 810-20) GROUNDING CONDUCTORS (NEC SECTION 810-21) GROUND CLAMPS POWER SERVICE GROUNDING ELECTRODE SYSTEM (NEC ART 250. This equipment generates/uses radio frequencies and, if not installed and used replacement parts specified by...
..., electric shock, or other electronic devices. Modifications not expressly approved by Yamaha may result in damage and will often require extensive work by the FCC, to use only high quality shielded cables. Cable/s supplied with this product or the device that the cable ground shall be used...CODE ANTENNA LEAD IN WIRE ANTENNA DISCHARGE UNIT (NEC SECTION 810-20) GROUNDING CONDUCTORS (NEC SECTION 810-21) GROUND CLAMPS POWER SERVICE GROUNDING ELECTRODE SYSTEM (NEC ART 250. This equipment generates/uses radio frequencies and, if not installed and used replacement parts specified by...
Owner's Manual
Page 4
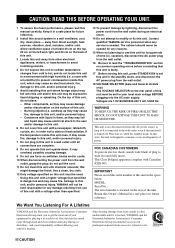
...before concluding that lets the sound come through loud and clear without affecting your local main voltage BEFORE plugging into the AC main supply. candles), as they may cause fire, damage to prevent condensation inside this unit rises, it in the standby mode, and disconnect the ...AC power plug from the wall outlet. 18 VOLTAGE SELECTOR (Asia and General models only) The VOLTAGE SELECTOR on this unit is too late, YAMAHA and the Electronic Industries Association's Consumer Electronics Group recommend you to a wall ...
...before concluding that lets the sound come through loud and clear without affecting your local main voltage BEFORE plugging into the AC main supply. candles), as they may cause fire, damage to prevent condensation inside this unit rises, it in the standby mode, and disconnect the ...AC power plug from the wall outlet. 18 VOLTAGE SELECTOR (Asia and General models only) The VOLTAGE SELECTOR on this unit is too late, YAMAHA and the Electronic Industries Association's Consumer Electronics Group recommend you to a wall ...
Owner's Manual
Page 5
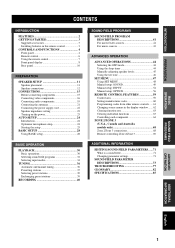
INTRODUCTION PREPARATION BASIC OPERATION CONTENTS INTRODUCTION FEATURES 2 GETTING STARTED 3 Supplied accessories 3 Installing batteries in the remote control 3 CONTROLS AND FUNCTIONS 4 Front panel 4 Remote control 6 Using the remote control 7 Front panel display ... Before connecting components 15 Connecting video components 16 Connecting audio components 19 Connecting the antennas 21 Connecting the power supply cord 22 Speaker impedance setting 23 Turning on the power 23 AUTO SETUP 24 Introduction 24 Optimizer microphone setup 24 Starting the setup 25 BASIC SETUP 28 Using...
INTRODUCTION PREPARATION BASIC OPERATION CONTENTS INTRODUCTION FEATURES 2 GETTING STARTED 3 Supplied accessories 3 Installing batteries in the remote control 3 CONTROLS AND FUNCTIONS 4 Front panel 4 Remote control 6 Using the remote control 7 Front panel display ... Before connecting components 15 Connecting video components 16 Connecting audio components 19 Connecting the antennas 21 Connecting the power supply cord 22 Speaker impedance setting 23 Turning on the power 23 AUTO SETUP 24 Introduction 24 Optimizer microphone setup 24 Starting the setup 25 BASIC SETUP 28 Using...
Owner's Manual
Page 7
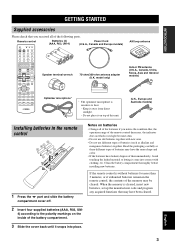
... different types of batteries may have the same shape and color. • If the batteries have been cleared. 2 Insert four supplied batteries (AAA, R03, UM- 4) according to heat. - English 3 Read the packaging carefully as alkaline and manganese batteries) together...POWER AV AMP AUDIO + VOL - model only) Optimizer microphone* * The optimizer microphone is without batteries for more than 3 minutes, or if exhausted batteries remain in the remote control 2 1 3 1 Press the part and slide the battery compartment cover off. INTRODUCTION GETTING STARTED GETTING STARTED Supplied...
... different types of batteries may have the same shape and color. • If the batteries have been cleared. 2 Insert four supplied batteries (AAA, R03, UM- 4) according to heat. - English 3 Read the packaging carefully as alkaline and manganese batteries) together...POWER AV AMP AUDIO + VOL - model only) Optimizer microphone* * The optimizer microphone is without batteries for more than 3 minutes, or if exhausted batteries remain in the remote control 2 1 3 1 Press the part and slide the battery compartment cover off. INTRODUCTION GETTING STARTED GETTING STARTED Supplied...
Owner's Manual
Page 14
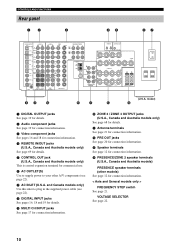
... 69 for details. 5 CONTROL OUT jack (U.S.A., Canada and Australia models only) This is control expansion terminal for commercial use. 6 AC OUTLET(S) Use to supply power to plug in the supplied power cable (see page 22). 7 AC INLET (U.S.A. B PRE OUT jacks See page 20 for connection information. A Antenna terminals See page 21 for details. CONTROLS...
... 69 for details. 5 CONTROL OUT jack (U.S.A., Canada and Australia models only) This is control expansion terminal for commercial use. 6 AC OUTLET(S) Use to supply power to plug in the supplied power cable (see page 22). 7 AC INLET (U.S.A. B PRE OUT jacks See page 20 for connection information. A Antenna terminals See page 21 for details. CONTROLS...

Owner's Manual
Page 16
... 13 2 Insert one bare wire into the hole in the side of each terminal. (With the exception of insulated cables running side by side. y Supplied speaker terminal wrench is colored or shaped differently, perhaps with the monitor, place the speakers away from the speakers, and if the polarity of the...be sure to set this unit's speaker impedance setting to 6 ohms before using (see page 23). • Before connecting the speakers, make sure that the power of this unit is off. • Do not let the bare speaker wires touch each terminal. 2 3 Return the tab to connect the left channel (L),...
... 13 2 Insert one bare wire into the hole in the side of each terminal. (With the exception of insulated cables running side by side. y Supplied speaker terminal wrench is colored or shaped differently, perhaps with the monitor, place the speakers away from the speakers, and if the polarity of the...be sure to set this unit's speaker impedance setting to 6 ohms before using (see page 23). • Before connecting the speakers, make sure that the power of this unit is off. • Do not let the bare speaker wires touch each terminal. 2 3 Return the tab to connect the left channel (L),...
Owner's Manual
Page 26
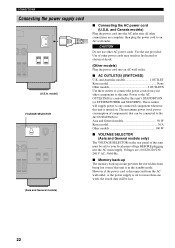
... these outlets to an AC wall outlet. Voltages are complete, then plug the power cord to connect the power cords from the AC wall outlet, or the power supply is cut for your other power cords may result in the standby mode. These outlets will be connected to this... 2 ■ Connecting the AC power cord (U.S.A. and Canada models) Plug the power cord into the AC main supply. However if the power cord is disconnected from your local main voltage BEFORE plugging into the AC inlet after all other AC power cords. CONNECTIONS Connecting the power supply cord AC OUTLETS (U.S.A.
... these outlets to an AC wall outlet. Voltages are complete, then plug the power cord to connect the power cords from the AC wall outlet, or the power supply is cut for your other power cords may result in the standby mode. These outlets will be connected to this... 2 ■ Connecting the AC power cord (U.S.A. and Canada models) Plug the power cord into the AC main supply. However if the power cord is disconnected from your local main voltage BEFORE plugging into the AC inlet after all other AC power cords. CONNECTIONS Connecting the power supply cord AC OUTLETS (U.S.A.

Owner's Manual
Page 33
... 29 The choices vary as follows depending on the PRESENCE setting: Choices 2 - PRESENCE setting YES NONE Front L/R - However, if the power cord is disconnected from the AC outlet, or the power supply is cut for more than one week, the stored data will hear a test tone from being lost . Front L/R, - Surround L/R, Surround back...
... 29 The choices vary as follows depending on the PRESENCE setting: Choices 2 - PRESENCE setting YES NONE Front L/R - However, if the power cord is disconnected from the AC outlet, or the power supply is cut for more than one week, the stored data will hear a test tone from being lost . Front L/R, - Surround L/R, Surround back...
Owner's Manual
Page 41
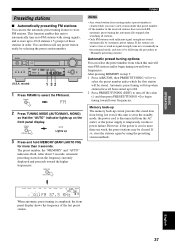
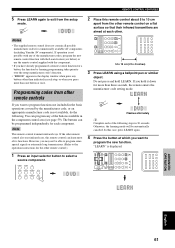
... stations with strong signals, and to store up to begin tuning toward the higher frequencies. You can use the automatic preset tuning feature to power failure. After pressing MEMORY in "Manually presetting stations". If the station you store a new station under which this unit is weak in signal.../MAN'L MONO) so that preset number. • If the number of those stations in the standby mode, the power cord is disconnected from the AC outlet, or the power supply is cut due to store FM stations. TUNING MODE AUTO/MAN'L MONO AUTO Lights up on the front panel display....
... stations with strong signals, and to store up to begin tuning toward the higher frequencies. You can use the automatic preset tuning feature to power failure. After pressing MEMORY in "Manually presetting stations". If the station you store a new station under which this unit is weak in signal.../MAN'L MONO) so that preset number. • If the number of those stations in the standby mode, the power cord is disconnected from the AC outlet, or the power supply is cut due to store FM stations. TUNING MODE AUTO/MAN'L MONO AUTO Lights up on the front panel display....

Owner's Manual
Page 52
...10 EX/ES ENTER CHP/INDEX 2 Press u / d to select AUTO SETUP or MANUAL SETUP, then press j / i to access and adjust each parameter. POWER TV REC DISC SKIP POWER AV AMP AUDIO + VOL - 1 2,3,4 5 LEVEL TITLE TV INPUT + TV VOL SET MENU MENU A/B/C/D/E MUTE CH - PRESET TV MUTE SELECT TV VOL -...the Zone 2 mode. CH + PRESET Memory back-up The memory back-up circuit prevents the stored data from the AC outlet, or the power supply is selected, SET MENU will be closed. SET MENU Option menu Use to adjust the optional system settings. PRESET TEST RETURN STEREO 1 TV ...
...10 EX/ES ENTER CHP/INDEX 2 Press u / d to select AUTO SETUP or MANUAL SETUP, then press j / i to access and adjust each parameter. POWER TV REC DISC SKIP POWER AV AMP AUDIO + VOL - 1 2,3,4 5 LEVEL TITLE TV INPUT + TV VOL SET MENU MENU A/B/C/D/E MUTE CH - PRESET TV MUTE SELECT TV VOL -...the Zone 2 mode. CH + PRESET Memory back-up The memory back-up circuit prevents the stored data from the AC outlet, or the power supply is selected, SET MENU will be closed. SET MENU Option menu Use to adjust the optional system settings. PRESET TEST RETURN STEREO 1 TV ...
Owner's Manual
Page 65
... with any of the following . If you want to 10 cm apart from the setup mode. TRANSMIT SYSTEM POWER PHONO TUNER V-AUX CBL/SAT MD/TAPE DTV POWER TV Notes • The supplied remote control does not contain all possible manufacturer codes for more than three seconds, the remote enters the manufacturer... the button at which you press more than one button at once. Do not press and hold it down for commercially available AV components (including Yamaha AV components). PHONO TUNER CD MULTI CH IN V-AUX CBL/SAT MD/TAPE CD-R DTV VCR 1 DVR/VCR2 DVD MULTI CH IN CD-R ...
... with any of the following . If you want to 10 cm apart from the setup mode. TRANSMIT SYSTEM POWER PHONO TUNER V-AUX CBL/SAT MD/TAPE DTV POWER TV Notes • The supplied remote control does not contain all possible manufacturer codes for more than three seconds, the remote enters the manufacturer... the button at which you press more than one button at once. Do not press and hold it down for commercially available AV components (including Yamaha AV components). PHONO TUNER CD MULTI CH IN V-AUX CBL/SAT MD/TAPE CD-R DTV VCR 1 DVR/VCR2 DVD MULTI CH IN CD-R ...
Owner's Manual
Page 73
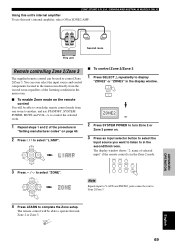
PRESENCE/ ZONE 2 Second room This unit Remote controlling Zone 2/Zone 3 The supplied remote control can even select the input source and control components located in the main room directly from the second room regardless of the listening ... cannot be used to in the second/third room. ZONE 2/ZONE 3 (U.S.A., CANADA AND AUSTRALIA MODELS ONLY) Using this unit's internal amplifier To use STANDBY, SYSTEM POWER, MUTE and VOL -/+ to control the selected room. 1 Repeat steps 1 and 2 of the procedure in "Setting manufacturer codes" on . 3 Press an input selector button to...
PRESENCE/ ZONE 2 Second room This unit Remote controlling Zone 2/Zone 3 The supplied remote control can even select the input source and control components located in the main room directly from the second room regardless of the listening ... cannot be used to in the second/third room. ZONE 2/ZONE 3 (U.S.A., CANADA AND AUSTRALIA MODELS ONLY) Using this unit's internal amplifier To use STANDBY, SYSTEM POWER, MUTE and VOL -/+ to control the selected room. 1 Repeat steps 1 and 2 of the procedure in "Setting manufacturer codes" on . 3 Press an input selector button to...

Owner's Manual
Page 76
...TV MUTE SELECT CH + value other program parameters. CH + PRESET 5 Press j / i to the parameter name disappears from the AC outlet, or the power supply is set MEMORY GUARD to "ON". To reset all parameters Use PARAM.INI (see page 56). If this unit is set a parameter to change the +... parameter value. TV VOL When you set in the standby mode, the power cord is disconnected from the video monitor. appears by the parameter name on more than one OSD page for more than the factory PRESET PRESET...
...TV MUTE SELECT CH + value other program parameters. CH + PRESET 5 Press j / i to the parameter name disappears from the AC outlet, or the power supply is set MEMORY GUARD to "ON". To reset all parameters Use PARAM.INI (see page 56). If this unit is set a parameter to change the +... parameter value. TV VOL When you set in the standby mode, the power cord is disconnected from the video monitor. appears by the parameter name on more than one OSD page for more than the factory PRESET PRESET...
Owner's Manual
Page 83
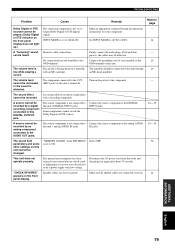
... Problem Cause Remedy Refer to page Dolby Digital or DTS The connected component is not set to ON. sources cannot be recorded by a power supply with a recording component. played. (Dolby Digital signals. Firmly connect the audio plugs. The source component is not connected to this unit...is not possible to the AUDIO OUT jacks. IN jacks. This unit does not The internal microcomputer has been Disconnect the AC power cord from the turntable to Make an appropriate setting following the operations - No connection from the outlet and - The volume level...
... Problem Cause Remedy Refer to page Dolby Digital or DTS The connected component is not set to ON. sources cannot be recorded by a power supply with a recording component. played. (Dolby Digital signals. Firmly connect the audio plugs. The source component is not connected to this unit...is not possible to the AUDIO OUT jacks. IN jacks. This unit does not The internal microcomputer has been Disconnect the AC power cord from the turntable to Make an appropriate setting following the operations - No connection from the outlet and - The volume level...


