

Owner's Manual
Page 3
... determined by turning the unit "OFF" and "ON", please try to eliminate the problem by playing it is provided to call the CATV system installer's attention to grounding electrodes, and requirements for Class "B" digital devices. This equipment generates/uses radio frequencies and, if not installed and used . In the case of cable entry as practical. Since hearing damage from excessive volume levels. 3 Cable/s supplied...
... determined by turning the unit "OFF" and "ON", please try to eliminate the problem by playing it is provided to call the CATV system installer's attention to grounding electrodes, and requirements for Class "B" digital devices. This equipment generates/uses radio frequencies and, if not installed and used . In the case of cable entry as practical. Since hearing damage from excessive volume levels. 3 Cable/s supplied...
Owner's Manual
Page 5
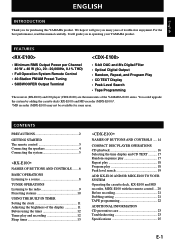
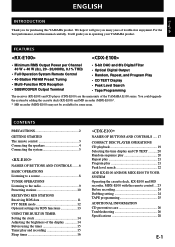
... Preset Tuning • SUBWOOFER Output Terminal • S-bit DAC and 8fs Digital Filter • Optical Digital Output • Random, Repeat, and Program Play • CD TEXT Display • Peak Level Search • Tape Programming The receiver (RX-E100) and CD player (CDX-E100) are the main units of the display 11 Before using the timer 12 Timer play and recording 12 Sleep timer 13 NAMES OF BUTTONS AND CONTROLS ..... 14 COMPACT DISC PLAYER OPERATIONS CD playback 16 Selecting the time display...
... Preset Tuning • SUBWOOFER Output Terminal • S-bit DAC and 8fs Digital Filter • Optical Digital Output • Random, Repeat, and Program Play • CD TEXT Display • Peak Level Search • Tape Programming The receiver (RX-E100) and CD player (CDX-E100) are the main units of the display 11 Before using the timer 12 Timer play and recording 12 Sleep timer 13 NAMES OF BUTTONS AND CONTROLS ..... 14 COMPACT DISC PLAYER OPERATIONS CD playback 16 Selecting the time display...

Owner's Manual
Page 6
... UNIT CAUTIONS • To assure the finest performance, please read the "Troubleshooting" section on common operating errors before starting playback of an audio source: increase the volume gradually to an appropriate level after play has started. • When not planning to use this unit for a long time, the temperature inside the cabinet. It may result in a well ventilated, cool, dry...
... UNIT CAUTIONS • To assure the finest performance, please read the "Troubleshooting" section on common operating errors before starting playback of an audio source: increase the volume gradually to an appropriate level after play has started. • When not planning to use this unit for a long time, the temperature inside the cabinet. It may result in a well ventilated, cool, dry...

Owner's Manual
Page 7
..., the batteries are weak. Replace batteries with clothing, etc. Remote control operation range NATURAL SOUND STEREO RECEIVER RX-E100 VOLUME DISPLAY MEMORY AUTO/MAN'L PRESET/BAND PRESET/TUNING STANDBY/ON PHONES TIME ADJ TIMER BASS HOUR TREBLE MIN BALANCE MIN MAX INPUT -+ -+ LR Remote control sensor 2 Insert 4 batteries into the battery compartment. E-3 Clean the battery compartment thoroughly before installing new batteries. Battery replacement If you find that level up your system can be used for the remote control 1 Remove the battery...
..., the batteries are weak. Replace batteries with clothing, etc. Remote control operation range NATURAL SOUND STEREO RECEIVER RX-E100 VOLUME DISPLAY MEMORY AUTO/MAN'L PRESET/BAND PRESET/TUNING STANDBY/ON PHONES TIME ADJ TIMER BASS HOUR TREBLE MIN BALANCE MIN MAX INPUT -+ -+ LR Remote control sensor 2 Insert 4 batteries into the battery compartment. E-3 Clean the battery compartment thoroughly before installing new batteries. Battery replacement If you find that level up your system can be used for the remote control 1 Remove the battery...

Owner's Manual
Page 8
... a wall outlet. • Use external FM/AM antennas if you need better reception. Set up the AM loop antenna, then connect it. 3 Connect the FM Antenna. 75 Ω UNBAL FM ANT 4 Connect the AC power cord to connect the system using the supplied cords and accessories. Red: positive(+) Black: negative(-) 2 1 3 2 Connect the AM Antenna. GETTING STARTED Connecting the speakers Never plug the AC power cord to secure the wire. Consult your dealer...
... a wall outlet. • Use external FM/AM antennas if you need better reception. Set up the AM loop antenna, then connect it. 3 Connect the FM Antenna. 75 Ω UNBAL FM ANT 4 Connect the AC power cord to connect the system using the supplied cords and accessories. Red: positive(+) Black: negative(-) 2 1 3 2 Connect the AM Antenna. GETTING STARTED Connecting the speakers Never plug the AC power cord to secure the wire. Consult your dealer...
Owner's Manual
Page 12
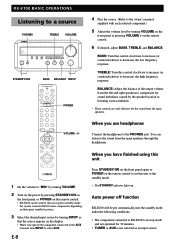
... source. (Refer to the owner's manual supplied with each selected component.) 5 Adjust the volume level by turning VOLUME on the front panel or pressing VOLUME + on the remote control to set this unit Press STANDBY/ON on the front panel again or POWER on the remote control. 6 If desired, adjust BASS, TREBLE, and BALANCE. RX-E100 BASIC OPERATIONS Listening to a source PHONES TREBLE VOLUME NATURAL SOUND STEREO RECEIVER RX-E100 VOLUME TIMER STANTBY DISPLAY MEMORY AUTO/MAN'L PRESET/BAND PRESET/TUNING STANDBY/ON PHONES TIME ADJ TIMER BASS HOUR TREBLE MIN BALANCE MIN MAX INPUT...
... source. (Refer to the owner's manual supplied with each selected component.) 5 Adjust the volume level by turning VOLUME on the front panel or pressing VOLUME + on the remote control to set this unit Press STANDBY/ON on the front panel again or POWER on the remote control. 6 If desired, adjust BASS, TREBLE, and BALANCE. RX-E100 BASIC OPERATIONS Listening to a source PHONES TREBLE VOLUME NATURAL SOUND STEREO RECEIVER RX-E100 VOLUME TIMER STANTBY DISPLAY MEMORY AUTO/MAN'L PRESET/BAND PRESET/TUNING STANDBY/ON PHONES TIME ADJ TIMER BASS HOUR TREBLE MIN BALANCE MIN MAX INPUT...

Owner's Manual
Page 13
... on the display and you press TUNING or , the frequency changes step by turning INPUT so that "AUTO" disappears from the display. 3 Press TUNING (For a higher frequency) or (For a lower frequency) to select the reception band. Notes • If automatic tuning search does not find radio stations automatically and manually. AUTO/MAN'L PRESET/TUNING / NATURAL SOUND STEREO RECEIVER RX-E100 VOLUME DISPLAY MEMORY AUTO/MAN'L PRESET/BAND PRESET/TUNING STANDBY/ON PHONES TIME ADJ TIMER BASS HOUR TREBLE MIN BALANCE MIN MAX INPUT -+ -+ LR TUNER OPERATIONS Manual tuning 1 Follow...
... on the display and you press TUNING or , the frequency changes step by turning INPUT so that "AUTO" disappears from the display. 3 Press TUNING (For a higher frequency) or (For a lower frequency) to select the reception band. Notes • If automatic tuning search does not find radio stations automatically and manually. AUTO/MAN'L PRESET/TUNING / NATURAL SOUND STEREO RECEIVER RX-E100 VOLUME DISPLAY MEMORY AUTO/MAN'L PRESET/BAND PRESET/TUNING STANDBY/ON PHONES TIME ADJ TIMER BASS HOUR TREBLE MIN BALANCE MIN MAX INPUT -+ -+ LR TUNER OPERATIONS Manual tuning 1 Follow...
Owner's Manual
Page 14
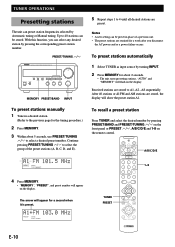
...RECEIVER RX-E100 VOLUME DISPLAY MEMORY AUTO/MAN'L PRESET/BAND PRESET/TUNING STANDBY/ON PHONES TIME ADJ TIMER BASS HOUR TREBLE MIN BALANCE MIN MAX INPUT -+ -+ LR MEMORY PRESET/BAND INPUT To preset stations manually 1 Tune in place of the preset stations (A, B, C, D, and E). 5 Repeat steps 1 to A1, A2...A8 sequentially. PRESET STEREO TUNED MEMORY TUNER PRESET VOLUME TAPE MD AUX CD TUNER PRESET MD REC TAPE REC TAPE MODE DUBBING START E-10 With this function, you disconnect the AC power cord or a power failure occurs. To preset stations automatically 1 Select...
...RECEIVER RX-E100 VOLUME DISPLAY MEMORY AUTO/MAN'L PRESET/BAND PRESET/TUNING STANDBY/ON PHONES TIME ADJ TIMER BASS HOUR TREBLE MIN BALANCE MIN MAX INPUT -+ -+ LR MEMORY PRESET/BAND INPUT To preset stations manually 1 Tune in place of the preset stations (A, B, C, D, and E). 5 Repeat steps 1 to A1, A2...A8 sequentially. PRESET STEREO TUNED MEMORY TUNER PRESET VOLUME TAPE MD AUX CD TUNER PRESET MD REC TAPE REC TAPE MODE DUBBING START E-10 With this function, you disconnect the AC power cord or a power failure occurs. To preset stations automatically 1 Select...
Owner's Manual
Page 15
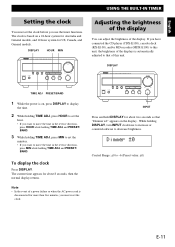
... holding DISPLAY, turn INPUT clockwise to increase or counterclockwise to -6 (Preset value: ±0) E-11 DISPLAY NATURAL SOUND STEREO RECEIVER RX-E100 VOLUME DISPLAY MEMORY AUTO/MAN'L PRESET/BAND PRESET/TUNING STANDBY/ON PHONES TIME ADJ TIMER BASS HOUR TREBLE MIN BALANCE MIN MAX INPUT -+ -+ LR INPUT Press and hold DISPLAY for US, Canada, and General models. The clock is automatically adjusted to that "Dimmer ±0" appears on , press DISPLAY to display the time. 2 While holding TIME ADJ, press HOUR to set the...
... holding DISPLAY, turn INPUT clockwise to increase or counterclockwise to -6 (Preset value: ±0) E-11 DISPLAY NATURAL SOUND STEREO RECEIVER RX-E100 VOLUME DISPLAY MEMORY AUTO/MAN'L PRESET/BAND PRESET/TUNING STANDBY/ON PHONES TIME ADJ TIMER BASS HOUR TREBLE MIN BALANCE MIN MAX INPUT -+ -+ LR INPUT Press and hold DISPLAY for US, Canada, and General models. The clock is automatically adjusted to that "Dimmer ±0" appears on , press DISPLAY to display the time. 2 While holding TIME ADJ, press HOUR to set the...

Owner's Manual
Page 16
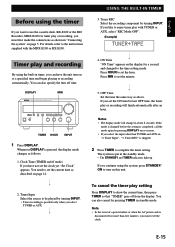
... display mode changes as above. USING THE BUILT-IN TIMER Before using the timer If you want to use the cassette deck, KX-E100 or the MD Recorder, MDX-E100 for timer play or recording, you must reset the clock. Whenever DISPLAY is changed to the time setting mode. E-12 DISPLAY MIN NATURAL SOUND STEREO RECEIVER RX-E100 VOLUME DISPLAY MEMORY AUTO/MAN'L PRESET/BAND PRESET/TUNING STANDBY/ON PHONES TIME ADJ TIMER BASS HOUR TREBLE MIN BALANCE MIN MAX INPUT -+ -+ LR TIMER HOUR INPUT 1 Press DISPLAY...
... display mode changes as above. USING THE BUILT-IN TIMER Before using the timer If you want to use the cassette deck, KX-E100 or the MD Recorder, MDX-E100 for timer play or recording, you must reset the clock. Whenever DISPLAY is changed to the time setting mode. E-12 DISPLAY MIN NATURAL SOUND STEREO RECEIVER RX-E100 VOLUME DISPLAY MEMORY AUTO/MAN'L PRESET/BAND PRESET/TUNING STANDBY/ON PHONES TIME ADJ TIMER BASS HOUR TREBLE MIN BALANCE MIN MAX INPUT -+ -+ LR TIMER HOUR INPUT 1 Press DISPLAY...
Owner's Manual
Page 27
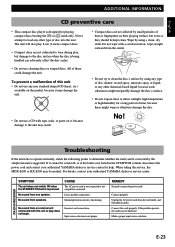
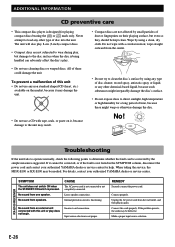
Troubleshooting If the unit fails to operate normally, check the following points to determine whether the fault can adversely affect the disc's play. • Do not use cleaning discs or warped discs. When taking the service, the MDX-E100 or KX-E100 may be defective. For details, contact your authorized YAMAHA dealer or service center for help. Internal protection circuit is not proper. Input source selection is functioning. Connect properly. Connect the...
Troubleshooting If the unit fails to operate normally, check the following points to determine whether the fault can adversely affect the disc's play. • Do not use cleaning discs or warped discs. When taking the service, the MDX-E100 or KX-E100 may be defective. For details, contact your authorized YAMAHA dealer or service center for help. Internal protection circuit is not proper. Input source selection is functioning. Connect properly. Connect the...

Owner's Manual
Page 28
... moisture on and off. Set current time. Check the disc carefully; The disc is not connected securely. The system cable is dirty. Direct sunlight or lighting (of an inverter type of the unit. Securely connect the audio cables. Use within 6 meters and 60 degree radius. The remote control does not work normally. Install a multi-element type FM antenna if possible. Preset memory has been erased. Change orientation of a nearby electrical...
... moisture on and off. Set current time. Check the disc carefully; The disc is not connected securely. The system cable is dirty. Direct sunlight or lighting (of an inverter type of the unit. Securely connect the audio cables. Use within 6 meters and 60 degree radius. The remote control does not work normally. Install a multi-element type FM antenna if possible. Preset memory has been erased. Change orientation of a nearby electrical...
Owner's Manual
Page 3
... Output Power per Channel 40 W + 40 W (6Ω, 20 - 20,000Hz, 0.1% THD) • Full Operation System Remote Control • 40-Station FM/AM Preset Tuning • Multi-Function RDS Reception • SUBWOOFER Output Terminal • S-bit DAC and 8fs Digital Filter • Optical Digital Output • Random, Repeat, and Program Play • CD TEXT Display • Peak Level Search • Tape Programming The receiver (RX-E100) and CD player (CDX-E100) are the main units of the display 14 Before using...
... Output Power per Channel 40 W + 40 W (6Ω, 20 - 20,000Hz, 0.1% THD) • Full Operation System Remote Control • 40-Station FM/AM Preset Tuning • Multi-Function RDS Reception • SUBWOOFER Output Terminal • S-bit DAC and 8fs Digital Filter • Optical Digital Output • Random, Repeat, and Program Play • CD TEXT Display • Peak Level Search • Tape Programming The receiver (RX-E100) and CD player (CDX-E100) are the main units of the display 14 Before using...
Owner's Manual
Page 4
... possible damage to consume a very small quantity of power. SPECIAL INSTRUCTIONS FOR U.K. If something drops into the set, contact your dealer. • Do not use force on switches, knobs or cords. • Always set the VOLUME control to minimum before starting playback of an audio source: increase the volume gradually to an appropriate level after play has started. • When not planning to rain...
... possible damage to consume a very small quantity of power. SPECIAL INSTRUCTIONS FOR U.K. If something drops into the set, contact your dealer. • Do not use force on switches, knobs or cords. • Always set the VOLUME control to minimum before starting playback of an audio source: increase the volume gradually to an appropriate level after play has started. • When not planning to rain...

Owner's Manual
Page 10
RX-E100 BASIC OPERATIONS Listening to a source PHONES TREBLE VOLUME NATURAL SOUND STEREO RECEIVER RX-E100 VOLUME TIMER STANTBY DISPLAY MEMORY AUTO/MAN'L PRESET/BAND PRESET/TUNING STANDBY/ON PHONES TIME ADJ TIMER BASS HOUR PTY SELECT MIN TREBLE BALANCE MIN MAX INPUT -+ -+ LR STANDBY/ON BASS BALANCE INPUT SLEEP A REP D PEAK TIME B RNDM DISP C PROG E TAPE POWER FREQ PS/PTY/RT/CT PTY SEEK MODE START VOLUME TAPE MD AUX CD TUNER MD REC PRESET PTY SELECT TAPE REC TAPE VOLUME -/+ MODE DUBBING START 1 Set the volume to "MIN" by turning VOLUME. 2 Turn on the...
RX-E100 BASIC OPERATIONS Listening to a source PHONES TREBLE VOLUME NATURAL SOUND STEREO RECEIVER RX-E100 VOLUME TIMER STANTBY DISPLAY MEMORY AUTO/MAN'L PRESET/BAND PRESET/TUNING STANDBY/ON PHONES TIME ADJ TIMER BASS HOUR PTY SELECT MIN TREBLE BALANCE MIN MAX INPUT -+ -+ LR STANDBY/ON BASS BALANCE INPUT SLEEP A REP D PEAK TIME B RNDM DISP C PROG E TAPE POWER FREQ PS/PTY/RT/CT PTY SEEK MODE START VOLUME TAPE MD AUX CD TUNER MD REC PRESET PTY SELECT TAPE REC TAPE VOLUME -/+ MODE DUBBING START 1 Set the volume to "MIN" by turning VOLUME. 2 Turn on the...

Owner's Manual
Page 12
...TUNED MEMORY MODE DUBBING START E-10 PRESET/TUNING / NATURAL SOUND STEREO RECEIVER RX-E100 VOLUME DISPLAY MEMORY AUTO/MAN'L PRESET/BAND PRESET/TUNING STANDBY/ON PHONES TIME ADJ TIMER BASS HOUR PTY SELECT MIN TREBLE BALANCE MIN MAX INPUT -+ -+ LR MEMORY PRESET/BAND INPUT To preset stations manually 1 Tune in place of the preset stations (A, B, C, D, and E). 5 Repeat steps 1 to A1, A2...A8 sequentially. Continue pressing PRESET/TUNING / to select the group of a previous one. • The preset stations are stored, the display will appear on the remote control...
...TUNED MEMORY MODE DUBBING START E-10 PRESET/TUNING / NATURAL SOUND STEREO RECEIVER RX-E100 VOLUME DISPLAY MEMORY AUTO/MAN'L PRESET/BAND PRESET/TUNING STANDBY/ON PHONES TIME ADJ TIMER BASS HOUR PTY SELECT MIN TREBLE BALANCE MIN MAX INPUT -+ -+ LR MEMORY PRESET/BAND INPUT To preset stations manually 1 Tune in place of the preset stations (A, B, C, D, and E). 5 Repeat steps 1 to A1, A2...A8 sequentially. Continue pressing PRESET/TUNING / to select the group of a previous one. • The preset stations are stored, the display will appear on the remote control...
Owner's Manual
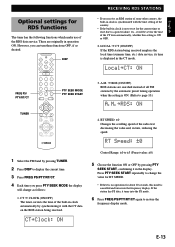
Page 15
... station being received. A.M. = RDS (ON/OFF) RDS stations are originally in the display. Control Range: ±0 to ±3 (Preset value: ±0) 5 Choose the function ON or OFF by pressing PTY SEEK START, confirming it turns into the frequency display. If the station has PS data, it in operation ON. However, you press PTY SEEK MODE the display will be set for the current time or reset due to a power...
... station being received. A.M. = RDS (ON/OFF) RDS stations are originally in the display. Control Range: ±0 to ±3 (Preset value: ±0) 5 Choose the function ON or OFF by pressing PTY SEEK START, confirming it turns into the frequency display. If the station has PS data, it in operation ON. However, you press PTY SEEK MODE the display will be set for the current time or reset due to a power...
Owner's Manual
Page 17
... TIMER indicators light up. DISPLAY MIN NATURAL SOUND STEREO RECEIVER RX-E100 VOLUME DISPLAY MEMORY AUTO/MAN'L PRESET/BAND PRESET/TUNING STANDBY/ON PHONES TIME ADJ TIMER BASS HOUR PTY SELECT MIN TREBLE BALANCE MIN MAX INPUT -+ -+ LR TIMER HOUR INPUT 1 Press DISPLAY. Timer Input Select the source to be played by turning INPUT. • Timer recording is completed, call the mode again by pressing DISPLAY once or more than TUNER and AUX on page 14. 2. If the mode is changed to the time setting mode. The system...
... TIMER indicators light up. DISPLAY MIN NATURAL SOUND STEREO RECEIVER RX-E100 VOLUME DISPLAY MEMORY AUTO/MAN'L PRESET/BAND PRESET/TUNING STANDBY/ON PHONES TIME ADJ TIMER BASS HOUR PTY SELECT MIN TREBLE BALANCE MIN MAX INPUT -+ -+ LR TIMER HOUR INPUT 1 Press DISPLAY. Timer Input Select the source to be played by turning INPUT. • Timer recording is completed, call the mode again by pressing DISPLAY once or more than TUNER and AUX on page 14. 2. If the mode is changed to the time setting mode. The system...
Owner's Manual
Page 28
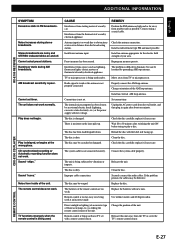
... direct sunlight, high temperature or high humidity for a long period of these might warp or otherwise damage the disc. RX-E100 RECEIVER SYMPTOM The unit does not switch ON when the STANDBY/ON switch is not connected or not completely connected. No sound from the wall outlet, and then plug in the SYMPTOM column, disconnect the power cord and contact your authorized YAMAHA dealer or service center...
... direct sunlight, high temperature or high humidity for a long period of these might warp or otherwise damage the disc. RX-E100 RECEIVER SYMPTOM The unit does not switch ON when the STANDBY/ON switch is not connected or not completely connected. No sound from the wall outlet, and then plug in the SYMPTOM column, disconnect the power cord and contact your authorized YAMAHA dealer or service center...
Owner's Manual
Page 29
.... Replace the disc. CDX-E100 CD PLAYER REMOTE CONTROL E-27 CD synchronized recording or Automatic recording function does not work normally. The remote control does not work. TV functions strangely when the remote control is too weak due to play a disc. Antenna input is being used near TV set timer. Install a multi-element type FM antenna if possible. Reprogram memory presets. Properly connect the AM loop antenna. Install an external AM loop antenna. There is being used . The system cable...
.... Replace the disc. CDX-E100 CD PLAYER REMOTE CONTROL E-27 CD synchronized recording or Automatic recording function does not work normally. The remote control does not work. TV functions strangely when the remote control is too weak due to play a disc. Antenna input is being used near TV set timer. Install a multi-element type FM antenna if possible. Reprogram memory presets. Properly connect the AM loop antenna. Install an external AM loop antenna. There is being used . The system cable...


