
Setup Guide
Page 1
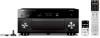
... 9) ■ HDMI cable (x 2) ■ Audio pin cable (x 1) ■ Digital optical cable or stereo pin cable (x 1) (unnecessary if your TV supports ARC) http://download.yamaha.com/ Cables necessary for U.S.A. AV Receiver 1 Preparations Accessories Check that the following accessories are supplied with this guide and "Owner 's Manual" can be downloaded from...channel system and play back surround sound of this product. ■ Remote control ■ Batteries (AAA, R03, UM-4) (x 4) Easy Setup Guide English for connections You need to separately prepare the following website.
... 9) ■ HDMI cable (x 2) ■ Audio pin cable (x 1) ■ Digital optical cable or stereo pin cable (x 1) (unnecessary if your TV supports ARC) http://download.yamaha.com/ Cables necessary for U.S.A. AV Receiver 1 Preparations Accessories Check that the following accessories are supplied with this guide and "Owner 's Manual" can be downloaded from...channel system and play back surround sound of this product. ■ Remote control ■ Batteries (AAA, R03, UM-4) (x 4) Easy Setup Guide English for connections You need to separately prepare the following website.
Setup Guide
Page 3
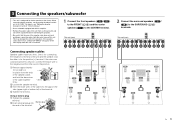
...(black) firmly. a Remove approximately 10 mm (3/8") of insulation from an AC wall outlet and turn off the subwoofer before connecting the speakers. • Be careful that the core of the speaker cable does not touch anything or come into contact with...appear on the front display when this unit to the SURROUND ( / ) terminals. One is configured for the positive (+) terminal. This may damage this unit. b 2 Connect the surround speakers ( / ) to "6 Ω MIN". BACK (REAR) SUBWOOFER CENTER R SURROUND L R SURROUND BACK L SPEAKERS ZONE 2/ZONE 3/R.PRESENCE R EXTRA ...
...(black) firmly. a Remove approximately 10 mm (3/8") of insulation from an AC wall outlet and turn off the subwoofer before connecting the speakers. • Be careful that the core of the speaker cable does not touch anything or come into contact with...appear on the front display when this unit to the SURROUND ( / ) terminals. One is configured for the positive (+) terminal. This may damage this unit. b 2 Connect the surround speakers ( / ) to "6 Ω MIN". BACK (REAR) SUBWOOFER CENTER R SURROUND L R SURROUND BACK L SPEAKERS ZONE 2/ZONE 3/R.PRESENCE R EXTRA ...

Setup Guide
Page 4
... ZONE OUT PRE OUT (SINGLE) (FRONT) 1 2 This unit (rear) FRONT SURROUND SUR. BACK SU(BRWEOAORF)ER CENTER CENTER FRONT 3 Connect the surround back speakers ( / ) to the AUDIO 3 AUDIO 4 MULTI CH INPUT CENTER ZONE OUT PRE OUT (SINGLE) (FRONT) 1...R SURROUND L R SURROUND BACK L SPEAKERS ZONE 2/ZONE 3/R.PRESENCE R EXTRA SP2 L CENTER R FRONT L ZONE 2/ZONE 3/F.PRESENCE/ BI-AMP R EXTRA SP1 L 5 Connect the subwoofer ( SUBWOOFER (1) jack. ) to the SURROUND BACK ( / ) terminals. BACK SUBWOOFER ZONE 2 ZONE 3 FRONT SURROUND SUR. BACK (REAR) SUBWOOFER CENTER R ...
... ZONE OUT PRE OUT (SINGLE) (FRONT) 1 2 This unit (rear) FRONT SURROUND SUR. BACK SU(BRWEOAORF)ER CENTER CENTER FRONT 3 Connect the surround back speakers ( / ) to the AUDIO 3 AUDIO 4 MULTI CH INPUT CENTER ZONE OUT PRE OUT (SINGLE) (FRONT) 1...R SURROUND L R SURROUND BACK L SPEAKERS ZONE 2/ZONE 3/R.PRESENCE R EXTRA SP2 L CENTER R FRONT L ZONE 2/ZONE 3/F.PRESENCE/ BI-AMP R EXTRA SP1 L 5 Connect the subwoofer ( SUBWOOFER (1) jack. ) to the SURROUND BACK ( / ) terminals. BACK SUBWOOFER ZONE 2 ZONE 3 FRONT SURROUND SUR. BACK (REAR) SUBWOOFER CENTER R ...
Setup Guide
Page 5
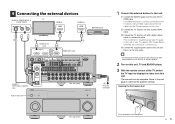
... R EXTRA SP1 L AC IN O AUDIO1 (OPTICAL or AUDIO) jack NATURAL SOUND AV RECEIVER RX-A2010 SINGLE This unit (rear) Turn on this unit. a Connect the BD/DVD player and this unit with another HDMI cable. b Connect the TV and this connection is required to play back TV audio on this unit MAIN ZONE PURE DIRECT...
... R EXTRA SP1 L AC IN O AUDIO1 (OPTICAL or AUDIO) jack NATURAL SOUND AV RECEIVER RX-A2010 SINGLE This unit (rear) Turn on this unit. a Connect the BD/DVD player and this unit with another HDMI cable. b Connect the TV and this connection is required to play back TV audio on this unit MAIN ZONE PURE DIRECT...
Setup Guide
Page 6
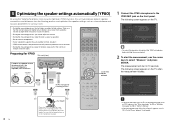
...start the measurement, use the tripod screws to fix the microphone in place. 1 Connect the YPAO microphone to half. 5 Optimizing the speaker settings automatically (YPAO) By using the Yamaha Parametric room Acoustic Optimizer (YPAO) function, this function at night when it may ... USB DOCK TUNER SIRIUS SCENE 1 2 3 4 V-AUX 4 NET [A] 4 Turned on the front panel. Also, refrain from using this unit automatically detects speaker connections and distances from the room. You can use the cursor keys to select "Measure" and press ENTER. Take care that the test tone does not...
...start the measurement, use the tripod screws to fix the microphone in place. 1 Connect the YPAO microphone to half. 5 Optimizing the speaker settings automatically (YPAO) By using the Yamaha Parametric room Acoustic Optimizer (YPAO) function, this function at night when it may ... USB DOCK TUNER SIRIUS SCENE 1 2 3 4 V-AUX 4 NET [A] 4 Turned on the front panel. Also, refrain from using this unit automatically detects speaker connections and distances from the room. You can use the cursor keys to select "Measure" and press ENTER. Take care that the test tone does not...

Setup Guide
Page 7
... (top of the speaker indicated with "Reverse". b Use the cursor keys to select "Result" and press ENTER. c Check the cable connections (+/-) of an AV equipment, etc). If the speaker is connected correctly: You can save the current settings. Depending on the type of Phase" appears Follow the procedure below to select "SAVE... YPAO measurement again. a Use the cursor keys to select "Wiring". Press RETURN and proceed to select "Save/Cancel" and press ENTER. If the speaker is connected incorrectly: Turn off this message may appear even if the speakers are...
... (top of the speaker indicated with "Reverse". b Use the cursor keys to select "Result" and press ENTER. c Check the cable connections (+/-) of an AV equipment, etc). If the speaker is connected correctly: You can save the current settings. Depending on the type of Phase" appears Follow the procedure below to select "SAVE... YPAO measurement again. a Use the cursor keys to select "Wiring". Press RETURN and proceed to select "Save/Cancel" and press ENTER. If the speaker is connected incorrectly: Turn off this message may appear even if the speakers are...
Setup Guide
Page 8
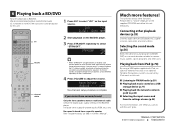
...For more information, see "What you can do with iPod, an optional Yamaha iPod dock or an optional Yamaha iPod wireless system, you can enjoy iPod music on this unit" (p.6). © 2011 Yamaha Corporation YD505A0/ESEN1 No sound is heard from all speakers, press STEREO repeatedly...from the surround back and front presence speakers. We recommend playing back multichannel audio (5.1-channel or more features! SP IMP. - Connecting other uses. If you cannot have surround sound Only the front speakers work on multichannel audio Check the digital audio output setting ...
...For more information, see "What you can do with iPod, an optional Yamaha iPod dock or an optional Yamaha iPod wireless system, you can enjoy iPod music on this unit" (p.6). © 2011 Yamaha Corporation YD505A0/ESEN1 No sound is heard from all speakers, press STEREO repeatedly...from the surround back and front presence speakers. We recommend playing back multichannel audio (5.1-channel or more features! SP IMP. - Connecting other uses. If you cannot have surround sound Only the front speakers work on multichannel audio Check the digital audio output setting ...


