

Owner's Manual
Page 3
... eliminate the problem by the interference. Article 810 of other controls may result in damage and will not occur in all installation instructions. Follow all installations. This product, when installed as an improper adjustment of the National Electrical Code, ANSI/NFPA 70, provides information with this product MUST be used replacement parts specified by the operating instructions as indicated in the instructions contained in this manual, meets...
... eliminate the problem by the interference. Article 810 of other controls may result in damage and will not occur in all installation instructions. Follow all installations. This product, when installed as an improper adjustment of the National Electrical Code, ANSI/NFPA 70, provides information with this product MUST be used replacement parts specified by the operating instructions as indicated in the instructions contained in this manual, meets...
Owner's Manual
Page 4
... temperature inside this unit. Using this unit, and/or personal injury. The cabinet should never be exposed to this unit with chemical solvents; vacation), disconnect the AC power plug from loud sounds is often undetectable until all connections are complete. 8 Do not operate this manual carefully. Turn the power off . MODEL: Serial No.: The serial number is too late, YAMAHA and the Electronic Industries...
... temperature inside this unit. Using this unit, and/or personal injury. The cabinet should never be exposed to this unit with chemical solvents; vacation), disconnect the AC power plug from loud sounds is often undetectable until all connections are complete. 8 Do not operate this manual carefully. Turn the power off . MODEL: Serial No.: The serial number is too late, YAMAHA and the Electronic Industries...
Owner's Manual
Page 5
... COMPONENTS 11 Connecting a CD recorder or MD recorder 11 Connecting the Power Cables 12 INSTALLING BATTERIES IN THE REMOTE CONTROL 13 USING THE REMOTE CONTROL 13 BASIC OPERATION TURNING THE POWER TO ON/STANDBY 14 SELECTING AN INPUT SOURCE 14 ADJUSTING THE VOLUME LEVEL 15 MUTING THE SOUND (MUTE 15 ADJUSTING THE CLOCK 16 SETTING THE TIMER 16 SETTING THE SLEEP TIMER 17 CHANGING THE BRIGHTNESS OF THE DISPLAY 18 CHANGING DVD SETTING ON THE TV (OSD MENU 19 Operating the OSD menu 19 OSD guide 20 SUPPORTED DISC...
... COMPONENTS 11 Connecting a CD recorder or MD recorder 11 Connecting the Power Cables 12 INSTALLING BATTERIES IN THE REMOTE CONTROL 13 USING THE REMOTE CONTROL 13 BASIC OPERATION TURNING THE POWER TO ON/STANDBY 14 SELECTING AN INPUT SOURCE 14 ADJUSTING THE VOLUME LEVEL 15 MUTING THE SOUND (MUTE 15 ADJUSTING THE CLOCK 16 SETTING THE TIMER 16 SETTING THE SLEEP TIMER 17 CHANGING THE BRIGHTNESS OF THE DISPLAY 18 CHANGING DVD SETTING ON THE TV (OSD MENU 19 Operating the OSD menu 19 OSD guide 20 SUPPORTED DISC...

Owner's Manual
Page 6
SUPPLIED ACCESSORIES This product includes the following parts. REPEAT A-B PROG TV INPUT PRESETd RANDOM uPRESET GUI MENU SET UP ENTER TOP MENU /RETURN TV VOL + MUTE VOLUME + - Remote control Batteries (x2) (AA, R06, UM-3) Video pin cable STANDBY/ON POWER TV 1 2 3 4 5 6 7 8 DIMMER SLEEP 9 0 + TV CH - EQ TV DVD/CD DIRECT AUX TUNER SUBTITLE ANGLE ZOOM AUDIO Indoor FM antenna AM loop antenna 2 NIGHT - In case of differences between the manual and the product, the product has priority...
SUPPLIED ACCESSORIES This product includes the following parts. REPEAT A-B PROG TV INPUT PRESETd RANDOM uPRESET GUI MENU SET UP ENTER TOP MENU /RETURN TV VOL + MUTE VOLUME + - Remote control Batteries (x2) (AA, R06, UM-3) Video pin cable STANDBY/ON POWER TV 1 2 3 4 5 6 7 8 DIMMER SLEEP 9 0 + TV CH - EQ TV DVD/CD DIRECT AUX TUNER SUBTITLE ANGLE ZOOM AUDIO Indoor FM antenna AM loop antenna 2 NIGHT - In case of differences between the manual and the product, the product has priority...

Owner's Manual
Page 7
... disc playback. 6 INPUT Selects an input source. 7 h/e Starts and pauses disc playback. 8 PHONES jack Connects headphones. 9 TIMER Sets the DVD receiver to the timer play mode or sleep mode. 0 DISPLAY Displays the status information such as the elapsed time of current track/chapter. B MULTI JOG Adjusts various settings and the frequency when tuning radio station. C MODE Supports MULTI JOG and enables various operations. D Remote control sensor Receives signals from the remote control. Pressing during standby mode turns on . E VOLUME Adjusts the volume level. INTRODUCTION Front panel...
... disc playback. 6 INPUT Selects an input source. 7 h/e Starts and pauses disc playback. 8 PHONES jack Connects headphones. 9 TIMER Sets the DVD receiver to the timer play mode or sleep mode. 0 DISPLAY Displays the status information such as the elapsed time of current track/chapter. B MULTI JOG Adjusts various settings and the frequency when tuning radio station. C MODE Supports MULTI JOG and enables various operations. D Remote control sensor Receives signals from the remote control. Pressing during standby mode turns on . E VOLUME Adjusts the volume level. INTRODUCTION Front panel...

Owner's Manual
Page 9
... transmitter Sends signals to "TUNING RADIO STATIONS" (page 33). Adjusts the overall volume level. 0 Input selection buttons Selects the input source of the display (page 18). 9 VOLUME +/- FM/AM • Radio station tuning • Radio station preset, etc. and Canada models unless otherwise specified. To switch the operation mode • DVD/CD mode: Press DVD/CD. • TUNER mode: Press TUNER. y You can also operate the TV and other components connected to change the remote control button assignments. NIGHT - The DVD receiver has two main operation modes. Press again to...
... transmitter Sends signals to "TUNING RADIO STATIONS" (page 33). Adjusts the overall volume level. 0 Input selection buttons Selects the input source of the display (page 18). 9 VOLUME +/- FM/AM • Radio station tuning • Radio station preset, etc. and Canada models unless otherwise specified. To switch the operation mode • DVD/CD mode: Press DVD/CD. • TUNER mode: Press TUNER. y You can also operate the TV and other components connected to change the remote control button assignments. NIGHT - The DVD receiver has two main operation modes. Press again to...
Owner's Manual
Page 11
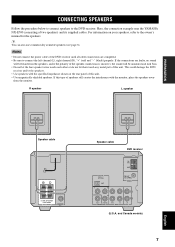
... also use commercially available speakers (see page 8). For information on the rear panel of this unit. TUNER L R IN TV (U.S.A. Here, the connection example uses the YAMAHA NX-E700 (consisting of the DVD receiver until all cable connections are faulty, no sound will be unnatural and lack bass. • Do not let the bare speaker wires touch each other or do not let them touch any metal part of...
... also use commercially available speakers (see page 8). For information on the rear panel of this unit. TUNER L R IN TV (U.S.A. Here, the connection example uses the YAMAHA NX-E700 (consisting of the DVD receiver until all cable connections are faulty, no sound will be unnatural and lack bass. • Do not let the bare speaker wires touch each other or do not let them touch any metal part of...

Owner's Manual
Page 13
... TV using the supplied video pin cable. 2 To output sound from the speakers connected to the DVD receiver, connect the TV IN jacks on the DVD receiver to the component video input jacks on your TV using the supplied video pin cable and audio cables (sold separately). and Canada models) AM ANT GND R L 6Ω MIN. /SPEAKER CLASS 2 WIRING SPEAKERS SUB WOOFER OUT DIGITAL OPTICAL OUT FM ANT 75Ω UNBAL. IN OUT ■ Other connection methods To make a component video connection, a corresponding cable is required. VIDEO TV L AUDIO R Video pin cable (supplied) Audio cable...
... TV using the supplied video pin cable. 2 To output sound from the speakers connected to the DVD receiver, connect the TV IN jacks on the DVD receiver to the component video input jacks on your TV using the supplied video pin cable and audio cables (sold separately). and Canada models) AM ANT GND R L 6Ω MIN. /SPEAKER CLASS 2 WIRING SPEAKERS SUB WOOFER OUT DIGITAL OPTICAL OUT FM ANT 75Ω UNBAL. IN OUT ■ Other connection methods To make a component video connection, a corresponding cable is required. VIDEO TV L AUDIO R Video pin cable (supplied) Audio cable...

Owner's Manual
Page 14
... PR VIDEO COMPONENT VIDEO OUT OUT IN AUX FM ANT 75Ω UNBAL. A good earth ground is a problem of weak radio wave reception in your area or you want to improve radio reception, we recommend that you do not need to connect AM and FM antennas to the FM ANT jack on the DVD receiver. 2 Place the antenna away from the DVD receiver and speaker cables. While...
... PR VIDEO COMPONENT VIDEO OUT OUT IN AUX FM ANT 75Ω UNBAL. A good earth ground is a problem of weak radio wave reception in your area or you want to improve radio reception, we recommend that you do not need to connect AM and FM antennas to the FM ANT jack on the DVD receiver. 2 Place the antenna away from the DVD receiver and speaker cables. While...

Owner's Manual
Page 17
... to spill liquid on the battery cover and open the cover. 2 Insert the two supplied batteries (AA, R06, UM-3) into contact with new one. • Do not use an old battery together with your skin or clothing. USING THE REMOTE CONTROL INPUT STANDBY/ON PHONES TIMER DISPLAY SOUND MULTI JOG PUSH-ENTER MODE VOLUME 30˚ 30˚ Within 6 m (20 feet) Use the remote control within two minutes to preserve...
... to spill liquid on the battery cover and open the cover. 2 Insert the two supplied batteries (AA, R06, UM-3) into contact with new one. • Do not use an old battery together with your skin or clothing. USING THE REMOTE CONTROL INPUT STANDBY/ON PHONES TIMER DISPLAY SOUND MULTI JOG PUSH-ENTER MODE VOLUME 30˚ 30˚ Within 6 m (20 feet) Use the remote control within two minutes to preserve...

Owner's Manual
Page 24
... VIDEO OUT COMPONENT jacks. Select a setting from the DIGITAL OPTICAL OUT jack is displayed. When using a TV compatible with the "PAL" setting, the video quality may deteriorate. • Depending on this to "OFF" or "ON". Use the number buttons to change a password to LPCM 48 kHz. Sets the LPCM 48 kHz down sampled to prevent children from the speakers or AUX OUT jacks during playback of your TV. ON: The audio signal output...
... VIDEO OUT COMPONENT jacks. Select a setting from the DIGITAL OPTICAL OUT jack is displayed. When using a TV compatible with the "PAL" setting, the video quality may deteriorate. • Depending on this to "OFF" or "ON". Use the number buttons to change a password to LPCM 48 kHz. Sets the LPCM 48 kHz down sampled to prevent children from the speakers or AUX OUT jacks during playback of your TV. ON: The audio signal output...

Owner's Manual
Page 26
... not work properly when using Playback Control (page 27) to play a video CD. ■ To specify a track for playback VCD CD Use the number buttons to play back the current track. ■ To stop playback, the DVD receiver automatically memorizes the stopping position, and "RESUME" appears in the front panel display. y • If you want to enter the track number you do not perform any operations for...
... not work properly when using Playback Control (page 27) to play a video CD. ■ To specify a track for playback VCD CD Use the number buttons to play back the current track. ■ To stop playback, the DVD receiver automatically memorizes the stopping position, and "RESUME" appears in the front panel display. y • If you want to enter the track number you do not perform any operations for...

Owner's Manual
Page 27
... TV INPUT PRESETd RANDOM uPRESET GUI MENU Number buttons PROG ENTER SET UP ENTER TOP MENU /RETURN TV VOL + MUTE VOLUME + - If playback does not start automatically, press p. To customize playback order, turn on the DVD receiver. BASIC OPERATION English 23 Customizing playback order (Program Play) You can store up in the DVD receiver display, the OSD menu disappears, and Program Play starts automatically. USEFUL PLAYBACK OPERATIONS USEFUL PLAYBACK OPERATIONS You can enjoy movie or music discs...
... TV INPUT PRESETd RANDOM uPRESET GUI MENU Number buttons PROG ENTER SET UP ENTER TOP MENU /RETURN TV VOL + MUTE VOLUME + - If playback does not start automatically, press p. To customize playback order, turn on the DVD receiver. BASIC OPERATION English 23 Customizing playback order (Program Play) You can store up in the DVD receiver display, the OSD menu disappears, and Program Play starts automatically. USEFUL PLAYBACK OPERATIONS USEFUL PLAYBACK OPERATIONS You can enjoy movie or music discs...

Owner's Manual
Page 35
... VIDEO (NTSC/PROGRESSIVE SCAN) DVD-V Progressive Scan is video that has component video input jacks compatible with Progressive Scan. For details on connections, refer to bottom. The Progressive Scan mode is activated and the "PROGRESSIVE" indicator lights up in the DVD receiver display. ■ To turn off the Progressive Scan mode While disc playback is stopped, press SET UP to turn on a 16:9 wide television screen, Progressive Scan may fill the screen...
... VIDEO (NTSC/PROGRESSIVE SCAN) DVD-V Progressive Scan is video that has component video input jacks compatible with Progressive Scan. For details on connections, refer to bottom. The Progressive Scan mode is activated and the "PROGRESSIVE" indicator lights up in the DVD receiver display. ■ To turn off the Progressive Scan mode While disc playback is stopped, press SET UP to turn on a 16:9 wide television screen, Progressive Scan may fill the screen...

Owner's Manual
Page 41
... on the connected component. Also, you can enjoy the sources played back on your component using the remote control by setting a remote control code (page 41). EQ TV DVD/CD DIRECT AUX TUNER SUBTITLE ANGLE ZOOM AUDIO AUX 1 Turn on the TV, then press STANDBY/ON ( ) to turn on the DVD receiver. 2 Press TV. 1 Turn on the component, then press STANDBY/ON ( ) to turn on the DVD receiver. 2 Press AUX. 3 Start playback on connection methods, refer to the audio output L/R jacks on the component with DVD receiver. ADVANCED OPERATION English...
... on the connected component. Also, you can enjoy the sources played back on your component using the remote control by setting a remote control code (page 41). EQ TV DVD/CD DIRECT AUX TUNER SUBTITLE ANGLE ZOOM AUDIO AUX 1 Turn on the TV, then press STANDBY/ON ( ) to turn on the DVD receiver. 2 Press TV. 1 Turn on the component, then press STANDBY/ON ( ) to turn on the DVD receiver. 2 Press AUX. 3 Start playback on connection methods, refer to the audio output L/R jacks on the component with DVD receiver. ADVANCED OPERATION English...

Owner's Manual
Page 45
... this case, use the remote control supplied with the product. REPEAT A-B PROG TV INPUT PRESETd RANDOM uPRESET GUI MENU Number buttons PROG SET UP ENTER TOP MENU /RETURN TV VOL + MUTE VOLUME + - In this case, perform step 1 again. Note Depending on the remote control. CONTROLLING EXTERNAL COMPONENTS In addition to controlling this unit, you can set the input source of the DVD receiver to the component you want to operate with the remote control. 2 While holding...
... this case, use the remote control supplied with the product. REPEAT A-B PROG TV INPUT PRESETd RANDOM uPRESET GUI MENU Number buttons PROG SET UP ENTER TOP MENU /RETURN TV VOL + MUTE VOLUME + - In this case, perform step 1 again. Note Depending on the remote control. CONTROLLING EXTERNAL COMPONENTS In addition to controlling this unit, you can set the input source of the DVD receiver to the component you want to operate with the remote control. 2 While holding...

Owner's Manual
Page 46
... channels. 3 TV INPUT Switches the TV inputs. 4 TV VOL +/- Adjusts the TV volume level. 5 POWER TV Turns the Cable TV or Digital Broadcast Satellite tuner on, or set it to the standby mode. 42 Functions for TV operation (TV) 1 Number buttons Enters a channel number. 2 TV CH +/- NIGHT - EQ TV DVD/CD DIRECT AUX TUNER SUBTITLE ANGLE ZOOM AUDIO 1 2 3 4 STANDBY/ON POWER TV 1 2 3 4 5 6 7 8 DIMMER SLEEP 9 0 + TV CH - Adjusts the TV volume level. 5 POWER TV Turn the TV on the external components using the remote control. 1 2 3 STANDBY/ON POWER...
... channels. 3 TV INPUT Switches the TV inputs. 4 TV VOL +/- Adjusts the TV volume level. 5 POWER TV Turns the Cable TV or Digital Broadcast Satellite tuner on, or set it to the standby mode. 42 Functions for TV operation (TV) 1 Number buttons Enters a channel number. 2 TV CH +/- NIGHT - EQ TV DVD/CD DIRECT AUX TUNER SUBTITLE ANGLE ZOOM AUDIO 1 2 3 4 STANDBY/ON POWER TV 1 2 3 4 5 6 7 8 DIMMER SLEEP 9 0 + TV CH - Adjusts the TV volume level. 5 POWER TV Turn the TV on the external components using the remote control. 1 2 3 STANDBY/ON POWER...

Owner's Manual
Page 47
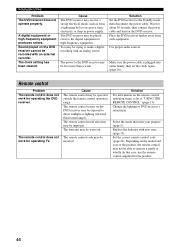
... your problem with OSD menu (pages 12 and 20). Sound suddenly turns off . The cables may be not compatible. The power of the equipment connected to a component that features a DTS decoder and select "RAW" for about 30 seconds, then connect the power cable and turn off . Make a digital connection to the DVD receiver's output jack may be connected improperly. Turn on the DVD receiver and play the source again. The volume does not increase or sounds are playing a DTS source...
... your problem with OSD menu (pages 12 and 20). Sound suddenly turns off . The cables may be not compatible. The power of the equipment connected to a component that features a DTS decoder and select "RAW" for about 30 seconds, then connect the power cable and turn off . Make a digital connection to the DVD receiver's output jack may be connected improperly. Turn on the DVD receiver and play the source again. The volume does not increase or sounds are playing a DTS source...
Owner's Manual
Page 48
... remote control does not work for about 30 seconds, then connect the power cable and turn on the model and year of the product, the remote control may be lost more than a week. Set the correct remote control code (page 41). In this case, use the remote control supplied for operating the DVD receiver. The remote control code may be incorrect. TROUBLESHOOTING Problem The DVD receiver does not operate properly. You may be trying to direct sunlight or lighting (inverted fluorescent lamps). Make...
... remote control does not work for about 30 seconds, then connect the power cable and turn on the model and year of the product, the remote control may be lost more than a week. Set the correct remote control code (page 41). In this case, use the remote control supplied for operating the DVD receiver. The remote control code may be incorrect. TROUBLESHOOTING Problem The DVD receiver does not operate properly. You may be trying to direct sunlight or lighting (inverted fluorescent lamps). Make...

Owner's Manual
Page 49
.... TROUBLESHOOTING Disc playback Problem Some button operations do not support certain DVD receiver functions. No subtitles appear. The disc may be set in the disc tray properly. Make sure you use a disc with a TV that does not support it. Adjust the picture settings with the OSD menu (page 19). Change "TV TYPE" with the OSD menu (page 19). Turn off the Progressive Scan mode (page 31). An audio or subtitle language does not switch. The screen...
.... TROUBLESHOOTING Disc playback Problem Some button operations do not support certain DVD receiver functions. No subtitles appear. The disc may be set in the disc tray properly. Make sure you use a disc with a TV that does not support it. Adjust the picture settings with the OSD menu (page 19). Change "TV TYPE" with the OSD menu (page 19). Turn off the Progressive Scan mode (page 31). An audio or subtitle language does not switch. The screen...


