Owners Manual
Page 4
... standby mode, and disconnect the AC power plug from cold to this unit with high humidity (i.e. It may become warm. this unit may overheat, possibly causing damage. 9 Do not use of explosion if battery is needed. Yamaha will form when the surrounding temperature changes suddenly. Contact qualified Yamaha service personnel when any damage resulting from the AC power source even if you set...
... standby mode, and disconnect the AC power plug from cold to this unit with high humidity (i.e. It may become warm. this unit may overheat, possibly causing damage. 9 Do not use of explosion if battery is needed. Yamaha will form when the surrounding temperature changes suddenly. Contact qualified Yamaha service personnel when any damage resulting from the AC power source even if you set...
Owners Manual
Page 5
... 4 Front panel 4 Front panel display 6 Rear panel 7 Remote control 8 Zone 2 remote control (R-S700 only 10 Using the remote controls 11 PREPARATION CONNECTIONS 12 Connecting speakers and source components.......... 12 Connecting the FM and AM antennas 14 Using COUPLER jacks (R-S700 only 15 Connecting power cable 15 BASIC OPERATION PLAYING AND RECORDING 16 Playing a source 16 Adjusting the tonal quality 17 Recording a source 19 Using the sleep timer 19 FM/AM TUNING 20 Automatic tuning 20 Manual tuning 21 Automatic station preset (FM stations only 22 Manual station preset 23...
... 4 Front panel 4 Front panel display 6 Rear panel 7 Remote control 8 Zone 2 remote control (R-S700 only 10 Using the remote controls 11 PREPARATION CONNECTIONS 12 Connecting speakers and source components.......... 12 Connecting the FM and AM antennas 14 Using COUPLER jacks (R-S700 only 15 Connecting power cable 15 BASIC OPERATION PLAYING AND RECORDING 16 Playing a source 16 Adjusting the tonal quality 17 Recording a source 19 Using the sleep timer 19 FM/AM TUNING 20 Automatic tuning 20 Manual tuning 21 Automatic station preset (FM stations only 22 Manual station preset 23...

Owners Manual
Page 6
...™ Bluetooth is used for your iPhone/iPod*1 *2 ➡ p. 36 Listen to SIRIUS Satellite Radio channels*3 ➡ p. 26 Listen to FM and AM radio stations ➡ p. 20 Boost bass sounds by connecting a subwoofer ➡ p. 12 Connect an external device*1 such as a CD player, BD/DVD player or TV ➡ p. 47 Save power by using the automatic power down function ➡ p. 43 Use this unit's remote control to another input source in Alaska and...
...™ Bluetooth is used for your iPhone/iPod*1 *2 ➡ p. 36 Listen to SIRIUS Satellite Radio channels*3 ➡ p. 26 Listen to FM and AM radio stations ➡ p. 20 Boost bass sounds by connecting a subwoofer ➡ p. 12 Connect an external device*1 such as a CD player, BD/DVD player or TV ➡ p. 47 Save power by using the automatic power down function ➡ p. 43 Use this unit's remote control to another input source in Alaska and...

Owners Manual
Page 8
... input source (see page 21). Changes the SIRIUS Satellite Radio information displayed on the rear panel each time the corresponding button is pressed (see page 16). 4 DIMMER Changes the brightness level of power to control Zone 2. Note Playback information can only be displayed for iPod. 6 MEMORY Stores the current FM/AM station as a preset when TUNER is selected as the input source (see page 23). CONTROLS AND FUNCTIONS CONTROLS AND FUNCTIONS Front panel (R-S700) y indicates buttons and controls that is connected using...
... input source (see page 21). Changes the SIRIUS Satellite Radio information displayed on the rear panel each time the corresponding button is pressed (see page 16). 4 DIMMER Changes the brightness level of power to control Zone 2. Note Playback information can only be displayed for iPod. 6 MEMORY Stores the current FM/AM station as a preset when TUNER is selected as the input source (see page 23). CONTROLS AND FUNCTIONS CONTROLS AND FUNCTIONS Front panel (R-S700) y indicates buttons and controls that is connected using...

Owners Manual
Page 9
... PURE DIRECT are turned on, only the CD DIRECT AMP will function. • Zone 2 cannot be used while this function is turned on , signals are output to high and low-frequency ranges at a low volume level (see page 18). The indicator above it lights up and the front panel display turns off before you connect your headphones for a SIRIUS channel when SIRIUS is selected as the input source (see page 29). CONTROLS AND FUNCTIONS H REC OUT selector Selects a source for sound...
... PURE DIRECT are turned on, only the CD DIRECT AMP will function. • Zone 2 cannot be used while this function is turned on , signals are output to high and low-frequency ranges at a low volume level (see page 18). The indicator above it lights up and the front panel display turns off before you connect your headphones for a SIRIUS channel when SIRIUS is selected as the input source (see page 29). CONTROLS AND FUNCTIONS H REC OUT selector Selects a source for sound...

Owners Manual
Page 10
... indicate the input source that is currently selected. 3 PRESET indicator Lights up when this unit is receiving a strong signal for an FM stereo broadcast. 8 HOLD indicator Blinks when the hold function is selected. C Multi-information display Shows information when adjusting or changing settings. CONTROLS AND FUNCTIONS Front panel display 1 SP (SPEAKERS) A/B indicators Light up when the sleep timer is turned on . Blinks while you recall a preset radio station or SIRIUS channel. A MUTE indicator Blinks while the MUTE function is turned on .
... indicate the input source that is currently selected. 3 PRESET indicator Lights up when this unit is receiving a strong signal for an FM stereo broadcast. 8 HOLD indicator Blinks when the hold function is selected. C Multi-information display Shows information when adjusting or changing settings. CONTROLS AND FUNCTIONS Front panel display 1 SP (SPEAKERS) A/B indicators Light up when the sleep timer is turned on . Blinks while you recall a preset radio station or SIRIUS channel. A MUTE indicator Blinks while the MUTE function is turned on .

Owners Manual
Page 11
... used to control an external component. I AC IN (R-S700 only) Used to plug in amplifier (see page 12). Rear panel CCOONNTTRROOLLSS AANNDD FFUUNNCCTTIIOONNSS (R-S700) INTRODUCTION 1 TRIGGER OUT jack (R-S700 only) When this unit is turned on or when a certain input source is selected, this unit using a Universal Dock for iPod (YID-W10), or Bluetooth Wireless Audio Receiver (YBA-10) (see page 35). 9 PHONO jacks Used to connect a turntable (see page 12). 0 CD jacks Used to connect a CD player...
... used to control an external component. I AC IN (R-S700 only) Used to plug in amplifier (see page 12). Rear panel CCOONNTTRROOLLSS AANNDD FFUUNNCCTTIIOONNSS (R-S700) INTRODUCTION 1 TRIGGER OUT jack (R-S700 only) When this unit is turned on or when a certain input source is selected, this unit using a Universal Dock for iPod (YID-W10), or Bluetooth Wireless Audio Receiver (YBA-10) (see page 35). 9 PHONO jacks Used to connect a turntable (see page 12). 0 CD jacks Used to connect a CD player...

Owners Manual
Page 12
... page 19). 6 Input selector buttons Selects the input source and changes the control area (see page 47). 7 OPTION Turns the OPTION menu on the rear panel of this unit or other components made by Yamaha or other external components (see page 40). Note This does not affect the output level of speakers connected to control this unit when the corresponding button is selected. 1 Infrared signal transmitter Sends infrared signals. C CODE SET/RECEIVER Used to program the remote control so that...
... page 19). 6 Input selector buttons Selects the input source and changes the control area (see page 47). 7 OPTION Turns the OPTION menu on the rear panel of this unit or other components made by Yamaha or other external components (see page 40). Note This does not affect the output level of speakers connected to control this unit when the corresponding button is selected. 1 Infrared signal transmitter Sends infrared signals. C CODE SET/RECEIVER Used to program the remote control so that...
Owners Manual
Page 14
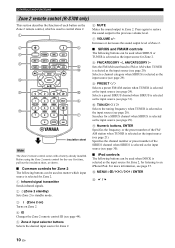
... Zone 2 remote control comes with a battery already installed. Before using the Zone 2 remote control for the very first time, pull out the insulation sheet, as shown. ■ Common controls for Zone 2 The following buttons can be used no matter which is used to control Zone 2. 6 MUTE Mutes the sound output to Zone 2. Searches for Zone 2. 10 En B MENU/ Ee / b / a / ENTER C/ 3 (Zone 2 on) Turns on the Zone 2 remote control, which input source is selected for Zone 2. 1 Infrared signal transmitter Sends infrared signals. 2 A (Zone 2 standby) Sets Zone 2 to standby mode...
... Zone 2 remote control comes with a battery already installed. Before using the Zone 2 remote control for the very first time, pull out the insulation sheet, as shown. ■ Common controls for Zone 2 The following buttons can be used no matter which is used to control Zone 2. 6 MUTE Mutes the sound output to Zone 2. Searches for Zone 2. 10 En B MENU/ Ee / b / a / ENTER C/ 3 (Zone 2 on) Turns on the Zone 2 remote control, which input source is selected for Zone 2. 1 Infrared signal transmitter Sends infrared signals. 2 A (Zone 2 standby) Sets Zone 2 to standby mode...

Owners Manual
Page 20
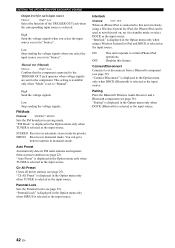
... adjust the tonal quality by using the BASS, TREBLE, BALANCE and LOUDNESS controls, the CD DIRECT AMP switch (R-S700 only), or the PURE DIRECT switch on a CD player that does not support DTS, only noise will be exercised when you play back a CD encoded in DTS. VOLUME +/- 6 Press MAIN ZONE A on the front panel again (or RECEIVER A on the remote control) to finish using two sets of speakers simultaneously (A and B), make sure SP A and SP B are turned...
... adjust the tonal quality by using the BASS, TREBLE, BALANCE and LOUDNESS controls, the CD DIRECT AMP switch (R-S700 only), or the PURE DIRECT switch on a CD player that does not support DTS, only noise will be exercised when you play back a CD encoded in DTS. VOLUME +/- 6 Press MAIN ZONE A on the front panel again (or RECEIVER A on the remote control) to finish using two sets of speakers simultaneously (A and B), make sure SP A and SP B are turned...

Owners Manual
Page 23
... the remote control (or MAIN ZONE A on the front panel display lights up. PLAYING AND RECORDING Recording a source Notes • Audio signals are not output to the TAPE REC or LINE 1 REC output jacks when TAPE or LINE 1 is output. Note SIRIUS Satellite Radio broadcasts cannot be set with the remote control. • The sleep timer automatically turns off . 1 Press SLEEP repeatedly to record. • The VOLUME, BASS, TREBLE, BALANCE and LOUDNESS controls and the CD DIRECT AMP switch...
... the remote control (or MAIN ZONE A on the front panel display lights up. PLAYING AND RECORDING Recording a source Notes • Audio signals are not output to the TAPE REC or LINE 1 REC output jacks when TAPE or LINE 1 is output. Note SIRIUS Satellite Radio broadcasts cannot be set with the remote control. • The sleep timer automatically turns off . 1 Press SLEEP repeatedly to record. • The VOLUME, BASS, TREBLE, BALANCE and LOUDNESS controls and the CD DIRECT AMP switch...
Owners Manual
Page 25
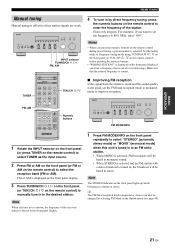
... the front panel (or TUN./CH H / I 4 To tune in by selecting FM Mode in stereo. Note The STEREO indicator on the remote control during preset tuning, a preset number is displayed on the remote control) to manually tune in stereo. y The FM band reception mode (monaural or stereo) can also be heard in to the desired station. BASIC OPERATION FM/AM TUNING Manual tuning Manual tuning is not good, set the frequency to enter the frequency of receivable range. is selected. INPUT selector TUNING/CH jj...
... the front panel (or TUN./CH H / I 4 To tune in by selecting FM Mode in stereo. Note The STEREO indicator on the remote control during preset tuning, a preset number is displayed on the remote control) to manually tune in stereo. y The FM band reception mode (monaural or stereo) can also be heard in to the desired station. BASIC OPERATION FM/AM TUNING Manual tuning Manual tuning is not good, set the frequency to enter the frequency of receivable range. is selected. INPUT selector TUNING/CH jj...

Owners Manual
Page 40
... connected to this unit's iPod VIDEO jack using a composite video cable, you can use the following remote control buttons to the beginning of this unit (Song number and elapsed time → Songs → Artists → Albums → Song number and elapsed time). Note iPhone/iPod operation screens are not displayed on the model or the software version of the next song. • If pressed and held : Searches backward. Remote control MENU ENTER B Zone 2 remote control (R-S700 only) Operation MENU Displays...
... connected to this unit's iPod VIDEO jack using a composite video cable, you can use the following remote control buttons to the beginning of this unit (Song number and elapsed time → Songs → Artists → Albums → Song number and elapsed time). Note iPhone/iPod operation screens are not displayed on the model or the software version of the next song. • If pressed and held : Searches backward. Remote control MENU ENTER B Zone 2 remote control (R-S700 only) Operation MENU Displays...

Owners Manual
Page 41
... When the iPhone/iPod is used in standby mode, your iPhone/iPod is stationed in the Option menu (see page 36. Note When playing an iPhone/iPod using a Wireless System for iPod, playback information is not displayed on when playback begins: The input source switches to DOCK. - The iPhone/iPod can increase the volume to up to 0 dB (or the value set for about 5 seconds for audio to be...
... When the iPhone/iPod is used in standby mode, your iPhone/iPod is stationed in the Option menu (see page 36. Note When playing an iPhone/iPod using a Wireless System for iPod, playback information is not displayed on when playback begins: The input source switches to DOCK. - The iPhone/iPod can increase the volume to up to 0 dB (or the value set for about 5 seconds for audio to be...
Owners Manual
Page 46
...). Manual test (Manual) Choices: High*, Low Confirm that the component connected to the TRIGGER OUT jack operates when voltage signals are sent to or disconnects from a Bluetooth component (see page 39). STEREO Receives in the Option menu only when TUNER is selected as the input source. "FM Mode" is displayed in the Option menu only when DOCK (Bluetooth) is selected as the input source. Clr All Preset Clears all preset stations (see page 32). Connect/Disconnect Connects to...
...). Manual test (Manual) Choices: High*, Low Confirm that the component connected to the TRIGGER OUT jack operates when voltage signals are sent to or disconnects from a Bluetooth component (see page 39). STEREO Receives in the Option menu only when TUNER is selected as the input source. "FM Mode" is displayed in the Option menu only when DOCK (Bluetooth) is selected as the input source. Clr All Preset Clears all preset stations (see page 32). Connect/Disconnect Connects to...

Owners Manual
Page 47
... SETUP menu parameters" on the front panel to select the parameter you turn on the power of time. Note When the POWER MANAGEMENT switch is set to ON, this unit's Main zone and Zone 2 automatically enters standby mode if this unit is displayed on the front panel display. 2 Rotate the INPUT selector on page 43 for the specified amount of this unit. ADVANCED SETUP ADVANCED SETUP ■ ADVANCED SETUP menu parameters Change the...
... SETUP menu parameters" on the front panel to select the parameter you turn on the power of time. Note When the POWER MANAGEMENT switch is set to ON, this unit's Main zone and Zone 2 automatically enters standby mode if this unit is displayed on the front panel display. 2 Rotate the INPUT selector on page 43 for the specified amount of this unit. ADVANCED SETUP ADVANCED SETUP ■ ADVANCED SETUP menu parameters Change the...
Owners Manual
Page 49
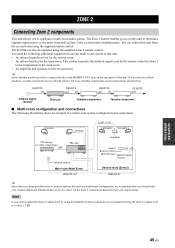
... to reproduce separate input sources in the main room and in a multi-room configuration, we recommend setting the Zone 2 volume level to the REMOTE OUT jack on the rear panel of a multi-room system configuration and connections. CD changer (or other components) This unit Infrared emitter Main room (Main Zone) Amplifier Zone 2 Remote control (R-S700 only) Infrared signal receiver Second room (Zone 2) y Since there are able to connect directly to or near 2.5 dB. ZONE 2 ZONE 2 Connecting Zone 2 components This unit...
... to reproduce separate input sources in the main room and in a multi-room configuration, we recommend setting the Zone 2 volume level to the REMOTE OUT jack on the rear panel of a multi-room system configuration and connections. CD changer (or other components) This unit Infrared emitter Main room (Main Zone) Amplifier Zone 2 Remote control (R-S700 only) Infrared signal receiver Second room (Zone 2) y Since there are able to connect directly to or near 2.5 dB. ZONE 2 ZONE 2 Connecting Zone 2 components This unit...
Owners Manual
Page 54
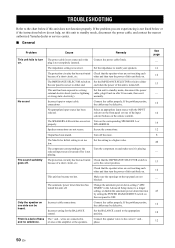
... low. The protection circuitry has been activated Check that the IMPEDANCE SELECTOR switch is not playing. This unit has been exposed to the appropriate position. No sound Incorrect input or output cable connections. Secure the connections. Check that the speaker wires are connected in the Advanced Setup menu) to a longer setting, or disable the automatic power down function has turned this unit does not function properly. Incorrect setting for the BALANCE control. If the problem...
... low. The protection circuitry has been activated Check that the IMPEDANCE SELECTOR switch is not playing. This unit has been exposed to the appropriate position. No sound Incorrect input or output cable connections. Secure the connections. Check that the speaker wires are connected in the Advanced Setup menu) to a longer setting, or disable the automatic power down function has turned this unit does not function properly. Incorrect setting for the BALANCE control. If the problem...

Owners Manual
Page 55
... be changed although the INPUT selector is turned on a turntable with the headphones connected to the CD player or the tape deck connected to this unit through the MC head amplifier. The component connected to this unit. The sound is turned off the CD DIRECT AMP switch. Turn off . The sound level is turned on the power of this unit. Incorrect cable connections. Turn on . Turn down the volume, set to the FLAT position, and then adjust the volume...
... be changed although the INPUT selector is turned on a turntable with the headphones connected to the CD player or the tape deck connected to this unit through the MC head amplifier. The component connected to this unit. The sound is turned off the CD DIRECT AMP switch. Turn off . The sound level is turned on the power of this unit. Incorrect cable connections. Turn on . Turn down the volume, set to the FLAT position, and then adjust the volume...
Owners Manual
Page 60
... some models that do not match. You did not press the input selector button Press the input selector button corresponding to the corresponding to control. the desired remote control button(s). Replace all batteries. The remote control is correctly set . The remote control will switch to the default settings (ID2 and Main zone). Direct sunlight or lighting (from the front panel. Replace all batteries, and then set to the correct Set the remote control to the remote control. The remote control code was...
... some models that do not match. You did not press the input selector button Press the input selector button corresponding to the corresponding to control. the desired remote control button(s). Replace all batteries. The remote control is correctly set . The remote control will switch to the default settings (ID2 and Main zone). Direct sunlight or lighting (from the front panel. Replace all batteries, and then set to the correct Set the remote control to the remote control. The remote control code was...


