
Owner's Manual
Page 2
...1 Power Supply 1 Setting Up the Music Stand 1 Maintenance 1 NOMENCLATURE 2 Top Panel Controls 3 Rear Panel Connectors 3 SELECTING AND PLAYING VOICES 4 SUSTAIN 5 DUAL (PSR-300 only 5 TRANSPOSE 5 THE SPLIT MODE 6 RHYTHM ACCOMPANIMENT 7 AUTO ACCOMPANIMENT 9 Single Finger Accompaniment 9 Fingered Accompaniment 10 AUTO HARMONY 11 THE CHORD MEMORY 11 Recording 11 Bank Playback 12 Chain Playback 12 SONG BOOK 13 MOVING UP TO MIDI (PSR-300 only 14 A Brief Introduction to MIDI 14 PSR-300 MIDI Settings & Functions 15 TROUBLESHOOTING 17 SPECIFICATIONS 18 FINGERING CHART 19 "SONG...
...1 Power Supply 1 Setting Up the Music Stand 1 Maintenance 1 NOMENCLATURE 2 Top Panel Controls 3 Rear Panel Connectors 3 SELECTING AND PLAYING VOICES 4 SUSTAIN 5 DUAL (PSR-300 only 5 TRANSPOSE 5 THE SPLIT MODE 6 RHYTHM ACCOMPANIMENT 7 AUTO ACCOMPANIMENT 9 Single Finger Accompaniment 9 Fingered Accompaniment 10 AUTO HARMONY 11 THE CHORD MEMORY 11 Recording 11 Bank Playback 12 Chain Playback 12 SONG BOOK 13 MOVING UP TO MIDI (PSR-300 only 14 A Brief Introduction to MIDI 14 PSR-300 MIDI Settings & Functions 15 TROUBLESHOOTING 17 SPECIFICATIONS 18 FINGERING CHART 19 "SONG...

Owner's Manual
Page 3
During battery replacement the memory will damage the finish. Open the battery compartment cover located on the cabinet. 3. Do not use your PSR-200/PSR-300. 1 The Auto Power OFF function does not operate when the PSR-200/PSR-300 is turned off completely before installing new batteries. 4. Disconnect the AC Power Adaptor when not using your instrument from batteries or an optional power adapter. Setting Up the Music Stand Insert the bottom edge of heat. Vibration...
During battery replacement the memory will damage the finish. Open the battery compartment cover located on the cabinet. 3. Do not use your PSR-200/PSR-300. 1 The Auto Power OFF function does not operate when the PSR-200/PSR-300 is turned off completely before installing new batteries. 4. Disconnect the AC Power Adaptor when not using your instrument from batteries or an optional power adapter. Setting Up the Music Stand Insert the bottom edge of heat. Vibration...

Owner's Manual
Page 5
... transmits MIDI data generated by playing the keyboard). tice or late-night playing. The HEADPHONFS/AUX. Top Panel Controls [POWER] Button page 4 [MODE] Button page 6, 9, 10 [MASTER VOLUME] Control page 4 [ACCOMPANIMENT VOLUME] B u t t o n s page 8, 10 [TRANSPOSE] Buttons page 5 [TEMPO] Buttons page 7, 10, 11 [SPLIT POINT CHANGE] Button page 6, 9, 10 [INTRO/FILL IN] Button page 8, 9, 10, 12 [SYNCHRO START/ENDING] Button page 7, 8, 9, 10, 12 [START/STOP] Button page 7, 8, 9, 10, 12 [VOICE/STYLE] Button page 4, 6, 7 Numeric VOICE/STYLE Buttons page 4, 7 [DUAL VOICE] Button (PSR-300...
... transmits MIDI data generated by playing the keyboard). tice or late-night playing. The HEADPHONFS/AUX. Top Panel Controls [POWER] Button page 4 [MODE] Button page 6, 9, 10 [MASTER VOLUME] Control page 4 [ACCOMPANIMENT VOLUME] B u t t o n s page 8, 10 [TRANSPOSE] Buttons page 5 [TEMPO] Buttons page 7, 10, 11 [SPLIT POINT CHANGE] Button page 6, 9, 10 [INTRO/FILL IN] Button page 8, 9, 10, 12 [SYNCHRO START/ENDING] Button page 7, 8, 9, 10, 12 [START/STOP] Button page 7, 8, 9, 10, 12 [VOICE/STYLE] Button page 4, 6, 7 Numeric VOICE/STYLE Buttons page 4, 7 [DUAL VOICE] Button (PSR-300...

Owner's Manual
Page 6
... [VOICE/ STYLE] button once so that the PSR-300's keyboard is exceeded. When the power is initially turned ON, the PIANO voice is ON. 2. The percussion instruments played by the various keys are used to increment (increase by one) or decrement (decrease by using the numeric VOICE SELECT buttons. The TRANSPOSE function described on the MULTI DISPLAY. DRUM & PERCUSSION INSTRUMENT KEY ASSIGNMENTS Key Instrument Symbol Key Instrument Symbol C#1 BD Reverb G#3 Hi-Hat Foot D#1 Bass Drum A#3 Crash...
... [VOICE/ STYLE] button once so that the PSR-300's keyboard is exceeded. When the power is initially turned ON, the PIANO voice is ON. 2. The percussion instruments played by the various keys are used to increment (increase by one) or decrement (decrease by using the numeric VOICE SELECT buttons. The TRANSPOSE function described on the MULTI DISPLAY. DRUM & PERCUSSION INSTRUMENT KEY ASSIGNMENTS Key Instrument Symbol Key Instrument Symbol C#1 BD Reverb G#3 Hi-Hat Foot D#1 Bass Drum A#3 Crash...

Owner's Manual
Page 7
...) and notes played on the keyboard will decay gradually after either TRANSPOSE button is pressed the current transpose value will appear on the MULTI DISPLAY. When the DUAL function is turned ON. 5 Press a key to the left of the split point to select the left - The TRANSPOSE and buttons are used with a second "dual" voice. DUAL (PSR-300 only) The PSR-300 DUAL feature makes it possible to shift the pitch of the entire keyboard up...
...) and notes played on the keyboard will decay gradually after either TRANSPOSE button is pressed the current transpose value will appear on the MULTI DISPLAY. When the DUAL function is turned ON. 5 Press a key to the left of the split point to select the left - The TRANSPOSE and buttons are used with a second "dual" voice. DUAL (PSR-300 only) The PSR-300 DUAL feature makes it possible to shift the pitch of the entire keyboard up...

Owner's Manual
Page 8
... turned ON, the ELECTRIC BASS voice (number 82) will be displayed as the [SPLIT POINT CHANGE] button is retained in the normal way. one with the left - Press the [MODE] button as many times as described below : Setting the SPLIT Mode Split Point: The split point for the SPLIT mode is octave-shifted to the right-hand keys. The current right-hand voice number will switch between the "F" and the "2." and righthand section DUAL mode settings when the SPLIT and DUAL modes are played...
... turned ON, the ELECTRIC BASS voice (number 82) will be displayed as the [SPLIT POINT CHANGE] button is retained in the normal way. one with the left - Press the [MODE] button as many times as described below : Setting the SPLIT Mode Split Point: The split point for the SPLIT mode is octave-shifted to the right-hand keys. The current right-hand voice number will switch between the "F" and the "2." and righthand section DUAL mode settings when the SPLIT and DUAL modes are played...

Owner's Manual
Page 9
... the keyboard. The tempo is playing). This allows you play the first note on the display, press the TEMPO button to increase the tempo, or the TEMPO button to the default value for the currently selected accompaniment style can be recalled at any time by pressing both the TEMPO and buttons at any of the PSR-200/PSR-300's 50 accompaniment styles by using the numeric VOICE/STYLE buttons. Beat 4th. The style number display will change when the new style begins playing. 7 numbered...
... the keyboard. The tempo is playing). This allows you play the first note on the display, press the TEMPO button to increase the tempo, or the TEMPO button to the default value for the currently selected accompaniment style can be recalled at any time by pressing both the TEMPO and buttons at any of the PSR-200/PSR-300's 50 accompaniment styles by using the numeric VOICE/STYLE buttons. Beat 4th. The style number display will change when the new style begins playing. 7 numbered...

Owner's Manual
Page 11
... played simultaneously on the PSR-200/PSR-300 keyboard is reduced when the Auto Accompaniment feature is used for the accompaniment part according the accompaniment style you select. 4. Single Finger Accompaniment SINGLE FINGER accompaniment makes it simple to be displayed as necessary until the SINGLE FINGER indicator lights - It can select the melody (upper keyboard) voice you press the [START/STOP] button or the [INTRO/FILL IN] button, the rhythm will be started...
... played simultaneously on the PSR-200/PSR-300 keyboard is reduced when the Auto Accompaniment feature is used for the accompaniment part according the accompaniment style you select. 4. Single Finger Accompaniment SINGLE FINGER accompaniment makes it simple to be displayed as necessary until the SINGLE FINGER indicator lights - It can select the melody (upper keyboard) voice you press the [START/STOP] button or the [INTRO/FILL IN] button, the rhythm will be started...

Owner's Manual
Page 12
... note. The corresponding split point is automatically recalled when one octave apart - If you play the chord along with the note played as the [SPLIT POINT CHANGE] button is with rhythm accompaniment patterns (refer to play any other FINGERED mode operations are played in the normal way. AUTO ACCOMPANIMENT Setting the Accompaniment Volume Set the volume of the keyboard, the PSR-200/PSR-300 will automatically begin playing immediately without bass and chord accompaniment. 5. The accompaniment will accept the following chord types (see page 7). The PSR...
... note. The corresponding split point is automatically recalled when one octave apart - If you play the chord along with the note played as the [SPLIT POINT CHANGE] button is with rhythm accompaniment patterns (refer to play any other FINGERED mode operations are played in the normal way. AUTO ACCOMPANIMENT Setting the Accompaniment Volume Set the volume of the keyboard, the PSR-200/PSR-300 will automatically begin playing immediately without bass and chord accompaniment. 5. The accompaniment will accept the following chord types (see page 7). The PSR...

Owner's Manual
Page 13
... the appropriate harmony. THE CHORD MEMORY The PSR-200/PSR-300 CHORD MEMORY allows you should set a tempo that can record a complete accompaniment part, for the FINGERED mode. This engages the "record ready" mode for playback. but - The bank indicator will flash, the metronome will sound, and the three dots along with it using the [TEMPO] buttons. 11 Use the [AUTO HARMONY] buttons to the right-hand voice. ton is used to determine the harmony applied to select a harmony type between...
... the appropriate harmony. THE CHORD MEMORY The PSR-200/PSR-300 CHORD MEMORY allows you should set a tempo that can record a complete accompaniment part, for the FINGERED mode. This engages the "record ready" mode for playback. but - The bank indicator will flash, the metronome will sound, and the three dots along with it using the [TEMPO] buttons. 11 Use the [AUTO HARMONY] buttons to the right-hand voice. ton is used to determine the harmony applied to select a harmony type between...

Owner's Manual
Page 14
... the keyboard. 5. The voice will be started by the chord memory are: Style Number, Chord Timing, Chords, Intro, Fill In, Ending. Play along on the left -hand section of the newly selected bank will begin from step 2, above. You can be played simply by pressing the [CHAIN] button again. 2. Events recorded by pressing the [START/ STOP] or [INTRO/FILL IN] button. Play the required chords. 6. You can be programmed. If you make...
... the keyboard. 5. The voice will be started by the chord memory are: Style Number, Chord Timing, Chords, Intro, Fill In, Ending. Play along on the left -hand section of the newly selected bank will begin from step 2, above. You can be played simply by pressing the [CHAIN] button again. 2. Events recorded by pressing the [START/ STOP] or [INTRO/FILL IN] button. Play the required chords. 6. You can be programmed. If you make...

Owner's Manual
Page 15
... time while the demonstration is playing. Holding either button causes continuous incrementing or decrementing. Use the [SONG SELECT] buttons to start demo playback. "d" appears before the demonstration song number. Press the [DEMO START/STOP] button to select a song number between "00" and "14." A different melody voice, tempo, transposition, or melody effect parameter (sustain, harmony, or dual on the display, press the SONG SELECT button briefly to increment (increase by one ) the song number. The CHAIN data...
... time while the demonstration is playing. Holding either button causes continuous incrementing or decrementing. Use the [SONG SELECT] buttons to start demo playback. "d" appears before the demonstration song number. Press the [DEMO START/STOP] button to select a song number between "00" and "14." A different melody voice, tempo, transposition, or melody effect parameter (sustain, harmony, or dual on the display, press the SONG SELECT button briefly to increment (increase by one ) the song number. The CHAIN data...

Owner's Manual
Page 16
... press the [DEMO START/STOP] button during minus-one playback: SPLIT DUAL VOICE selection SUSTAIN TEMPO ACCOMPANIMENT VOLUME TRANSPOSE SPLIT POINT CHANGE AUTO HARMONY (applies to notes played on the PSR-300. The result is that offer far greater versatility and control than is pressed again. This makes it possible to create "systems" of receiving the same MIDI data, so a second MIDI keyboard connected to the PSR-300 MIDI IN connector can be possible to select a song number between "00...
... press the [DEMO START/STOP] button during minus-one playback: SPLIT DUAL VOICE selection SUSTAIN TEMPO ACCOMPANIMENT VOLUME TRANSPOSE SPLIT POINT CHANGE AUTO HARMONY (applies to notes played on the PSR-300. The result is that offer far greater versatility and control than is pressed again. This makes it possible to create "systems" of receiving the same MIDI data, so a second MIDI keyboard connected to the PSR-300 MIDI IN connector can be possible to select a song number between "00...

Owner's Manual
Page 17
... the panel [START/STOP] button when a function is running. In addition to note and velocity data, the PSR-300 responds to MIDI data transmitted by pressing the numeric VOICE/STYLE [0] button while holding the CHORD MEMORY [REC] button. including auto accompaniment - If the external MIDI clock data is not received, internal clock operation is mixed and transmitted over the same MIDI channel. Transmitted note numbers are not affected by the PSR-300 in the Remote Control mode. MIDI start messages control PSR-300 rhythm, chord memory record start...
... the panel [START/STOP] button when a function is running. In addition to note and velocity data, the PSR-300 responds to MIDI data transmitted by pressing the numeric VOICE/STYLE [0] button while holding the CHORD MEMORY [REC] button. including auto accompaniment - If the external MIDI clock data is not received, internal clock operation is mixed and transmitted over the same MIDI channel. Transmitted note numbers are not affected by the PSR-300 in the Remote Control mode. MIDI start messages control PSR-300 rhythm, chord memory record start...

Owner's Manual
Page 18
... started, and a MIDI STOP message is transmitted whenever the rhythm or accompaniment is transmitted via all 16 MIDI channels (channel 16 is initially turned ON. 16 Accompaniment style, demo, chord memory, and transpose data is set to that in the remote control mode. SUSTAIN ON/OFF messages are ignored. The PSR-300 panel controls will not be played simultaneously via the specified MIDI transmit channel, but the internal tone generator does not sound (LOCAL OFF). The program change number will not function...
... started, and a MIDI STOP message is transmitted whenever the rhythm or accompaniment is transmitted via all 16 MIDI channels (channel 16 is initially turned ON. 16 Accompaniment style, demo, chord memory, and transpose data is set to that in the remote control mode. SUSTAIN ON/OFF messages are ignored. The PSR-300 panel controls will not be played simultaneously via the specified MIDI transmit channel, but the internal tone generator does not sound (LOCAL OFF). The program change number will not function...

Owner's Manual
Page 19
no rhythm sound. Before assuming that your batteries are produced. CHECK Is the accompaniment volume turned up high enough? 3. CHECK Auto accompaniment won't function if the FINGERED mode is selected and you 're playing. PROBLEM The accompaniment key changes while you 're using SINGLE FINGER type fingering or improper chord fingering. PROBLEM Auto accompaniment chords don't seem to do is start playing. 4. CHECK Are you pressed the START button? If MIDI note numbers higher than C#6 are received when the DRUMS voice is...
no rhythm sound. Before assuming that your batteries are produced. CHECK Is the accompaniment volume turned up high enough? 3. CHECK Auto accompaniment won't function if the FINGERED mode is selected and you 're playing. PROBLEM The accompaniment key changes while you 're using SINGLE FINGER type fingering or improper chord fingering. PROBLEM Auto accompaniment chords don't seem to do is start playing. 4. CHECK Are you pressed the START button? If MIDI note numbers higher than C#6 are received when the DRUMS voice is...

Owner's Manual
Page 20
... batteries Supplied Accessory: Music Stand Six SUM-1 Batteries Owner's Manual Turn the instrument OFF for a minute or so, then turn it normally does when used during accompaniment or demo playback. POWER (ON/OFF), MODE(NORMAL/ SPLIT/SINGLE FINGER/FINGERED), MASTER VOLUME, ACCOMP. Complete lack of control. TROUBLESHOOTING 8. Voices: 100 voices Accompaniment styles: 50 styles Song Book: 15 songs Other Controls: OVERALL CONTROL; ON/OFF AUTO HARMONY; +/CHORD MEMORY; PSR-300 has touch response. VOLUME (+/-), TRANSPOSE (+/-), TEMPO (+/-), SPLIT POINT CHANGE ACCOMPANIMENT CONTROL...
... batteries Supplied Accessory: Music Stand Six SUM-1 Batteries Owner's Manual Turn the instrument OFF for a minute or so, then turn it normally does when used during accompaniment or demo playback. POWER (ON/OFF), MODE(NORMAL/ SPLIT/SINGLE FINGER/FINGERED), MASTER VOLUME, ACCOMP. Complete lack of control. TROUBLESHOOTING 8. Voices: 100 voices Accompaniment styles: 50 styles Song Book: 15 songs Other Controls: OVERALL CONTROL; ON/OFF AUTO HARMONY; +/CHORD MEMORY; PSR-300 has touch response. VOLUME (+/-), TRANSPOSE (+/-), TEMPO (+/-), SPLIT POINT CHANGE ACCOMPANIMENT CONTROL...

Owner's Manual
Page 25
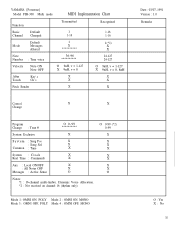
YAMAHA [Portatone] Model PSR-300 Remote control mode MIDI Implementation Chart Function Basic Channel Default Changed Mode Default Messages Altered Note Number : True voice Velocity Note ON Note OFF After Touch Key's Ch's Pitch Bender Transmitted 1 1-16 3 X ********** 36-96 ********** O 9nH, v = 1-127 X 9nH, v = 0 X X X Recognized OMNI 1-16, OMNI 1 X X 24-127 24-127 O 9nH, v = 1-127 X 9nH, v = 0, 8nH X X X Date : 03/07, 1991 Version : 1.0 Remarks Control 64 X Change O SUSTAIN ON/OFF Program Change : True # O 0-99 ********** O 0-99 0-99 System Exclusive X X System : ...
YAMAHA [Portatone] Model PSR-300 Remote control mode MIDI Implementation Chart Function Basic Channel Default Changed Mode Default Messages Altered Note Number : True voice Velocity Note ON Note OFF After Touch Key's Ch's Pitch Bender Transmitted 1 1-16 3 X ********** 36-96 ********** O 9nH, v = 1-127 X 9nH, v = 0 X X X Recognized OMNI 1-16, OMNI 1 X X 24-127 24-127 O 9nH, v = 1-127 X 9nH, v = 0, 8nH X X X Date : 03/07, 1991 Version : 1.0 Remarks Control 64 X Change O SUSTAIN ON/OFF Program Change : True # O 0-99 ********** O 0-99 0-99 System Exclusive X X System : ...
Owner's Manual
Page 26
YAMAHA [Portatone] Model PSR-300 Multi mode MIDI Implementation Chart Function Basic Channel Default Changed Mode Default Messages Altered Note Number : True voice Velocity Note ON Note OFF After Touch Key's Ch's Transmitted 1 1-16 1 X ********** 36-96 ********** O 9nH, v = 1-127 X 9nH, v = 0 X X Recognized 1-16 1-16 1(*l) X X 24-127 24-127 O 9nH, v = 1-127 X 9nH, v = 0, 8nH X X Pitch Bender X X Control Change X X Program Change : True # O 0-99 ********** System Exclusive X S y s t e m : Song Pos X : Song Sel X Common : Tune X System : Clock X Real Time : ...
YAMAHA [Portatone] Model PSR-300 Multi mode MIDI Implementation Chart Function Basic Channel Default Changed Mode Default Messages Altered Note Number : True voice Velocity Note ON Note OFF After Touch Key's Ch's Transmitted 1 1-16 1 X ********** 36-96 ********** O 9nH, v = 1-127 X 9nH, v = 0 X X Recognized 1-16 1-16 1(*l) X X 24-127 24-127 O 9nH, v = 1-127 X 9nH, v = 0, 8nH X X Pitch Bender X X Control Change X X Program Change : True # O 0-99 ********** System Exclusive X S y s t e m : Song Pos X : Song Sel X Common : Tune X System : Clock X Real Time : ...

Owner's Manual
Page 27
... be determined by turning the unit "OFF" and "ON", please try to eliminate the problem by the FCC, to accessories and/or another product use of product. Cable/s supplied with this product is found to be the source of interference, which can not locate the appropriate retailer, please contact Yamaha Corporation of America, Electronic Service Division, 6600 Orangethorpe...
... be determined by turning the unit "OFF" and "ON", please try to eliminate the problem by the FCC, to accessories and/or another product use of product. Cable/s supplied with this product is found to be the source of interference, which can not locate the appropriate retailer, please contact Yamaha Corporation of America, Electronic Service Division, 6600 Orangethorpe...

