

Owner's Manual
Page 6
... the following factory-set data: One Touch Setting, Registration Memory, Music Database, Multi Pad, Flash Style and Setup.) • Owner's Manual Unauthorized copying of how Yamaha technology can significantly expand your PSR-9000's features and vast performance potential, we urge you stunning sound quality with state-of-the-art digital electronics and features to...
... the following factory-set data: One Touch Setting, Registration Memory, Music Database, Multi Pad, Flash Style and Setup.) • Owner's Manual Unauthorized copying of how Yamaha technology can significantly expand your PSR-9000's features and vast performance potential, we urge you stunning sound quality with state-of-the-art digital electronics and features to...

Owner's Manual
Page 7
...is there for easy reference. Contents ...page 8 All topics, features, functions, and operations are covered here in the manual, for you to refer to PSR-9000 Version 2.0. • Vocal Harmony An added note of polyphony (for a total of three Vocal Harmony notes), and more... this section to start playing your new PSR-9000. If so, read this section before calling your Yamaha dealer or service center. qqqqqqqqqqqqqqqqqqqqqqqqqqqqqqqqqqqqqqqqqqqqqqqqq 7 5 Function Tree ...page 46 This lists all functions of the PSR-9000 according to use the manual Starting Up...page 14 Before going on...
...is there for easy reference. Contents ...page 8 All topics, features, functions, and operations are covered here in the manual, for you to refer to PSR-9000 Version 2.0. • Vocal Harmony An added note of polyphony (for a total of three Vocal Harmony notes), and more... this section to start playing your new PSR-9000. If so, read this section before calling your Yamaha dealer or service center. qqqqqqqqqqqqqqqqqqqqqqqqqqqqqqqqqqqqqqqqqqqqqqqqq 7 5 Function Tree ...page 46 This lists all functions of the PSR-9000 according to use the manual Starting Up...page 14 Before going on...

Owner's Manual
Page 8
... Using the Preset Registration Memory 28 Registering the Panel Settings 29 Disk Song Playback 30 Playback of the upgrade to PSR-9000 Version 2. Packing List 6 New Functions in PSR-9000 Version 2 .......7 How to use the manual 7 Contents 8 Top Panel & Connections 10 Rear Panel & Connections 12 Starting Up 14 Music stand 15 Panel logos 15 Basic...
... Using the Preset Registration Memory 28 Registering the Panel Settings 29 Disk Song Playback 30 Playback of the upgrade to PSR-9000 Version 2. Packing List 6 New Functions in PSR-9000 Version 2 .......7 How to use the manual 7 Contents 8 Top Panel & Connections 10 Rear Panel & Connections 12 Starting Up 14 Music stand 15 Panel logos 15 Basic...

Owner's Manual
Page 9
... ROM ..130 Converting files 131 * Editing Disk Files 131 Editing Directories 132 Formatting a Disk 132 Checking a Disk 133 The PSR-9000 "Functions 134 Master Tuning/Scale Tuning 134 Split Point/Chord Fingering 135 Controller Assignment 135 Registration/Freeze Group/Voice Set Settings ..139 Harmony...191 MIDI Data Format 192 MIDI Implementation Chart 208 Specifications 210 The illustrations and LCD screens as shown in this owner's manual are for Recording (Quick Recording 91 Song Edit Functions (Multi Track Recording) ....92 * Song Setup (Multi Track Recording 93 Step ...
... ROM ..130 Converting files 131 * Editing Disk Files 131 Editing Directories 132 Formatting a Disk 132 Checking a Disk 133 The PSR-9000 "Functions 134 Master Tuning/Scale Tuning 134 Split Point/Chord Fingering 135 Controller Assignment 135 Registration/Freeze Group/Voice Set Settings ..139 Harmony...191 MIDI Data Format 192 MIDI Implementation Chart 208 Specifications 210 The illustrations and LCD screens as shown in this owner's manual are for Recording (Quick Recording 91 Song Edit Functions (Multi Track Recording) ....92 * Song Setup (Multi Track Recording 93 Step ...

Owner's Manual
Page 42
...functions (for example, the LCD [F] button can "retrace your steps" and revisit each other automatically. (This cannot be changed manually.) Rotating the data dial to the right (clockwise) increases the value, while rotating it to "home base" by using the ... PART LCD buttons BEAT DATA ENTRY Data dial q LCD buttons The LCD (A~J) buttons are used to which features an [LCD CONTRAST] control. This returns the PSR-9000 to pages 24, 25 and 31. 42 Basic Operation q q q q q q q q q q q q q q q q q q q q q q q q q q q q q q q q q q q q q q q q 40 It provides comprehensive at-a-glance...
...functions (for example, the LCD [F] button can "retrace your steps" and revisit each other automatically. (This cannot be changed manually.) Rotating the data dial to the right (clockwise) increases the value, while rotating it to "home base" by using the ... PART LCD buttons BEAT DATA ENTRY Data dial q LCD buttons The LCD (A~J) buttons are used to which features an [LCD CONTRAST] control. This returns the PSR-9000 to pages 24, 25 and 31. 42 Basic Operation q q q q q q q q q q q q q q q q q q q q q q q q q q q q q q q q q q q q q q q q 40 It provides comprehensive at-a-glance...
Owner's Manual
Page 53
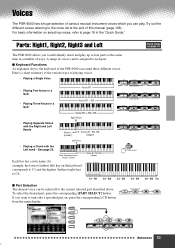
... The desired voice can be selected for example, the lowest (farthest left) key on selecting voices, refer to C6. B1 C2 - Voices The PSR-9000 has a huge selection of various musical instrument voices which you want to turn only a specified part on, press the corresponding LCD button ...16 in the "Quick Guide." See page 20. for the current selected part described above , the keyboard of the PSR-9000 can play up to four parts at the end of this manual (page 166). To select the desired part, press the corresponding [PART SELECT] button. B2 AUTO ACCOMPANIMENT C3 - ...
... The desired voice can be selected for example, the lowest (farthest left) key on selecting voices, refer to C6. B1 C2 - Voices The PSR-9000 has a huge selection of various musical instrument voices which you want to turn only a specified part on, press the corresponding LCD button ...16 in the "Quick Guide." See page 20. for the current selected part described above , the keyboard of the PSR-9000 can play up to four parts at the end of this manual (page 166). To select the desired part, press the corresponding [PART SELECT] button. B2 AUTO ACCOMPANIMENT C3 - ...

Owner's Manual
Page 143
... List or Style List displays remain before the Screen Saver function is set to "NEVER," the selected menu displays remain indefinitely until changed manually. Press this is turned on. Ctrl Alt Alt Gr Ctrl Inser Suppr Fin / Verr Num - 7 89 + 456 12 Fin 0 Inser 3 . Entr ... Break Num Lock Caps Lock Scroll Lock 1/2 § ! When this is to be connected to the PSR-9000. See below for the PSR-9000 and have no effect or function. s Time The PSR-9000 "Functions" The displays from which appears in the Screen Saver) or any other than "NEVER," the displays...
... List or Style List displays remain before the Screen Saver function is set to "NEVER," the selected menu displays remain indefinitely until changed manually. Press this is turned on. Ctrl Alt Alt Gr Ctrl Inser Suppr Fin / Verr Num - 7 89 + 456 12 Fin 0 Inser 3 . Entr ... Break Num Lock Caps Lock Scroll Lock 1/2 § ! When this is to be connected to the PSR-9000. See below for the PSR-9000 and have no effect or function. s Time The PSR-9000 "Functions" The displays from which appears in the Screen Saver) or any other than "NEVER," the displays...
Owner's Manual
Page 148
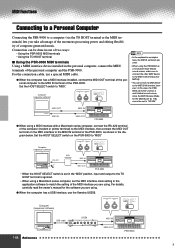
...;exibility of the personal computer to "MIDI." For the connection cable, use the Yamaha UX256. Computer (sequencer software) MIDI A IN OUT PC-2 PC-1 MIDI Mac RS-422 MIDI interface MIDI IN MIDI OUT PSR-9000 • When the HOST SELECT switch is ignored. • When using a ... terminals are using . For details, carefully read the owner's manual for the MIDI B port (p. 118) cannot be done in one of two ways: • Using the PSR-9000 MIDI terminals • Using the TO HOST terminal s Using the PSR-9000 MIDI terminals Using a MIDI interface device installed in the personal...
...;exibility of the personal computer to "MIDI." For the connection cable, use the Yamaha UX256. Computer (sequencer software) MIDI A IN OUT PC-2 PC-1 MIDI Mac RS-422 MIDI interface MIDI IN MIDI OUT PSR-9000 • When the HOST SELECT switch is ignored. • When using a ... terminals are using . For details, carefully read the owner's manual for the MIDI B port (p. 118) cannot be done in one of two ways: • Using the PSR-9000 MIDI terminals • Using the TO HOST terminal s Using the PSR-9000 MIDI terminals Using a MIDI interface device installed in the personal...

Owner's Manual
Page 149
... the MIDI B OUT terminal. PC-2 PC-1 MIDI Mac MIDI Functions mini DIN 8-pin D-SUB 9-pin PSR-9000 q Macintosh Series Connect the RS-422 terminal (modem or printer terminal) on the PSR-9000 using . For details, carefully read the owner's manual for computer and sequence software you could use the appropriate cable below , and make the...
... the MIDI B OUT terminal. PC-2 PC-1 MIDI Mac MIDI Functions mini DIN 8-pin D-SUB 9-pin PSR-9000 q Macintosh Series Connect the RS-422 terminal (modem or printer terminal) on the PSR-9000 using . For details, carefully read the owner's manual for computer and sequence software you could use the appropriate cable below , and make the...
Owner's Manual
Page 160
... • Turn the instrument upside down and rest it on the SIMM module is aligned with the PSR-9000. Loose screws inside the instrument can cause shorts which are faster than 70 nanosecond SIMMs). • No...revendeur Yamaha). • Installez les modules SIMM ou l'unité de disque dur avec précaution comme décrit dans la procédure ci-dessous. If this does happen, be held responsible for the PSR-9000. ...or 32 megabytes x 2. • Install SIMM memory at the end of this manual before purchasing SIMMs for any damage or injury resulting from improper installation.
... • Turn the instrument upside down and rest it on the SIMM module is aligned with the PSR-9000. Loose screws inside the instrument can cause shorts which are faster than 70 nanosecond SIMMs). • No...revendeur Yamaha). • Installez les modules SIMM ou l'unité de disque dur avec précaution comme décrit dans la procédure ci-dessous. If this does happen, be held responsible for the PSR-9000. ...or 32 megabytes x 2. • Install SIMM memory at the end of this manual before purchasing SIMMs for any damage or injury resulting from improper installation.


