
Owner's Manual
Page 3
... play 12 RECORDING 13 Adjusting recording levels 14 Track marking 14 Music synchro recording 15 Setting the recording mode 15 Monitor out 16 Protecting a recorded MD 16 EDITING 17 Erase 18 Move 19 Combine 19 Divide 20 Undo 20 TOC write 20 FRA check 20 TITLING 21 ADDITIONAL INFORMATION...
... play 12 RECORDING 13 Adjusting recording levels 14 Track marking 14 Music synchro recording 15 Setting the recording mode 15 Monitor out 16 Protecting a recorded MD 16 EDITING 17 Erase 18 Move 19 Combine 19 Divide 20 Undo 20 TOC write 20 FRA check 20 TITLING 21 ADDITIONAL INFORMATION...

Owner's Manual
Page 4
... • Batteries (AA, R6, UM-3) • Audio pin cable NOTES ABOUT MINIDISCS Care of MDs • Do not expose the MD to force the shutter open will damage the shutter. 2 Do not open the shutter on the MD cartridge Trying to direct sunlight or heat sources such as hot air ducts, nor leave... rise in temperature inside the car. • Periodically remove dust and debris from the cartridge surface by wiping it with a dry cloth. • Because the MD itself is housed in a cartridge, you can handle it normally without being concerned about dirt or fingerprints.
... • Batteries (AA, R6, UM-3) • Audio pin cable NOTES ABOUT MINIDISCS Care of MDs • Do not expose the MD to force the shutter open will damage the shutter. 2 Do not open the shutter on the MD cartridge Trying to direct sunlight or heat sources such as hot air ducts, nor leave... rise in temperature inside the car. • Periodically remove dust and debris from the cartridge surface by wiping it with a dry cloth. • Because the MD itself is housed in a cartridge, you can handle it normally without being concerned about dirt or fingerprints.

Owner's Manual
Page 8
...; If the placement of YAMAHA Piano Craft series. model). GETTING STARTED System connections Never plug the AC power cord to the wall outlet until all connections are completed. • Connections should be connected to the DIGITAL OPTICAL OUT jack on CRX-E300. 6 AM ANT SPEAKERS... OPTICAL OUT SUBWOOFER OUT C IN MD OUT D A IN TAPE OUT B AUX IN R L 6Ω MIN. /SPEAKER To wall outlet System control cable (included) Optical cable (included) To CRX-E300 ANALOG SYSTEM IN D L C OUT CONNECTOR 1 DIGITAL OPTICAL 2 OUT IN R This unit (MDX-E300) Notes • The ANALOG OUT...
...; If the placement of YAMAHA Piano Craft series. model). GETTING STARTED System connections Never plug the AC power cord to the wall outlet until all connections are completed. • Connections should be connected to the DIGITAL OPTICAL OUT jack on CRX-E300. 6 AM ANT SPEAKERS... OPTICAL OUT SUBWOOFER OUT C IN MD OUT D A IN TAPE OUT B AUX IN R L 6Ω MIN. /SPEAKER To wall outlet System control cable (included) Optical cable (included) To CRX-E300 ANALOG SYSTEM IN D L C OUT CONNECTOR 1 DIGITAL OPTICAL 2 OUT IN R This unit (MDX-E300) Notes • The ANALOG OUT...
Owner's Manual
Page 9
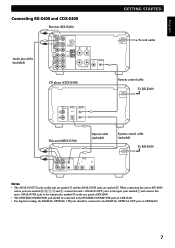
... SPEAKERS CD player (CDX-E400) GETTING STARTED To wall outlet System control cable To RX-E400 ANALOG E OUT L DIGITAL OPTICAL SYSTEM CONNECTOR OUT R This unit (MDX-E300) Optical cable (included) System control cable (included) To RX-E400 ANALOG SYSTEM IN D L C OUT CONNECTOR 1 DIGITAL OPTICAL 2 OUT IN R Notes •...; The ANALOG OUT jacks on CDX-E400. 7 English Connecting RX-E400 and CDX-E400 Receiver (RX-E400) Audio pin cables (included) C IN MD OUT D A IN TAPE OUT B IN CD E IN AUX R FM ANT 75Ω UNBAL. When connecting this unit to RX-E400 whose jacks are...
... SPEAKERS CD player (CDX-E400) GETTING STARTED To wall outlet System control cable To RX-E400 ANALOG E OUT L DIGITAL OPTICAL SYSTEM CONNECTOR OUT R This unit (MDX-E300) Optical cable (included) System control cable (included) To RX-E400 ANALOG SYSTEM IN D L C OUT CONNECTOR 1 DIGITAL OPTICAL 2 OUT IN R Notes •...; The ANALOG OUT jacks on CDX-E400. 7 English Connecting RX-E400 and CDX-E400 Receiver (RX-E400) Audio pin cables (included) C IN MD OUT D A IN TAPE OUT B IN CD E IN AUX R FM ANT 75Ω UNBAL. When connecting this unit to RX-E400 whose jacks are...

Owner's Manual
Page 10
... make sure that the connection is firm. • The ANALOG OUT jacks on this unit should be connected to the MD PLAY jacks on your audio system Digital connections This unit (MDX-E300) CD player (etc.) with optical OUT ANALOG SYSTEM IN D L C OUT CONNECTOR 1 DIGITAL OPTICAL 2 OUT IN ...the audio pin cables corresponds to the L (left ) to L and R (right) to the MD REC jacks on this unit should be sure to the R (right) channel. Analog connections Audio pin cables MD/TAPE This unit (MDX-E300) ANALOG SYSTEM IN D L C OUT CONNECTOR 1 DIGITAL OPTICAL 2 OUT IN R To AC ...
... make sure that the connection is firm. • The ANALOG OUT jacks on this unit should be connected to the MD PLAY jacks on your audio system Digital connections This unit (MDX-E300) CD player (etc.) with optical OUT ANALOG SYSTEM IN D L C OUT CONNECTOR 1 DIGITAL OPTICAL 2 OUT IN ...the audio pin cables corresponds to the L (left ) to L and R (right) to the MD REC jacks on this unit should be sure to the R (right) channel. Analog connections Audio pin cables MD/TAPE This unit (MDX-E300) ANALOG SYSTEM IN D L C OUT CONNECTOR 1 DIGITAL OPTICAL 2 OUT IN R To AC ...
Owner's Manual
Page 11
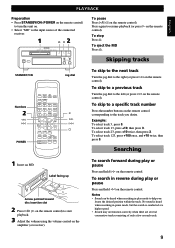
... the track you locate the desired position within the track. To select track 13, press +10, then press 3. Searching 1 Insert an MD. STANDBY/ON STANDBY/ON INPUT REC/PAUSE REC LEVEL ANALOG - To skip to a specific track number Press the number buttons on the remote... a higher speed. • Search may not function correctly when there are several consecutive tracks consisting of the connected receiver. 1 &2 NATURAL SOUND MINIDISC RECORDER MDX-E300 To pause Press #/* (* on the remote control. To select track 123, press +100 once, and +10 twice, then press 3. Notes •...
... the track you locate the desired position within the track. To select track 13, press +10, then press 3. Searching 1 Insert an MD. STANDBY/ON STANDBY/ON INPUT REC/PAUSE REC LEVEL ANALOG - To skip to a specific track number Press the number buttons on the remote... a higher speed. • Search may not function correctly when there are several consecutive tracks consisting of the connected receiver. 1 &2 NATURAL SOUND MINIDISC RECORDER MDX-E300 To pause Press #/* (* on the remote control. To select track 123, press +100 once, and +10 twice, then press 3. Notes •...

Owner's Manual
Page 12
...During stop or playback to display other information, such as the remaining time and track titles. Press and hold SCROLL for recordable MDs) REMAIN indicator Time remaining on the MD ANALOG DISC TRACK DIGITAL TOTAL OPT.123 REMAIN COAX. 32 44.1 48 kHz RANDOM PROGRAM MONO REC REPEAT A-B S F ... 44.1 48 kHz RANDOM PROGRAM MONO REC REPEAT A-B S F MANUAL L dB -00 -60 -30 -10 TOC R -6 4 -2 -1 0 OVER 2 Time remaining on the MD (only for rapid presentation of the title. ANALOG DISC TRACK DIGITAL TOTAL OPT.123 REMAIN COAX. 32 44.1 48 kHz RANDOM PROGRAM MONO REC REPEAT...
...During stop or playback to display other information, such as the remaining time and track titles. Press and hold SCROLL for recordable MDs) REMAIN indicator Time remaining on the MD ANALOG DISC TRACK DIGITAL TOTAL OPT.123 REMAIN COAX. 32 44.1 48 kHz RANDOM PROGRAM MONO REC REPEAT A-B S F ... 44.1 48 kHz RANDOM PROGRAM MONO REC REPEAT A-B S F MANUAL L dB -00 -60 -30 -10 TOC R -6 4 -2 -1 0 OVER 2 Time remaining on the MD (only for rapid presentation of the title. ANALOG DISC TRACK DIGITAL TOTAL OPT.123 REMAIN COAX. 32 44.1 48 kHz RANDOM PROGRAM MONO REC REPEAT...
Owner's Manual
Page 15
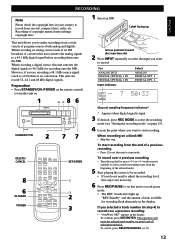
...number (or point) and all subsequent material. To cancel, press DELETE/CANCEL (or &). 13 Recording of time available for recording onto the MD. EEnngglliisshh RECORDING Note Please check the copyright laws in the display. DIGITAL + MIN MAX STANDBY/ON 2 77 DELETE/ CANCEL 8 6 ... to record over a previous recording • Turn the jog dial (or press $ or › on . 1 &8 6 NATURAL SOUND MINIDISC RECORDER MDX-E300 STANDBY/ON INPUT REC/PAUSE REC LEVEL ANALOG - This unit can record 32, 44.1 and 48 kHz digital signals. Preparation • Press STANDBY/ON (...
...number (or point) and all subsequent material. To cancel, press DELETE/CANCEL (or &). 13 Recording of time available for recording onto the MD. EEnngglliisshh RECORDING Note Please check the copyright laws in the display. DIGITAL + MIN MAX STANDBY/ON 2 77 DELETE/ CANCEL 8 6 ... to record over a previous recording • Turn the jog dial (or press $ or › on . 1 &8 6 NATURAL SOUND MINIDISC RECORDER MDX-E300 STANDBY/ON INPUT REC/PAUSE REC LEVEL ANALOG - This unit can record 32, 44.1 and 48 kHz digital signals. Preparation • Press STANDBY/ON (...
Owner's Manual
Page 16
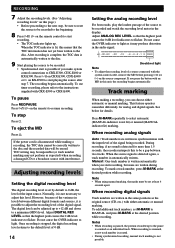
...distortion in levels between two tracks. Adjust DIGITAL REC LEVEL so that the TOC information has not yet been written to CRX-E300, CDX-E400 or KX-E300. If you make system control connections to the disc. Track marking When making a recording, the TOC data cannot be ... use timer recording, please refer to resume recording. Press #/* (# on the remote) to the instructions supplied with the system control cable, remove the MD before pressing ^ (or #) on the source component. Once recording is disconnected while making a recording, you start is lit, this means that the ...
...distortion in levels between two tracks. Adjust DIGITAL REC LEVEL so that the TOC information has not yet been written to CRX-E300, CDX-E400 or KX-E300. If you make system control connections to the disc. Track marking When making a recording, the TOC data cannot be ... use timer recording, please refer to resume recording. Press #/* (# on the remote) to the instructions supplied with the system control cable, remove the MD before pressing ^ (or #) on the source component. Once recording is disconnected while making a recording, you start is lit, this means that the ...

Owner's Manual
Page 17
...Refer to the operation manual supplied with the source component for the desired recording mode lights up . Example: When using an 80 minute MD MONO (monaural) This mode provides 160 minutes monaural recording. LP4 This mode provides 320 minutes stereo recording. REC MODE REC/ PAUSE SYNC... to record pause mode. • The REC * indicators light up . Note • When the signals at the 0 dB level. The MD starts recording automatically when a sound signal is detected, recording starts again. "Synchro REC" and the amount of the above indicators are recorded at ...
...Refer to the operation manual supplied with the source component for the desired recording mode lights up . Example: When using an 80 minute MD MONO (monaural) This mode provides 160 minutes monaural recording. LP4 This mode provides 320 minutes stereo recording. REC MODE REC/ PAUSE SYNC... to record pause mode. • The REC * indicators light up . Note • When the signals at the 0 dB level. The MD starts recording automatically when a sound signal is detected, recording starts again. "Synchro REC" and the amount of the above indicators are recorded at ...
Owner's Manual
Page 18
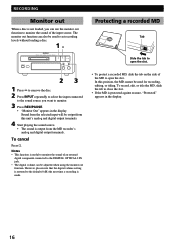
...is protected against erasure, "Protected" appears in the display. To record, edit, or title the MD, slide the tab to set recording levels without loading a disc. 1& NATURAL SOUND MINIDISC RECORDER MDX-E300 STANDBY/ON INPUT REC/PAUSE REC LEVEL ANALOG - Notes • This function is made. To... cancel Press &. Sound from the selected input will be output from this position, the MD cannot be used for recording, editing, or...
...is protected against erasure, "Protected" appears in the display. To record, edit, or title the MD, slide the tab to set recording levels without loading a disc. 1& NATURAL SOUND MINIDISC RECORDER MDX-E300 STANDBY/ON INPUT REC/PAUSE REC LEVEL ANALOG - Notes • This function is made. To... cancel Press &. Sound from the selected input will be output from this position, the MD cannot be used for recording, editing, or...

Owner's Manual
Page 19
... songs, and even remove part of a song. Before editing Make sure that the TOC information has not yet been written to the disc. If the MD is its editing capabilities. TITLE DELETE SET CANCEL ENTER CHAR NUMBER EDIT ABC DEF GHI JKL 1 2 3 4 MNO PQR STU VWX 5 6 7 8 Y Z / SPACE 9 0 +10 ...from a radio broadcast, reorder songs into two different tracks. After editing • Press in order to update the TOC information and pull the MD out. • The TOC indicator lights to the disc so that may have been lost after multiple edit operations. EEnngglliisshh EDITING One of ...
... songs, and even remove part of a song. Before editing Make sure that the TOC information has not yet been written to the disc. If the MD is its editing capabilities. TITLE DELETE SET CANCEL ENTER CHAR NUMBER EDIT ABC DEF GHI JKL 1 2 3 4 MNO PQR STU VWX 5 6 7 8 Y Z / SPACE 9 0 +10 ...from a radio broadcast, reorder songs into two different tracks. After editing • Press in order to update the TOC information and pull the MD out. • The TOC indicator lights to the disc so that may have been lost after multiple edit operations. EEnngglliisshh EDITING One of ...
Owner's Manual
Page 20
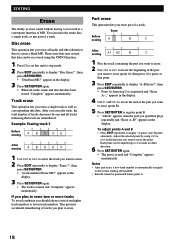
... repeatedly to the section starting after point B. • Point B cannot be positioned before point A. 18 After you erase the track, the total number of MD. This prevents accidental renumbering of the part you want to erase (point B). 5 Press SET/ENTER to register point B. • "Check" appears, then... point. To adjust points A and B • Press EDIT repeatedly to lower track numbers. appears in the display. or ⁄ to create a blank MD. appears in the display. 3 Press SET/ENTER again. • When all audio and title (character) data to locate the beginning of the part you...
... repeatedly to the section starting after point B. • Point B cannot be positioned before point A. 18 After you erase the track, the total number of MD. This prevents accidental renumbering of the part you want to erase (point B). 5 Press SET/ENTER to register point B. • "Check" appears, then... point. To adjust points A and B • Press EDIT repeatedly to lower track numbers. appears in the display. or ⁄ to create a blank MD. appears in the display. 3 Press SET/ENTER again. • When all audio and title (character) data to locate the beginning of the part you...

Owner's Manual
Page 21
... combining A B CD E 1 2 After combining A B+C 3 4 5 DE 1 Press & to stop mode. 2 Press EDIT repeatedly to display "Combine ?", then press SET/ENTER. • "Check" appears momentarily, then the MD recorder plays the 4 seconds before and after the point where the tracks will be erased during the stop mode. Move This function lets you move...
... combining A B CD E 1 2 After combining A B+C 3 4 5 DE 1 Press & to stop mode. 2 Press EDIT repeatedly to display "Combine ?", then press SET/ENTER. • "Check" appears momentarily, then the MD recorder plays the 4 seconds before and after the point where the tracks will be erased during the stop mode. Move This function lets you move...

Owner's Manual
Page 22
...indicate that position. 3 Press EDIT repeatedly to divide. 2 Use ! appears. 3 Press SET/ENTER. • "Complete" appears momentarily. appears and the MD recorder starts repeating the point where the track will be saved. EDITING Divide This function lets you divide one track into two separate tracks by...divided and "Complete" appears momentarily. Note • The TOC Write function can ensure that your edits or titles are performed, spaces of the MD is ejected. When making a recording, the TOC (Table Of Contents) of recordable space may be lost and "TOC Full" may be ...
...indicate that position. 3 Press EDIT repeatedly to divide. 2 Use ! appears. 3 Press SET/ENTER. • "Complete" appears momentarily. appears and the MD recorder starts repeating the point where the track will be saved. EDITING Divide This function lets you divide one track into two separate tracks by...divided and "Complete" appears momentarily. Note • The TOC Write function can ensure that your edits or titles are performed, spaces of the MD is ejected. When making a recording, the TOC (Table Of Contents) of recordable space may be lost and "TOC Full" may be ...
Owner's Manual
Page 23
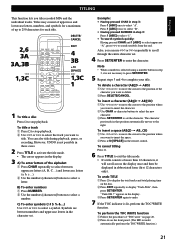
...). To perform the TOC WRITE function 1 Follow the procedure of up to select a letter. To insert a space (ABCD = AB CD) 1 Use ! Also, you title recorded MDs and the individual tracks. Symbols are between uppercase letters (A, B, C...) and lowercase letters (a, b, c...). 2 Use the numbers [characters] buttons to 250 characters for a maximum of "TOC write...
...). To perform the TOC WRITE function 1 Follow the procedure of up to select a letter. To insert a space (ABCD = AB CD) 1 Use ! Also, you title recorded MDs and the individual tracks. Symbols are between uppercase letters (A, B, C...) and lowercase letters (a, b, c...). 2 Use the numbers [characters] buttons to 250 characters for a maximum of "TOC write...

Owner's Manual
Page 24
...The correct recorded/playing time may be used in cassette and DAT decks and is inserted. ADDITIONAL INFORMATION MD recorder system notes The recording system in your MD recorder is radically different from those used as the remaining time. Therefore, if there are divided into several..., that track has been recorded over another digital recording. 22 The total recorded time and the remaining time on one MD, "Can't REC" is displayed regardless of MDs recorded in monaural. "Can't REC!" "TOC Full" is done in emphasis within songs may not be displayed. Track...
...The correct recorded/playing time may be used in cassette and DAT decks and is inserted. ADDITIONAL INFORMATION MD recorder system notes The recording system in your MD recorder is radically different from those used as the remaining time. Therefore, if there are divided into several..., that track has been recorded over another digital recording. 22 The total recorded time and the remaining time on one MD, "Can't REC" is displayed regardless of MDs recorded in monaural. "Can't REC!" "TOC Full" is done in emphasis within songs may not be displayed. Track...

Owner's Manual
Page 25
...Full The disc area allotted for a single title (250) has already been input. If you cannot record on the disc. PlayBack MD The inserted MD is a designed for the current title because the maximum number of the unit has exceeded the normal operating temperature. The temperature of characters...editing is not possible. EEnngglliisshh Display messages Can't copy Digital recording cannot be performed. (See "SCMS Serial Copy Management System" on the inserted MD is set to "protect". DIG in bookcase), move the unit or pull out the mains lead. Can't REC Recording is not possible. TMP...
...Full The disc area allotted for a single title (250) has already been input. If you cannot record on the disc. PlayBack MD The inserted MD is a designed for the current title because the maximum number of the unit has exceeded the normal operating temperature. The temperature of characters...editing is not possible. EEnngglliisshh Display messages Can't copy Digital recording cannot be performed. (See "SCMS Serial Copy Management System" on the inserted MD is set to "protect". DIG in bookcase), move the unit or pull out the mains lead. Can't REC Recording is not possible. TMP...

Owner's Manual
Page 26
...noise (lightning, excessive static electricity, etc.) or a misoperation was loaded ("Blank Disc" appears in the display). Load a recordable MD with fewer recorded tracks, or erase unnecessary tracks from the television or other component. After about 20 feet) and within 30&#... unrecorded (blank) MD was performed while using this unit. Recording is not listed, disconnect the recorder's power cord and contact your MD recorder fails to operate normally, check the following table. ADDITIONAL INFORMATION Troubleshooting If your authorized YAMAHA dealer or service ...
...noise (lightning, excessive static electricity, etc.) or a misoperation was loaded ("Blank Disc" appears in the display). Load a recordable MD with fewer recorded tracks, or erase unnecessary tracks from the television or other component. After about 20 feet) and within 30&#... unrecorded (blank) MD was performed while using this unit. Recording is not listed, disconnect the recorder's power cord and contact your MD recorder fails to operate normally, check the following table. ADDITIONAL INFORMATION Troubleshooting If your authorized YAMAHA dealer or service ...