
Owner's Manual
Page 3
...PROGRAM PLAY 10 RECORDING 11 Adjusting Recording Levels 12 Track Marking 12 SYNCHRO RECORDING 13 MONAURAL RECORDING 13 MONITOR OUT 14 PROTECTING A RECORDED MD 14 EDITING 15 ERASE 16 Disc Erase 16 Track Erase 16 Part Erase 16 Disc or Track Title Erase 17 MOVE 17 COMBINE ...WRITE 18 FRA CHECK 18 TITLING 19 MD SYSTEM LIMITATIONS 20 DISPLAY MESSAGES 21 COPY PROTECTION (SCMS 21 TROUBLESHOOTING 22 SPECIFICATIONS 23 E-3 For the best performance, read this YAMAHA product. We hope it will guide you in operating your YAMAHA product. English INTRODUCTION Thank you for purchasing...
...PROGRAM PLAY 10 RECORDING 11 Adjusting Recording Levels 12 Track Marking 12 SYNCHRO RECORDING 13 MONAURAL RECORDING 13 MONITOR OUT 14 PROTECTING A RECORDED MD 14 EDITING 15 ERASE 16 Disc Erase 16 Track Erase 16 Part Erase 16 Disc or Track Title Erase 17 MOVE 17 COMBINE ...WRITE 18 FRA CHECK 18 TITLING 19 MD SYSTEM LIMITATIONS 20 DISPLAY MESSAGES 21 COPY PROTECTION (SCMS 21 TROUBLESHOOTING 22 SPECIFICATIONS 23 E-3 For the best performance, read this YAMAHA product. We hope it will guide you in operating your YAMAHA product. English INTRODUCTION Thank you for purchasing...

Owner's Manual
Page 6
... (not included) B L TAPE R OUT L MD R D 75 Ω UNBAL. Make connections between the E100 series components using the SYSTEM CONNECTOR jack allows you to control this unit are marked Ç and the ANALOG IN jacks are marked Î. This unit (MDX-E100) ANALOG SYSTEM IN D L C OUT CONNECTOR DIGITAL... are complete. • Connections should be connected to the jacks of external digital components. When connecting this unit to the YAMAHA RX-E100 receiver whose terminals are marked and ‰), connect this unit's ANALOG OUT terminals to the input terminals marked Ç and...
... (not included) B L TAPE R OUT L MD R D 75 Ω UNBAL. Make connections between the E100 series components using the SYSTEM CONNECTOR jack allows you to control this unit are marked Ç and the ANALOG IN jacks are marked Î. This unit (MDX-E100) ANALOG SYSTEM IN D L C OUT CONNECTOR DIGITAL... are complete. • Connections should be connected to the jacks of external digital components. When connecting this unit to the YAMAHA RX-E100 receiver whose terminals are marked and ‰), connect this unit's ANALOG OUT terminals to the input terminals marked Ç and...

Owner's Manual
Page 7
...Jog dial To pause Press #/* (* on the remote). Skipping Tracks To skip to the next track Turn the jog dial to MD. 1 &2 NATURAL SOUND MINIDISC RECORDER MDX-E100 STANDBY/ON / INPUT REC/PAUSE REC LEVEL ANALOG - No sound is heard when searching in reverse during play or pause Press ... to a specific track number Press the number buttons on the remote corresponding to start playback. 3 Adjust the volume using the volume control on the RX-E100. To select track 123, press +100 once, and +10 twice, then press 3. Label facing up Arrow pointed toward disc insertion slot 2 Press #/*...
...Jog dial To pause Press #/* (* on the remote). Skipping Tracks To skip to the next track Turn the jog dial to MD. 1 &2 NATURAL SOUND MINIDISC RECORDER MDX-E100 STANDBY/ON / INPUT REC/PAUSE REC LEVEL ANALOG - No sound is heard when searching in reverse during play or pause Press ... to a specific track number Press the number buttons on the remote corresponding to start playback. 3 Adjust the volume using the volume control on the RX-E100. To select track 123, press +100 once, and +10 twice, then press 3. Label facing up Arrow pointed toward disc insertion slot 2 Press #/*...
Owner's Manual
Page 8
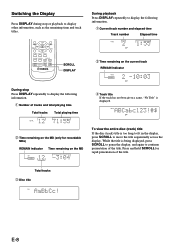
..., press SCROLL to pause the display, and again to move the title sequentially across the display. E-8 Press and hold SCROLL for recordable MDs) REMAIN indicator Time remaining on the MD ANALOG DISC TRACK DIGITAL TOTAL OPT.123 REMAIN COAX. 32 44.1 48 kHz RANDOM PROGRAM MONO REC REPEAT A-B S F MANUAL L dB -00 -60... OPT.123 REMAIN COAX. 32 44.1 48 kHz RANDOM PROGRAM MONO REC REPEAT A-B S F MANUAL L dB -00 -60 -30 -10 TOC R -6 4 -2 -1 0 OVER 2 Time remaining on the MD (only for rapid presentation of the title.
..., press SCROLL to pause the display, and again to move the title sequentially across the display. E-8 Press and hold SCROLL for recordable MDs) REMAIN indicator Time remaining on the MD ANALOG DISC TRACK DIGITAL TOTAL OPT.123 REMAIN COAX. 32 44.1 48 kHz RANDOM PROGRAM MONO REC REPEAT A-B S F MANUAL L dB -00 -60... OPT.123 REMAIN COAX. 32 44.1 48 kHz RANDOM PROGRAM MONO REC REPEAT A-B S F MANUAL L dB -00 -60 -30 -10 TOC R -6 4 -2 -1 0 OVER 2 Time remaining on the MD (only for rapid presentation of the title.

Owner's Manual
Page 11
...to start recording. • When recording on the remote) to turn this unit to be recorded. 1 NATURAL SOUND MINIDISC RECORDER MDX-E100 STANDBY/ON &7 5 / INPUT REC/PAUSE REC LEVEL ANALOG - This operation will erase the selected track number (or point) and... STU VWX 5 6 7 8 Y Z / SPACE 9 0 +10 +100 REC/ PAUSE SYNC M-MARK MONO/ST INPUT RANDOM PROGRAM REPEAT A-B S/F DISPLAY SCROLL POWER SET/ENTER * & 2 1 Insert an MD. If you do not need to adjust the recording level, this step is no conversion. When recording a digital source, this unit converts the digital signals...
...to start recording. • When recording on the remote) to turn this unit to be recorded. 1 NATURAL SOUND MINIDISC RECORDER MDX-E100 STANDBY/ON &7 5 / INPUT REC/PAUSE REC LEVEL ANALOG - This operation will erase the selected track number (or point) and... STU VWX 5 6 7 8 Y Z / SPACE 9 0 +10 +100 REC/ PAUSE SYNC M-MARK MONO/ST INPUT RANDOM PROGRAM REPEAT A-B S/F DISPLAY SCROLL POWER SET/ENTER * & 2 1 Insert an MD. If you do not need to adjust the recording level, this step is no conversion. When recording a digital source, this unit converts the digital signals...
Owner's Manual
Page 12
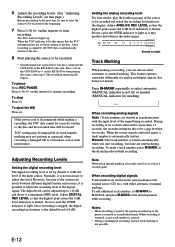
... between two tracks. To stop Press &. If the power cord is disconnected while making a recording, you have connected the CDX-E100 or the KX-E100 to this unit. Once recording is stopped, the digital recording level returns to the default level of the input source. This feature...(# on the remote) to select automatic (MANUAL indicator is set M-MARK to MANUAL and press M-MARK at least 4 seconds apart. To eject the MD Press . Adjusting Recording Levels Setting the digital recording level The digital recording level is not lit) or manual (MANUAL indicator lit) marking. Normally, it...
... between two tracks. To stop Press &. If the power cord is disconnected while making a recording, you have connected the CDX-E100 or the KX-E100 to this unit. Once recording is stopped, the digital recording level returns to the default level of the input source. This feature...(# on the remote) to select automatic (MANUAL indicator is set M-MARK to MANUAL and press M-MARK at least 4 seconds apart. To eject the MD Press . Adjusting Recording Levels Setting the digital recording level The digital recording level is not lit) or manual (MANUAL indicator lit) marking. Normally, it...

Owner's Manual
Page 13
..., or select the track you want to record. 3 Press SYNC to set this unit to start recording. To cancel the synchronized recording mode Press &. The MD starts recording automatically when a sound signal is detected, recording starts again. To adjust the recording level of time available for instructions regarding its use.) 2 Press... this unit to record pause mode. "Synchro REC" and the amount of digital or analog input sources, see "Adjusting Recording Levels" on one 74 minute MD. 1 Follow steps 1, 2, and 3, of a track are not recorded.
..., or select the track you want to record. 3 Press SYNC to set this unit to start recording. To cancel the synchronized recording mode Press &. The MD starts recording automatically when a sound signal is detected, recording starts again. To adjust the recording level of time available for instructions regarding its use.) 2 Press... this unit to record pause mode. "Synchro REC" and the amount of digital or analog input sources, see "Adjusting Recording Levels" on one 74 minute MD. 1 Follow steps 1, 2, and 3, of a track are not recorded.

Owner's Manual
Page 14
... component connected to the DIGITAL OPTICAL 2 IN jack. • The digital volume can use the monitor out function to monitor the sound of the MD to the default (0 dB) the next time a recording is made. However, please note that the digital volume setting is restored to open the ...slot. PROTECTING A RECORDED MD Tab Slide the tab to open the slot. • To protect a recorded MD, slide the tab on the side of the input source. 1& NATURAL SOUND MINIDISC RECORDER MDX-E100 STANDBY/ON / INPUT REC/PAUSE REC LEVEL ANALOG - "Monitor Out"...
... component connected to the DIGITAL OPTICAL 2 IN jack. • The digital volume can use the monitor out function to monitor the sound of the MD to the default (0 dB) the next time a recording is made. However, please note that the digital volume setting is restored to open the ...slot. PROTECTING A RECORDED MD Tab Slide the tab to open the slot. • To protect a recorded MD, slide the tab on the side of the input source. 1& NATURAL SOUND MINIDISC RECORDER MDX-E100 STANDBY/ON / INPUT REC/PAUSE REC LEVEL ANALOG - "Monitor Out"...

Owner's Manual
Page 15
... a different track number. ¶ COMBINE Lets you combine two adjacent tracks. ! ¶ DIVIDE $ Lets you split a single track into the order you cannot edit the MD. The TOC indicator lights to show that the TOC information has not yet been written to update the TOC information and pull the... MD out. - Slide the tab to the disc so that the MD is protected, you want, remove songs, combine songs, and even remove part of a song. Notes on the side of the...
... a different track number. ¶ COMBINE Lets you combine two adjacent tracks. ! ¶ DIVIDE $ Lets you split a single track into the order you cannot edit the MD. The TOC indicator lights to show that the TOC information has not yet been written to update the TOC information and pull the... MD out. - Slide the tab to the disc so that the MD is protected, you want, remove songs, combine songs, and even remove part of a song. Notes on the side of the...
Owner's Manual
Page 16
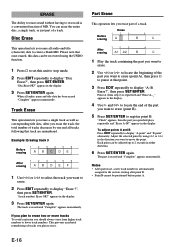
...; to select the track you should always erase from step 2) is registered and "Erase A-_" appears in the direction you want to create a blank MD. If you plan to erase two or more tracks To avoid confusion you want to erase. 2 Press EDIT repeatedly to display "Disc Erase?", then ... E-16 After you plan to erase. 2 Use ! appears in the display. 3 Press SET/ENTER again. Track Erase This operation lets you erase part of MD. The part is erased and "Complete" appears momentarily. Notes • After part erase, a new track number is a convenient function of a track. You ...
...; to select the track you should always erase from step 2) is registered and "Erase A-_" appears in the direction you want to create a blank MD. If you plan to erase two or more tracks To avoid confusion you want to erase. 2 Press EDIT repeatedly to display "Disc Erase?", then ... E-16 After you plan to erase. 2 Use ! appears in the display. 3 Press SET/ENTER again. Track Erase This operation lets you erase part of MD. The part is erased and "Complete" appears momentarily. Notes • After part erase, a new track number is a convenient function of a track. You ...

Owner's Manual
Page 17
.... 3 Use $ or › to select the second track of the two you change the position of tracks decreases by one . "Check" appears momentarily, then the MD recorder plays the 4 seconds before and after the point where the tracks will be erased during the stop playback. 2 Use $ or › to select the...
.... 3 Use $ or › to select the second track of the two you change the position of tracks decreases by one . "Check" appears momentarily, then the MD recorder plays the 4 seconds before and after the point where the tracks will be erased during the stop playback. 2 Use $ or › to select the...

Owner's Manual
Page 18
... A BCDE After dividing 1 2 3 4 5 6 A B C1 C2 D 1 Play the track you want to divide the track, then press * to the TOC, it is ejected. appears and the MD recorder starts repeating the point where the track will be divided. The dividing position can be possible to recover the FRA (Freely Recordable Area) on... be saved. TOC WRITE When making disc edits or titling, however, the TOC isn't automatically written unless the disc is possible that your MD discs. When making a recording, the TOC (Table Of Contents) of the point where the track will not be adjusted up to display...
... A BCDE After dividing 1 2 3 4 5 6 A B C1 C2 D 1 Play the track you want to divide the track, then press * to the TOC, it is ejected. appears and the MD recorder starts repeating the point where the track will be divided. The dividing position can be possible to recover the FRA (Freely Recordable Area) on... be saved. TOC WRITE When making disc edits or titling, however, the TOC isn't automatically written unless the disc is possible that your MD discs. When making a recording, the TOC (Table Of Contents) of the point where the track will not be adjusted up to display...

Owner's Manual
Page 19
...B, C...) and lowercase letters (a, b, c...). 2 Use the numbers [characters] buttons to display the total tracks and total playing time on the front panel. (The MD recorder automatically performs the TOC WRITE function.) E-19 To cancel titling Press &. 6 Press TITLE to select a symbol. To undo TITLE 1 Press & to select ...page 18. 2 Press on the disc. 2 Press EDIT repeatedly to set . 4 Press SET/ENTER to the position where you title recorded MDs and the individual tracks. To perform the TOC WRITE function 1 Follow the procedure of the character you want to insert the character. 2 ...
...B, C...) and lowercase letters (a, b, c...). 2 Use the numbers [characters] buttons to display the total tracks and total playing time on the front panel. (The MD recorder automatically performs the TOC WRITE function.) E-19 To cancel titling Press &. 6 Press TITLE to select a symbol. To undo TITLE 1 Press & to select ...page 18. 2 Press on the disc. 2 Press EDIT repeatedly to set . 4 Press SET/ENTER to the position where you title recorded MDs and the individual tracks. To perform the TOC WRITE function 1 Follow the procedure of the character you want to insert the character. 2 ...

Owner's Manual
Page 20
.... "TOC Reading" is displayed continuously The "TOC Reading" display lasts longer than 10 seconds of stereo sound. E-20 MD SYSTEM LIMITATIONS The recording system in your MD recorder is radically different from those used in minimum units of 2 seconds each, no matter how short the material. &#... if that these units may be displayed during search operations. "Can't REC!" The minimum size of these limitations are inherent to the MD recording system and are several separate blank spaces, the remaining time will only display a time equivalent to the maximum recording time •...
.... "TOC Reading" is displayed continuously The "TOC Reading" display lasts longer than 10 seconds of stereo sound. E-20 MD SYSTEM LIMITATIONS The recording system in your MD recorder is radically different from those used in minimum units of 2 seconds each, no matter how short the material. &#... if that these units may be displayed during search operations. "Can't REC!" The minimum size of these limitations are inherent to the MD recording system and are several separate blank spaces, the remaining time will only display a time equivalent to the maximum recording time •...

Owner's Manual
Page 21
... normally. If you cannot record on the disc. COPY PROTECTION (SCMS) As a digital audio component, this page.) Can't edit! Therefore, an MD recorded through a digital input cannot be used as a built in a place with the Serial Copy Management System (SCMS) standards. Not Audio The ... recording. TOC Full The disc area allotted for playback only (you do, recorded material may not be enough blank space remaining on the MD cartridge Trying to "protect". Do not move the unit to the UTOC. However, malfunctioning may be damaged. Edit operations are not possible...
... normally. If you cannot record on the disc. COPY PROTECTION (SCMS) As a digital audio component, this page.) Can't edit! Therefore, an MD recorded through a digital input cannot be used as a built in a place with the Serial Copy Management System (SCMS) standards. Not Audio The ... recording. TOC Full The disc area allotted for playback only (you do, recorded material may not be enough blank space remaining on the MD cartridge Trying to "protect". Do not move the unit to the UTOC. However, malfunctioning may be damaged. Edit operations are not possible...

Owner's Manual
Page 22
...be lost. Recording is not possible. • The disc is write protected ("Protected" appears in the display). • A pre-mastered MD is loaded ("Playback MD" appears in the display). • The source is not connected correctly. • The input setting is incorrect. • The recording ...to operate normally, check the following table. Playback is not possible. • Moisture is located in the display). TROUBLESHOOTING If your authorized YAMAHA dealer or service center for the moisture to evaporate before trying to play a disc. • Press STANDBY/ON (POWER on the remote...
...be lost. Recording is not possible. • The disc is write protected ("Protected" appears in the display). • A pre-mastered MD is loaded ("Playback MD" appears in the display). • The source is not connected correctly. • The input setting is incorrect. • The recording ...to operate normally, check the following table. Playback is not possible. • Moisture is located in the display). TROUBLESHOOTING If your authorized YAMAHA dealer or service center for the moisture to evaporate before trying to play a disc. • Press STANDBY/ON (POWER on the remote...
