

Owner's Manual
Page 3
...timer. * This is not possible if MD is a direct copy of another digital signal (see page 24 for selecting this YAMAHA mini disc recorder. US and foreign patents licensed from the radio, etc.) ¶ The Monaural Record mode lets you record up...seconds before you will not miss the beginning of a song when recording directly from Dolby Laboratories Licensing Corporation. CONTENTS PART DESCRIPTIONS 4 FRONT PANEL 5 REMOTE CONTROL 6 CONNECTIONS 7 ANALOG CONNECTIONS 7 DIGITAL CONNECTIONS 7 PLAYBACK 8 Skipping Tracks 8 Searching 9 Switching the Display 9 RANDOM PLAY 10 REPEAT PLAY ...
...timer. * This is not possible if MD is a direct copy of another digital signal (see page 24 for selecting this YAMAHA mini disc recorder. US and foreign patents licensed from the radio, etc.) ¶ The Monaural Record mode lets you record up...seconds before you will not miss the beginning of a song when recording directly from Dolby Laboratories Licensing Corporation. CONTENTS PART DESCRIPTIONS 4 FRONT PANEL 5 REMOTE CONTROL 6 CONNECTIONS 7 ANALOG CONNECTIONS 7 DIGITAL CONNECTIONS 7 PLAYBACK 8 Skipping Tracks 8 Searching 9 Switching the Display 9 RANDOM PLAY 10 REPEAT PLAY ...

Owner's Manual
Page 5
Use to move the cursor when inputting a disc (track) title. ¤ Display panel (9) Displays various information. # Remote control sensor (24) Receives the signals emitted from the analog inputs. * REC (14) Press during stop (or pause) to start recording. Disc insertion... to record from: ANALOG or DIGITAL (OPTICAL 1, OPTICAL 2, or COAXIAL). ‡ REC LEVEL (14) Use to adjust the recording level when recording from the remote control. ‹ DISPLAY (9) Press repeatedly to switch between the title and time displays. $ TITLE (21) Press to activate or deactivate the title mode. ›...
Use to move the cursor when inputting a disc (track) title. ¤ Display panel (9) Displays various information. # Remote control sensor (24) Receives the signals emitted from the analog inputs. * REC (14) Press during stop (or pause) to start recording. Disc insertion... to record from: ANALOG or DIGITAL (OPTICAL 1, OPTICAL 2, or COAXIAL). ‡ REC LEVEL (14) Use to adjust the recording level when recording from the remote control. ‹ DISPLAY (9) Press repeatedly to switch between the title and time displays. $ TITLE (21) Press to activate or deactivate the title mode. ›...

Owner's Manual
Page 6
... titling a disc (track). ‡ M-MARK (14) Press to select automatic or manual marking of the previous or next tracks during record pause to record from a YAMAHA CD player. ) ? REMOTE CONTROL See the pages in parenthesis for A-B repeat. Press to select single track (S) or full disc (F) repeat.
... titling a disc (track). ‡ M-MARK (14) Press to select automatic or manual marking of the previous or next tracks during record pause to record from a YAMAHA CD player. ) ? REMOTE CONTROL See the pages in parenthesis for A-B repeat. Press to select single track (S) or full disc (F) repeat.
Owner's Manual
Page 8
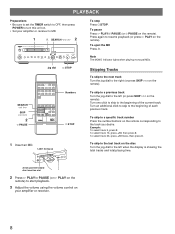
...D E F 2 G H I 3 J K L 4 M N O 5 PQR STU VWX Y Z / 6 7 8 9 0 SPACE +10 TITLE CHAR. Example: To select track 3, press 3. To skip to the last track on the remote). SEARCH ⁄ REC LEVEL SET INPUT REC & STOP CANCEL ENTER - $ + › 0 10 # PLAY/ * PAUSE To stop Press & STOP. Note The MONO indicator lights when playing...jog dial & STOP SEARCH ! ⁄ SKIP $ › 2 * PAUSE ! ? Label facing up s NATURAL SOUND MINIDISC RECORDER MDX-9 0 Skipping Tracks To skip to the next track Turn the jog dial to the right (or press SKIP › on your amplifier...
...D E F 2 G H I 3 J K L 4 M N O 5 PQR STU VWX Y Z / 6 7 8 9 0 SPACE +10 TITLE CHAR. Example: To select track 3, press 3. To skip to the last track on the remote). SEARCH ⁄ REC LEVEL SET INPUT REC & STOP CANCEL ENTER - $ + › 0 10 # PLAY/ * PAUSE To stop Press & STOP. Note The MONO indicator lights when playing...jog dial & STOP SEARCH ! ⁄ SKIP $ › 2 * PAUSE ! ? Label facing up s NATURAL SOUND MINIDISC RECORDER MDX-9 0 Skipping Tracks To skip to the next track Turn the jog dial to the right (or press SKIP › on your amplifier...

Owner's Manual
Page 13
...IN COAXIAL DIGITAL IN OPTICAL 1 DIGITAL IN OPTICAL 2 Select ANALOG DIGITAL COAX. Turn the jog dial (or press SKIP $ or › on the remote) to select a track (recording starts from a wide variety of a previous recording. When recording an analog source (such as a CD) there is ... & STOP CANCEL ENTER - $ + › 0 10 # PLAY/ * PAUSE 24 6 6 & STOP TITLE CHAR. Label facing up s NATURAL SOUND MINIDISC RECORDER MDX-9 0 Arrow pointed toward disc insertion slot 2 Press INPUT repeatedly to select the input connected to the sound source you want to start recording. • When...
...IN COAXIAL DIGITAL IN OPTICAL 1 DIGITAL IN OPTICAL 2 Select ANALOG DIGITAL COAX. Turn the jog dial (or press SKIP $ or › on the remote) to select a track (recording starts from a wide variety of a previous recording. When recording an analog source (such as a CD) there is ... & STOP CANCEL ENTER - $ + › 0 10 # PLAY/ * PAUSE 24 6 6 & STOP TITLE CHAR. Label facing up s NATURAL SOUND MINIDISC RECORDER MDX-9 0 Arrow pointed toward disc insertion slot 2 Press INPUT repeatedly to select the input connected to the sound source you want to start recording. • When...
Owner's Manual
Page 14
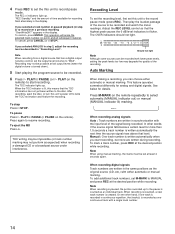
... the selected track number (or point) and all subsequent material. Recording may not be recorded. 6 Press # PLAY/* PAUSE (or # PLAY on the remote) to start recording, but none are written during recording. Press again to select automatic (MANUAL indicator out) or manual (MANUAL indicator lit) marking. Recording...or & STOP). After recording, eject the disc, or turn this unit to "MAX". To eject the MD Press ). Press M-MARK on the remote). On the other words, if the source signal falls below for analog and digital signals. Then play the loudest passage of the signal being recorded...
... the selected track number (or point) and all subsequent material. Recording may not be recorded. 6 Press # PLAY/* PAUSE (or # PLAY on the remote) to start recording, but none are written during recording. Press again to select automatic (MANUAL indicator out) or manual (MANUAL indicator lit) marking. Recording...or & STOP). After recording, eject the disc, or turn this unit to "MAX". To eject the MD Press ). Press M-MARK on the remote). On the other words, if the source signal falls below for analog and digital signals. Then play the loudest passage of the signal being recorded...
Owner's Manual
Page 15
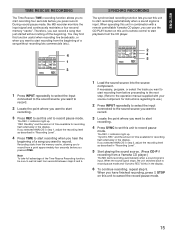
...want to start recording from before proceeding to the next step. (Refer to the operation manual supplied with a remote controllable Yamaha CD player, you to record from a Yamaha CD player.) The MD starts recording automatically when a sound signal is input. When operating this unit in ... this unit to start recording automatically when a sound signal is input. CD-P s MDX 4 1 3 SYNCHRO RECORDING The synchronized recording function lets you press record. The REC * indicators light up . CD-P s MDX 2 4 5 1 Press INPUT repeatedly to select the input connected to the sound ...
...want to start recording from before proceeding to the next step. (Refer to the operation manual supplied with a remote controllable Yamaha CD player, you to record from a Yamaha CD player.) The MD starts recording automatically when a sound signal is input. When operating this unit in ... this unit to start recording automatically when a sound signal is input. CD-P s MDX 4 1 3 SYNCHRO RECORDING The synchronized recording function lets you press record. The REC * indicators light up . CD-P s MDX 2 4 5 1 Press INPUT repeatedly to select the input connected to the sound ...
Owner's Manual
Page 21
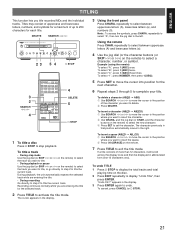
CD-P s MDX 4 DELETE 5 & STOP 1 To title a disc Press & STOP to title the current track. To title a track • During stop mode Use the jog dial (or SKIP $ or › on the remote) to select the track you want to title. • During playback or pause Use the jog dial (or SKIP $ or &#...move the cursor to select a character, number, or symbol. To undo TITLE 1 Press & STOP to display the total tracks and total playing time on the remote) to the position of more than 12 characters, it will scroll across the display once and then be displayed in that position automatically moves to...
CD-P s MDX 4 DELETE 5 & STOP 1 To title a disc Press & STOP to title the current track. To title a track • During stop mode Use the jog dial (or SKIP $ or › on the remote) to select the track you want to title. • During playback or pause Use the jog dial (or SKIP $ or &#...move the cursor to select a character, number, or symbol. To undo TITLE 1 Press & STOP to display the total tracks and total playing time on the remote) to the position of more than 12 characters, it will scroll across the display once and then be displayed in that position automatically moves to...

Owner's Manual
Page 24
.... However, subsequent recordings can record from a digital satellite broadcast onto a DAT tape or recordable MD via a digital input jack on the remote sensor may also be copied digitally). Note, however, that apply to avoid direct lighting. Rule 2 You can record a DAT tape or ... a copy protection code, secondgeneration digital copying will not be used as illustrated on the battery compartment). • Remove the batteries if the remote control will not be possible. Rule 3 You can record a digital signal input from digital program sources (CDs, DATs or pre-mastered MDs...
.... However, subsequent recordings can record from a digital satellite broadcast onto a DAT tape or recordable MD via a digital input jack on the remote sensor may also be copied digitally). Note, however, that apply to avoid direct lighting. Rule 2 You can record a DAT tape or ... a copy protection code, secondgeneration digital copying will not be used as illustrated on the battery compartment). • Remove the batteries if the remote control will not be possible. Rule 3 You can record a digital signal input from digital program sources (CDs, DATs or pre-mastered MDs...
Owner's Manual
Page 25
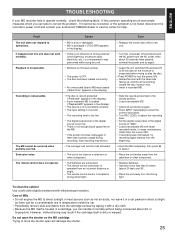
...correct the problem. After about 20 feet) and 30°. • Place the unit away from an incorrect distance or angle. • The remote control sensor is damaged ("UTOC ERR appears in the display). Care of MDs • Do not expose the MD to direct sunlight or heat sources...a misoperation was interrupted, try again. • Leave the unit switched ON and wait 20 to 30 minutes for help. ENGLISH TROUBLESHOOTING If your authorized YAMAHA dealer or service center for the moisture to evaporate before trying to play the disc. • Press POWER to turn the power ON. • Reload...
...correct the problem. After about 20 feet) and 30°. • Place the unit away from an incorrect distance or angle. • The remote control sensor is damaged ("UTOC ERR appears in the display). Care of MDs • Do not expose the MD to direct sunlight or heat sources...a misoperation was interrupted, try again. • Leave the unit switched ON and wait 20 to 30 minutes for help. ENGLISH TROUBLESHOOTING If your authorized YAMAHA dealer or service center for the moisture to evaporate before trying to play the disc. • Press POWER to turn the power ON. • Reload...

Owner's Manual
Page 27
... optical connector jack GENERAL Power Supplies 230 V, 50 Hz Power Consumption 20 W Dimensions (W x H x D) 280 x 82.5 x 362 mm (11" x 3-1/4" x 14-1/4") Weight 4 kg (8 lbs. 13 oz.) Accessories Remote Control 1 Audio cord 2 Batteries (size AA, R6, UM-3) 2 Specifications subject to change without notice. 27
... optical connector jack GENERAL Power Supplies 230 V, 50 Hz Power Consumption 20 W Dimensions (W x H x D) 280 x 82.5 x 362 mm (11" x 3-1/4" x 14-1/4") Weight 4 kg (8 lbs. 13 oz.) Accessories Remote Control 1 Audio cord 2 Batteries (size AA, R6, UM-3) 2 Specifications subject to change without notice. 27