

Owner's Manual
Page 2
... equipment. 8. CLASS 1 LASER PRODUCT This mini disc recorder is a sophisticated mini disc recorder. Avoid placing it away from records, compact discs, radio, etc. Keep this manual in damage to do so may result in your unit carefully. WARNING TO REDUCE THE RISK OF FIRE OR ELECTRIC SHOCK, DO NOT EXPOSE THIS APPLIANCE TO RAIN OR MOISTURE. CAUTION Use of controls or adjustments or performance of...
... equipment. 8. CLASS 1 LASER PRODUCT This mini disc recorder is a sophisticated mini disc recorder. Avoid placing it away from records, compact discs, radio, etc. Keep this manual in damage to do so may result in your unit carefully. WARNING TO REDUCE THE RISK OF FIRE OR ELECTRIC SHOCK, DO NOT EXPOSE THIS APPLIANCE TO RAIN OR MOISTURE. CAUTION Use of controls or adjustments or performance of...

Owner's Manual
Page 3
... PROGRAM PLAY 11 RECORDING 13 Recording Level 14 Auto Marking 14 TIME RESCUE RECORDING 15 SYNCHRO RECORDING 15 MONAURAL RECORDING 16 MONITOR OUT 16 EDITING 17 MOVE 17 ERASE 18 Disc Erase 18 Track Erase 18 Part Erase 19 COMBINE 19 DIVIDE 20 TITLING 21 TIMER OPERATIONS 22 Timer recording 22 Timer playback 22 MD SYSTEM LIMITATIONS 23 COPY PROTECTION (SCMS 24 NOTES REGARDING THE REMOTE CONTROL 24 Remote control operation range 24 Battery installation 24 TROUBLESHOOTING 25 DISPLAY MESSAGES 26 SPECIFICATIONS...
... PROGRAM PLAY 11 RECORDING 13 Recording Level 14 Auto Marking 14 TIME RESCUE RECORDING 15 SYNCHRO RECORDING 15 MONAURAL RECORDING 16 MONITOR OUT 16 EDITING 17 MOVE 17 ERASE 18 Disc Erase 18 Track Erase 18 Part Erase 19 COMBINE 19 DIVIDE 20 TITLING 21 TIMER OPERATIONS 22 Timer recording 22 Timer playback 22 MD SYSTEM LIMITATIONS 23 COPY PROTECTION (SCMS 24 NOTES REGARDING THE REMOTE CONTROL 24 Remote control operation range 24 Battery installation 24 TROUBLESHOOTING 25 DISPLAY MESSAGES 26 SPECIFICATIONS...

Owner's Manual
Page 5
... the input jacks you can edit (like track numbers, playback time, and title data). 5 Press to cancel an edit or title input operation. ( ‹ PLAY/* PAUSE (8, 13) Press during record pause to start playback. UTOC (User's Table of the previous or next tracks. Use to move the cursor when inputting a disc (track) title. ¤ Display panel (9) Displays various information. # Remote control sensor (24) Receives the signals emitted from the analog inputs. * REC (14) Press during play or record...
... the input jacks you can edit (like track numbers, playback time, and title data). 5 Press to cancel an edit or title input operation. ( ‹ PLAY/* PAUSE (8, 13) Press during record pause to start playback. UTOC (User's Table of the previous or next tracks. Use to move the cursor when inputting a disc (track) title. ¤ Display panel (9) Displays various information. # Remote control sensor (24) Receives the signals emitted from the analog inputs. * REC (14) Press during play or record...

Owner's Manual
Page 6
... or title input operation. 6 Press to specify a track. when creating a disc (track) title. Use to select characters when inputting a disc (track) title. $ ‹ PLAY (8, 14) Press during stop or pause to the record pause mode. REC (14) Press during stop to activate Synchronized Recording and set the unit to activate the record pause mode. Press while recording to manually add a track mark. , & STOP (8, 14, 17, 21) Press to start playback from a YAMAHA CD player. ) ? when creating a disc (track) title. Ÿ...
... or title input operation. 6 Press to specify a track. when creating a disc (track) title. Use to select characters when inputting a disc (track) title. $ ‹ PLAY (8, 14) Press during stop or pause to the record pause mode. REC (14) Press during stop to activate Synchronized Recording and set the unit to activate the record pause mode. Press while recording to manually add a track mark. , & STOP (8, 14, 17, 21) Press to start playback from a YAMAHA CD player. ) ? when creating a disc (track) title. Ÿ...

Owner's Manual
Page 7
... connecting this unit to a YAMAHA amplifier or receiver whose terminals are numbered 1, 2, 3, 4 ... (etc.), connect this unit's LINE OUT terminals to a any component with an optical input so you are numbered 4. Be sure to connect L (left ) channel and the red plug corresponds to the output terminals numbered 4 on the rear panel of the amplifier or receiver. Also make direct digital recordings. • The DIGITAL OUT terminal can be connected to the MD PLAY jacks...
... connecting this unit to a YAMAHA amplifier or receiver whose terminals are numbered 1, 2, 3, 4 ... (etc.), connect this unit's LINE OUT terminals to a any component with an optical input so you are numbered 4. Be sure to connect L (left ) channel and the red plug corresponds to the output terminals numbered 4 on the rear panel of the amplifier or receiver. Also make direct digital recordings. • The DIGITAL OUT terminal can be connected to the MD PLAY jacks...
Owner's Manual
Page 8
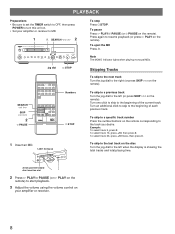
... MONO indicator lights when playing monaural MDs. NUMBER DELETE SET SEARCH !⁄ M-MARK MONO/ST INPUT SKIP $› REC TIME SYNC PLAY PAUSE STOP REC ‹ * & ? To skip to a specific track number Press the number buttons on the remote corresponding to resume playback (or press # PLAY on the remote). Example: To select track 3, press 3. To pause Press # PLAY/* PAUSE (or * PAUSE on the disc Turn the jog dial to the left (or press SKIP $ on the remote). DISPLAY...
... MONO indicator lights when playing monaural MDs. NUMBER DELETE SET SEARCH !⁄ M-MARK MONO/ST INPUT SKIP $› REC TIME SYNC PLAY PAUSE STOP REC ‹ * & ? To skip to a specific track number Press the number buttons on the remote corresponding to resume playback (or press # PLAY on the remote). Example: To select track 3, press 3. To pause Press # PLAY/* PAUSE (or * PAUSE on the disc Turn the jog dial to the left (or press SKIP $ on the remote). DISPLAY...
Owner's Manual
Page 9
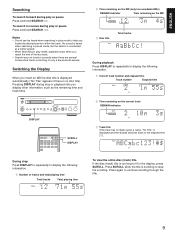
... for recordable MDs) REMAIN indicator Time remaining on the MD DISC TRACK TOTAL REMAIN 3 Disc title Total tracks DISC TRACK TOTAL REMAIN During playback Press DISPLAY to repeatedly to display the following information. 1 Current track number and elapsed time Track number Elapsed time DISC TRACK TOTAL REMAIN # 2 Time remaining on the current track REMAIN indicator DISC TRACK TOTAL REMAIN # 3 Track title If the track has not been given a name, "No Title" is no disc title). s TIMER OFF REC PLAY NATURAL SOUND MINIDISC RECORDER MDX-9 ) POWER DISPLAY...
... for recordable MDs) REMAIN indicator Time remaining on the MD DISC TRACK TOTAL REMAIN 3 Disc title Total tracks DISC TRACK TOTAL REMAIN During playback Press DISPLAY to repeatedly to display the following information. 1 Current track number and elapsed time Track number Elapsed time DISC TRACK TOTAL REMAIN # 2 Time remaining on the current track REMAIN indicator DISC TRACK TOTAL REMAIN # 3 Track title If the track has not been given a name, "No Title" is no disc title). s TIMER OFF REC PLAY NATURAL SOUND MINIDISC RECORDER MDX-9 ) POWER DISPLAY...

Owner's Manual
Page 11
.... REPEAT again to specify the end (B point) of the part you want to repeat. PROGRAM PLAY This function lets you desire. 2 SEARCH ! ⁄ SKIP $ › 4 ! ? NUMBER DELETE SET SEARCH !⁄ M-MARK MONO/ST INPUT SKIP $› REC TIME SYNC PLAY PAUSE STOP REC ‹ * & ? The REPEAT A indicators light up the PROGRAM indicator. 3 Program the desired track by pressing the corresponding numeric buttons. REPEAT. It's a convenient way to study a language, or learn...
.... REPEAT again to specify the end (B point) of the part you want to repeat. PROGRAM PLAY This function lets you desire. 2 SEARCH ! ⁄ SKIP $ › 4 ! ? NUMBER DELETE SET SEARCH !⁄ M-MARK MONO/ST INPUT SKIP $› REC TIME SYNC PLAY PAUSE STOP REC ‹ * & ? The REPEAT A indicators light up the PROGRAM indicator. 3 Program the desired track by pressing the corresponding numeric buttons. REPEAT. It's a convenient way to study a language, or learn...

Owner's Manual
Page 12
... on the front panel). 3 Use the numeric buttons to search through the step information (or use the jog dial on the front panel) to off the "PROGRAM" indicator, eject the disc, or set POWER to delete the step. To delete a specific step 1 Stop program playback. 2 Press SKIP $ or › to skip through all tracks in the current program. • SEARCH ! To cancel Press PROG To turn off .
... on the front panel). 3 Use the numeric buttons to search through the step information (or use the jog dial on the front panel) to off the "PROGRAM" indicator, eject the disc, or set POWER to delete the step. To delete a specific step 1 Stop program playback. 2 Press SKIP $ or › to skip through all tracks in the current program. • SEARCH ! To cancel Press PROG To turn off .

Owner's Manual
Page 13
... be recorded. 1 ) REC LEVEL & STOP s NATURAL SOUND MINIDISC RECORDER TIMER OFF REC PLAY MDX-9 ) POWER DISPLAY TITLE CHARA. Turn the jog dial (or press SKIP $ or › on the remote) to start recording. • When recording from the beginning of program sources (both analog and digital). SEARCH ⁄ REC LEVEL SET INPUT REC & STOP CANCEL ENTER - $ + › 0 10 # PLAY/ * PAUSE 24 6 6 & STOP TITLE CHAR. However, If you to make recordings from a wide variety of the deleted track), or press * PAUSE during playback...
... be recorded. 1 ) REC LEVEL & STOP s NATURAL SOUND MINIDISC RECORDER TIMER OFF REC PLAY MDX-9 ) POWER DISPLAY TITLE CHARA. Turn the jog dial (or press SKIP $ or › on the remote) to start recording. • When recording from the beginning of program sources (both analog and digital). SEARCH ⁄ REC LEVEL SET INPUT REC & STOP CANCEL ENTER - $ + › 0 10 # PLAY/ * PAUSE 24 6 6 & STOP TITLE CHAR. However, If you to make recordings from a wide variety of the deleted track), or press * PAUSE during playback...
Owner's Manual
Page 14
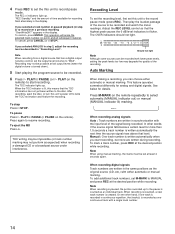
... display. This operation will erase the selected track number (or point) and all subsequent material. To cancel, press CANCEL (or & STOP). When the TOC indicator is turned down). 5 Start playing the program source to be possible at low output levels (when the digital volume is lit, this unit to the record pause mode (press REC). TOC writing may be impossible (or track number marking may not be recorded. 6 Press # PLAY/* PAUSE (or # PLAY on the remote...
... display. This operation will erase the selected track number (or point) and all subsequent material. To cancel, press CANCEL (or & STOP). When the TOC indicator is turned down). 5 Start playing the program source to be possible at low output levels (when the digital volume is lit, this unit to the record pause mode (press REC). TOC writing may be impossible (or track number marking may not be recorded. 6 Press # PLAY/* PAUSE (or # PLAY on the remote...
Owner's Manual
Page 15
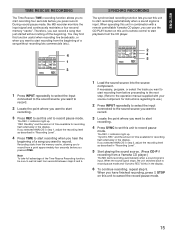
... track you want to start recording four seconds before you press record. The REC * indicators light up . When the sound signal stops, the unit switches back to record pause mode and "Synchro REC" blinks in combination with your source component for recording flash alternately in the display. ENGLISH TIME RESCUE RECORDING The Time Rescue (TIME) recording function allows you to start recording. 3 Press REC to set this unit's remote control to start recording when you hear the beginning of time available for instructions regarding its use the CD-PLAY button...
... track you want to start recording four seconds before you press record. The REC * indicators light up . When the sound signal stops, the unit switches back to record pause mode and "Synchro REC" blinks in combination with your source component for recording flash alternately in the display. ENGLISH TIME RESCUE RECORDING The Time Rescue (TIME) recording function allows you to start recording. 3 Press REC to set this unit's remote control to start recording when you hear the beginning of time available for instructions regarding its use the CD-PLAY button...
Owner's Manual
Page 16
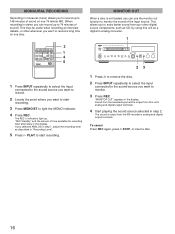
.... (When recording in stereo you can use the monitor out function to monitor the sound of the input source. Sound from the MD recorder's analog and digital output terminals. To cancel Press REC again, press & STOP, or insert a disc. 16 "MONITOR OUT" appears in the display. NUMBER DELETE SET SEARCH !⁄ M-MARK MONO/ST INPUT SKIP $› REC TIME SYNC PLAY PAUSE STOP REC ‹ * & ? CD-P s MDX 3 1 4 5 1 Press INPUT repeatedly to select the input connected to the sound source...
.... (When recording in stereo you can use the monitor out function to monitor the sound of the input source. Sound from the MD recorder's analog and digital output terminals. To cancel Press REC again, press & STOP, or insert a disc. 16 "MONITOR OUT" appears in the display. NUMBER DELETE SET SEARCH !⁄ M-MARK MONO/ST INPUT SKIP $› REC TIME SYNC PLAY PAUSE STOP REC ‹ * & ? CD-P s MDX 3 1 4 5 1 Press INPUT repeatedly to select the input connected to the sound source...
Owner's Manual
Page 17
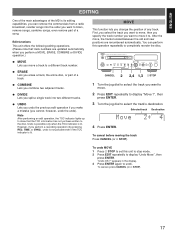
... ENTER. However, if you change the position of any track. "Undo OK ?" s NATURAL SOUND MINIDISC RECORDER TIMER OFF REC PLAY MDX-9 ) POWER DISPLAY TITLE CHARA. Note After performing an edit operation, the TOC indicator lights up to show that track numbers are updated automatically when you perform a MOVE, ERASE, COMBINE or DIVIDE operation.) ¶ MOVE Lets you want to a different track number. ¶ ERASE Lets you erase a track, the entire disc, or part of a song.
... ENTER. However, if you change the position of any track. "Undo OK ?" s NATURAL SOUND MINIDISC RECORDER TIMER OFF REC PLAY MDX-9 ) POWER DISPLAY TITLE CHARA. Note After performing an edit operation, the TOC indicator lights up to show that track numbers are updated automatically when you perform a MOVE, ERASE, COMBINE or DIVIDE operation.) ¶ MOVE Lets you want to a different track number. ¶ ERASE Lets you erase a track, the entire disc, or part of a song.
Owner's Manual
Page 18
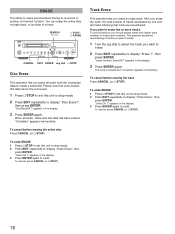
... ERASE 1 Press & STOP to set this unit to stop mode. 2 Press EDIT repeatedly to lower track numbers. Track Erase This operation lets you should always erase from higher track numbers to display "Undo Erase", then press ENTER. SEARCH ⁄ REC LEVEL SET INPUT REC & STOP CANCEL ENTER - $ + › 0 10 # PLAY/ * PAUSE CANCEL EDIT ENTER Jog dial & STOP Disc Erase This operation lets you want to erase. 2 Press EDIT repeatedly to undo. To cancel before erasing the track Press CANCEL (or & STOP). DELETE...
... ERASE 1 Press & STOP to set this unit to stop mode. 2 Press EDIT repeatedly to lower track numbers. Track Erase This operation lets you should always erase from higher track numbers to display "Undo Erase", then press ENTER. SEARCH ⁄ REC LEVEL SET INPUT REC & STOP CANCEL ENTER - $ + › 0 10 # PLAY/ * PAUSE CANCEL EDIT ENTER Jog dial & STOP Disc Erase This operation lets you want to erase. 2 Press EDIT repeatedly to undo. To cancel before erasing the track Press CANCEL (or & STOP). DELETE...
Owner's Manual
Page 19
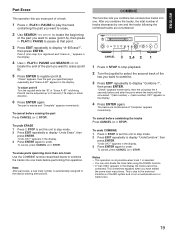
... (or & STOP). To erase parts spanning more than one track Use the COMBINE function described below to combine the tracks into one. s NATURAL SOUND MINIDISC RECORDER TIMER OFF REC PLAY MDX-9 ) POWER DISPLAY TITLE CHARA. "Check" appears momentarily, then the unit plays the 4 seconds before performing this unit to stop mode. 2 Press EDIT repeatedly to undo. To cancel before erasing the part Press CANCEL (or & STOP). To undo COMBINE 1 Press & STOP to set this operation. This...
... (or & STOP). To erase parts spanning more than one track Use the COMBINE function described below to combine the tracks into one. s NATURAL SOUND MINIDISC RECORDER TIMER OFF REC PLAY MDX-9 ) POWER DISPLAY TITLE CHARA. "Check" appears momentarily, then the unit plays the 4 seconds before performing this unit to stop mode. 2 Press EDIT repeatedly to undo. To cancel before erasing the part Press CANCEL (or & STOP). To undo COMBINE 1 Press & STOP to set this operation. This...
Owner's Manual
Page 21
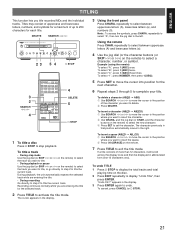
... display. 3 Using the front panel Press CHARA. ENGLISH TITLING This function lets you want to title, or go directly to step 2 to title the current track. Using the remote Press CHAR. To cancel, press CANCEL (or & STOP). 21 DISPLAY SCROLL S/F A-B REPEAT & - ( RNDM PROG ) # A B C 1 D E F 2 G H I 3 J K L 4 M N O 5 PQR STU VWX Y Z / 6 7 8 9 0 SPACE +10 TITLE CHAR. To title a track • During stop playback. SEARCH ⁄ REC LEVEL SET INPUT REC & STOP CANCEL ENTER - $ + › 0 10 # PLAY...
... display. 3 Using the front panel Press CHARA. ENGLISH TITLING This function lets you want to title, or go directly to step 2 to title the current track. Using the remote Press CHAR. To cancel, press CANCEL (or & STOP). 21 DISPLAY SCROLL S/F A-B REPEAT & - ( RNDM PROG ) # A B C 1 D E F 2 G H I 3 J K L 4 M N O 5 PQR STU VWX Y Z / 6 7 8 9 0 SPACE +10 TITLE CHAR. To title a track • During stop playback. SEARCH ⁄ REC LEVEL SET INPUT REC & STOP CANCEL ENTER - $ + › 0 10 # PLAY...
Owner's Manual
Page 22
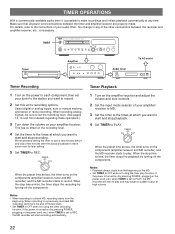
... start a few minutes before and stop recording. Tuner TIMER s NATURAL SOUND MINIDISC RECORDER TIMER OFF REC PLAY MDX-9 ) POWER DISPLAY TITLE CHARA. When recording analog signals, be sure to REC, the MD recorder will start to make recordings and initiate playback automatically at which you want to start and stop a few minutes after the actual broadcast to leave some room for details regarding these operations.) 3 Turn down the volume on the recording level. 4 Set the timer to the times...
... start a few minutes before and stop recording. Tuner TIMER s NATURAL SOUND MINIDISC RECORDER TIMER OFF REC PLAY MDX-9 ) POWER DISPLAY TITLE CHARA. When recording analog signals, be sure to REC, the MD recorder will start to make recordings and initiate playback automatically at which you want to start and stop a few minutes after the actual broadcast to leave some room for details regarding these operations.) 3 Turn down the volume on the recording level. 4 Set the timer to the times...

Owner's Manual
Page 23
... tracks are several smaller tracks during digital recording. It is not possible to eliminate noise is not recommended since this happens, erase the track using the A-B ERASE function This unit organizes the audio data in the recording time. Limitations when recording over an existing track • The correct remaining recording time may not be displayed. • You may find it impossible to label a track while recording over a track to erase part of channels being recorded...
... tracks are several smaller tracks during digital recording. It is not possible to eliminate noise is not recommended since this happens, erase the track using the A-B ERASE function This unit organizes the audio data in the recording time. Limitations when recording over an existing track • The correct remaining recording time may not be displayed. • You may find it impossible to label a track while recording over a track to erase part of channels being recorded...
Owner's Manual
Page 25
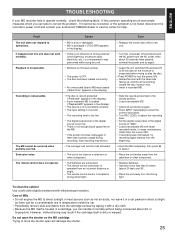
... the correct input jacks. • Turn REC LEVEL to adjust the recording level. • Set the digital output level of strong external noise (lightning, excessive static electricity, etc.) or a misoperation was loaded ("Blank Disc" appears in the display) . • The disc is record protected ("Protected" appears in the display). • A pre-mastered MD is loaded ("PlaybackMD" appears in the display). • The source is not connected correctly. • The input setting is...
... the correct input jacks. • Turn REC LEVEL to adjust the recording level. • Set the digital output level of strong external noise (lightning, excessive static electricity, etc.) or a misoperation was loaded ("Blank Disc" appears in the display) . • The disc is record protected ("Protected" appears in the display). • A pre-mastered MD is loaded ("PlaybackMD" appears in the display). • The source is not connected correctly. • The input setting is...

