
Owner's Manual
Page 2
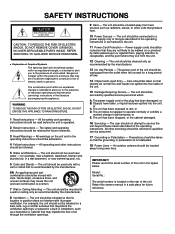
... power lines. NO USER-SERVICEABLE PARTS INSIDE. The exclamation point within an equilateral triangle is intended to alert you to the presence of this owners manual in the operating instructions should be adhered to the presence of the unit. The power-supply cord or the plug has been damaged; An outdoor...
... power lines. NO USER-SERVICEABLE PARTS INSIDE. The exclamation point within an equilateral triangle is intended to alert you to the presence of this owners manual in the operating instructions should be adhered to the presence of the unit. The power-supply cord or the plug has been damaged; An outdoor...
Owner's Manual
Page 3
...retailer that interference will not result in harmful interference with FCC regulations does not guarantee that is too late, YAMAHA and the Electronic Industries Association's Consumer Electronics Group recommend you avoid prolonged exposure to comply with Canadian ICES-003...Group want you cannot locate the appropriate retailer, please contact Yamaha Electronics Corp., U.S.A. 6660 Orangethorpe Ave, Buena Park, CA 90620. If these requirements provides a reasonable level of the following measures: Relocate this manual, meets FCC requirements. FCC INFORMATION (for Class "B" digital...
...retailer that interference will not result in harmful interference with FCC regulations does not guarantee that is too late, YAMAHA and the Electronic Industries Association's Consumer Electronics Group recommend you avoid prolonged exposure to comply with Canadian ICES-003...Group want you cannot locate the appropriate retailer, please contact Yamaha Electronics Corp., U.S.A. 6660 Orangethorpe Ave, Buena Park, CA 90620. If these requirements provides a reasonable level of the following measures: Relocate this manual, meets FCC requirements. FCC INFORMATION (for Class "B" digital...
Owner's Manual
Page 4
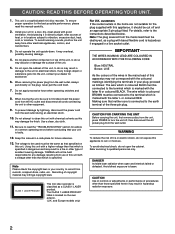
... it should be the same as a plug with the letter L or coloured RED. To avoid humming sounds, position the unit away from use of this manual in your plug, proceed as a CLASS 1 LASER product. and Europe models only) For U.K. Do not open the cabinet of heat, or in hazardous...excessive force when operating switches and knobs. 8. To avoid electrical shock, do so may infringe copyright laws. This unit is located on the plug; YAMAHA will not be sure to first disconnect the power cord from records, compact discs, radio, etc. IMPORTANT THE WIRES IN MAINS LEAD ARE COLOURED IN...
... it should be the same as a plug with the letter L or coloured RED. To avoid humming sounds, position the unit away from use of this manual in your plug, proceed as a CLASS 1 LASER product. and Europe models only) For U.K. Do not open the cabinet of heat, or in hazardous...excessive force when operating switches and knobs. 8. To avoid electrical shock, do so may infringe copyright laws. This unit is located on the plug; YAMAHA will not be sure to first disconnect the power cord from records, compact discs, radio, etc. IMPORTANT THE WIRES IN MAINS LEAD ARE COLOURED IN...
Owner's Manual
Page 8
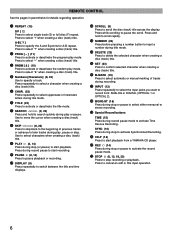
...deactivate the program play mode. Press while scrolling to select "?" when creating a disc (track) title. Ÿ PROG [ - ] (11) Press to record from a YAMAHA CD player. ) REC ? (14) Press during stop recording or playback. REMOTE CONTROL See the pages in parenthesis for A-B repeat. Press to pause the scroll. A-B [.... & SET (23) Press to confirm selected character when creating a disc (track) title. ‡ M-MARK (15) Press to select automatic or manual marking of previous tracks or advance to later tracks during record pause to activate or deactivate the random play mode.
...deactivate the program play mode. Press while scrolling to select "?" when creating a disc (track) title. Ÿ PROG [ - ] (11) Press to record from a YAMAHA CD player. ) REC ? (14) Press during stop recording or playback. REMOTE CONTROL See the pages in parenthesis for A-B repeat. Press to pause the scroll. A-B [.... & SET (23) Press to confirm selected character when creating a disc (track) title. ‡ M-MARK (15) Press to select automatic or manual marking of previous tracks or advance to later tracks during record pause to activate or deactivate the random play mode.
Owner's Manual
Page 9
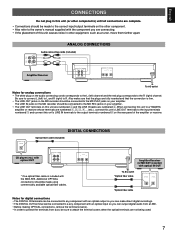
... L (left) channel and the red plug corresponds to attach the terminal covers when the optical terminals are not being used. 7 When connecting this unit to a YAMAHA amplifier or receiver whose terminals are connecting. • If the placement of the amplifier or receiver. ANALOG CONNECTIONS Audio connecting cords (included) 3 PLAY 4 REC R L Amplifier... input/output terminals on the other component. • Also refer to the MD PLAY jacks on the MD recorder should be connected to the owner's manual supplied with the MDX-595.
... L (left) channel and the red plug corresponds to attach the terminal covers when the optical terminals are not being used. 7 When connecting this unit to a YAMAHA amplifier or receiver whose terminals are connecting. • If the placement of the amplifier or receiver. ANALOG CONNECTIONS Audio connecting cords (included) 3 PLAY 4 REC R L Amplifier... input/output terminals on the other component. • Also refer to the MD PLAY jacks on the MD recorder should be connected to the owner's manual supplied with the MDX-595.
Owner's Manual
Page 17
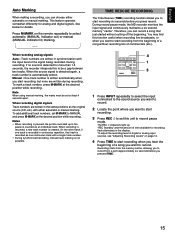
... possible. When recording is resumed, a new track number is automatically written. Therefore, you to select automatic (MANUAL indicator out) or manual (MANUAL indicator lit) marking. Note When using manual marking, the marks must be a gap between two tracks. To adjust the recording level of a song without...see "Adjusting Recording Levels" on the remote repeatedly to start recording six seconds before you to record. TITLE CHAR. CD-P s MDX 4 1 3 1 Press INPUT repeatedly to select the input connected to the sound source you want to record. 2 Locate the point where ...
... possible. When recording is resumed, a new track number is automatically written. Therefore, you to select automatic (MANUAL indicator out) or manual (MANUAL indicator lit) marking. Note When using manual marking, the marks must be a gap between two tracks. To adjust the recording level of a song without...see "Adjusting Recording Levels" on the remote repeatedly to start recording six seconds before you to record. TITLE CHAR. CD-P s MDX 4 1 3 1 Press INPUT repeatedly to select the input connected to the sound source you want to record. 2 Locate the point where ...
Owner's Manual
Page 18
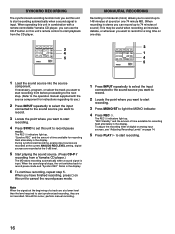
...recording function lets you set this unit to start recording from before proceeding to the next step. (Refer to the operation manual supplied with a remote controllable Yamaha CD player, you can record up to 148 minutes of sound on one 74 minute MD. (When recording in stereo ... and "Synchro REC" blinks in combination with the source component for recording flash alternately in the display. The REC * indicators light up . CD-P s MDX 3 1 4 5 1 Load the sound source into the source component. To adjust the recording level of digital or analog input sources, see "Adjusting Recording...
...recording function lets you set this unit to start recording from before proceeding to the next step. (Refer to the operation manual supplied with a remote controllable Yamaha CD player, you can record up to 148 minutes of sound on one 74 minute MD. (When recording in stereo ... and "Synchro REC" blinks in combination with the source component for recording flash alternately in the display. The REC * indicators light up . CD-P s MDX 3 1 4 5 1 Load the sound source into the source component. To adjust the recording level of digital or analog input sources, see "Adjusting Recording...
Owner's Manual
Page 26
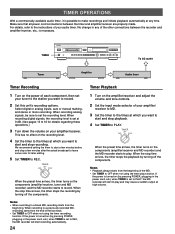
TIMER NATURAL SOUND MINIDISC RECORDER MDX-595 POWER TIMER OFF REC PLAY )EJECT #˜* & REC RANDOM S/F REPEAT A-B DISPLAY SCROLL TITLE CHARA. REC LEVEL › + SET ! This has no effect on the recording ... set at which you want to start and stop playback. 4 Set TIMER to PLAY. DELETE EDIT CANCEL DIGITAL $- Select digital or analog inputs, auto or manual marking, and stereo or mono recording. When the stop time arrives, the timer stops the recording by turning off the components. Notes • Playback always...
TIMER NATURAL SOUND MINIDISC RECORDER MDX-595 POWER TIMER OFF REC PLAY )EJECT #˜* & REC RANDOM S/F REPEAT A-B DISPLAY SCROLL TITLE CHARA. REC LEVEL › + SET ! This has no effect on the recording ... set at which you want to start and stop playback. 4 Set TIMER to PLAY. DELETE EDIT CANCEL DIGITAL $- Select digital or analog inputs, auto or manual marking, and stereo or mono recording. When the stop time arrives, the timer stops the recording by turning off the components. Notes • Playback always...


