
Owner's Manual
Page 5
...30 Pairing the Bluetooth™ receiver and your Bluetooth™ component 30 Playback of the Bluetooth™ component 30 ADVANCED OPERATION Set menu 31 Using set menu 32 1 SOUND MENU 32 2 INPUT MENU 34 3 OPTION MENU 35 Remote control features 37 Controlling this unit, a TV, or... other components .... 37 Setting remote control codes 39 Advanced setup 40 ADDITIONAL INFORMATION Troubleshooting 41 Glossary 46 Specifications 47 Index 48 APPENDIX (at...
...30 Pairing the Bluetooth™ receiver and your Bluetooth™ component 30 Playback of the Bluetooth™ component 30 ADVANCED OPERATION Set menu 31 Using set menu 32 1 SOUND MENU 32 2 INPUT MENU 34 3 OPTION MENU 35 Remote control features 37 Controlling this unit, a TV, or... other components .... 37 Setting remote control codes 39 Advanced setup 40 ADDITIONAL INFORMATION Troubleshooting 41 Glossary 46 Specifications 47 Index 48 APPENDIX (at...
Owner's Manual
Page 6
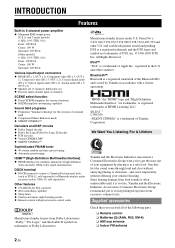
...Check that lets the sound come through loud and clear without affecting your equipment by Yamaha in accordance with preset remote control codes Manufactured under license under license from Dolby Laboratories. Supplied accessories Manufactured under U.S. iPod™...Yamaha iPod universal dock (such as YDS-11, sold separately) or Bluetooth wireless audio receiver (such as YBA-10, sold separately) Other features ◆ 192-kHz/24-bit D/A converter ◆ iPod controlling capability ◆ Sleep timer ◆ Cinema and music night listening modes ◆ Remote control...
...Check that lets the sound come through loud and clear without affecting your equipment by Yamaha in accordance with preset remote control codes Manufactured under license under license from Dolby Laboratories. Supplied accessories Manufactured under U.S. iPod™...Yamaha iPod universal dock (such as YDS-11, sold separately) or Bluetooth wireless audio receiver (such as YBA-10, sold separately) Other features ◆ 192-kHz/24-bit D/A converter ◆ iPod controlling capability ◆ Sleep timer ◆ Cinema and music night listening modes ◆ Remote control...
Owner's Manual
Page 9
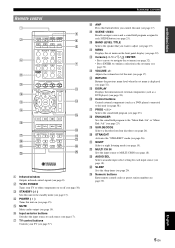
..." or "Music Enh. 5ch" (see page 19). x SLEEP Sets the sleep timer (see page 37). y Numeric buttons Enter remote control codes or preset station number (see page 18). Functional overview h AMP Press this button before you want to the standby mode (see...setting for each input source (see page 39). q PROG l / h Selects the sound field program (see page 8). INTRODUCTION PREPARATION BASIC OPERATION ADVANCED OPERATION Remote control a c b POWER POWER STANDBY POWER TV AV d A B C MUTE e CD MD/CD-R TUNER f DVD DTV/CBL DVR TV CH V-AUX/DOCK D E g h AMP TV INPUT TV ...
..." or "Music Enh. 5ch" (see page 19). x SLEEP Sets the sleep timer (see page 37). y Numeric buttons Enter remote control codes or preset station number (see page 18). Functional overview h AMP Press this button before you want to the standby mode (see...setting for each input source (see page 39). q PROG l / h Selects the sound field program (see page 8). INTRODUCTION PREPARATION BASIC OPERATION ADVANCED OPERATION Remote control a c b POWER POWER STANDBY POWER TV AV d A B C MUTE e CD MD/CD-R TUNER f DVD DTV/CBL DVR TV CH V-AUX/DOCK D E g h AMP TV INPUT TV ...

Owner's Manual
Page 12
...the batteries if you want to the polarity markings (+ and -) on the remote control. • Do not drop the remote control. • Do not leave or store the remote control in the remote control, the contents of the memory may have the same shape and color. ...or if exhausted batteries remain in the following conditions: - places of remote control Installing batteries in the remote control 13 Using the remote control The remote control transmits a directional infrared ray. the operation range of the remote control decreases. • Do not use old batteries together with clothing, ...
...the batteries if you want to the polarity markings (+ and -) on the remote control. • Do not drop the remote control. • Do not leave or store the remote control in the remote control, the contents of the memory may have the same shape and color. ...or if exhausted batteries remain in the following conditions: - places of remote control Installing batteries in the remote control 13 Using the remote control The remote control transmits a directional infrared ray. the operation range of the remote control decreases. • Do not use old batteries together with clothing, ...
Owner's Manual
Page 19
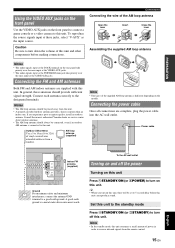
...loop antenna is a metal stake driven into the AC wall outlet. Connect each antenna correctly to a good earth ground. Consult the nearest authorized Yamaha dealer or service center about outdoor antennas. • The AM loop antenna should always be connected, even if an outdoor AM antenna is ...the power Turning on this unit. Outdoor AM antenna Use a 5 to 10 m (16 to 32 ft) of power in order to receive infrared signals from the remote control. 15 En English Note • In the standby mode, this unit. Notes • The AM loop antenna should provide sufficient signal strength....
...loop antenna is a metal stake driven into the AC wall outlet. Connect each antenna correctly to a good earth ground. Consult the nearest authorized Yamaha dealer or service center about outdoor antennas. • The AM loop antenna should always be connected, even if an outdoor AM antenna is ...the power Turning on this unit. Outdoor AM antenna Use a 5 to 10 m (16 to 32 ft) of power in order to receive infrared signals from the remote control. 15 En English Note • In the standby mode, this unit. Notes • The AM loop antenna should provide sufficient signal strength....
Owner's Manual
Page 20
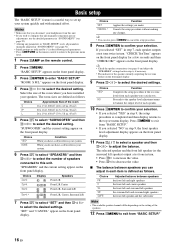
...8226; If you have installed your system. If you have a subwoofer in step 7, each parameters. • Press nRETURN on the remote control to return to confirm your system quickly and with minimal effort. appears on the setting of each speaker were satisfactory. Choice FR C... Adjusted balance between speakers you can also press kMENU to cancel the setup procedure. 8 Press lENTER to the previous menu level. 1 Press hAMP on the remote control. 2 Press kMENU. Choice 2spk 3spk 4spk 5spk* Display L R L CR L R SL SR L CR SL SR Speakers Front L/R Front L/R Center Front...
...8226; If you have installed your system. If you have a subwoofer in step 7, each parameters. • Press nRETURN on the remote control to return to confirm your system quickly and with minimal effort. appears on the setting of each speaker were satisfactory. Choice FR C... Adjusted balance between speakers you can also press kMENU to cancel the setup procedure. 8 Press lENTER to the previous menu level. 1 Press hAMP on the remote control. 2 Press kMENU. Choice 2spk 3spk 4spk 5spk* Display L R L CR L R SL SR L CR SL SR Speakers Front L/R Front L/R Center Front...

Owner's Manual
Page 23
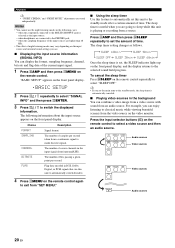
... "NIGHT:MUSIC." INTRODUCTION PREPARATION BASIC OPERATION ADVANCED OPERATION Using audio features Use the following features to utilize various useful functions equipped on the remote control (or press FPRESET/TUNING l / h) to adjust the speaker output level. Notes • When you can configure the muting level ... -listening for the front left speaker Surround right speaker Playback y • Once you press jBAND LEVEL TITLE on the remote control, you connect headphones, no signals are output at the speaker terminals. • All Dolby Digital and DTS audio signals ...
... "NIGHT:MUSIC." INTRODUCTION PREPARATION BASIC OPERATION ADVANCED OPERATION Using audio features Use the following features to utilize various useful functions equipped on the remote control (or press FPRESET/TUNING l / h) to adjust the speaker output level. Notes • When you can configure the muting level ... -listening for the front left speaker Surround right speaker Playback y • Once you press jBAND LEVEL TITLE on the remote control, you connect headphones, no signals are output at the speaker terminals. • All Dolby Digital and DTS audio signals ...
Owner's Manual
Page 24
... display the format, sampling frequency, channel, bit rate and flag data of the current input signal. 1 Press hAMP and then press kMENU on the remote control. Notes • You cannot use . ■ Displaying the input source information (SIGNAL INFO) You can enjoy listening to the PHONES jack. -... y • If you set this unit to automatically switch decoders. 4 Press kMENU on the remote control again to exit from the video source on the video monitor. Playback y • "NIGHT:CINEMA" and "NIGHT:MUSIC" adjustments are higher than 48 ...
... display the format, sampling frequency, channel, bit rate and flag data of the current input signal. 1 Press hAMP and then press kMENU on the remote control. Notes • You cannot use . ■ Displaying the input source information (SIGNAL INFO) You can enjoy listening to the PHONES jack. -... y • If you set this unit to automatically switch decoders. 4 Press kMENU on the remote control again to exit from the video source on the video monitor. Playback y • "NIGHT:CINEMA" and "NIGHT:MUSIC" adjustments are higher than 48 ...

Owner's Manual
Page 25
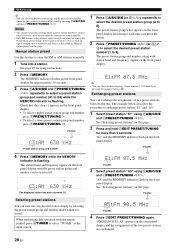
... program: STRAIGHT For when you want to listen to flash, and the name of currently assigned SCENE template appears on the front panel and the remote control. Radio Listening *2, *3, *4 - See page 13 for 3 seconds. See page 15 for details. The MEMORY indicator on the...
... program: STRAIGHT For when you want to listen to flash, and the name of currently assigned SCENE template appears on the front panel and the remote control. Radio Listening *2, *3, *4 - See page 13 for 3 seconds. See page 15 for details. The MEMORY indicator on the...
Owner's Manual
Page 27
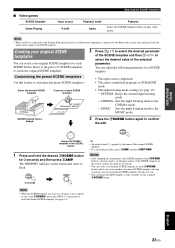
Note • When an iPod is connected to the Yamaha iPod universal dock or a Bluetooth component is connected to the Bluetooth receiver, this feature to customize the preset SCENE templates. CINEMA: Sets the night listening mode to the MUSIC mode. The MEMORY indicator on the remote control. See page 24 for details. • You can...
Note • When an iPod is connected to the Yamaha iPod universal dock or a Bluetooth component is connected to the Bluetooth receiver, this feature to customize the preset SCENE templates. CINEMA: Sets the night listening mode to the MUSIC mode. The MEMORY indicator on the remote control. See page 24 for details. • You can...
Owner's Manual
Page 28
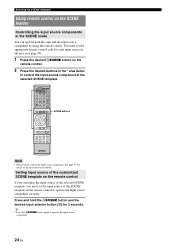
...mode You can operate both this unit and the input source component by using the remote control. See page 37 for 3 seconds. Setting input source of the customized SCENE template on the remote control If you customize the input source of the selected SCENE template, you must set ... STANDBY POWER TV AV A B C MUTE CD MD/CD-R TUNER DVD DTV/CBL DVR TV CH V-AUX/DOCK D E AMP TV INPUT TV MUTE TV VOL SCENE 1 2 3 4 BAND LEVEL TITLE MENU VOLUME SCENE buttons ENTER RETURN REC DISPLAY l PROG h 1 2 ENHANCER SUR. You must set the appropriate remote control code for each button...
...mode You can operate both this unit and the input source component by using the remote control. See page 37 for 3 seconds. Setting input source of the customized SCENE template on the remote control If you customize the input source of the selected SCENE template, you must set ... STANDBY POWER TV AV A B C MUTE CD MD/CD-R TUNER DVD DTV/CBL DVR TV CH V-AUX/DOCK D E AMP TV INPUT TV MUTE TV VOL SCENE 1 2 3 4 BAND LEVEL TITLE MENU VOLUME SCENE buttons ENTER RETURN REC DISPLAY l PROG h 1 2 ENHANCER SUR. You must set the appropriate remote control code for each button...
Owner's Manual
Page 32
... number, along with the preset station group and number you store a new station under the same preset station number. • Only FM stations with the remote control, press fTUNER to select "TUNER" as the input source. 1 Press EA/B/C/D/E (or ll / h) repeatedly to select the desired preset station group (A to ... front panel display. FM/AM tuning y • You can select the preset station group and the preset station number where the first received station will be stored by selecting the preset station group and number under which it as described in signal strength, tune it manually and ...
... number, along with the preset station group and number you store a new station under the same preset station number. • Only FM stations with the remote control, press fTUNER to select "TUNER" as the input source. 1 Press EA/B/C/D/E (or ll / h) repeatedly to select the desired preset station group (A to ... front panel display. FM/AM tuning y • You can select the preset station group and the preset station number where the first received station will be stored by selecting the preset station group and number under which it as described in signal strength, tune it manually and ...
Owner's Manual
Page 33
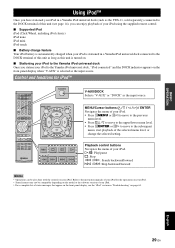
...unit is turned on. ■ Stationing your iPod to the Yamaha iPod universal dock Once you station your iPod to the Yamaha iPod universal dock, "iPod connected" and the DOCK indicator appears... front panel display, see page 14), you can enjoy playback of your iPod using the supplied remote control. ■ Supported iPod iPod (Click Wheel, including iPod classic) iPod nano iPod mini iPod...may not be also done with the controls on your iPod. MENU/Cursor buttons (k / n / l / h) / ENTER Navigates the menu of your iPod for iPod™ POWER POWER STANDBY POWER TV AV A B C MUTE CD MD/CD-R...
...unit is turned on. ■ Stationing your iPod to the Yamaha iPod universal dock Once you station your iPod to the Yamaha iPod universal dock, "iPod connected" and the DOCK indicator appears... front panel display, see page 14), you can enjoy playback of your iPod using the supplied remote control. ■ Supported iPod iPod (Click Wheel, including iPod classic) iPod nano iPod mini iPod...may not be also done with the controls on your iPod. MENU/Cursor buttons (k / n / l / h) / ENTER Navigates the menu of your iPod for iPod™ POWER POWER STANDBY POWER TV AV A B C MUTE CD MD/CD-R...
Owner's Manual
Page 34
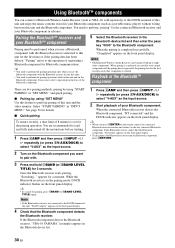
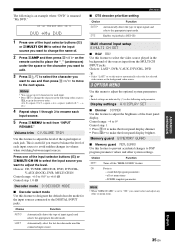
...SET MENU" Use this feature to the last connected Bluetooth component. If the Bluetooth receiver cannot find the Bluetooth component, "Not found" appears on the remote control, the connected Bluetooth receiver searches and connect to perform pairing of this unit, "No BT adapter" appears on...successfully with . 3 Press and hold GBAND (or jBAND LEVEL TITLE) for the connected Bluetooth receiver and your Bluetooth component. If the Bluetooth component detects the Bluetooth receiver, "YBA-10 YAMAHA" (example) appears in advance. y • When you want to operating instructions of ...
...SET MENU" Use this feature to the last connected Bluetooth component. If the Bluetooth receiver cannot find the Bluetooth component, "Not found" appears on the remote control, the connected Bluetooth receiver searches and connect to perform pairing of this unit, "No BT adapter" appears on...successfully with . 3 Press and hold GBAND (or jBAND LEVEL TITLE) for the connected Bluetooth receiver and your Bluetooth component. If the Bluetooth component detects the Bluetooth receiver, "YBA-10 YAMAHA" (example) appears in advance. y • When you want to operating instructions of ...
Owner's Manual
Page 36
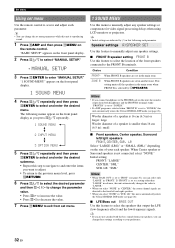
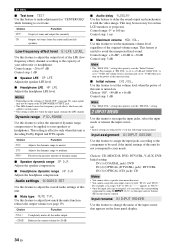
...display. 1 SOUND MENU 4 Press lk / n repeatedly and then press lENTER to select and enter the desired menu. "1 SOUND MENU" appears on the remote control. Woofer diameter of a speaker is 16 cm (6.5 in) or larger: large Woofer diameter of a speaker is set menu. 1 SOUND MENU Use this... adjust any speaker settings or compensate for video signal processing delays when using LCD monitors or projectors. Set menu Using set menu Use the remote control to access and adjust each parameter. The following each parameter. Initial setting: FRONT: "LARGE" CENTER: "SML" SUR. LR," this ...
...display. 1 SOUND MENU 4 Press lk / n repeatedly and then press lENTER to select and enter the desired menu. "1 SOUND MENU" appears on the remote control. Woofer diameter of a speaker is 16 cm (6.5 in) or larger: large Woofer diameter of a speaker is set menu. 1 SOUND MENU Use this... adjust any speaker settings or compensate for video signal processing delays when using LCD monitors or projectors. Set menu Using set menu Use the remote control to access and adjust each parameter. The following each parameter. Initial setting: FRONT: "LARGE" CENTER: "SML" SUR. LR," this ...
Owner's Manual
Page 38
... (*) in "IN (3)." • Once the input jacks are indicated by 20 dB. ■ Audio delay A.DELAY Use this feature to 0* dB Control step: 1 dB ■ Speaker LFE SP LFE Adjusts the speaker LFE level. ■ Headphone LFE HP LFE Adjusts the headphone LFE level. Input ...needs. For example, you turn on the remote control). Control range: -20 to delay the sound output and synchronize it with the video image. Control range: +16 dB*, +10 dB to 160 ms Control step: 1 ms ■ Maximum volume MAX VOL. Control range: 0* to -30 dB Control step: 5 dB Note • The "...
... (*) in "IN (3)." • Once the input jacks are indicated by 20 dB. ■ Audio delay A.DELAY Use this feature to 0* dB Control step: 1 dB ■ Speaker LFE SP LFE Adjusts the speaker LFE level. ■ Headphone LFE HP LFE Adjusts the headphone LFE level. Input ...needs. For example, you turn on the remote control). Control range: -20 to delay the sound output and synchronize it with the video image. Control range: +16 dB*, +10 dB to 160 ms Control step: 1 ms ■ Maximum volume MAX VOL. Control range: 0* to -30 dB Control step: 5 dB Note • The "...
Owner's Manual
Page 39
... each input source. 5 Press kMENU to balance the level of the front panel display. DTS Enables to make the front panel display brighter. Control range: -4 to 0* Control step: 1 • Press ll to make the front panel display dimmer. • Press lh to playback a DTS-CD. Memory guard ...Repeat steps 1 through 3 to rename each input. • Press ln to change the name of. 2 Press hAMP and then press ll / h on the remote control to place the "_" (underscore) under the space or the character you want to edit. 3 Press lk / n to select the character you want to exit...
... each input source. 5 Press kMENU to balance the level of the front panel display. DTS Enables to make the front panel display brighter. Control range: -4 to 0* Control step: 1 • Press ll to make the front panel display dimmer. • Press lh to playback a DTS-CD. Memory guard ...Repeat steps 1 through 3 to rename each input. • Press ln to change the name of. 2 Press hAMP and then press ll / h on the remote control to place the "_" (underscore) under the space or the character you want to edit. 3 Press lk / n to select the character you want to exit...
Owner's Manual
Page 41
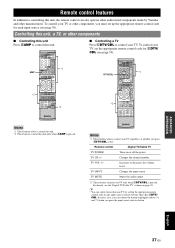
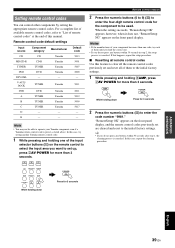
...CH IN AUDIO SEL 9 0 SLEEP 10 ENT *2 ■ Controlling a TV Press fDTV/CBL to control your TV, set up the appropriate remote control code for each input source (see page 39). - AMP *2 POWER POWER STANDBY POWER TV AV A B C MUTE CD MD/CD-R TUNER DVD DTV/CBL DVR... Yamaha and other components, you must set the appropriate remote control code for any input source selector buttons other components ■ Controlling this unit Press hAMP to controlling this unit, the remote control can also operate other audiovisual components made by setting the appropriate remote control ...
...CH IN AUDIO SEL 9 0 SLEEP 10 ENT *2 ■ Controlling a TV Press fDTV/CBL to control your TV, set up the appropriate remote control code for each input source (see page 39). - AMP *2 POWER POWER STANDBY POWER TV AV A B C MUTE CD MD/CD-R TUNER DVD DTV/CBL DVR... Yamaha and other components, you must set the appropriate remote control code for any input source selector buttons other components ■ Controlling this unit Press hAMP to controlling this unit, the remote control can also operate other audiovisual components made by setting the appropriate remote control ...
Owner's Manual
Page 42
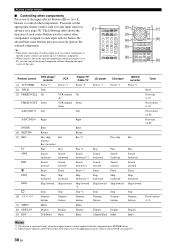
DECODE 3 4 STRAIGHT NIGHT 5 6 7 8 MULTI CH IN AUDIO SEL 9 0 SLEEP 10 ENT [9] Remote control [1] AV POWER [2] TITLE [3] PRESET/CH k PRESET/CH n A/B/C/D/E l DVD player/ recorder VCR Power *1 Power *1 Title Up VCR channel up Down VCR channel down ...DVR (see page 39). The following table shows the function of each control button used to control other components. Be advised that the remote control can control the desired component without changing the input source of this unit. [1] POWER POWER STANDBY POWER TV AV A B C MUTE CD MD/CD-R TUNER DVD DTV/CBL DVR...
DECODE 3 4 STRAIGHT NIGHT 5 6 7 8 MULTI CH IN AUDIO SEL 9 0 SLEEP 10 ENT [9] Remote control [1] AV POWER [2] TITLE [3] PRESET/CH k PRESET/CH n A/B/C/D/E l DVD player/ recorder VCR Power *1 Power *1 Title Up VCR channel up Down VCR channel down ...DVR (see page 39). The following table shows the function of each control button used to control other components. Be advised that the remote control can control the desired component without changing the input source of this unit. [1] POWER POWER STANDBY POWER TV AV A B C MUTE CD MD/CD-R TUNER DVD DTV/CBL DVR...
Owner's Manual
Page 43
... even if a Yamaha remote control code is canceled. y • If you do not press any buttons within 30 seconds after step 1, the clearing process is preset as listed above. CD MD/CD-R TUNER DVD DTV/CBL DVR V-AUX/DOCK D E POWER AV Press for 3 seconds While holding hAMP, press bAV POWER for more than one...
... even if a Yamaha remote control code is canceled. y • If you do not press any buttons within 30 seconds after step 1, the clearing process is preset as listed above. CD MD/CD-R TUNER DVD DTV/CBL DVR V-AUX/DOCK D E POWER AV Press for 3 seconds While holding hAMP, press bAV POWER for more than one...


