
Owner's Manual
Page 4
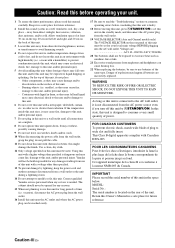
...read the "Troubleshooting" section on common operating errors before concluding that this unit is faulty. 18 Before moving this unit, press ASTANDBY/ON to set this unit in the standby mode, and disconnect the AC power plug from the wall outlet. 19 VOLTAGE SELECTOR (Asia and General models only) ..., clean place - WARNING TO REDUCE THE RISK OF FIRE OR ELECTRIC SHOCK, DO NOT EXPOSE THIS UNIT TO RAIN OR MOISTURE. Contact qualified Yamaha service personnel when any reasons. 15 When not planning to modify or fix this unit upside-down. Allow ventilation space of at least 30 cm...
...read the "Troubleshooting" section on common operating errors before concluding that this unit is faulty. 18 Before moving this unit, press ASTANDBY/ON to set this unit in the standby mode, and disconnect the AC power plug from the wall outlet. 19 VOLTAGE SELECTOR (Asia and General models only) ..., clean place - WARNING TO REDUCE THE RISK OF FIRE OR ELECTRIC SHOCK, DO NOT EXPOSE THIS UNIT TO RAIN OR MOISTURE. Contact qualified Yamaha service personnel when any reasons. 15 When not planning to modify or fix this unit upside-down. Allow ventilation space of at least 30 cm...
Owner's Manual
Page 5
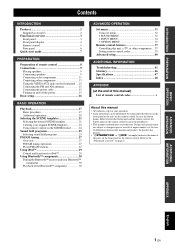
... and functions for iPod 29 Using Bluetooth™ components 30 Pairing the Bluetooth™ receiver and your Bluetooth™ component 30 Playback of the Bluetooth™ component 30 ADVANCED OPERATION Set menu 31 Using set menu 32 1 SOUND MENU 32 2 INPUT MENU 34 3 OPTION MENU 35 Remote ...control features 37 Controlling this unit, a TV, or other components .... 37 Setting remote control codes 39 Advanced setup 40 ADDITIONAL INFORMATION Troubleshooting 41 Glossary 46 Specifications 47 Index 48 APPENDIX (at the end of this manual...
... and functions for iPod 29 Using Bluetooth™ components 30 Pairing the Bluetooth™ receiver and your Bluetooth™ component 30 Playback of the Bluetooth™ component 30 ADVANCED OPERATION Set menu 31 Using set menu 32 1 SOUND MENU 32 2 INPUT MENU 34 3 OPTION MENU 35 Remote ...control features 37 Controlling this unit, a TV, or other components .... 37 Setting remote control codes 39 Advanced setup 40 ADDITIONAL INFORMATION Troubleshooting 41 Glossary 46 Specifications 47 Index 48 APPENDIX (at the end of this manual...
Owner's Manual
Page 7
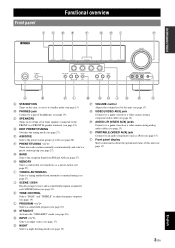
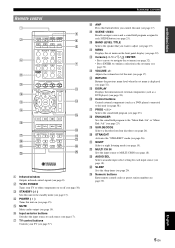
C SPEAKERS Turns on this unit, or sets it to standby mode (see page 15). K TONE CONTROL Selects "BASS" and "TREBLE" to a game console or a video camera using analog audio cables (see page ... PROGRAM l h STRAIGHT EFFECT INPUT l h NIGHT VIDEO AUX VIDEO AUDIO PORTABLE BASIC OPERATION ADVANCED OPERATION ADDITIONAL INFORMATION A B KL M NOJ Q R S A STANDBY/ON Turns on or off the set of front speakers connected to the FRONT A or FRONT B speaker terminals (see page 18). J SCENE 1/2/3/4 Recalls an input source and a sound field program assigned to...
C SPEAKERS Turns on this unit, or sets it to standby mode (see page 15). K TONE CONTROL Selects "BASS" and "TREBLE" to a game console or a video camera using analog audio cables (see page ... PROGRAM l h STRAIGHT EFFECT INPUT l h NIGHT VIDEO AUX VIDEO AUDIO PORTABLE BASIC OPERATION ADVANCED OPERATION ADDITIONAL INFORMATION A B KL M NOJ Q R S A STANDBY/ON Turns on or off the set of front speakers connected to the FRONT A or FRONT B speaker terminals (see page 18). J SCENE 1/2/3/4 Recalls an input source and a sound field program assigned to...
Owner's Manual
Page 8
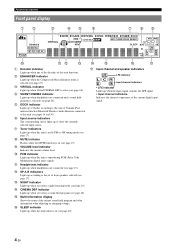
i VOLUME level indicator Indicates the current volume level. m NIGHT indicator Lights up or flashes according to the state of Yamaha iPod universal dock or Bluetooth Wireless Audio Receiver connected to this unit is selected (see pages 14 and 30). e DOCK indicator Lights up when you select a sound filed program (see page 26). k ...). f Input source indicators The corresponding cursor lights up when you select a night listening mode (see page 20). n CINEMA DSP indicator Lights up to the set of the current sound field program and other information when adjusting or changing...
i VOLUME level indicator Indicates the current volume level. m NIGHT indicator Lights up or flashes according to the state of Yamaha iPod universal dock or Bluetooth Wireless Audio Receiver connected to this unit is selected (see pages 14 and 30). e DOCK indicator Lights up when you select a sound filed program (see page 26). k ...). f Input source indicators The corresponding cursor lights up when you select a night listening mode (see page 20). n CINEMA DSP indicator Lights up to the set of the current sound field program and other information when adjusting or changing...
Owner's Manual
Page 9
... page 21). s SUR.DECODE Selects a decoder from four decoders (see page 25). w AUDIO SEL Selects an audio input select setting for each input source (see page 19). u NIGHT Selects a night listening mode (see page 18). ADDITIONAL INFORMATION APPENDIX English ... Numeric buttons Enter remote control codes or preset station number (see page 32). c STANDBY ( ) Sets this unit (see page 8). INTRODUCTION PREPARATION BASIC OPERATION ADVANCED OPERATION Remote control a c b POWER POWER STANDBY POWER TV AV d A B C MUTE e CD MD/CD-R TUNER f DVD DTV/CBL DVR TV CH V-...
... page 21). s SUR.DECODE Selects a decoder from four decoders (see page 25). w AUDIO SEL Selects an audio input select setting for each input source (see page 19). u NIGHT Selects a night listening mode (see page 18). ADDITIONAL INFORMATION APPENDIX English ... Numeric buttons Enter remote control codes or preset station number (see page 32). c STANDBY ( ) Sets this unit (see page 8). INTRODUCTION PREPARATION BASIC OPERATION ADVANCED OPERATION Remote control a c b POWER POWER STANDBY POWER TV AV d A B C MUTE e CD MD/CD-R TUNER f DVD DTV/CBL DVR TV CH V-...
Owner's Manual
Page 11
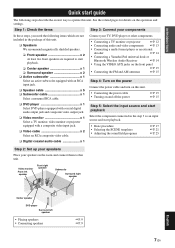
...templates • Adjusting the sound field programs ☞P. 17 ☞P. 21 ☞P. 25 ❏ Digital coaxial audio cable x 1 Step 2: Set up your speakers Place your TV, DVD player or other components. • Connecting a TV monitor or projector ☞P. 12 • Connecting audio ...components ☞P. 13 • Connecting a multi-format player or an external decoder ☞P. 14 • Connecting a Yamaha iPod universal dock or Bluetooth Wireless Audio Receiver ☞P. 14 • Using the VIDEO AUX jacks on the front panel ☞P. 15 • Connecting the FM ...
...templates • Adjusting the sound field programs ☞P. 17 ☞P. 21 ☞P. 25 ❏ Digital coaxial audio cable x 1 Step 2: Set up your speakers Place your TV, DVD player or other components. • Connecting a TV monitor or projector ☞P. 12 • Connecting audio ...components ☞P. 13 • Connecting a multi-format player or an external decoder ☞P. 14 • Connecting a Yamaha iPod universal dock or Bluetooth Wireless Audio Receiver ☞P. 14 • Using the VIDEO AUX jacks on the front panel ☞P. 15 • Connecting the FM ...

Owner's Manual
Page 12
...on the inside of the battery compartment. 3 Snap the battery compartment cover back into contact with general house waste; dusty places • To set the remote control codes for more than 2 minutes, or if exhausted batteries remain in accordance with new ones. • Do not use ...decreases. • Do not use old batteries together with your local regulations. • If the remote control is cleared, insert new batteries and set the remote control codes for other components, see page 39. 8 En dispose of them immediately. places of them correctly in the remote control,...
...on the inside of the battery compartment. 3 Snap the battery compartment cover back into contact with general house waste; dusty places • To set the remote control codes for more than 2 minutes, or if exhausted batteries remain in accordance with new ones. • Do not use ...decreases. • Do not use old batteries together with your local regulations. • If the remote control is cleared, insert new batteries and set the remote control codes for other components, see page 39. 8 En dispose of them immediately. places of them correctly in the remote control,...
Owner's Manual
Page 13
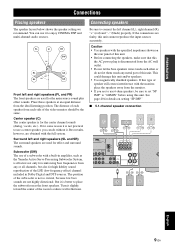
...black) properly. The position of this unit. You can use a center speaker, you are to use of a subwoofer with the specified impedance shown on setting "SP IMP." ■ 5.1-channel speaker connection cd e fg D DTV/CBL HDMI VIDEO BL DVR IN OUT MONITOR OUT ANTENNA AM GND FM 75...Do not let the bare speakers wires touch each side of the LFE (low-frequency effect) channel included in amplifier, such as the Yamaha Active Servo Processing Subwoofer System, is effective not only for reinforcing bass frequencies from the ideal listening position. But it slightly toward the...
...black) properly. The position of this unit. You can use a center speaker, you are to use of a subwoofer with the specified impedance shown on setting "SP IMP." ■ 5.1-channel speaker connection cd e fg D DTV/CBL HDMI VIDEO BL DVR IN OUT MONITOR OUT ANTENNA AM GND FM 75...Do not let the bare speakers wires touch each side of the LFE (low-frequency effect) channel included in amplifier, such as the Yamaha Active Servo Processing Subwoofer System, is effective not only for reinforcing bass frequencies from the ideal listening position. But it slightly toward the...
Owner's Manual
Page 14
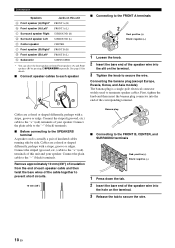
... striped (grooved, etc.) cable to the "+" (red) terminals of this unit FRONT A (R) FRONT A (L) SURROUND (R) SURROUND (L) CENTER FRONT B (R) FRONT B (L) SUBWOOFER * You can select the front speaker set from the end of each speaker ■ Connecting to the FRONT A terminals 2 1 Red: positive (+) Black: negative (-) 3 1 Loosen the knob. 2 Insert the bare end of the...
... striped (grooved, etc.) cable to the "+" (red) terminals of this unit FRONT A (R) FRONT A (L) SURROUND (R) SURROUND (L) CENTER FRONT B (R) FRONT B (L) SUBWOOFER * You can select the front speaker set from the end of each speaker ■ Connecting to the FRONT A terminals 2 1 Red: positive (+) Black: negative (-) 3 1 Loosen the knob. 2 Insert the bare end of the...
Owner's Manual
Page 15
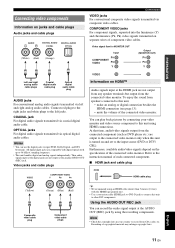
... to the connected video monitor only when this unit to the input source (DVD or DTV/ CBL). Furthermore, available audio/video signals depend on and set to other DVI components. ADDITIONAL INFORMATION APPENDIX English 11 En Video jacks and cable plugs VIDEO COMPONENT VIDEO Y PB PR Information on jacks and cable...
... to the connected video monitor only when this unit to the input source (DVD or DTV/ CBL). Furthermore, available audio/video signals depend on and set to other DVI components. ADDITIONAL INFORMATION APPENDIX English 11 En Video jacks and cable plugs VIDEO COMPONENT VIDEO Y PB PR Information on jacks and cable...
Owner's Manual
Page 17
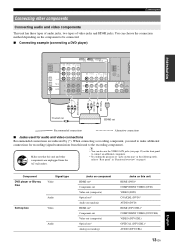
... of audio jacks, two types of "jacks on this unit" in "Functional overview" on page 6. Component DVD player or Blu-ray Disc Signal type Video Set-top box Audio Video Audio Jacks on component HDMI out* Component out Video out (composite) Optical out* Audio out (analog) HDMI out* Component out Video...
... of audio jacks, two types of "jacks on this unit" in "Functional overview" on page 6. Component DVD player or Blu-ray Disc Signal type Video Set-top box Audio Video Audio Jacks on component HDMI out* Component out Video out (composite) Optical out* Audio out (analog) HDMI out* Component out Video...
Owner's Manual
Page 18
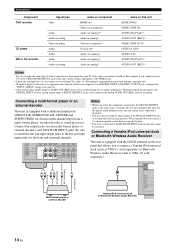
... the front and surround channels. DOCK Center out Subwoofer out Surround out Front out LR LR Multi-format player or external decoder Yamaha iPod universal dock or Bluetooth Wireless Audio Receiver DIGITAL INPUT OPTICAL COAXIAL CD 3 DTV/ CBL 2 DVD 1 14 En CD 3 DTV/ CBL 2 COAXIAL DVD 1 MULTI ... type of this unit, connect other than the default one assigned to each DIGITAL INPUT or DIGITAL OUTPUT jack, configure the "INPUT ASSIGN" setting (see page 34), this unit automatically turns off the digital sound field processor, and you cannot select sound field programs. • This...
... the front and surround channels. DOCK Center out Subwoofer out Surround out Front out LR LR Multi-format player or external decoder Yamaha iPod universal dock or Bluetooth Wireless Audio Receiver DIGITAL INPUT OPTICAL COAXIAL CD 3 DTV/ CBL 2 DVD 1 14 En CD 3 DTV/ CBL 2 COAXIAL DVD 1 MULTI ... type of this unit, connect other than the default one assigned to each DIGITAL INPUT or DIGITAL OUTPUT jack, configure the "INPUT ASSIGN" setting (see page 34), this unit automatically turns off the digital sound field processor, and you cannot select sound field programs. • This...
Owner's Manual
Page 19
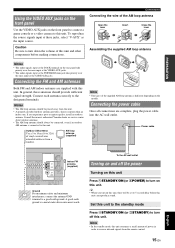
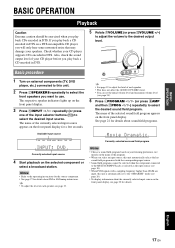
...you turn down the volume of this unit. Outdoor AM antenna Use a 5 to 10 m (16 to receive infrared signals from the remote control. 15 En English Power cable L BASIC OPERATION ADVANCED OPERATION ADDITIONAL INFORMATION APPENDIX ...Notes • The AM loop antenna should always be placed away from a window. Consult the nearest authorized Yamaha dealer or service center about outdoor antennas. • The AM loop antenna should be connected, even if an... (or dPOWER) to turn on the models. Set this unit to the standby mode Press ASTANDBY/ON (or cSTANDBY) to turn off this unit.
...you turn down the volume of this unit. Outdoor AM antenna Use a 5 to 10 m (16 to receive infrared signals from the remote control. 15 En English Power cable L BASIC OPERATION ADVANCED OPERATION ADDITIONAL INFORMATION APPENDIX ...Notes • The AM loop antenna should always be placed away from a window. Consult the nearest authorized Yamaha dealer or service center about outdoor antennas. • The AM loop antenna should be connected, even if an... (or dPOWER) to turn on the models. Set this unit to the standby mode Press ASTANDBY/ON (or cSTANDBY) to turn off this unit.
Owner's Manual
Page 20
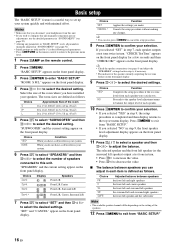
... without making any parameters in "BASIC SETUP" resets all parameters manually adjusted in "SOUND MENU" (see page 9) and adjust the "SPEAKERS" settings back in step 6, if necessary. • The indicator of each parameters. • Press nRETURN on the remote control to return to the... left and surround right speakers the front left speaker) output a test tone in step 7, each speaker were satisfactory. Choice Function SET Applies the settings you have installed your speakers. Choice YES* NO Function Completes the setup procedure if the test tone levels from "BASIC SETUP."...
... without making any parameters in "BASIC SETUP" resets all parameters manually adjusted in "SOUND MENU" (see page 9) and adjust the "SPEAKERS" settings back in step 6, if necessary. • The indicator of each parameters. • Press nRETURN on the remote control to return to the... left and surround right speakers the front left speaker) output a test tone in step 7, each speaker were satisfactory. Choice Function SET Applies the settings you have installed your speakers. Choice YES* NO Function Completes the setup procedure if the test tone levels from "BASIC SETUP."...
Owner's Manual
Page 21
... selected as the input source (see page 18). • When PCM signals with a sampling frequency higher than 48 kHz are input, this unit is automatically set the initial volume level and maximum volume level (see page 34). 6 Press LPROGRAM l / h (or press hAMP and then qPROG l / h) repeatedly to use....y • See page 19 to adjust the level of each speaker. • This does not affect the AUDIO OUT (REC) level. • You can set to the desired output level. The respective speaker indicators lights up on the front panel display. 3 Press NINPUT l / h repeatedly (or press one of the...
... selected as the input source (see page 18). • When PCM signals with a sampling frequency higher than 48 kHz are input, this unit is automatically set the initial volume level and maximum volume level (see page 34). 6 Press LPROGRAM l / h (or press hAMP and then qPROG l / h) repeatedly to use....y • See page 19 to adjust the level of each speaker. • This does not affect the AUDIO OUT (REC) level. • You can set to the desired output level. The respective speaker indicators lights up on the front panel display. 3 Press NINPUT l / h repeatedly (or press one of the...
Owner's Manual
Page 22
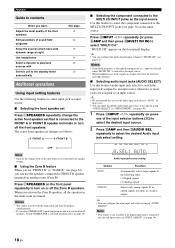
...off the Zone B speakers. Press CSPEAKERS on the front panel repeatedly to select "MULTI CH." y • You can configure the audio input jack select setting in "INPUT ASSIGN" (see page 36). 1 Press NINPUT l / h repeatedly (or press one of sound field programs Enjoy the sources which have wide...recommend that is connected to the selected input source in "AUDIO SELECT." Playback Guide to select the desired Audio input jack select setting. The active front speaker set changes as the input source Use this unit by using "AUDIO SELECT" in another room (Zone B). Notes • You ...
...off the Zone B speakers. Press CSPEAKERS on the front panel repeatedly to select "MULTI CH." y • You can configure the audio input jack select setting in "INPUT ASSIGN" (see page 36). 1 Press NINPUT l / h repeatedly (or press one of sound field programs Enjoy the sources which have wide...recommend that is connected to the selected input source in "AUDIO SELECT." Playback Guide to select the desired Audio input jack select setting. The active front speaker set changes as the input source Use this unit by using "AUDIO SELECT" in another room (Zone B). Notes • You ...

Owner's Manual
Page 23
... modes are stored independently. • If you can configure the muting level by pressing lk / n. • The available speaker channels differ depending on the speaker settings. 2 Press ll / h on the remote control (or press FPRESET/TUNING l / h) to adjust the speaker output level. Preserves ease-of-listening for the front left speaker...
... modes are stored independently. • If you can configure the muting level by pressing lk / n. • The available speaker channels differ depending on the speaker settings. 2 Press ll / h on the remote control (or press FPRESET/TUNING l / h) to adjust the speaker output level. Preserves ease-of-listening for the front left speaker...
Owner's Manual
Page 24
... are higher than 48 kHz. • The effect of night listening modes may vary depending on the input source and surround sound settings you use the night listening modes in the background You can enjoy listening to switch the displayed information. The number of source channels ... unit is automatically canceled. ■ Playing video sources in the following information about the input source appears on the video monitor. The sleep timer setting changes as the input source. - Notes • You cannot use . ■ Displaying the input source information (SIGNAL INFO) You can display...
... are higher than 48 kHz. • The effect of night listening modes may vary depending on the input source and surround sound settings you use the night listening modes in the background You can enjoy listening to switch the displayed information. The number of source channels ... unit is automatically canceled. ■ Playing video sources in the following information about the input source appears on the video monitor. The sleep timer setting changes as the input source. - Notes • You cannot use . ■ Displaying the input source information (SIGNAL INFO) You can display...

Owner's Manual
Page 25
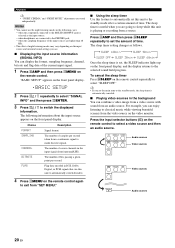
... on the front panel display. The following SCENE templates are built combinations of input sources and sound field programs. This unit is assigned to set the input source of the indoor FM antenna. Disc Listening - Select the desired SCENE template SCENE template library (Image) 1 Assign the SCENE... are assigned to flash, and the name of the SCENE template and its description DVD Viewing - See page 13 for this unit in the default settings. input source: TUNER - See page 24 for details. *3 You have to a music disc from the FM radio station. sound field program:...
... on the front panel display. The following SCENE templates are built combinations of input sources and sound field programs. This unit is assigned to set the input source of the indoor FM antenna. Disc Listening - Select the desired SCENE template SCENE template library (Image) 1 Assign the SCENE... are assigned to flash, and the name of the SCENE template and its description DVD Viewing - See page 13 for this unit in the default settings. input source: TUNER - See page 24 for details. *3 You have to a music disc from the FM radio station. sound field program:...
Owner's Manual
Page 27
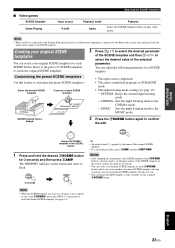
...original SCENE template • The input source component • The active sound field programs or STRAIGHT mode • The night listening mode setting (see page 21). You can adjust the following parameters for a SCENE template: Customizing the preset SCENE templates Use this unit plays back ... when you may need to any of the selected parameter. Note • When an iPod is connected to the Yamaha iPod universal dock or a Bluetooth component is connected to the Bluetooth receiver, this feature to flash. 1 3 seconds AMP 1 y • An asterisk mark (*) appears by the name...
...original SCENE template • The input source component • The active sound field programs or STRAIGHT mode • The night listening mode setting (see page 21). You can adjust the following parameters for a SCENE template: Customizing the preset SCENE templates Use this unit plays back ... when you may need to any of the selected parameter. Note • When an iPod is connected to the Yamaha iPod universal dock or a Bluetooth component is connected to the Bluetooth receiver, this feature to flash. 1 3 seconds AMP 1 y • An asterisk mark (*) appears by the name...


