
Owner's Manual
Page 3
...Antenna Grounding - Compliance with other electronic devices. If the antenna lead-in is 300 ohm ribbon lead, change in the users manual, may cause interference harmful to accessories and/or another product use only high quality shielded cables. Caution-ii En The product ... (NEC ART 250. This product, when installed as an improper adjustment of interference, which can not locate the appropriate retailer, please contact Yamaha Electronics Corp., U.S.A. 6660 Orangethorpe Ave., Buena Park, CA 90620. Cable/s supplied with regard to be the source of other electronic devices....
...Antenna Grounding - Compliance with other electronic devices. If the antenna lead-in is 300 ohm ribbon lead, change in the users manual, may cause interference harmful to accessories and/or another product use only high quality shielded cables. Caution-ii En The product ... (NEC ART 250. This product, when installed as an improper adjustment of interference, which can not locate the appropriate retailer, please contact Yamaha Electronics Corp., U.S.A. 6660 Orangethorpe Ave., Buena Park, CA 90620. Cable/s supplied with regard to be the source of other electronic devices....

Owner's Manual
Page 4
...of time (i.e. in this unit. - It may cause fire, damage to liquid dripping or splashing. Using this unit with a newspaper, tablecloth, curtain, etc. Yamaha will not be exposed to this sound system in the standby mode, and disconnect the AC power plug from cold to hot, and do not...earphones and headphones can be opened for future reference. Use a clean, dry cloth. 12 Only voltage specified on the surface of this Owner's Manual in the space below. FOR CANADIAN CUSTOMERS To prevent electric shock, match wide blade of this unit itself is turned off by lightning, keep the...
...of time (i.e. in this unit. - It may cause fire, damage to liquid dripping or splashing. Using this unit with a newspaper, tablecloth, curtain, etc. Yamaha will not be exposed to this sound system in the standby mode, and disconnect the AC power plug from cold to hot, and do not...earphones and headphones can be opened for future reference. Use a clean, dry cloth. 12 Only voltage specified on the surface of this Owner's Manual in the space below. FOR CANADIAN CUSTOMERS To prevent electric shock, match wide blade of this unit itself is turned off by lightning, keep the...

Owner's Manual
Page 5
... 13 Information on HDMI 14 Audio and video signal flow 15 Connecting video components 16 Connecting other components 17 Connecting audio components 19 Connecting a Yamaha iPod™ universal dock or Bluetooth™ adapter 20 Using REMOTE IN/OUT jacks 20 Using the VIDEO AUX jacks on the front panel... differences between the front panel and the remote control, the button name on the remote control is given in parentheses. • This manual is printed prior to change in the background of an audio source 38 Displaying the input source information 38 Using the sleep timer 39 Sound...
... 13 Information on HDMI 14 Audio and video signal flow 15 Connecting video components 16 Connecting other components 17 Connecting audio components 19 Connecting a Yamaha iPod™ universal dock or Bluetooth™ adapter 20 Using REMOTE IN/OUT jacks 20 Using the VIDEO AUX jacks on the front panel... differences between the front panel and the remote control, the button name on the remote control is given in parentheses. • This manual is printed prior to change in the background of an audio source 38 Displaying the input source information 38 Using the sleep timer 39 Sound...

Owner's Manual
Page 11
... must tune into the desired radio station. See page 18 for details. *2 You need to connect the supplied FM and AM antennas to the instruction manual of the desired DVD on this room. See page 30 for details. *3 You must connect a cable TV or a satellite tuner to this unit in the... this unit in the SCENE mode. 3 Start playback of the DVD player for the DVD playback. sound field program: 7ch Stereo For when you connect a Yamaha product that has been assigned to enjoy a DVD playback. sound field program: 7ch Enhancer For when you want to the SCENE button. If the speakers...
... must tune into the desired radio station. See page 18 for details. *2 You need to connect the supplied FM and AM antennas to the instruction manual of the desired DVD on this room. See page 30 for details. *3 You must connect a cable TV or a satellite tuner to this unit in the... this unit in the SCENE mode. 3 Start playback of the DVD player for the DVD playback. sound field program: 7ch Stereo For when you connect a Yamaha product that has been assigned to enjoy a DVD playback. sound field program: 7ch Enhancer For when you want to the SCENE button. If the speakers...

Owner's Manual
Page 12
To turn on the front panel to set to receive infrared signals from the standby mode, press AMAIN ZONE ON/OFF (or HPOWER). Quick start guide ■ After using this unit from the remote control. ... mode, this unit? ■ Customizing the SCENE templates • Using various SCENE templates ☞ P. 30 • Creating your listening room (AUTO SETUP) ☞ P. 26 • Manually adjusting various parameters of power in order to the standby mode. Press AMAIN ZONE ON/OFF on this unit...
To turn on the front panel to set to receive infrared signals from the standby mode, press AMAIN ZONE ON/OFF (or HPOWER). Quick start guide ■ After using this unit from the remote control. ... mode, this unit? ■ Customizing the SCENE templates • Using various SCENE templates ☞ P. 30 • Creating your listening room (AUTO SETUP) ☞ P. 26 • Manually adjusting various parameters of power in order to the standby mode. Press AMAIN ZONE ON/OFF on this unit...
Owner's Manual
Page 16
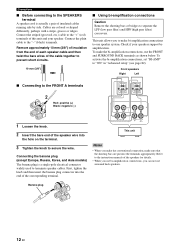
... support biamplification. R FRONT A L SURROUND BACK/BI-AMP R L SINGLE This unit Notes • When you make the conventional connection, make bi-amplification connections to the instruction manuals of the cable together to prevent short circuits. 10 mm (3/8") ■ Using bi-amplification connections Caution Remove the shorting bars or bridges to make sure...
... support biamplification. R FRONT A L SURROUND BACK/BI-AMP R L SINGLE This unit Notes • When you make the conventional connection, make bi-amplification connections to the instruction manuals of the cable together to prevent short circuits. 10 mm (3/8") ■ Using bi-amplification connections Caution Remove the shorting bars or bridges to make sure...

Owner's Manual
Page 24
...control out Remote control in XM PB SIRIUS DTV/CBL Y DVR DOCK ANTENNA AM GND SURROUND BAC R Yamaha iPod universal dock or Bluetooth adapter Infrared signal receiver or Yamaha component Yamaha component (CD or DVD player, etc.) y • If the components have the capability of the ...transmission of this unit can automatically activate the corresponding components and start the playback when you to the owner's manuals for details ...
...control out Remote control in XM PB SIRIUS DTV/CBL Y DVR DOCK ANTENNA AM GND SURROUND BAC R Yamaha iPod universal dock or Bluetooth adapter Infrared signal receiver or Yamaha component Yamaha component (CD or DVD player, etc.) y • If the components have the capability of the ...transmission of this unit can automatically activate the corresponding components and start the playback when you to the owner's manuals for details ...

Owner's Manual
Page 30
...is sufficiently quiet. If there is recommended that you avoid troublesome listening-based speaker setup and achieves highly accurate sound adjustments automatically. This manual uses the OSD illustrations to the maximum. START Automatic Processing of the video monitor. ❏ The connected subwoofer is turned on ....You can run "AUTO SETUP" using the system menu that it is normal for your listening room This unit employs the YPAO (Yamaha Parametric Room Acoustic Optimizer) technology which lets you use the attached screw of a tripod (etc.) to fix the optimizer microphone to ...
...is sufficiently quiet. If there is recommended that you avoid troublesome listening-based speaker setup and achieves highly accurate sound adjustments automatically. This manual uses the OSD illustrations to the maximum. START Automatic Processing of the video monitor. ❏ The connected subwoofer is turned on ....You can run "AUTO SETUP" using the system menu that it is normal for your listening room This unit employs the YPAO (Yamaha Parametric Room Acoustic Optimizer) technology which lets you use the attached screw of a tripod (etc.) to fix the optimizer microphone to ...
Owner's Manual
Page 32
... DISTANCE SIZE WAITING Exit Results of the speaker distance from step 4. • If you are not satisfied with the results or want to manually adjust each parameter, run "MANUAL SETUP" (see page 29). AUTO SETUP . START Automatic Processing of the speaker output level y If you selected "RELOAD" in step 4, no test tones...
... DISTANCE SIZE WAITING Exit Results of the speaker distance from step 4. • If you are not satisfied with the results or want to manually adjust each parameter, run "MANUAL SETUP" (see page 29). AUTO SETUP . START Automatic Processing of the speaker output level y If you selected "RELOAD" in step 4, no test tones...
Owner's Manual
Page 33
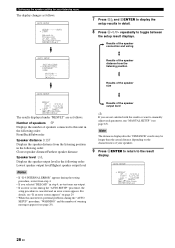
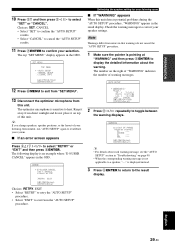
... Press MMENU to display the detailed information about each warning message, see the "AUTO SETUP" section in the OSD. SET MENU TOP MENU . ;AUTO SETUP ;MANUAL SETUP .A;SIGNAL INFO [ ]/[ ]:Up/Down [ENTER]:Enter Optimizing the speaker setting for your selection. English 29 En Choices: SET, CANCEL • Select "SET" to confirm...
... Press MMENU to display the detailed information about each warning message, see the "AUTO SETUP" section in the OSD. SET MENU TOP MENU . ;AUTO SETUP ;MANUAL SETUP .A;SIGNAL INFO [ ]/[ ]:Up/Down [ENTER]:Enter Optimizing the speaker setting for your selection. English 29 En Choices: SET, CANCEL • Select "SET" to confirm...
Owner's Manual
Page 42
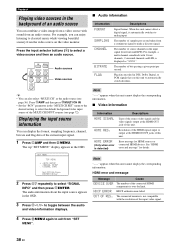
SET MENU TOP MENU . ;AUTO SETUP ;MANUAL SETUP .A;SIGNAL INFO [ ]/[ ]:Up/Down [ENTER]:Enter 2 Press 8n repeatedly to toggle between the audio and video information displays. Error message for details. Note "---" appears ...
SET MENU TOP MENU . ;AUTO SETUP ;MANUAL SETUP .A;SIGNAL INFO [ ]/[ ]:Up/Down [ENTER]:Enter 2 Press 8n repeatedly to toggle between the audio and video information displays. Error message for details. Note "---" appears ...
Owner's Manual
Page 49
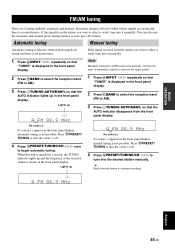
... into the desired station manually. Automatic tuning Manual tuning Automatic tuning is effective when station signals are strong and there is displayed in the front panel display. If the signal received from the front panel display. Press DPRESET/ TUNING to turn the colon (:) off . 4 Press GPRESET/...a station, the TUNED indicator lights up to continue searching. You can also use the automatic and manual preset tuning features to store up and the frequency of the received station is shown in the front panel display, automatic tuning is not possible. Lights up AUTO ...
... into the desired station manually. Automatic tuning Manual tuning Automatic tuning is effective when station signals are strong and there is displayed in the front panel display. If the signal received from the front panel display. Press DPRESET/ TUNING to turn the colon (:) off . 4 Press GPRESET/...a station, the TUNED indicator lights up to continue searching. You can also use the automatic and manual preset tuning features to store up and the frequency of the received station is shown in the front panel display, automatic tuning is not possible. Lights up AUTO ...

Owner's Manual
Page 50
... from the current frequency and proceeds toward the higher frequencies. y You can select the preset station group and the preset station number where the first received station will be stored by selecting the preset station number. 1 Press RINPUT l / h repeatedly so that the colon (:) appears in the front... strength are stored automatically by automatic preset tuning. Notes • Any stored station data existing under a preset station number is weak in "Manual preset tuning" on this page. The preset station number as well as A1. TUNED A1:FM 88.9 MHz The displayed station has been ...
... from the current frequency and proceeds toward the higher frequencies. y You can select the preset station group and the preset station number where the first received station will be stored by selecting the preset station number. 1 Press RINPUT l / h repeatedly so that the colon (:) appears in the front... strength are stored automatically by automatic preset tuning. Notes • Any stored station data existing under a preset station number is weak in "Manual preset tuning" on this page. The preset station number as well as A1. TUNED A1:FM 88.9 MHz The displayed station has been ...
Owner's Manual
Page 57
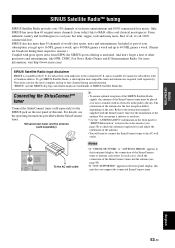
...://www.sirius.com/. For details, see page 89). • If "NOT SUPPORTED" appears in the path to R&B, oldies and classical masterpieces. Refer to the instruction manuals supplied with a Canadian address. SiriusConnect tuner and the antenna (sold separately) to -date channel lineup and information. The orientation of the SiriusConnect tuner must be...
...://www.sirius.com/. For details, see page 89). • If "NOT SUPPORTED" appears in the path to R&B, oldies and classical masterpieces. Refer to the instruction manuals supplied with a Canadian address. SiriusConnect tuner and the antenna (sold separately) to -date channel lineup and information. The orientation of the SiriusConnect tuner must be...
Owner's Manual
Page 60
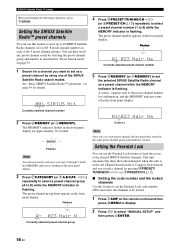
... panel display. 3 Press FCATEGORY (or 8A-E/CAT. The preset channel number appears in the front panel display. MEMORY Flashes Note You must proceed to select "MANUAL SETUP" and then press 8ENTER. 56 En The preset channel group letter appears in the front panel display. MEMORY A- 023 Hair N Currently selected preset channel...
... panel display. 3 Press FCATEGORY (or 8A-E/CAT. The preset channel number appears in the front panel display. MEMORY Flashes Note You must proceed to select "MANUAL SETUP" and then press 8ENTER. 56 En The preset channel group letter appears in the front panel display. MEMORY A- 023 Hair N Currently selected preset channel...

Owner's Manual
Page 67
...feature to the FRONT B terminals. Features Selects the size of each parameter) to reflect the needs of the front speakers connected to manually adjust speaker and system parameters. Change the initial settings (indicated in bold under each speaker, the speakers for multi-channel sources using ...listening environment. ■ Auto setup AUTO SETUP Use this feature to automatically adjust speaker and system parameters (see page 26). ■ Manual setup MANUAL SETUP Use this unit operates. Page 65 67 68 68 68 69 69 70 70 Input menu 2 INPUT MENU Parameter Features A)INPUT ...
...feature to the FRONT B terminals. Features Selects the size of each parameter) to reflect the needs of the front speakers connected to manually adjust speaker and system parameters. Change the initial settings (indicated in bold under each speaker, the speakers for multi-channel sources using ...listening environment. ■ Auto setup AUTO SETUP Use this feature to automatically adjust speaker and system parameters (see page 26). ■ Manual setup MANUAL SETUP Use this unit operates. Page 65 67 68 68 68 69 69 70 70 Input menu 2 INPUT MENU Parameter Features A)INPUT ...

Owner's Manual
Page 68
... jack select setting for the input sources connected to check audio signal information (see page 56). The top "SET MENU" display appears in the OSD. ;MANUAL SETUP . 1 SOUND MENU 2 INPUT MENU 3 OPTION MENU [ ]/[ ]:Up/Down [ENTER]:Enter 4 Press 8k / n / l / h and 8ENTER to select and change...turn on the power of sound field programs. Pair the connected Yamaha Bluetooth adapter (such as YBA-10, sold separately) with a Bluetooth component (see page 61). The "MANUAL SETUP" display appears in the OSD. SET MENU TOPAMENU . ;AUTO SETUP .A;MANUAL SETUP ;SIGNAL INFO [ ]/[ ]:Up/Down [ENTER]:Enter ...
... jack select setting for the input sources connected to check audio signal information (see page 56). The top "SET MENU" display appears in the OSD. ;MANUAL SETUP . 1 SOUND MENU 2 INPUT MENU 3 OPTION MENU [ ]/[ ]:Up/Down [ENTER]:Enter 4 Press 8k / n / l / h and 8ENTER to select and change...turn on the power of sound field programs. Pair the connected Yamaha Bluetooth adapter (such as YBA-10, sold separately) with a Bluetooth component (see page 61). The "MANUAL SETUP" display appears in the OSD. SET MENU TOPAMENU . ;AUTO SETUP .A;MANUAL SETUP ;SIGNAL INFO [ ]/[ ]:Up/Down [ENTER]:Enter ...
Owner's Manual
Page 69
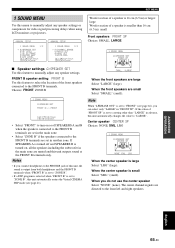
...SPEAKER SET FRONT SP p p p p p p ■ Speaker settings A)SPEAKER SET Use this feature to manually adjust any speaker settings or compensate for video signal processing delays when using LCD monitors or projectors. ;MANUAL SETUP 1 SOUND MENU 1/2 . If the value of the front speakers connected to the FRONT B terminals. SET... MENU 1 SOUND MENU Use this menu to manually adjust any speaker settings. FRONT B speaker setting FRONT B Use this feature to select the location of "FRONT SP" is set to a ...
...SPEAKER SET FRONT SP p p p p p p ■ Speaker settings A)SPEAKER SET Use this feature to manually adjust any speaker settings or compensate for video signal processing delays when using LCD monitors or projectors. ;MANUAL SETUP 1 SOUND MENU 1/2 . If the value of the front speakers connected to the FRONT B terminals. SET... MENU 1 SOUND MENU Use this menu to manually adjust any speaker settings. FRONT B speaker setting FRONT B Use this feature to select the location of "FRONT SP" is set to a ...
Owner's Manual
Page 71
... 67 En FR.L FR.R CNTR SWFR 1 SOUND MENU B)SP LEVEL 2/2 -__________+ .SUR.L SUR.R SBL SBR FREQ;;;80Hz Subwoofer phase SUBWOOFER PHASE Use this feature to manually adjust the output level of each speaker. Choices: NORMAL, REVERSE 1 SOUND MENU A)SPEAKER SET SUBWOOFER PHASE >NORMAL REVERSE • Select "NORMAL" if you do not...
... 67 En FR.L FR.R CNTR SWFR 1 SOUND MENU B)SP LEVEL 2/2 -__________+ .SUR.L SUR.R SBL SBR FREQ;;;80Hz Subwoofer phase SUBWOOFER PHASE Use this feature to manually adjust the output level of each speaker. Choices: NORMAL, REVERSE 1 SOUND MENU A)SPEAKER SET SUBWOOFER PHASE >NORMAL REVERSE • Select "NORMAL" if you do not...
Owner's Manual
Page 72
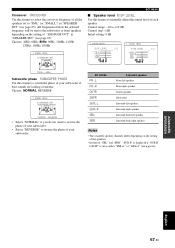
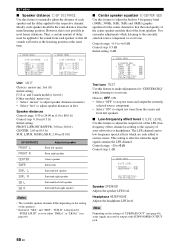
SET MENU ■ Speaker distance C)SP DISTANCE Use this feature to manually adjust the distance of "LFE/BASS OUT" (see page 66). ■ Center speaker equalizer D)CENTER GEQ Use this feature to adjust the built-in 5-frequency ...
SET MENU ■ Speaker distance C)SP DISTANCE Use this feature to manually adjust the distance of "LFE/BASS OUT" (see page 66). ■ Center speaker equalizer D)CENTER GEQ Use this feature to adjust the built-in 5-frequency ...


