
Owner's Manual
Page 3
... the instructions found in the users manual, may result in damage and will not occur in to provide some protection against voltage surges and built-up static charges. Utilize power outlets that the product is provided to call the CATV system installer's attention to Article 820-40 of other products (including amplifiers) that provides guidelines for service. 20 Replacement Parts...
... the instructions found in the users manual, may result in damage and will not occur in to provide some protection against voltage surges and built-up static charges. Utilize power outlets that the product is provided to call the CATV system installer's attention to Article 820-40 of other products (including amplifiers) that provides guidelines for service. 20 Replacement Parts...

Owner's Manual
Page 5
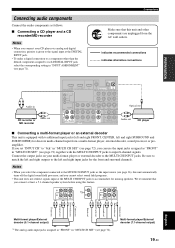
... and cable plugs 13 Information on HDMI 14 Audio and video signal flow 15 Connecting video components 16 Connecting other components 17 Connecting audio components 19 Connecting a Yamaha iPod™ universal dock or Bluetooth™ adapter 20 Using REMOTE IN/OUT jacks 20 Using the VIDEO AUX jacks on the front panel .... 21 Connecting the FM and AM antennas 21 Connecting the power cable 22 Setting the speaker impedance 23 Turning on and off the power 23 Front panel display 24 Optimizing the speaker setting for your listening room 26 Using AUTO SETUP 26 BASIC OPERATION Selecting...
... and cable plugs 13 Information on HDMI 14 Audio and video signal flow 15 Connecting video components 16 Connecting other components 17 Connecting audio components 19 Connecting a Yamaha iPod™ universal dock or Bluetooth™ adapter 20 Using REMOTE IN/OUT jacks 20 Using the VIDEO AUX jacks on the front panel .... 21 Connecting the FM and AM antennas 21 Connecting the power cable 22 Setting the speaker impedance 23 Turning on and off the power 23 Front panel display 24 Optimizing the speaker setting for your listening room 26 Using AUTO SETUP 26 BASIC OPERATION Selecting...

Owner's Manual
Page 10
Quick start guide Step 2: Connect your DVD player and other kind of this unit. IN OUT DVR CD L CENTER R SUB WOOFER FRONT(6CH) SUB SB(8CH) SURROUND WOOFER MULTI CH INPUT ZONE 2 OUT OUTPUT CENTER SURROUND BACK/BI-AMP R L SINGLE R FRONT A L R SURROUND L R FRONT B L AC OUTLETS SWITCHED 3 Connect the video cable to the video input jack of your video monitor and the VIDEO MONITOR OUT jack of this unit. DVD player AV receiver 4 Connect the power plug of this unit and other components (except Korea model). y This unit is equipped...
Quick start guide Step 2: Connect your DVD player and other kind of this unit. IN OUT DVR CD L CENTER R SUB WOOFER FRONT(6CH) SUB SB(8CH) SURROUND WOOFER MULTI CH INPUT ZONE 2 OUT OUTPUT CENTER SURROUND BACK/BI-AMP R L SINGLE R FRONT A L R SURROUND L R FRONT B L AC OUTLETS SWITCHED 3 Connect the video cable to the video input jack of your video monitor and the VIDEO MONITOR OUT jack of this unit. DVD player AV receiver 4 Connect the power plug of this unit and other components (except Korea model). y This unit is equipped...

Owner's Manual
Page 11
... player. 4 Rotate L VOLUME to the SCENE button. input source: DVD - sound field program: 7ch Stereo For when you want to listen to the instruction manual of the DVD player for this unit can turn on the selected SCENE button lights up while this unit. 2 Press TSCENE 1. "DVD Viewing" appears in advance. Refer to a music disc from the FM radio station. to "6Ω MIN" before using this unit (see page 23). 1 Turn on your favorite input source and sound...
... player. 4 Rotate L VOLUME to the SCENE button. input source: DVD - sound field program: 7ch Stereo For when you want to listen to the instruction manual of the DVD player for this unit can turn on the selected SCENE button lights up while this unit. 2 Press TSCENE 1. "DVD Viewing" appears in advance. Refer to a music disc from the FM radio station. to "6Ω MIN" before using this unit (see page 23). 1 Turn on your favorite input source and sound...
Owner's Manual
Page 23
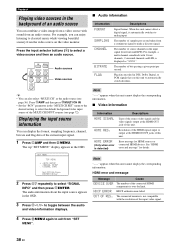
... programs. • This unit does not redirect signals input at least a 5.1-channel speaker system before using this unit and other than the default component assigned to each DIGITAL INPUT jack, select the corresponding setting in "MULTI CH SET" (see page 72) together with 6 additional input jacks (left and right FRONT, CENTER, left and right outputs to accommodate for the front and surround channels. Multi-format player/External decoder (7.1-channel output) 19 En CENTER L R FRONT(6CH) SB(8CH) SURROUND SUB WOOFER MULTI...
... programs. • This unit does not redirect signals input at least a 5.1-channel speaker system before using this unit and other than the default component assigned to each DIGITAL INPUT jack, select the corresponding setting in "MULTI CH SET" (see page 72) together with 6 additional input jacks (left and right FRONT, CENTER, left and right outputs to accommodate for the front and surround channels. Multi-format player/External decoder (7.1-channel output) 19 En CENTER L R FRONT(6CH) SB(8CH) SURROUND SUB WOOFER MULTI...
Owner's Manual
Page 25
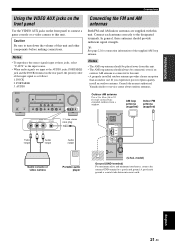
... or video camera Portable audio player SUB WOOFER TPUT CENTER (U.S.A. PORTABLE 3. y See page 22 for connection information of this unit. • A properly installed outdoor antenna provides clearer reception than an indoor one. MAIN ZONE ON/OFF PHONES SILENT CINEMA SPEAKERS A/B/OFF VOLUME SYSTEM OFF ZONE 2 ON/OFF EDIT SEARCH MODE PRESET/TUNING BAND CATEGORY A/B/C/D/E l PRESET/TUNING/CH h SCENE 1 2 3 4 OPTIMIZER MIC MEMORY INFO TUNING AUTO/MAN'L ZONE CONTROL TONE CONTROL l PROGRAM h STRAIGHT DIRECT l INPUT h AUDIO SELECT EFFECT VIDEO VIDEO AUX L AUDIO...
... or video camera Portable audio player SUB WOOFER TPUT CENTER (U.S.A. PORTABLE 3. y See page 22 for connection information of this unit. • A properly installed outdoor antenna provides clearer reception than an indoor one. MAIN ZONE ON/OFF PHONES SILENT CINEMA SPEAKERS A/B/OFF VOLUME SYSTEM OFF ZONE 2 ON/OFF EDIT SEARCH MODE PRESET/TUNING BAND CATEGORY A/B/C/D/E l PRESET/TUNING/CH h SCENE 1 2 3 4 OPTIMIZER MIC MEMORY INFO TUNING AUTO/MAN'L ZONE CONTROL TONE CONTROL l PROGRAM h STRAIGHT DIRECT l INPUT h AUDIO SELECT EFFECT VIDEO VIDEO AUX L AUDIO...

Owner's Manual
Page 40
... audio input jack select setting. while MULTI CH is selected as the input source. When no signals are assigned. Note This feature is not available when no digital input jacks (OPTICAL, COAXIAL and HDMI) are input, no sound is output. Press SAUDIO SELECT (or press 5AMP and then FAUDIO SEL) repeatedly to select MULTI CH. y Use "MULTI CH SET" menu in "INPUT MENU" to reassign the respective input jack (see page 72). When HDMI signals are amplified and output directly without sound processing. Use "INPUT ASSIGNMENT" in "INPUT MENU...
... audio input jack select setting. while MULTI CH is selected as the input source. When no signals are assigned. Note This feature is not available when no digital input jacks (OPTICAL, COAXIAL and HDMI) are input, no sound is output. Press SAUDIO SELECT (or press 5AMP and then FAUDIO SEL) repeatedly to select MULTI CH. y Use "MULTI CH SET" menu in "INPUT MENU" to reassign the respective input jack (see page 72). When HDMI signals are amplified and output directly without sound processing. Use "INPUT ASSIGNMENT" in "INPUT MENU...
Owner's Manual
Page 42
... the input selector buttons (4) to select "SIGNAL INFO" and then press 8ENTER. The number of the current input signal. 1 Press 5AMP and then MMENU. HDMI error and message Message Cause DEVICE OVER The number of the MULTI CH INPUT sources (see page 36). SET MENU TOP MENU . ;AUTO SETUP ;MANUAL SETUP .A;SIGNAL INFO [ ]/[ ]:Up/Down [ENTER]:Enter 2 Press 8n repeatedly to select a video source and then an audio source. For example, you can display the format, sampling frequency, channel, bit...
... the input selector buttons (4) to select "SIGNAL INFO" and then press 8ENTER. The number of the current input signal. 1 Press 5AMP and then MMENU. HDMI error and message Message Cause DEVICE OVER The number of the MULTI CH INPUT sources (see page 36). SET MENU TOP MENU . ;AUTO SETUP ;MANUAL SETUP .A;SIGNAL INFO [ ]/[ ]:Up/Down [ENTER]:Enter 2 Press 8n repeatedly to select a video source and then an audio source. For example, you can display the format, sampling frequency, channel, bit...
Owner's Manual
Page 49
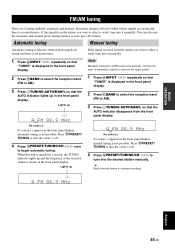
... panel display. You can also use the automatic and manual preset tuning features to 40 stations. Lights up to store up AUTO A FM 88.9 MHz No colon (:) If a colon (:) appears in the front panel display, automatic tuning is weak, tune into it manually. TUNED A FM 88.9 MHz English 45 En Automatic tuning is effective when station signals are 2 tuning methods: automatic and manual. If the signal received from the station you want to select...
... panel display. You can also use the automatic and manual preset tuning features to 40 stations. Lights up to store up AUTO A FM 88.9 MHz No colon (:) If a colon (:) appears in the front panel display, automatic tuning is weak, tune into it manually. TUNED A FM 88.9 MHz English 45 En Automatic tuning is effective when station signals are 2 tuning methods: automatic and manual. If the signal received from the station you want to select...

Owner's Manual
Page 67
.... ■ Auto setup AUTO SETUP Use this feature to automatically adjust speaker and system parameters (see page 26). ■ Manual setup MANUAL SETUP Use this feature to play back HDMI audio signals on this unit or on the rear panel of this unit operates. Adjusts the output level of Dolby Digital or DTS signals. Selects whether to manually adjust speaker and system parameters. B)INPUT RENAME Changes the name of the center speaker. Adjusts the tonal quality of the input source. E)MULTI CH SET Selects the video source played in "SET MENU" to be used. Page...
.... ■ Auto setup AUTO SETUP Use this feature to automatically adjust speaker and system parameters (see page 26). ■ Manual setup MANUAL SETUP Use this feature to play back HDMI audio signals on this unit or on the rear panel of this unit operates. Adjusts the output level of Dolby Digital or DTS signals. Selects whether to manually adjust speaker and system parameters. B)INPUT RENAME Changes the name of the center speaker. Adjusts the tonal quality of the input source. E)MULTI CH SET Selects the video source played in "SET MENU" to be used. Page...

Owner's Manual
Page 68
... A)DISPLAY SET B)MEMORY GUARD C)AUDIO SELECT D)PARAM. INI E)BLUETOOTH SET F)XM RADIO SET G)SIRIUS SET Features Adjusts the brightness of the XM Satellite Radio signals. Page 73 74 74 74 75 75 75 Note The "XM RADIO SET" and "SIRIUS SET" parameters are only applicable to enter "MANUAL SETUP". Designates the default audio input jack select setting for the input sources connected to check audio signal information (see page 38). p p p p Using SET MENU Use the remote control to select "MANUAL SETUP". Locks sound field program parameters and other "SET MENU" settings. SET MENU...
... A)DISPLAY SET B)MEMORY GUARD C)AUDIO SELECT D)PARAM. INI E)BLUETOOTH SET F)XM RADIO SET G)SIRIUS SET Features Adjusts the brightness of the XM Satellite Radio signals. Page 73 74 74 74 75 75 75 Note The "XM RADIO SET" and "SIRIUS SET" parameters are only applicable to enter "MANUAL SETUP". Designates the default audio input jack select setting for the input sources connected to check audio signal information (see page 38). p p p p Using SET MENU Use the remote control to select "MANUAL SETUP". Locks sound field program parameters and other "SET MENU" settings. SET MENU...
Owner's Manual
Page 69
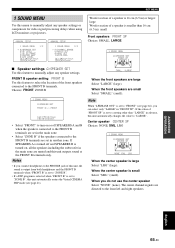
... RANGE G)AUDIO SET H)HDMI SET I)EXTD SUR. [ ]/[ ]:Up/Down [ENTER]:Enter Woofer section of a speaker is 16 cm (6.5 in) or larger: large Woofer section of a speaker is set to manually adjust any speaker settings or compensate for video signal processing delays when using LCD monitors or projectors. ;MANUAL SETUP 1 SOUND MENU 1/2 . Choices: FRONT, ZONE B 1 SOUND MENU A)SPEAKER SET FRONT B;;;;FRONT [ ]/[ ]:Up/Down [p]/[[]:Select • Select "FRONT" to turn on or off and SPEAKERS B is turned on, all the speakers including the subwoofer in...
... RANGE G)AUDIO SET H)HDMI SET I)EXTD SUR. [ ]/[ ]:Up/Down [ENTER]:Enter Woofer section of a speaker is 16 cm (6.5 in) or larger: large Woofer section of a speaker is set to manually adjust any speaker settings or compensate for video signal processing delays when using LCD monitors or projectors. ;MANUAL SETUP 1 SOUND MENU 1/2 . Choices: FRONT, ZONE B 1 SOUND MENU A)SPEAKER SET FRONT B;;;;FRONT [ ]/[ ]:Up/Down [p]/[[]:Select • Select "FRONT" to turn on or off and SPEAKERS B is turned on, all the speakers including the subwoofer in...

Owner's Manual
Page 74
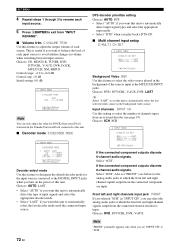
...HDMI SET Use this feature to select the component to play back HDMI audio signals. 1 SOUND MENU H)HDMI SET SUPPORT AUDIO: HTR-6150 ■ Extended surround I)EXTD SUR. 1 SOUND MENU I)EXTD SUR. . >AUTO LAST EXTD SUR.;;;;;;AUTO [p]/[[]:Select [ENTER]:Return [p]/[[]:Select [ENTER]:Return Support audio S.AUDIO Use this feature to select whether to play back signals in 6.1/7.1 channels using the Pro Logic IIx music decoder. Plays back HDMI audio signals on the rear panel of this feature to enjoy 6.1/7.1-channel playback for multi-channel sources using the Dolby Pro Logic IIx, Dolby Digital...
...HDMI SET Use this feature to select the component to play back HDMI audio signals. 1 SOUND MENU H)HDMI SET SUPPORT AUDIO: HTR-6150 ■ Extended surround I)EXTD SUR. 1 SOUND MENU I)EXTD SUR. . >AUTO LAST EXTD SUR.;;;;;;AUTO [p]/[[]:Select [ENTER]:Return [p]/[[]:Select [ENTER]:Return Support audio S.AUDIO Use this feature to select whether to play back signals in 6.1/7.1 channels using the Pro Logic IIx music decoder. Plays back HDMI audio signals on the rear panel of this feature to enjoy 6.1/7.1-channel playback for multi-channel sources using the Dolby Pro Logic IIx, Dolby Digital...
Owner's Manual
Page 76
... DIGITAL INPUT jacks when you turn on the power of the sources input at the MULTI CH INPUT jacks. Choices: DVD, DTV/CBL, V-AUX, DVR, LAST y Select "LAST" to set "FRONT" (see page 19). If the connected component outputs discrete 8-channel audio signals. DTS decoder prioritize setting Choices: AUTO, DTS • Select "AUTO" if you want this unit to automatically detect input signal types and select the appropriate input mode. • Select "DTS" when you play back a DTS-CD. ■ Multi channel input setup E)MULTI CH SET 2 INPUT MENU E)MULTI...
... DIGITAL INPUT jacks when you turn on the power of the sources input at the MULTI CH INPUT jacks. Choices: DVD, DTV/CBL, V-AUX, DVR, LAST y Select "LAST" to set "FRONT" (see page 19). If the connected component outputs discrete 8-channel audio signals. DTS decoder prioritize setting Choices: AUTO, DTS • Select "AUTO" if you want this unit to automatically detect input signal types and select the appropriate input mode. • Select "DTS" when you play back a DTS-CD. ■ Multi channel input setup E)MULTI CH SET 2 INPUT MENU E)MULTI...

Owner's Manual
Page 81
... the remote control can control the desired component without changing the input source of this unit. [1] POWER POWER STANDBY POWER TV AV A XM SIRIUS MUTE CD MD/CD-R TUNER DVD DTV/CBL DVR TV CH V-AUX/DOCK B C AMP TV INPUT TV MUTE TV VOL SCENE 1 2 3 4 [2] BAND LEVEL TITLE SRCH MODE MENU VOLUME [3] [4] [5] [6] ENTER RETURN MEMORY REC DISPLAY INFO l PROG h 1 2 ENHANCER SUR. h ENTER [4] RETURN [5] REC p w f e b a s [6] 1-9, 0, +10 [7] MENU [8] DISPLAY [9] ENT DVD player/ recorder VCR Digital TV/ Cable TV LD player CD player MD...
... the remote control can control the desired component without changing the input source of this unit. [1] POWER POWER STANDBY POWER TV AV A XM SIRIUS MUTE CD MD/CD-R TUNER DVD DTV/CBL DVR TV CH V-AUX/DOCK B C AMP TV INPUT TV MUTE TV VOL SCENE 1 2 3 4 [2] BAND LEVEL TITLE SRCH MODE MENU VOLUME [3] [4] [5] [6] ENTER RETURN MEMORY REC DISPLAY INFO l PROG h 1 2 ENHANCER SUR. h ENTER [4] RETURN [5] REC p w f e b a s [6] 1-9, 0, +10 [7] MENU [8] DISPLAY [9] ENT DVD player/ recorder VCR Digital TV/ Cable TV LD player CD player MD...

Owner's Manual
Page 88
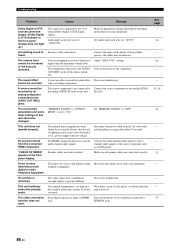
The speaker impedance setting is muted. The protection circuitry has been activated. Incorrect input or output cable connections. Audio input jack select is set . Play a source whose signals can be defective. The HDMI components connected to this unit. No sound. Set this unit to the standby mode, disconnect the power cable, plug it back in after the power is set to "Other" and Set "SUPPORT AUDIO" to "HTR-6150" in Dolby Digital or DTS. No appropriate Audio input jack select has Set an appropriate Audio input jack select. Speaker connections are ...
The speaker impedance setting is muted. The protection circuitry has been activated. Incorrect input or output cable connections. Audio input jack select is set . Play a source whose signals can be defective. The HDMI components connected to this unit. No sound. Set this unit to the standby mode, disconnect the power cable, plug it back in after the power is set to "Other" and Set "SUPPORT AUDIO" to "HTR-6150" in Dolby Digital or DTS. No appropriate Audio input jack select has Set an appropriate Audio input jack select. Speaker connections are ...
Owner's Manual
Page 90
... panel display does not light up.) The connected component is heard from digital or radio frequency equipment. This unit suddenly enters the standby mode. heard. with low voltage. This unit does not operate properly. The picture is too high and the overheat protection circuitry has been activated. The internal temperature is disturbed. The video conversion function does not work. Turn off . Set Audio input jack select to "OFF". A humming sound is not malfunction. Connect the audio cables...
... panel display does not light up.) The connected component is heard from digital or radio frequency equipment. This unit suddenly enters the standby mode. heard. with low voltage. This unit does not operate properly. The picture is too high and the overheat protection circuitry has been activated. The internal temperature is disturbed. The video conversion function does not work. Turn off . Set Audio input jack select to "OFF". A humming sound is not malfunction. Connect the audio cables...

Owner's Manual
Page 94
... MIC! A surround channel signal is not connected. Surround back speakers are connected, though surround L/R speakers are not detected. The optimizer microphone does not detect test tones. Run "AUTO SETUP" again. E-6:NO MIC E-7:NO SIGNAL E-8:USER CANCEL E-9:INTERNAL ERROR Cause Remedy Front L/R channel signals are not. Headphones are connected. During AUTO SETUP Error message E-1:NO FRONT SP E-2:NO SUR.SP E-3:SBR->SBL E-4:NOISY E-5:CHECK SUR. Check the surround speaker connections. Connect the supplied optimizer microphone to the OPTIMIZER MIC jack on the front panel...
... MIC! A surround channel signal is not connected. Surround back speakers are connected, though surround L/R speakers are not detected. The optimizer microphone does not detect test tones. Run "AUTO SETUP" again. E-6:NO MIC E-7:NO SIGNAL E-8:USER CANCEL E-9:INTERNAL ERROR Cause Remedy Front L/R channel signals are not. Headphones are connected. During AUTO SETUP Error message E-1:NO FRONT SP E-2:NO SUR.SP E-3:SBR->SBL E-4:NOISY E-5:CHECK SUR. Check the surround speaker connections. Connect the supplied optimizer microphone to the OPTIMIZER MIC jack on the front panel...
Owner's Manual
Page 102
... Audio components, Connection 19 Audio delay, Audio settings 69 Audio information 38 Audio input jacks selection 36 AUDIO jacks 13 Audio jacks 13 AUDIO SELECT 36 Audio select, Option menu 74 Audio settings, Sound menu 69 Audio signal flow 15 AUTO SETUP 26 AUTO SETUP, Error message 90 Automatic preset tuning, FM/AM tuning 46 Automatic tuning, FM/AM tuning ....... 45 ■B B)INPUT RENAME, Input menu 71 B)MEMORY GUARD, Option menu 74 B)SPEAKER LEVEL, Sound menu 67 Background Video, Multi channel input setup 72 BGV, Multi channel input setup .......... 72 BI-AMP, Advanced setup...
... Audio components, Connection 19 Audio delay, Audio settings 69 Audio information 38 Audio input jacks selection 36 AUDIO jacks 13 Audio jacks 13 AUDIO SELECT 36 Audio select, Option menu 74 Audio settings, Sound menu 69 Audio signal flow 15 AUTO SETUP 26 AUTO SETUP, Error message 90 Automatic preset tuning, FM/AM tuning 46 Automatic tuning, FM/AM tuning ....... 45 ■B B)INPUT RENAME, Input menu 71 B)MEMORY GUARD, Option menu 74 B)SPEAKER LEVEL, Sound menu 67 Background Video, Multi channel input setup 72 BGV, Multi channel input setup .......... 72 BI-AMP, Advanced setup...

Owner's Manual
Page 104
... effect level 68 Speaker, Low-frequency effect level 68 Specifications 97 SR PIN, Advanced setup 82 Standby mode, Zone 2 81 STRAIGHT 41 Straight 41 SUB UPDATED, SIRIUS Satellite Radio status message 89 SUBWOOFER PHASE, Speaker settings 67 Subwoofer phase, Speaker settings ......67 SUPPORT AUDIO, HDMI set 70 Support audio, HDMI set 70 SUR. Index Parameter initialization, Option menu 74 PARENTAL LOCK, SIRIUS Satellite Radio setting 75 PCM indicator 24 PHONES jack 37 Play information display, iPod controlling 60 Playing video sources in the background ........ 38 Virtual CINEMA...
... effect level 68 Speaker, Low-frequency effect level 68 Specifications 97 SR PIN, Advanced setup 82 Standby mode, Zone 2 81 STRAIGHT 41 Straight 41 SUB UPDATED, SIRIUS Satellite Radio status message 89 SUBWOOFER PHASE, Speaker settings 67 Subwoofer phase, Speaker settings ......67 SUPPORT AUDIO, HDMI set 70 Support audio, HDMI set 70 SUR. Index Parameter initialization, Option menu 74 PARENTAL LOCK, SIRIUS Satellite Radio setting 75 PCM indicator 24 PHONES jack 37 Play information display, iPod controlling 60 Playing video sources in the background ........ 38 Virtual CINEMA...


