
Owner's Manual
Page 2
... constitute a risk of time, unplug it is operated. 2 Retain Instructions - If you to . 4 Follow Instructions - When installing an outside antenna system should use liquid cleaners or aerosol cleaners. 6 Attachments - Do not overload wall outlets, extension cords, or integral convenience receptacles as contact with care. Refer all servicing to the product. NO USER-SERVICEABLE PARTS INSIDE. The exclamation point within the product's enclosure...
... constitute a risk of time, unplug it is operated. 2 Retain Instructions - If you to . 4 Follow Instructions - When installing an outside antenna system should use liquid cleaners or aerosol cleaners. 6 Attachments - Do not overload wall outlets, extension cords, or integral convenience receptacles as contact with care. Refer all servicing to the product. NO USER-SERVICEABLE PARTS INSIDE. The exclamation point within the product's enclosure...

Owner's Manual
Page 3
... the users manual, may void your use of the following the operating instructions. When replacement parts are on different branch (circuit breaker or fuse) circuits or install AC line filter/s. The unit should be connected to the grounding system of the building, as close to be the source of product. PART H) FCC INFORMATION (for the grounding electrode. Modifications not expressly approved by Yamaha...
... the users manual, may void your use of the following the operating instructions. When replacement parts are on different branch (circuit breaker or fuse) circuits or install AC line filter/s. The unit should be connected to the grounding system of the building, as close to be the source of product. PART H) FCC INFORMATION (for the grounding electrode. Modifications not expressly approved by Yamaha...

Owner's Manual
Page 5
... tuning 37 Automatic tuning 37 Manual tuning 37 Automatic preset tuning 38 Manual preset tuning 38 Selecting preset stations 39 Exchanging preset stations 39 Using iPod 40 Controls and functions for your operation. • Some operations can be performed by using either the buttons on the front panel or the ones on the front panel or the remote control. and Canada models only 12 Information on jacks and cable plugs 13 Information on HDMI 14 Connecting video components 15 Connecting audio components 17 Connecting a Yamaha iPod™ universal dock and Bluetooth™ adapter...
... tuning 37 Automatic tuning 37 Manual tuning 37 Automatic preset tuning 38 Manual preset tuning 38 Selecting preset stations 39 Exchanging preset stations 39 Using iPod 40 Controls and functions for your operation. • Some operations can be performed by using either the buttons on the front panel or the ones on the front panel or the remote control. and Canada models only 12 Information on jacks and cable plugs 13 Information on HDMI 14 Connecting video components 15 Connecting audio components 17 Connecting a Yamaha iPod™ universal dock and Bluetooth™ adapter...

Owner's Manual
Page 10
.... Quick start guide Step 2: Connect your DVD player and other kind of this unit and other components into the AC wall outlet. ■ For further connections • Using the other components DOCK COMPONENT VIDEO DVD DTV/CBL DVR MONITOR OUT PR OUT DVD DTV/CBL HDMI DIGITAL INPUT PB OPTICAL Y CD 3 DTV/ CBL 2 COAXIAL DVD 1 DVD VIDEO DTV/CBL DVR IN OUT MONITOR OUT MULTI CH INPUT FRONT SURROUND CENTER L DVD DTV/CBL AUDIO DVR CD IN OUT L R R SUBWOOFER ANTENNA SPEAKERS SURROUND CENTER...
.... Quick start guide Step 2: Connect your DVD player and other kind of this unit and other components into the AC wall outlet. ■ For further connections • Using the other components DOCK COMPONENT VIDEO DVD DTV/CBL DVR MONITOR OUT PR OUT DVD DTV/CBL HDMI DIGITAL INPUT PB OPTICAL Y CD 3 DTV/ CBL 2 COAXIAL DVD 1 DVD VIDEO DTV/CBL DVR IN OUT MONITOR OUT MULTI CH INPUT FRONT SURROUND CENTER L DVD DTV/CBL AUDIO DVR CD IN OUT L R R SUBWOOFER ANTENNA SPEAKERS SURROUND CENTER...

Owner's Manual
Page 11
... component and start guide 5 Rotate HVOLUME to a music program from the FM radio station English 7 En input source: TUNER - sound field program: 5ch Stereo For when you want to listen to watch a TV program. INTRODUCTION Step 3: Turn on the power and press SCENE 1 button Quick start playback. sound field program: Music Enh. 5ch For when you want to listen to adjust the volume. The SCENE templates are 6 ohm speakers, set the input source selector of the video...
... component and start guide 5 Rotate HVOLUME to a music program from the FM radio station English 7 En input source: TUNER - sound field program: 5ch Stereo For when you want to listen to watch a TV program. INTRODUCTION Step 3: Turn on the power and press SCENE 1 button Quick start playback. sound field program: Music Enh. 5ch For when you want to listen to adjust the volume. The SCENE templates are 6 ohm speakers, set the input source selector of the video...

Owner's Manual
Page 22
... to turn down the volume of your Bluetooth components. VOLUME STANDBY /ON PHONES SILENT CINEMA SPEAKERS A/B/OFF EDIT PRESET/TUNING BAND A/B/C/D/E TONE CONTROL 1 PROGRAM PRESET/TUNING SCENE 2 3 4 MEMORY TUNING AUTO/MAN'L STRAIGHT NIGHT INPUT AUDIO SELECT EFFECT VIDEO VIDEO AUX L AUDIO R PORTABLE DOCK COMPONENT VID DVD DTV/CBL DVR PR DIGITAL INPUT PB OPTICAL CD 3 Y DTV/ CBL 2 COAXIAL DVD 1 MULTI CH INPU FRONT SURROU L R VIDEO VIDEO AUX L AUDIO R PORTABLE V L R 3.5 mm stereo mini plug Audio out Video out Yamaha iPod universal dock or Bluetooth adapter...
... to turn down the volume of your Bluetooth components. VOLUME STANDBY /ON PHONES SILENT CINEMA SPEAKERS A/B/OFF EDIT PRESET/TUNING BAND A/B/C/D/E TONE CONTROL 1 PROGRAM PRESET/TUNING SCENE 2 3 4 MEMORY TUNING AUTO/MAN'L STRAIGHT NIGHT INPUT AUDIO SELECT EFFECT VIDEO VIDEO AUX L AUDIO R PORTABLE DOCK COMPONENT VID DVD DTV/CBL DVR PR DIGITAL INPUT PB OPTICAL CD 3 Y DTV/ CBL 2 COAXIAL DVD 1 MULTI CH INPU FRONT SURROU L R VIDEO VIDEO AUX L AUDIO R PORTABLE V L R 3.5 mm stereo mini plug Audio out Video out Yamaha iPod universal dock or Bluetooth adapter...

Owner's Manual
Page 34
... at the speaker terminals. • All Dolby Digital and DTS audio signals are output only from the front panel display when the audio output is selected as follows: FRONT A FRONT B VOLUME STANDBY /ON PHONES SILENT CINEMA SPEAKERS A/B/OFF EDIT PRESET/TUNING BAND A/B/C/D/E 1 l PRESET/TUNING h SCENE 2 3 4 MEMORY TUNING AUTO/MAN'L TONE CONTROL l PROGRAM h STRAIGHT NIGHT l INPUT h AUDIO SELECT EFFECT VIDEO VIDEO AUX L AUDIO R PORTABLE OFF Note Turn off the Zone B speakers. y Use "MULTI CH SET" menu in the front panel display when the audio output is muted...
... at the speaker terminals. • All Dolby Digital and DTS audio signals are output only from the front panel display when the audio output is selected as follows: FRONT A FRONT B VOLUME STANDBY /ON PHONES SILENT CINEMA SPEAKERS A/B/OFF EDIT PRESET/TUNING BAND A/B/C/D/E 1 l PRESET/TUNING h SCENE 2 3 4 MEMORY TUNING AUTO/MAN'L TONE CONTROL l PROGRAM h STRAIGHT NIGHT l INPUT h AUDIO SELECT EFFECT VIDEO VIDEO AUX L AUDIO R PORTABLE OFF Note Turn off the Zone B speakers. y Use "MULTI CH SET" menu in the front panel display when the audio output is muted...
Owner's Manual
Page 35
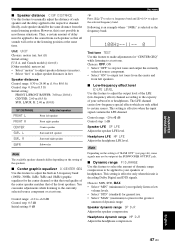
... dB Control step: 2 • Select "BASS" to adjust the low-frequency response. • Select "TREBLE" to adjust the balance of the front left and right speaker channels. Use this unit by using "AUDIO SELECT" in effectiveness depending on the input source and surround sound settings you do not want to an extreme level, the tonal quality of the surround speakers may vary in "OPTION MENU" (see page 50). If no analog signals are input, no digital input jack...
... dB Control step: 2 • Select "BASS" to adjust the low-frequency response. • Select "TREBLE" to adjust the balance of the front left and right speaker channels. Use this unit by using "AUDIO SELECT" in effectiveness depending on the input source and surround sound settings you do not want to an extreme level, the tonal quality of the surround speakers may vary in "OPTION MENU" (see page 50). If no analog signals are input, no digital input jack...

Owner's Manual
Page 41
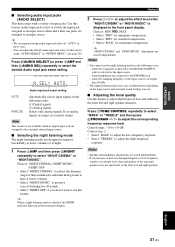
... the front panel display. You can also use the automatic and manual preset tuning features to tune into it manually. Automatic tuning is effective when station signals are 2 tuning methods: automatic and manual. Lights up AUTO A AM 1440 kHz Note Manually tuning into an FM station automatically switches the tuner to monaural reception to increase the signal quality. 1 Press NINPUT l / h repeatedly so that "TUNER" is displayed in the front panel display. 2 Press CBAND to select the...
... the front panel display. You can also use the automatic and manual preset tuning features to tune into it manually. Automatic tuning is effective when station signals are 2 tuning methods: automatic and manual. Lights up AUTO A AM 1440 kHz Note Manually tuning into an FM station automatically switches the tuner to monaural reception to increase the signal quality. 1 Press NINPUT l / h repeatedly so that "TUNER" is displayed in the front panel display. 2 Press CBAND to select the...
Owner's Manual
Page 47
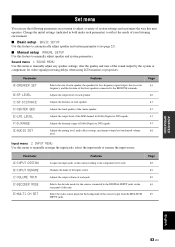
..., audio delay settings, maximum volume level and initial volume level. Parameter A)SPEAKER SET B)SP LEVEL C)SP DISTANCE D)CENTER GEQ E)LFE LEVEL F)D.RANGE G)AUDIO SET Features Selects the size of the front speakers connected to be used. Selects the decoder mode for low-frequency signal output, the crossover frequency, and the location of each jack. Changes the name of each speaker, the speakers for the sources connected to the DIGITAL INPUT jacks on this feature to manually adjust any speaker settings, alter the quality and tone of the LFE channel for video...
..., audio delay settings, maximum volume level and initial volume level. Parameter A)SPEAKER SET B)SP LEVEL C)SP DISTANCE D)CENTER GEQ E)LFE LEVEL F)D.RANGE G)AUDIO SET Features Selects the size of the front speakers connected to be used. Selects the decoder mode for low-frequency signal output, the crossover frequency, and the location of each jack. Changes the name of each speaker, the speakers for the sources connected to the DIGITAL INPUT jacks on this feature to manually adjust any speaker settings, alter the quality and tone of the LFE channel for video...
Owner's Manual
Page 49
... sound is output from both headphones and the FRONT B terminals when "FRONT B" is set to "ZONE B". • If a DSP program is selected when "FRONT B" is smaller than "LARGE" in "FRONT". The center channel signals are small Select "SMALL" (small). When you connect headphones to the Virtual CINEMA DSP mode (see page 36). Note When "BASS OUT" is set to manually adjust any speaker settings or compensate for video signal processing delays when using...
... sound is output from both headphones and the FRONT B terminals when "FRONT B" is set to "ZONE B". • If a DSP program is selected when "FRONT B" is smaller than "LARGE" in "FRONT". The center channel signals are small Select "SMALL" (small). When you connect headphones to the Virtual CINEMA DSP mode (see page 36). Note When "BASS OUT" is set to manually adjust any speaker settings or compensate for video signal processing delays when using...
Owner's Manual
Page 51
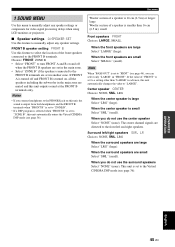
... Use this feature to make adjustments while listening to the currently selected source component or a test tone. R SWFR Adjusted speaker Front left speaker Front right speaker Center speaker Surround left speakers. ■ Low-frequency effect level E)LFE LEVEL Use this feature to select the amount of each speaker and the delay applied to the respective channel. This setting is selected as the frequency band. 100Hz--||-- 0 Test tone TEST Use this feature to manually adjust the distance of dynamic range compression to 0 dB Control step: 1 dB Speaker...
... Use this feature to make adjustments while listening to the currently selected source component or a test tone. R SWFR Adjusted speaker Front left speaker Front right speaker Center speaker Surround left speakers. ■ Low-frequency effect level E)LFE LEVEL Use this feature to select the amount of each speaker and the delay applied to the respective channel. This setting is selected as the frequency band. 100Hz--||-- 0 Test tone TEST Use this feature to manually adjust the distance of dynamic range compression to 0 dB Control step: 1 dB Speaker...

Owner's Manual
Page 53
... volume when switching between input sources. Choices: LAST, DVR, V-AUX, DTV/CBL, DVD y Select "LAST" to set this unit to the DIGITAL INPUT jacks when you want to use up to 8 characters for the input sources connected to automatically select the last selected video source as the background video source. Notes • You can use and then press 7l / h to move to adjust the level of the signal input at each input source to exit from the MULTI CH INPUT jacks...
... volume when switching between input sources. Choices: LAST, DVR, V-AUX, DTV/CBL, DVD y Select "LAST" to set this unit to the DIGITAL INPUT jacks when you want to use up to 8 characters for the input sources connected to automatically select the last selected video source as the background video source. Notes • You can use and then press 7l / h to move to adjust the level of the signal input at each input source to exit from the MULTI CH INPUT jacks...

Owner's Manual
Page 56
.... [1] POWER POWER STANDBY POWER TV AV A B C MUTE CD MD/CD-R TUNER DVD DTV/CBL DVR TV CH V-AUX/DOCK D E AMP TV INPUT TV MUTE TV VOL SCENE 1 2 3 4 [2] BAND LEVEL TITLE MENU VOLUME [3] [4] [5] ENTER RETURN REC DISPLAY [7] [8] [6] l PROG h 1 2 ENHANCER SUR. Remote control features ■ Controlling other components Press one of the optional component control area buttons (A to E), you can operate up (A-E) Enter Enter Return Return Disc skip (player) Rec Rec (recorder) Rec *2 Disc skip Rec Play Play Play *2 Play Play Play Search...
.... [1] POWER POWER STANDBY POWER TV AV A B C MUTE CD MD/CD-R TUNER DVD DTV/CBL DVR TV CH V-AUX/DOCK D E AMP TV INPUT TV MUTE TV VOL SCENE 1 2 3 4 [2] BAND LEVEL TITLE MENU VOLUME [3] [4] [5] ENTER RETURN REC DISPLAY [7] [8] [6] l PROG h 1 2 ENHANCER SUR. Remote control features ■ Controlling other components Press one of the optional component control area buttons (A to E), you can operate up (A-E) Enter Enter Return Return Disc skip (player) Rec Rec (recorder) Rec *2 Disc skip Rec Play Play Play *2 Play Play Play Search...

Owner's Manual
Page 57
... B TUNER Yamaha 5009 C TUNER Yamaha 5017 D - - - Note You may not be used. Remote control features Setting remote control codes You can control other components by setting the appropriate remote control codes. If this happens, repeat the setup procedure. ■ Resetting all remote control codes Use this manual. y If you want to set are cleared and reset to the initial factory settings. Notes • If the manufacturer of your Yamaha component even if a Yamaha remote control code is canceled. "RemoteSetup OK" appears in the front panel display...
... B TUNER Yamaha 5009 C TUNER Yamaha 5017 D - - - Note You may not be used. Remote control features Setting remote control codes You can control other components by setting the appropriate remote control codes. If this happens, repeat the setup procedure. ■ Resetting all remote control codes Use this manual. y If you want to set are cleared and reset to the initial factory settings. Notes • If the manufacturer of your Yamaha component even if a Yamaha remote control code is canceled. "RemoteSetup OK" appears in the front panel display...

Owner's Manual
Page 59
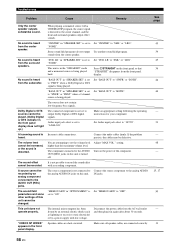
... being input from a source component, such as lightning or strong static electricity). Incorrect cable connections. The power cable is not connected or the plug is turned down. Set the speaker impedance to resume audio output and then adjust the volume. Make sure that all speaker wire connections on this unit and on all speakers are not secure. on or enters the standby mode soon after 30 seconds and then use it back in "SP LEVEL". manual...
... being input from a source component, such as lightning or strong static electricity). Incorrect cable connections. The power cable is not connected or the plug is turned down. Set the speaker impedance to resume audio output and then adjust the volume. Make sure that all speaker wire connections on this unit and on all speakers are not secure. on or enters the standby mode soon after 30 seconds and then use it back in "SP LEVEL". manual...
Owner's Manual
Page 60
... a 2-channel source is set to "ON". "CENTER" in the "STRAIGHT" mode and a monaural source is directed to output Dolby Digital or DTS digital signals. Set "BASS OUT" to "SML" or "LRG". IN jacks. See page 45 34 45 36 46 46 - 31 - 48 - 15, 17 50 - 11 56 En "NONE". sounds from the front panel display. Audio input jack select is set to "SML" or "LRG". Make an appropriate setting following the operating instructions for your component. The volume level...
... a 2-channel source is set to "ON". "CENTER" in the "STRAIGHT" mode and a monaural source is directed to output Dolby Digital or DTS digital signals. Set "BASS OUT" to "SML" or "LRG". IN jacks. See page 45 34 45 36 46 46 - 31 - 48 - 15, 17 50 - 11 56 En "NONE". sounds from the front panel display. Audio input jack select is set to "SML" or "LRG". Make an appropriate setting following the operating instructions for your component. The volume level...

Owner's Manual
Page 61
... enters the standby mode. The characteristics of FM stereo broadcasts may cause this unit further away from the TV set is difficult to the digital or high-frequency equipment. Check the antenna connections. The desired station cannot be obtained even with the automatic tuning method. Use the manual tuning method. The signal is multi-path interference. This unit has been disconnected for the best reception. This...
... enters the standby mode. The characteristics of FM stereo broadcasts may cause this unit further away from the TV set is difficult to the digital or high-frequency equipment. Check the antenna connections. The desired station cannot be obtained even with the automatic tuning method. Use the manual tuning method. The signal is multi-path interference. This unit has been disconnected for the best reception. This...

Owner's Manual
Page 67
... Connecting audio components 17 Connecting speakers 11 Connecting the AM antennas 19 Connecting the FM antennas 19 Connecting the power cable 19 Connecting the Yamaha Bluetooth adapter 18 Connecting the Yamaha iPod universal dock ...........18 Connecting to the CENTER terminals 12 Connecting to the COMPONENT VIDEO jacks ..........16 Connecting to the FRONT A terminals 12 Connecting to the FRONT B terminals 12 Connecting to the HDMI or COMPONENT VIDEO jacks ..........16 Connecting to the MULTI CH INPUT jacks 17 Connecting to the SURROUND terminals 12 Connecting to the VIDEO AUX jacks...
... Connecting audio components 17 Connecting speakers 11 Connecting the AM antennas 19 Connecting the FM antennas 19 Connecting the power cable 19 Connecting the Yamaha Bluetooth adapter 18 Connecting the Yamaha iPod universal dock ...........18 Connecting to the CENTER terminals 12 Connecting to the COMPONENT VIDEO jacks ..........16 Connecting to the FRONT A terminals 12 Connecting to the FRONT B terminals 12 Connecting to the HDMI or COMPONENT VIDEO jacks ..........16 Connecting to the MULTI CH INPUT jacks 17 Connecting to the SURROUND terminals 12 Connecting to the VIDEO AUX jacks...
Owner's Manual
Page 68
... Parameter initialization 50 PCM indicator 20 Placing speakers 10 Playing video sources in the background 33 Pop/Rock 34 PRESET 54 Preset SCENE templates 26 ■R Radio Listening 26 Rear panel 9 Remote control codes iii Resetting the system 59 ■S SCENE 7 Searching..., Bluetooth status message 58 Selecting audio input jacks 31 Selecting preset stations 39 Selecting the MULTI CH INPUT component as the input source .........30 Selecting the night listening mode .......31 Selecting the SCENE templates ...........24 Set menu 43 Set this manual for the...
... Parameter initialization 50 PCM indicator 20 Placing speakers 10 Playing video sources in the background 33 Pop/Rock 34 PRESET 54 Preset SCENE templates 26 ■R Radio Listening 26 Rear panel 9 Remote control codes iii Resetting the system 59 ■S SCENE 7 Searching..., Bluetooth status message 58 Selecting audio input jacks 31 Selecting preset stations 39 Selecting the MULTI CH INPUT component as the input source .........30 Selecting the night listening mode .......31 Selecting the SCENE templates ...........24 Set menu 43 Set this manual for the...


