MCXSP10 Manual
Page 1
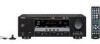
U HTR-6040 AV Receiver OWNER'S MANUAL
U HTR-6040 AV Receiver OWNER'S MANUAL
MCXSP10 Manual
Page 3
...will not result in all installation instructions. The above statements apply ONLY to its subsidiaries. Adjust only those products distributed by Yamaha Corporation of the following the operating instructions. this indicates a need for US customers) 1 IMPORTANT NOTICE: DO NOT MODIFY ..., Part 15 for proper grounding and, in particular, specifies that provides guidelines for Class "B" digital devices. Failure to follow instructions could void your use this manual, meets FCC requirements. Note to CATV system installer: This reminder is 300 ohm ribbon lead,...
...will not result in all installation instructions. The above statements apply ONLY to its subsidiaries. Adjust only those products distributed by Yamaha Corporation of the following the operating instructions. this indicates a need for US customers) 1 IMPORTANT NOTICE: DO NOT MODIFY ..., Part 15 for proper grounding and, in particular, specifies that provides guidelines for Class "B" digital devices. Failure to follow instructions could void your use this manual, meets FCC requirements. Note to CATV system installer: This reminder is 300 ohm ribbon lead,...

MCXSP10 Manual
Page 4
...may cause fire, damage to use force on the rear of power. On the top of this manual carefully. Containers with chemical solvents; in a well ventilated, cool, dry, clean place - vacation),.../220-240 V AC, 50/60 Hz. 20 The batteries shall not be used. Contact qualified Yamaha service personnel when any damage resulting from use of this unit with a newspaper, tablecloth, curtain, etc... to this unit. 6 Do not cover this unit, and/or personal injury. This Class B digital apparatus complies with high humidity (i.e. Caution-iii En candles), as they may be set this unit ...
...may cause fire, damage to use force on the rear of power. On the top of this manual carefully. Containers with chemical solvents; in a well ventilated, cool, dry, clean place - vacation),.../220-240 V AC, 50/60 Hz. 20 The batteries shall not be used. Contact qualified Yamaha service personnel when any damage resulting from use of this unit with a newspaper, tablecloth, curtain, etc... to this unit. 6 Do not cover this unit, and/or personal injury. This Class B digital apparatus complies with high humidity (i.e. Caution-iii En candles), as they may be set this unit ...

MCXSP10 Manual
Page 5
and Canada models only 13 Information on jacks and cable plugs 14 Connecting video components 15 Connecting audio components 17 Connecting a Yamaha iPod universal dock 18 Using the VIDEO AUX jacks on the front panel .... 18 Connecting the FM and AM antennas 19 Connecting ... Automatic preset tuning 39 Manual preset tuning 39 Selecting preset stations 40 Exchanging preset station 40 XM Satellite Radio tuning 41 Connecting the XM Mini-Tuner Dock 41 Activating XM Satellite Radio 42 Basic XM Satellite Radio operations 42 Setting XM Satellite Radio preset channels 44 Displaying the XM ...
and Canada models only 13 Information on jacks and cable plugs 14 Connecting video components 15 Connecting audio components 17 Connecting a Yamaha iPod universal dock 18 Using the VIDEO AUX jacks on the front panel .... 18 Connecting the FM and AM antennas 19 Connecting ... Automatic preset tuning 39 Manual preset tuning 39 Selecting preset stations 40 Exchanging preset station 40 XM Satellite Radio tuning 41 Connecting the XM Mini-Tuner Dock 41 Activating XM Satellite Radio 42 Basic XM Satellite Radio operations 42 Setting XM Satellite Radio preset channels 44 Displaying the XM ...

MCXSP10 Manual
Page 13
... C), you can select and change the assigned SCENE template for your iPod with this unit consumes a small amount of power in order to receive infrared signals from the remote control. Press FSCENE 4 (or FSCENE 4) to select "Radio Listening". INTRODUCTION Case C: "I want to do ...☞ P. 38 • Enjoying XM Satellite Radio programs ☞ P. 41 • Using your listening room (AUTO SETUP) ☞ P. 22 • Manually adjusting various parameters of this unit ☞ P. 49 • Setting the remote control ☞ P. 59 • Adjusting the advanced parameters ☞ P. 64...
... C), you can select and change the assigned SCENE template for your iPod with this unit consumes a small amount of power in order to receive infrared signals from the remote control. Press FSCENE 4 (or FSCENE 4) to select "Radio Listening". INTRODUCTION Case C: "I want to do ...☞ P. 38 • Enjoying XM Satellite Radio programs ☞ P. 41 • Using your listening room (AUTO SETUP) ☞ P. 22 • Manually adjusting various parameters of this unit ☞ P. 49 • Setting the remote control ☞ P. 59 • Adjusting the advanced parameters ☞ P. 64...

MCXSP10 Manual
Page 26
...progress. Optimizer microphone p p 22 En y It is recommended that it is normal for your listening room This unit employs the YPAO (Yamaha Parametric Room Acoustic Optimizer) technology which lets you are selected as the front speaker system (see page 30). ❏ The room is ... item [ ]/[ ]:Up/Down [p]/[[]:Select 3 Place the optimizer microphone at the same height as your speakers produce in the OSD. This manual uses the OSD illustrations to affix the optimizer microphone at your actual listening environment. SETUP;;;;;;;AUTO START Automatic Processing of a tripod (etc.)...
...progress. Optimizer microphone p p 22 En y It is recommended that it is normal for your listening room This unit employs the YPAO (Yamaha Parametric Room Acoustic Optimizer) technology which lets you are selected as the front speaker system (see page 30). ❏ The room is ... item [ ]/[ ]:Up/Down [p]/[[]:Select 3 Place the optimizer microphone at the same height as your speakers produce in the OSD. This manual uses the OSD illustrations to affix the optimizer microphone at your actual listening environment. SETUP;;;;;;;AUTO START Automatic Processing of a tripod (etc.)...

MCXSP10 Manual
Page 28
...displays. Optimizing the speaker setting for your listening room 6 Press DENTER to display the setup results in detail. 7 Press Dl / h repeatedly to manually adjust each parameter, run "AUTO SETUP" again to recalibrate your system. 8 Press DENTER to return to confirm your selection. The top "SET MENU"...from the listening position Results of your speakers. 11 Press NSET MENU to select "SET" or "CANCEL". SET MENU TOP MENU . ;AUTO SETUP ;MANUAL SETUP .A;SIGNAL INFO [ ]/[ ]:Up/Down [ENTER]:Enter Results of the speaker output level y If you change speakers, speaker positions, or the ...
...displays. Optimizing the speaker setting for your listening room 6 Press DENTER to display the setup results in detail. 7 Press Dl / h repeatedly to manually adjust each parameter, run "AUTO SETUP" again to recalibrate your system. 8 Press DENTER to return to confirm your selection. The top "SET MENU"...from the listening position Results of your speakers. 11 Press NSET MENU to select "SET" or "CANCEL". SET MENU TOP MENU . ;AUTO SETUP ;MANUAL SETUP .A;SIGNAL INFO [ ]/[ ]:Up/Down [ENTER]:Enter Results of the speaker output level y If you change speakers, speaker positions, or the ...

MCXSP10 Manual
Page 37
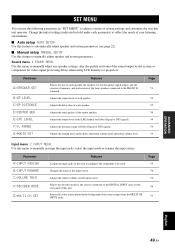
...select "SIGNAL INFO" and then press DENTER. The top "SET MENU" display appears in DTS, Dolby Digital, or PCM signals that cue this feature. SET MENU TOP MENU . ;AUTO SETUP ;MANUAL SETUP .A;SIGNAL INFO [ ]/[ ]:Up/Down [ENTER]:Enter p 2 Press Dn repeatedly to the MULTI CH... lower volumes or at lower volumes. • Select "NIGHT:MUSIC" to preserve ease-oflistening for maximum compression. FORMAT DolbyD SAMPLING 48kHz CHANNEL 3/2/0.1 BITRATE 384kbps FLAG None [RETURN]:Exit Display Description FORMAT Signal format. Notes • You cannot use the night listening modes in ...
...select "SIGNAL INFO" and then press DENTER. The top "SET MENU" display appears in DTS, Dolby Digital, or PCM signals that cue this feature. SET MENU TOP MENU . ;AUTO SETUP ;MANUAL SETUP .A;SIGNAL INFO [ ]/[ ]:Up/Down [ENTER]:Enter p 2 Press Dn repeatedly to the MULTI CH... lower volumes or at lower volumes. • Select "NIGHT:MUSIC" to preserve ease-oflistening for maximum compression. FORMAT DolbyD SAMPLING 48kHz CHANNEL 3/2/0.1 BITRATE 384kbps FLAG None [RETURN]:Exit Display Description FORMAT Signal format. Notes • You cannot use the night listening modes in ...

MCXSP10 Manual
Page 42
FM/AM TUNING FM/AM tuning There are strong and there is weak, tune into the desired station manually. If the signal received from the front panel display. Note Manually tuning into an FM station automatically switches the tuner to monaural reception to increase the signal quality. 2 Press...weak, tune into a station, the TUNED indicator lights up and the frequency of the received station is shown in the front panel display, automatic tuning is no interference. Automatic tuning Manual tuning Automatic tuning is effective when station signals are strong and there is not possible....
FM/AM TUNING FM/AM tuning There are strong and there is weak, tune into the desired station manually. If the signal received from the front panel display. Note Manually tuning into an FM station automatically switches the tuner to monaural reception to increase the signal quality. 2 Press...weak, tune into a station, the TUNED indicator lights up and the frequency of the received station is shown in the front panel display, automatic tuning is no interference. Automatic tuning Manual tuning Automatic tuning is effective when station signals are strong and there is not possible....

MCXSP10 Manual
Page 43
... stored as the MEMORY and AUTO indicators flashes. You can select the preset station group and the preset station number where the first received station will be stored by pressing 4A/B/C/D/E and then 5PRESET/TUNING/CH l / h. After approximately 5 seconds, automatic presetting starts from...signal strength are stored automatically by selecting the preset station number. 1 Press DINPUT l / h repeatedly so that the colon (:) appears in "Manual preset tuning" on this page. Notes • Any stored station data existing under the same preset station number. • Only FM stations ...
... stored as the MEMORY and AUTO indicators flashes. You can select the preset station group and the preset station number where the first received station will be stored by pressing 4A/B/C/D/E and then 5PRESET/TUNING/CH l / h. After approximately 5 seconds, automatic presetting starts from...signal strength are stored automatically by selecting the preset station number. 1 Press DINPUT l / h repeatedly so that the colon (:) appears in "Manual preset tuning" on this page. Notes • Any stored station data existing under the same preset station number. • Only FM stations ...
MCXSP10 Manual
Page 53
... DTS signals. Selects the decoder mode for video signal processing delays when using LCD monitors or projectors. Adjusts the output level of the LFE channel for low-frequency signal output, and the crossover frequency, and the location of the sources input from the MULTI CH INPUT jacks. Adjusts the ...jacks on the rear panel of each input source. Sound menu 1 SOUND MENU Use this menu to manually adjust any speaker settings, alter the quality and tone of each speaker, the speakers for Dolby Digital or DTS signals. Page 51 53 53 54 54 54 54 Input menu 2 INPUT MENU Use this...
... DTS signals. Selects the decoder mode for video signal processing delays when using LCD monitors or projectors. Adjusts the output level of the LFE channel for low-frequency signal output, and the crossover frequency, and the location of the sources input from the MULTI CH INPUT jacks. Adjusts the ...jacks on the rear panel of each input source. Sound menu 1 SOUND MENU Use this menu to manually adjust any speaker settings, alter the quality and tone of each speaker, the speakers for Dolby Digital or DTS signals. Page 51 53 53 54 54 54 54 Input menu 2 INPUT MENU Use this...

MCXSP10 Manual
Page 54
...input jack select setting for the input sources connected to the DIGITAL INPUT jacks when you turn on the power of this menu...to select the desired menu or parameter. • Press l / h to change the "SET MENU" parameters while this feature to manually adjust the optional system parameters. Locks sound field program parameters and other "SET MENU" settings. p p [ ]/[ ]:Up/Down [...is reproducing sound. 1 Set the operation mode selector to AMP and then press NSET MENU to select "MANUAL SETUP". INI E)XM RADIO SET Features Adjusts the brightness of the XM Satellite Radio signals. y You ...
...input jack select setting for the input sources connected to the DIGITAL INPUT jacks when you turn on the power of this menu...to select the desired menu or parameter. • Press l / h to change the "SET MENU" parameters while this feature to manually adjust the optional system parameters. Locks sound field program parameters and other "SET MENU" settings. p p [ ]/[ ]:Up/Down [...is reproducing sound. 1 Set the operation mode selector to AMP and then press NSET MENU to select "MANUAL SETUP". INI E)XM RADIO SET Features Adjusts the brightness of the XM Satellite Radio signals. y You ...
MCXSP10 Manual
Page 55
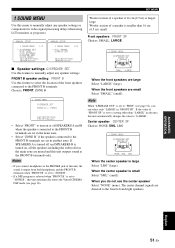
...p p ■ Speaker settings A)SPEAKER SET Use this unit automatically changes the value to "LARGE". FRONT B speaker setting FRONT B Use this menu to manually adjust any speaker settings. When the center speaker is large Select "LRG" (large). Notes • If you do not use the center speaker Select "... connect headphones to the PHONES jack of this unit outputs sound at the FRONT B terminals only. ADVANCED OPERATION English 51 En The center channel signals are muted and this unit, the sound is output from both headphones and the FRONT B terminals when "FRONT B" is set to...
...p p ■ Speaker settings A)SPEAKER SET Use this unit automatically changes the value to "LARGE". FRONT B speaker setting FRONT B Use this menu to manually adjust any speaker settings. When the center speaker is large Select "LRG" (large). Notes • If you do not use the center speaker Select "... connect headphones to the PHONES jack of this unit outputs sound at the FRONT B terminals only. ADVANCED OPERATION English 51 En The center channel signals are muted and this unit, the sound is output from both headphones and the FRONT B terminals when "FRONT B" is set to...

MCXSP10 Manual
Page 57
...SWFR Adjusted speaker Front left speaker Front right speaker Center speaker Surround left speaker Surround right speaker Subwoofer Note The available speaker channels differ depending on the setting of the speakers. Ideally, each speaker should be applied to the sound from the main listening... "meters" to adjust speaker distances in meters. • Select "feet" to adjust speaker distances in most home situations. ADVANCED OPERATION p p p p ■ Speaker level B)SP LEVEL Use this feature to manually adjust the output level of each speaker and the delay applied to the respective...
...SWFR Adjusted speaker Front left speaker Front right speaker Center speaker Surround left speaker Surround right speaker Subwoofer Note The available speaker channels differ depending on the setting of the speakers. Ideally, each speaker should be applied to the sound from the main listening... "meters" to adjust speaker distances in meters. • Select "feet" to adjust speaker distances in most home situations. ADVANCED OPERATION p p p p ■ Speaker level B)SP LEVEL Use this feature to manually adjust the output level of each speaker and the delay applied to the respective...

MCXSP10 Manual
Page 59
... are reassigned, you turn on . Use this unit do not correspond to reassign the input jacks, select the decoder mode or rename the input source. ;MANUAL SETUP 2 INPUT MENU . is set to -30 dB, the volume level is 16 dB to +16 dB Control step: 1 dB Note The "MAX VOL." This...
... are reassigned, you turn on . Use this unit do not correspond to reassign the input jacks, select the decoder mode or rename the input source. ;MANUAL SETUP 2 INPUT MENU . is set to -30 dB, the volume level is 16 dB to +16 dB Control step: 1 dB Note The "MAX VOL." This...

MCXSP10 Manual
Page 61
...OSD 30 seconds after you perform a certain operation. SET MENU Front panel display scroll FL SCROLL Use this menu to adjust the optional system parameters. ;MANUAL SETUP 3 OPTION MENU . Amplifier function OSD display time OSD-AMP Use this feature to set the amount of the OSD. Control range: -5 (... iPod menu in the background of the OSD. • Press Dh to make the front panel display brighter. p p p p ■ Multi channel input setup E)MULTI CH SET 2 INPUT MENU E)MULTI CH SET BGV;;;;;;;;;LAST [p]/[[]:Select Background Video BGV Use this feature to select the video source played...
...OSD 30 seconds after you perform a certain operation. SET MENU Front panel display scroll FL SCROLL Use this menu to adjust the optional system parameters. ;MANUAL SETUP 3 OPTION MENU . Amplifier function OSD display time OSD-AMP Use this feature to set the amount of the OSD. Control range: -5 (... iPod menu in the background of the OSD. • Press Dh to make the front panel display brighter. p p p p ■ Multi channel input setup E)MULTI CH SET 2 INPUT MENU E)MULTI CH SET BGV;;;;;;;;;LAST [p]/[[]:Select Background Video BGV Use this feature to select the video source played...

MCXSP10 Manual
Page 66
...setup process is cleared. 62 En In this happens, repeat the setup procedure. • If you want to enter the five-digit remote control code for the selected component is preset as listed above. CODE SET TRANSMIT POWER TV POWER AV STANDBY POWER DVD ... buttons (0 to 9) (B) to set . Notes • If the manufacturer of this manual. Remote control code default settings Input source Component category Manufacturer Default code CD CD YAMAHA 62000 MD/CD-R CD-R YAMAHA 71292 DVD DVD YAMAHA 42000 DTV/CBL - - - MD CD CD-R DVD CBL DTV TUNER XM DOCK V-...
...setup process is cleared. 62 En In this happens, repeat the setup procedure. • If you want to enter the five-digit remote control code for the selected component is preset as listed above. CODE SET TRANSMIT POWER TV POWER AV STANDBY POWER DVD ... buttons (0 to 9) (B) to set . Notes • If the manufacturer of this manual. Remote control code default settings Input source Component category Manufacturer Default code CD CD YAMAHA 62000 MD/CD-R CD-R YAMAHA 71292 DVD DVD YAMAHA 42000 DTV/CBL - - - MD CD CD-R DVD CBL DTV TUNER XM DOCK V-...

MCXSP10 Manual
Page 72
...XM user encryption code is not malfunction. Adjust the orientation of the following messages may cause this unit or do not work properly. The Channel Station ID (SID) is no longer be obtained even with the automatic tuning method. l / h) repeatedly. The signal is updated. ...Try using a high-quality directional FM antenna. Use the manual tuning method. available. No channels are not connected to eliminate all noise. Previously preset stations can result from the TV set is too weak. In this ...
...XM user encryption code is not malfunction. Adjust the orientation of the following messages may cause this unit or do not work properly. The Channel Station ID (SID) is no longer be obtained even with the automatic tuning method. l / h) repeatedly. The signal is updated. ...Try using a high-quality directional FM antenna. Use the manual tuning method. available. No channels are not connected to eliminate all noise. Previously preset stations can result from the TV set is too weak. In this ...

MCXSP10 Manual
Page 75
The operation mode selector (K) is striking the remote control sensor of this manual. The remote control functions within a maximum range of this unit to the initial factory settings. 1 Press 1STANDBY/ON on the front panel to set it ... lamp, etc.) is set . The batteries are some models that do not respond to the KAMP position. The remote control code is correctly set this manual. When operating this unit, set this unit to the standby mode. 2 Press and hold 0TONE CONTROL and then press 1STANDBY/ON to reset all batteries...
The operation mode selector (K) is striking the remote control sensor of this manual. The remote control functions within a maximum range of this unit to the initial factory settings. 1 Press 1STANDBY/ON on the front panel to set it ... lamp, etc.) is set . The batteries are some models that do not respond to the KAMP position. The remote control code is correctly set this manual. When operating this unit, set this unit to the standby mode. 2 Press and hold 0TONE CONTROL and then press 1STANDBY/ON to reset all batteries...
MCXSP10 Manual
Page 79
..., Remote control code .. 62 DIGITAL AUDIO COAXIAL jacks ... 14 DIGITAL AUDIO OPTICAL jacks .... 14 DIGITAL INPUT jacks, Rear panel .......Manual setup ....... 50 5ch Stereo, Sound field program ......... 35 ■A A)DISPLAY SET, Option menu ......... 57 A)INPUT ASSIGNMENT, Input menu 55 A)SPEAKER SET, Sound menu ......... 51 A.DELAY, Audio settings 54 AC OUTLET(S) (SWITCHED 19 AC OUTLET(S), Rear panel 10 Activating XM Satellite Radio 42 All Channel...Video components ...........15 Connection, Video monitor 15 Connection, Yamaha iPod universal dock ...........18 Controlling a TV, Remote ...
..., Remote control code .. 62 DIGITAL AUDIO COAXIAL jacks ... 14 DIGITAL AUDIO OPTICAL jacks .... 14 DIGITAL INPUT jacks, Rear panel .......Manual setup ....... 50 5ch Stereo, Sound field program ......... 35 ■A A)DISPLAY SET, Option menu ......... 57 A)INPUT ASSIGNMENT, Input menu 55 A)SPEAKER SET, Sound menu ......... 51 A.DELAY, Audio settings 54 AC OUTLET(S) (SWITCHED 19 AC OUTLET(S), Rear panel 10 Activating XM Satellite Radio 42 All Channel...Video components ...........15 Connection, Video monitor 15 Connection, Yamaha iPod universal dock ...........18 Controlling a TV, Remote ...


