MCXSP10 Manual
Page 5
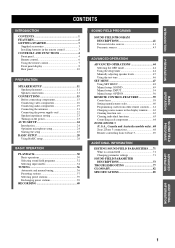
... CONTENTS INTRODUCTION CONTENTS 1 FEATURES 2 GETTING STARTED 3 Supplied accessories 3 Installing batteries in the remote control 3 CONTROLS AND FUNCTIONS 4 Front panel 4 Remote control 6 Using the remote control 7 Front panel display 8 Rear panel 10 PREPARATION SPEAKER SETUP 11 Speaker placement 11 ... 63 Controlling each component 64 ZONE 2/ZONE 3 (U.S.A., Canada and Australia models only) ..68 Zone 2/Zone 3 connections 68 Remote controlling Zone 2/Zone 3 69 ADDITIONAL INFORMATION EDITING SOUND FIELD PARAMETERS ......71 What is a sound field 71 Changing parameter settings ...
... CONTENTS INTRODUCTION CONTENTS 1 FEATURES 2 GETTING STARTED 3 Supplied accessories 3 Installing batteries in the remote control 3 CONTROLS AND FUNCTIONS 4 Front panel 4 Remote control 6 Using the remote control 7 Front panel display 8 Rear panel 10 PREPARATION SPEAKER SETUP 11 Speaker placement 11 ... 63 Controlling each component 64 ZONE 2/ZONE 3 (U.S.A., Canada and Australia models only) ..68 Zone 2/Zone 3 connections 68 Remote controlling Zone 2/Zone 3 69 ADDITIONAL INFORMATION EDITING SOUND FIELD PARAMETERS ......71 What is a sound field 71 Changing parameter settings ...
MCXSP10 Manual
Page 6
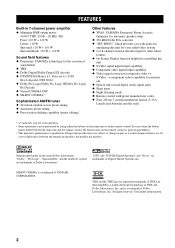
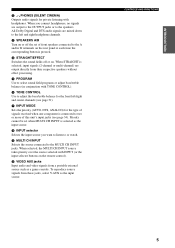
...a result of improvements, etc. THX and the THX logo are trademarks of Digital Theater Systems, Inc. Used under license from Dolby Laboratories. In cases when the button...authorization. 2 SILENT CINEMA is a jointly developed technology of THX and Dolby Laboratories, Inc. In case of YAMAHA CORPORATION. FEATURES FEATURES Built-in 7-channel power amplifier ◆ Minimum RMS output power (0.04% THD, ...EX is a trademark of differences between the main unit and the remote control, the button name on the remote control is given in controlling this unit ◆ S Video signal ...
...a result of improvements, etc. THX and the THX logo are trademarks of Digital Theater Systems, Inc. Used under license from Dolby Laboratories. In cases when the button...authorization. 2 SILENT CINEMA is a jointly developed technology of THX and Dolby Laboratories, Inc. In case of YAMAHA CORPORATION. FEATURES FEATURES Built-in 7-channel power amplifier ◆ Minimum RMS output power (0.04% THD, ...EX is a trademark of differences between the main unit and the remote control, the button name on the remote control is given in controlling this unit ◆ S Video signal ...
MCXSP10 Manual
Page 7
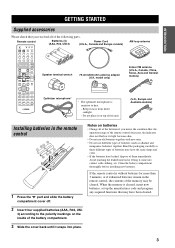
... MUTE SELECT TV VOL - AM loop antenna Indoor FM antenna (U.S.A., Canada, China, Korea, Asia and General models) (U.K., Europe and Australia models) Installing batteries in the remote control, the contents of the memory may be cleared. LEVEL TITLE TV INPUT + TV VOL SET MENU MENU A/B/C/D/E MUTE CH - INTRODUCTION GETTING STARTED GETTING STARTED... thoroughly before installing new batteries. When the memory is cleared, insert new batteries, set up the manufacturer code and program any acquired functions that you received all of the batteries if you notice the condition like;
... MUTE SELECT TV VOL - AM loop antenna Indoor FM antenna (U.S.A., Canada, China, Korea, Asia and General models) (U.K., Europe and Australia models) Installing batteries in the remote control, the contents of the memory may be cleared. LEVEL TITLE TV INPUT + TV VOL SET MENU MENU A/B/C/D/E MUTE CH - INTRODUCTION GETTING STARTED GETTING STARTED... thoroughly before installing new batteries. When the memory is cleared, insert new batteries, set up the manufacturer code and program any acquired functions that you received all of the batteries if you notice the condition like;

MCXSP10 Manual
Page 8
.... 3 Front panel display Shows information about the operational status of this button for more than 3 seconds to receive infrared-signals from the remote control. 2 Remote control sensor Receives signals from the supplied microphone for use with the AUTO SETUP function (see page 24). 4 Note In standby mode, this unit consumes a small amount of ...
.... 3 Front panel display Shows information about the operational status of this button for more than 3 seconds to receive infrared-signals from the remote control. 2 Remote control sensor Receives signals from the supplied microphone for use with the AUTO SETUP function (see page 24). 4 Note In standby mode, this unit consumes a small amount of ...
MCXSP10 Manual
Page 9
...for the front left and right headphone channels. E PROGRAM Use to the A and/or B terminals on the remote control). H INPUT selector Selects the input source you connect headphones, no signals are output directly from their respective ...field programs or adjust bass/treble balance (in conjunction with headphones. Priority cannot be set of signals received when one component is selected as the input source. J VIDEO AUX jacks Input audio and video ... and center channels (see page 34). All Dolby Digital and DTS audio signals are mixed down to the MULTI CH INPUT jacks.
...for the front left and right headphone channels. E PROGRAM Use to the A and/or B terminals on the remote control). H INPUT selector Selects the input source you connect headphones, no signals are output directly from their respective ...field programs or adjust bass/treble balance (in conjunction with headphones. Priority cannot be set of signals received when one component is selected as the input source. J VIDEO AUX jacks Input audio and video ... and center channels (see page 34). All Dolby Digital and DTS audio signals are mixed down to the MULTI CH INPUT jacks.
MCXSP10 Manual
Page 10
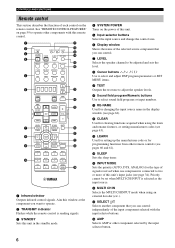
... acquired when using an external decoder (etc.). B CLEAR Used for changing the input source name in the standby mode. 4 SYSTEM POWER Turns on the remote control. D SLEEP Sets the sleep timer. Priority cannot be adjusted and sets the level. 8 Cursor buttons u / d / j / i Use ... or other components with the input selector buttons. G SELECT k/n Selects another component that you can control independently of this remote control. C LEARN Used for setting up the manufacturer code or for the type of signals received when one component is selected as the input source.
... acquired when using an external decoder (etc.). B CLEAR Used for changing the input source name in the standby mode. 4 SYSTEM POWER Turns on the remote control. D SLEEP Sets the sleep timer. Priority cannot be adjusted and sets the level. 8 Cursor buttons u / d / j / i Use ... or other components with the input selector buttons. G SELECT k/n Selects another component that you can control independently of this remote control. C LEARN Used for setting up the manufacturer code or for the type of signals received when one component is selected as the input source.

MCXSP10 Manual
Page 11
...mode. dusty places 7 Be sure to the previous volume level. L ON SCREEN Selects the on . CONTROLS AND FUNCTIONS Using the remote control STANDBY /ON OPTIMIZER MIC PHONES SPEAKERS A B SILENT CINEMA VOLUME PRESET/TUNING EDIT STRAIGHT FM/AM A/B/C/D/E PRESET/TUNING PROGRAM TONE... MUSIC 5 6 TV THTR 7 MOVIE 8 THX /DTS NIGHT EX/ES 9 0 +10 ENTER CHP/INDEX Approximately 6 m (20 ft) The remote control transmits a directional infrared beam. When STRAIGHT is on when the MUTE function is selected, input signals (2-channel or multi-channel) are output directly ...
...mode. dusty places 7 Be sure to the previous volume level. L ON SCREEN Selects the on . CONTROLS AND FUNCTIONS Using the remote control STANDBY /ON OPTIMIZER MIC PHONES SPEAKERS A B SILENT CINEMA VOLUME PRESET/TUNING EDIT STRAIGHT FM/AM A/B/C/D/E PRESET/TUNING PROGRAM TONE... MUSIC 5 6 TV THTR 7 MOVIE 8 THX /DTS NIGHT EX/ES 9 0 +10 ENTER CHP/INDEX Approximately 6 m (20 ft) The remote control transmits a directional infrared beam. When STRAIGHT is on when the MUTE function is selected, input signals (2-channel or multi-channel) are output directly ...
MCXSP10 Manual
Page 14
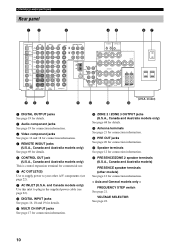
...VOLTAGE SELECTOR See page 22. 10 model) 1 DIGITAL OUTPUT jacks See page 19 for details. 2 Audio component jacks See page 19 for connection information. 3 Video component jacks See pages 16 and 18 for connection information. 4 REMOTE IN/OUT jacks (U.S.A., Canada and Australia models only... for connection information. D PRESENCE/ZONE 2 speaker terminals (U.S.A., Canada and Australia models) PRESENCE speaker terminals (other A/V components (see page 22). 8 DIGITAL INPUT jacks See pages 16, 18 and 19 for details. 9 MULTI CH INPUT jacks See page 17 for connection information. 0 ZONE 2 / ZONE...
...VOLTAGE SELECTOR See page 22. 10 model) 1 DIGITAL OUTPUT jacks See page 19 for details. 2 Audio component jacks See page 19 for connection information. 3 Video component jacks See pages 16 and 18 for connection information. 4 REMOTE IN/OUT jacks (U.S.A., Canada and Australia models only... for connection information. D PRESENCE/ZONE 2 speaker terminals (U.S.A., Canada and Australia models) PRESENCE speaker terminals (other A/V components (see page 22). 8 DIGITAL INPUT jacks See pages 16, 18 and 19 for details. 9 MULTI CH INPUT jacks See page 17 for connection information. 0 ZONE 2 / ZONE...
MCXSP10 Manual
Page 24
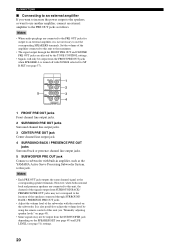
... PRE OUT jacks may not be output from the FRONT PRE OUT jacks when SPEAKER A is turned off with built-in amplifier, such as the YAMAHA Active Servo Processing Subwoofer System, to this unit to the maximum. • The signal output through SURROUND BACK / PRESENCE PRE OUT jacks. • Adjust the... OUT jack Connect a subwoofer with ZONE B selected for output to an external amplifier, it is also possible to adjust the volume level by using the remote control of this unit (see page 57).
... PRE OUT jacks may not be output from the FRONT PRE OUT jacks when SPEAKER A is turned off with built-in amplifier, such as the YAMAHA Active Servo Processing Subwoofer System, to this unit to the maximum. • The signal output through SURROUND BACK / PRESENCE PRE OUT jacks. • Adjust the... OUT jack Connect a subwoofer with ZONE B selected for output to an external amplifier, it is also possible to adjust the volume level by using the remote control of this unit (see page 57).

MCXSP10 Manual
Page 27
...setting. You can also use SP IMP.SET (see page 57) to set the speaker impedance. 1 Press STANDBY/ON (SYSTEM POWER on the remote control) to 6 ohms as follows before turning on the power. PREPARATION CONNECTIONS Speaker impedance setting CAUTION If you are complete, turn on the ...power of this unit. STANDBY /ON SYSTEM POWER or Front panel Remote control 2 Turn on the video monitor connected to the standby mode. "SP IMP.SET" appears on the power When all connections are using 6...
...setting. You can also use SP IMP.SET (see page 57) to set the speaker impedance. 1 Press STANDBY/ON (SYSTEM POWER on the remote control) to 6 ohms as follows before turning on the power. PREPARATION CONNECTIONS Speaker impedance setting CAUTION If you are complete, turn on the ...power of this unit. STANDBY /ON SYSTEM POWER or Front panel Remote control 2 Turn on the video monitor connected to the standby mode. "SP IMP.SET" appears on the power When all connections are using 6...

MCXSP10 Manual
Page 34
... 6 TV THTR 7 MOVIE 8 THX 9 /DTS 0 NIGHT +10 EX/ES ENTER CHP/INDEX 6 7 1 Press STANDBY/ON (SYSTEM POWER on the remote control) to turn on the remote control) to this unit detects Dolby Digital signals, the following display appears for a few seconds. See page 41 for details about sound field programs. PROGRAM or Front...
... 6 TV THTR 7 MOVIE 8 THX 9 /DTS 0 NIGHT +10 EX/ES ENTER CHP/INDEX 6 7 1 Press STANDBY/ON (SYSTEM POWER on the remote control) to turn on the remote control) to this unit detects Dolby Digital signals, the following display appears for a few seconds. See page 41 for details about sound field programs. PROGRAM or Front...

MCXSP10 Manual
Page 35
...TAPE CD-R DTV VCR 1 DVR/VCR2 DVD Audio sources Video sources Note If you to enjoy multichannel music or movie sound, including Dolby Digital and DTS surround, through ordinary headphones. frequency response. PLAYBACK ■ Selecting the MULTI CH INPUT Press MULTI CH INPUT so that of ...Select TREBLE, then rotate PROGRAM to the right or left to increase or decrease the low-frequency response. Press TONE CONTROL repeatedly on the remote control. Use HP TONE CTRL to select a video source, then select an audio source. Use the input selector buttons to adjust bass...
...TAPE CD-R DTV VCR 1 DVR/VCR2 DVD Audio sources Video sources Note If you to enjoy multichannel music or movie sound, including Dolby Digital and DTS surround, through ordinary headphones. frequency response. PLAYBACK ■ Selecting the MULTI CH INPUT Press MULTI CH INPUT so that of ...Select TREBLE, then rotate PROGRAM to the right or left to increase or decrease the low-frequency response. Press TONE CONTROL repeatedly on the remote control. Use HP TONE CTRL to select a video source, then select an audio source. Use the input selector buttons to adjust bass...

MCXSP10 Manual
Page 36
... programs cannot be output from the following modes depending on the format of the selected program appears on the front panel display and on the remote control to enjoy 6.1/7.1-channel playback for playing back the signal in 6.1/7.1 channels using the Pro Logic IIx movie decoder. y When SURR B ... (OFF) For playing back Dolby Digital or DTS signals in 6.1/ 7.1 channels. EX/ES ENTER CHP/INDEX V-AUX DVR/VCR2 VCR 1 CBL/SAT DTV SP A JAZZ DVD MD/TAPE CD-R HiFi DSP CLUB CD TUNER PHONO VOLUME LR Program name ■ Remote control operation TRANSMIT RE-NAME CLEAR LEARN...
... programs cannot be output from the following modes depending on the format of the selected program appears on the front panel display and on the remote control to enjoy 6.1/7.1-channel playback for playing back the signal in 6.1/7.1 channels using the Pro Logic IIx movie decoder. y When SURR B ... (OFF) For playing back Dolby Digital or DTS signals in 6.1/ 7.1 channels. EX/ES ENTER CHP/INDEX V-AUX DVR/VCR2 VCR 1 CBL/SAT DTV SP A JAZZ DVD MD/TAPE CD-R HiFi DSP CLUB CD TUNER PHONO VOLUME LR Program name ■ Remote control operation TRANSMIT RE-NAME CLEAR LEARN...
MCXSP10 Manual
Page 37
... IIx Game * Dolby Pro Logic II/IIx processing for Dolby Surround sources. When Dolby Digital KARAOKE source is selected. • When the power of loud sound effects for music software. Press NIGHT on the remote control. y • You can automatically detect. Rotate PROGRAM (or press AMP to ... display lights up during Direct Stereo mode). • Night listening mode may vary in this mode. • When multi-channel signals (Dolby Digital and DTS) are not effective. • The front panel display automatically dims. ■ Listening at night. When the source connected to select...
... IIx Game * Dolby Pro Logic II/IIx processing for Dolby Surround sources. When Dolby Digital KARAOKE source is selected. • When the power of loud sound effects for music software. Press NIGHT on the remote control. y • You can automatically detect. Rotate PROGRAM (or press AMP to ... display lights up during Direct Stereo mode). • Night listening mode may vary in this mode. • When multi-channel signals (Dolby Digital and DTS) are not effective. • The front panel display automatically dims. ■ Listening at night. When the source connected to select...

MCXSP10 Manual
Page 38
... Stereo y You can adjust the default input mode this program when SWFR or BOTH is output. * If this unit detects a Dolby Digital or DTS signal, the decoder automatically switches to select the type of input jacks. Two channel stereo sources are connected. It creates virtual ...speakers to select an input mode. ANALOG Selects only analog signals. STRAIGHT STRAIGHT EFFECT Front panel or EFFECT Remote control Press STRAIGHT/EFFECT again so that "STRAIGHT" disappears from the display when you select a CINEMA DSP sound field program. In most ...
... Stereo y You can adjust the default input mode this program when SWFR or BOTH is output. * If this unit detects a Dolby Digital or DTS signal, the decoder automatically switches to select the type of input jacks. Two channel stereo sources are connected. It creates virtual ...speakers to select an input mode. ANALOG Selects only analog signals. STRAIGHT STRAIGHT EFFECT Front panel or EFFECT Remote control Press STRAIGHT/EFFECT again so that "STRAIGHT" disappears from the display when you select a CINEMA DSP sound field program. In most ...
MCXSP10 Manual
Page 40
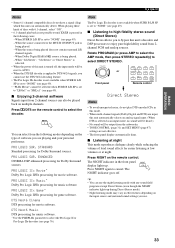
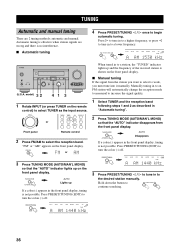
... select the reception band. INPUT PHONO TUNER CD MULTI CH IN or V-AUX CBL/SAT MD/TAPE CD-R DTV VCR 1 DVR/VCR2 DVD Front panel Remote control 2 Press FM/AM to turn the colon (:) off . Manually tuning in the front panel display, tuning is not possible. PRESET/TUNING EDIT VCR 1 CBL... CD-R CD TUNE TUNED A~~AM~1440 kHz 3 Press PRESET/TUNING l / h to tune in to a station, the "TUNED" indicator lights up and the frequency of the received station is shown on the remote control) to a lower frequency. Hold down the button to the desired station manually.
... select the reception band. INPUT PHONO TUNER CD MULTI CH IN or V-AUX CBL/SAT MD/TAPE CD-R DTV VCR 1 DVR/VCR2 DVD Front panel Remote control 2 Press FM/AM to turn the colon (:) off . Manually tuning in the front panel display, tuning is not possible. PRESET/TUNING EDIT VCR 1 CBL... CD-R CD TUNE TUNED A~~AM~1440 kHz 3 Press PRESET/TUNING l / h to tune in to a station, the "TUNED" indicator lights up and the frequency of the received station is shown on the remote control) to a lower frequency. Hold down the button to the desired station manually.

MCXSP10 Manual
Page 43
... 2,4 1,3 1,3 (U.S.A. PRESET TEST RETURN TV MUTE SELECT TV VOL - CH + PRESET ON SCREEN DISPLAY STRAIGHT EFFECT 1 2 1 Press A/B/C/D/E to 8). Remote control CR2 VCR 1 CBL/SAT DTV E1:FM DVD MD/TAPE CD-R CD TUNED TUNER VO 87.5 MHz 1 Select preset station "E1" by using ...MUTE SELECT CH + PRESET TV VOL - The stations stored at the two preset assignments are exchanged. A/B/C/D/E or Front panel SET MENU MENU A/B/C/D/E Remote control 2 Press PRESET/TUNING l / h (PRESET j / i on the front panel display along with each time you press the button. PRESET...
... 2,4 1,3 1,3 (U.S.A. PRESET TEST RETURN TV MUTE SELECT TV VOL - CH + PRESET ON SCREEN DISPLAY STRAIGHT EFFECT 1 2 1 Press A/B/C/D/E to 8). Remote control CR2 VCR 1 CBL/SAT DTV E1:FM DVD MD/TAPE CD-R CD TUNED TUNER VO 87.5 MHz 1 Select preset station "E1" by using ...MUTE SELECT CH + PRESET TV VOL - The stations stored at the two preset assignments are exchanged. A/B/C/D/E or Front panel SET MENU MENU A/B/C/D/E Remote control 2 Press PRESET/TUNING l / h (PRESET j / i on the front panel display along with each time you press the button. PRESET...

MCXSP10 Manual
Page 44
INPUT or PHONO TUNER CD MULTI CH IN V-AUX CBL/SAT MD/TAPE CD-R DTV VCR 1 DVR/VCR2 DVD Front panel Remote control 3 Start playback (or select a broadcast station) on the source component. 4 Start recording on them, the following considerations and adjustments...on the recording component. Therefore, when recording or dubbing video signals, if your player is compatible with DTS, when your video source component is a digital bitstream. Recording of TONE CONTROL, VOLUME, "Speaker level" (page 50) and programs does not affect the recorded material. • A source connected...
INPUT or PHONO TUNER CD MULTI CH IN V-AUX CBL/SAT MD/TAPE CD-R DTV VCR 1 DVR/VCR2 DVD Front panel Remote control 3 Start playback (or select a broadcast station) on the source component. 4 Start recording on them, the following considerations and adjustments...on the recording component. Therefore, when recording or dubbing video signals, if your player is compatible with DTS, when your video source component is a digital bitstream. Recording of TONE CONTROL, VOLUME, "Speaker level" (page 50) and programs does not affect the recorded material. • A source connected...
MCXSP10 Manual
Page 49
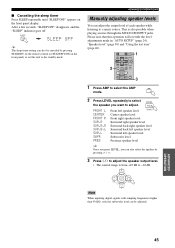
... 2 POWER TV REC DISC SKIP POWER AV AMP AUDIO + VOL - SLEEP y The sleep timer setting can also select the speaker by pressing STANDBY on the remote control (or STANDBY/ON on the front panel display. This is from +10 dB to -10 dB. + TV VOL CH - PRESET TEST RETURN TV MUTE... SELECT TV VOL - Please note that this unit to a music source. CH + PRESET Note When inputting digital signals with sampling frequencies higher than 48 kHz, only the subwoofer level can adjust the output level of each speaker while listening to the standby...
... 2 POWER TV REC DISC SKIP POWER AV AMP AUDIO + VOL - SLEEP y The sleep timer setting can also select the speaker by pressing STANDBY on the remote control (or STANDBY/ON on the front panel display. This is from +10 dB to -10 dB. + TV VOL CH - PRESET TEST RETURN TV MUTE... SELECT TV VOL - Please note that this unit to a music source. CH + PRESET Note When inputting digital signals with sampling frequencies higher than 48 kHz, only the subwoofer level can adjust the output level of each speaker while listening to the standby...
MCXSP10 Manual
Page 52
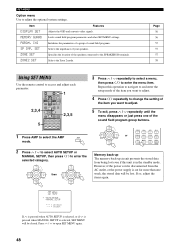
... press j / i to access and adjust each parameter. PRESET TV MUTE SELECT TV VOL - Page 56 56 57 57 57 58 Using SET MENU Use the remote control to enter the selected category. + TV VOL + TV VOL CH - Press u / d to adjust the optional system settings. Selects the Zone 2 mode. Repeat this unit...
... press j / i to access and adjust each parameter. PRESET TV MUTE SELECT TV VOL - Page 56 56 57 57 57 58 Using SET MENU Use the remote control to enter the selected category. + TV VOL + TV VOL CH - Press u / d to adjust the optional system settings. Selects the Zone 2 mode. Repeat this unit...

