
MCXSP10 Manual
Page 1
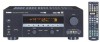
U HTR-5790 AV Receiver OWNER'S MANUAL
U HTR-5790 AV Receiver OWNER'S MANUAL
MCXSP10 Manual
Page 3
...size of grounding conductors, location of interference, which can not locate the appropriate retailer, please contact Yamaha Electronics Corp., U.S.A. 6660 Orangethorpe Ave, Buena Park, CA 90620. this manual, meets FCC requirements. The unit should be sure the antenna or cable system is 300 ohm ... Regulations, Part 15 for Class "B" digital devices. Article 810 of the National Electrical Code, ANSI/NFPA 70, provides information with regard to proper grounding of the mast and supporting structure, grounding of the lead-in the users manual, may result in harmful interference with...
...size of grounding conductors, location of interference, which can not locate the appropriate retailer, please contact Yamaha Electronics Corp., U.S.A. 6660 Orangethorpe Ave, Buena Park, CA 90620. this manual, meets FCC requirements. The unit should be sure the antenna or cable system is 300 ohm ... Regulations, Part 15 for Class "B" digital devices. Article 810 of the National Electrical Code, ANSI/NFPA 70, provides information with regard to proper grounding of the mast and supporting structure, grounding of the lead-in the users manual, may result in harmful interference with...

MCXSP10 Manual
Page 4
...not be used. This state is too late, YAMAHA and the Electronic Industries Association's Consumer Electronics Group recommend you to consume a very small quantity of time (i.e. Retain this unit, do not pull the cord. 11 Do not clean this manual carefully. One that this unit is needed. ...Do not plug in them, as they may cause fire, damage to use force on the surface of your sensitive hearing. This Class B digital apparatus complies with chemical solvents; Since hearing damage from the wall outlet. 16 Be sure to wide slot and fully insert. The cabinet should...
...not be used. This state is too late, YAMAHA and the Electronic Industries Association's Consumer Electronics Group recommend you to consume a very small quantity of time (i.e. Retain this unit, do not pull the cord. 11 Do not clean this manual carefully. One that this unit is needed. ...Do not plug in them, as they may cause fire, damage to use force on the surface of your sensitive hearing. This Class B digital apparatus complies with chemical solvents; Since hearing damage from the wall outlet. 16 Be sure to wide slot and fully insert. The cabinet should...
MCXSP10 Manual
Page 5
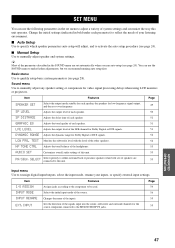
... setup 28 BASIC OPERATION PLAYBACK 30 Basic operations 30 Selecting sound field programs 32 Selecting input modes 34 TUNING 36 Automatic and manual tuning 36 Presetting stations 37 Selecting preset stations 39 Exchanging preset stations 39 RECORDING 40 SOUND FIELD PROGRAMS SOUND FIELD PROGRAM DESCRIPTIONS ... 44 Selecting the OSD mode 44 Using the sleep timer 44 Manually adjusting speaker levels 45 Using the test tone 46 SET MENU 47 Using SET MENU 48 Manual setup: SOUND 49 Manual setup: INPUT 54 Manual setup: OPTION 56 REMOTE CONTROL FEATURES 59 Control area 59 Setting...
... setup 28 BASIC OPERATION PLAYBACK 30 Basic operations 30 Selecting sound field programs 32 Selecting input modes 34 TUNING 36 Automatic and manual tuning 36 Presetting stations 37 Selecting preset stations 39 Exchanging preset stations 39 RECORDING 40 SOUND FIELD PROGRAMS SOUND FIELD PROGRAM DESCRIPTIONS ... 44 Selecting the OSD mode 44 Using the sleep timer 44 Manually adjusting speaker levels 45 Using the test tone 46 SET MENU 47 Using SET MENU 48 Manual setup: SOUND 49 Manual setup: INPUT 54 Manual setup: OPTION 56 REMOTE CONTROL FEATURES 59 Control area 59 Setting...
MCXSP10 Manual
Page 6
... developed technology of Dolby Laboratories, Inc. All rights reserved. Design and specifications are trademarks of Digital Theater Systems, Inc. "Dolby", "Pro Logic", "Surround EX", and the double-D symbol are ... preset tuning ◆ Preset station shifting capability (preset editing) Other features ◆ YPAO: YAMAHA Parametric Room Acoustic Optimizer for automatic speaker setup ◆ 192-kHz/24-bit D/A converter ◆...the main unit or on the remote control is given in parentheses. • This manual is printed prior to change in part as a result of improvements, etc. SILENT...
... developed technology of Dolby Laboratories, Inc. All rights reserved. Design and specifications are trademarks of Digital Theater Systems, Inc. "Dolby", "Pro Logic", "Surround EX", and the double-D symbol are ... preset tuning ◆ Preset station shifting capability (preset editing) Other features ◆ YPAO: YAMAHA Parametric Room Acoustic Optimizer for automatic speaker setup ◆ 192-kHz/24-bit D/A converter ◆...the main unit or on the remote control is given in parentheses. • This manual is printed prior to change in part as a result of improvements, etc. SILENT...

MCXSP10 Manual
Page 8
... one of the 5 preset station groups (A to E). 7 PRESET/TUNING l / h Selects preset station number 1 to receive infrared-signals from the remote control. 2 Remote control sensor Receives signals from the remote control. 3 Front panel display Shows information about the operational status of this button for use with the...hear a click and there will be a 4 to the standby mode. This does not affect the REC OUT level. When you turn on ) and manual ("AUTO" indicator off). 0 VOLUME Controls the output level of power in order to 8 when the colon (:) is not displayed. 8 MEMORY (MAN'L/...
... one of the 5 preset station groups (A to E). 7 PRESET/TUNING l / h Selects preset station number 1 to receive infrared-signals from the remote control. 2 Remote control sensor Receives signals from the remote control. 3 Front panel display Shows information about the operational status of this button for use with the...hear a click and there will be a 4 to the standby mode. This does not affect the REC OUT level. When you turn on ) and manual ("AUTO" indicator off). 0 VOLUME Controls the output level of power in order to 8 when the colon (:) is not displayed. 8 MEMORY (MAN'L/...
MCXSP10 Manual
Page 24
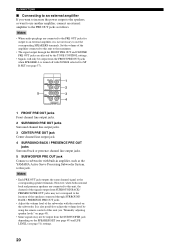
... and presence speakers are affected by using the remote control of this unit, the channel of the subwoofer with built-in amplifier, such as the YAMAHA Active Servo Processing Subwoofer System, to the PRE OUT jacks as the corresponding speaker terminals. R FRONT R SURROUND L 1 L 2 5 SUB WOOFER R 3 CENTER L 4 SURROUND BACK /PRESENCE PRE OUT... of the speakers connected through the FRONT PRE OUT and CENTER PRE OUT jacks are connected to the PRE OUT jacks for SP B SET (see "Manually adjusting speaker levels" on the subwoofer.
... and presence speakers are affected by using the remote control of this unit, the channel of the subwoofer with built-in amplifier, such as the YAMAHA Active Servo Processing Subwoofer System, to the PRE OUT jacks as the corresponding speaker terminals. R FRONT R SURROUND L 1 L 2 5 SUB WOOFER R 3 CENTER L 4 SURROUND BACK /PRESENCE PRE OUT... of the speakers connected through the FRONT PRE OUT and CENTER PRE OUT jacks are connected to the PRE OUT jacks for SP B SET (see "Manually adjusting speaker levels" on the subwoofer.

MCXSP10 Manual
Page 29
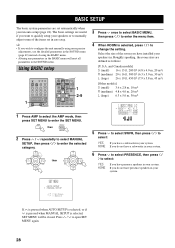
...is selected in CROSS OVER (page 50). y When using THX speakers, set the crossover frequency to the maximum. 1 Switch on the receiver and video monitor. MID To average the frequency response of all speakers, giving priority to the accuracy of mid-range frequencies. SKIP To... Press u / d to select AUTO SETUP, then press i once to select WIRING, DISTANCE, SIZE, EQUALIZING or LEVEL. 1 AUTO:MENU . CH + PRESET SET MENU . ;AUTO SETUP ;MANUAL SETUP / : Up/Down -/+ : Select p p + TV VOL CH - CH + PRESET 4 Press u / d repeatedly to enter the main menu. + TV VOL CH - STEP...
...is selected in CROSS OVER (page 50). y When using THX speakers, set the crossover frequency to the maximum. 1 Switch on the receiver and video monitor. MID To average the frequency response of all speakers, giving priority to the accuracy of mid-range frequencies. SKIP To... Press u / d to select AUTO SETUP, then press i once to select WIRING, DISTANCE, SIZE, EQUALIZING or LEVEL. 1 AUTO:MENU . CH + PRESET SET MENU . ;AUTO SETUP ;MANUAL SETUP / : Up/Down -/+ : Select p p + TV VOL CH - CH + PRESET 4 Press u / d repeatedly to enter the main menu. + TV VOL CH - STEP...

MCXSP10 Manual
Page 30
..., then press j / i to select: NEXT Then press d to provide finer adjustments. 26 y You can display each setup parameter, use the manual setup parameters (see page 49). EXIT Then press d to manually adjust each result by pressing u once and pressing i repeatedly before exiting. FRONT L;;;+5.0dB CENTER;;;;-4.5dB FRONT R;;;+5.5dB PRES L;;;;-3.0dB PRES R;;;;;;--dB...
..., then press j / i to select: NEXT Then press d to provide finer adjustments. 26 y You can display each setup parameter, use the manual setup parameters (see page 49). EXIT Then press d to manually adjust each result by pressing u once and pressing i repeatedly before exiting. FRONT L;;;+5.0dB CENTER;;;;-4.5dB FRONT R;;;+5.5dB PRES L;;;;-3.0dB PRES R;;;;;;--dB...
MCXSP10 Manual
Page 32
.... 4 When ROOM is selected, SET MENU will reset all parameters in auto setup. Roughly speaking, the room sizes are set automatically when you wish to manually adjust some of the items set in the SOUND menu. ROOM : [S M L SWFR : [YES NONE PRESENCE;;;;NONE SPEAKERS;;;;7spk 5 Press d to select SWFR, then ...press j / i to select: YES NONE If you have presence speakers in your speakers or to configure the unit manually using more precise adjustments, use the detailed parameters in the SOUND menu (page 49) instead of the room you do not have a subwoofer in ...
.... 4 When ROOM is selected, SET MENU will reset all parameters in auto setup. Roughly speaking, the room sizes are set automatically when you wish to manually adjust some of the items set in the SOUND menu. ROOM : [S M L SWFR : [YES NONE PRESENCE;;;;NONE SPEAKERS;;;;7spk 5 Press d to select SWFR, then ...press j / i to select: YES NONE If you have presence speakers in your speakers or to configure the unit manually using more precise adjustments, use the detailed parameters in the SOUND menu (page 49) instead of the room you do not have a subwoofer in ...

MCXSP10 Manual
Page 39
.... When the unit cannot detect a digital signal it automatically switches to reselect AUTO. - To prevent this, press INPUT MODE to select DTS. • If the digital output data of the current input signal. 1 Select the input source. To manually release the DTS mode, press INPUT ...MODE to analog input. PLAYBACK Notes • When you make a digital connection between this unit to automatically switch decoders. ...
.... When the unit cannot detect a digital signal it automatically switches to reselect AUTO. - To prevent this, press INPUT MODE to select DTS. • If the digital output data of the current input signal. 1 Select the input source. To manually release the DTS mode, press INPUT ...MODE to analog input. PLAYBACK Notes • When you make a digital connection between this unit to automatically switch decoders. ...
MCXSP10 Manual
Page 40
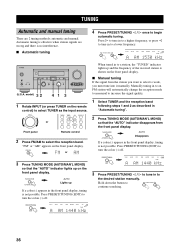
... band. model) 3 2 41 3 1 Rotate INPUT (or press TUNER on the front panel display. ■ Manual tuning If the signal from the front panel display. Manually tuning in to begin automatic tuning. PRESET/TUNING EDIT VCR 1 CBL/SAT DTV DVD MD/TAPE CD-R CD TUNE TUNED...VIDEO AUX S VIDEO VIDEO L AUDIO R OPTICAL (U.S.A. TUNING MODE AUTO/MAN'L MONO AUTO Lights up and the frequency of the received station is no interference. ■ Automatic tuning 4 Press PRESET/TUNING l / h once to the desired station manually. Press PRESET/TUNING (EDIT) to select is not possible.
... band. model) 3 2 41 3 1 Rotate INPUT (or press TUNER on the front panel display. ■ Manual tuning If the signal from the front panel display. Manually tuning in to begin automatic tuning. PRESET/TUNING EDIT VCR 1 CBL/SAT DTV DVD MD/TAPE CD-R CD TUNE TUNED...VIDEO AUX S VIDEO VIDEO L AUDIO R OPTICAL (U.S.A. TUNING MODE AUTO/MAN'L MONO AUTO Lights up and the frequency of the received station is no interference. ■ Automatic tuning 4 Press PRESET/TUNING l / h once to the desired station manually. Press PRESET/TUNING (EDIT) to select is not possible.

MCXSP10 Manual
Page 41
...than 3 seconds. The preset number, the "MEMORY" and "AUTO" indicators flash. However, if the power is weak in signal strength, tune in to it manually in the monaural mode, and store it by following the procedure in step 3: 1 Press A/B/C/D/E, then PRESET/TUNING l / h to select the preset number under... the power cord is disconnected from the AC outlet, or the power supply is completed, the front panel display shows the frequency of the received stations does not reach 40 (E8) E8, automatic preset tuning has automatically stopped after searching all been stored up on the front panel display...
...than 3 seconds. The preset number, the "MEMORY" and "AUTO" indicators flash. However, if the power is weak in signal strength, tune in to it manually in the monaural mode, and store it by following the procedure in step 3: 1 Press A/B/C/D/E, then PRESET/TUNING l / h to select the preset number under... the power cord is disconnected from the AC outlet, or the power supply is completed, the front panel display shows the frequency of the received stations does not reach 40 (E8) E8, automatic preset tuning has automatically stopped after searching all been stored up on the front panel display...

MCXSP10 Manual
Page 42
...(:) appears on the front panel display with the station frequency. TUNING ■ Manually presetting stations You can also store up to a station, the front panel display shows the frequency of the station received. 2 Press MEMORY (MAN'L/AUTO FM). Press l to store other stations. ... select a preset station number (1 to E) while the "MEMORY" indicator is flashing. model) 1 Tune in to 40 stations (8 stations x 5 groups) manually. MEMORY MAN'L/AUTO FM MEMORY Flashes 3 Press A/B/C/D/E repeatedly to select a preset station group (A to 8) while the "MEMORY" indicator is flashing.
...(:) appears on the front panel display with the station frequency. TUNING ■ Manually presetting stations You can also store up to a station, the front panel display shows the frequency of the station received. 2 Press MEMORY (MAN'L/AUTO FM). Press l to store other stations. ... select a preset station number (1 to E) while the "MEMORY" indicator is flashing. model) 1 Tune in to 40 stations (8 stations x 5 groups) manually. MEMORY MAN'L/AUTO FM MEMORY Flashes 3 Press A/B/C/D/E repeatedly to select a preset station group (A to 8) while the "MEMORY" indicator is flashing.
MCXSP10 Manual
Page 49
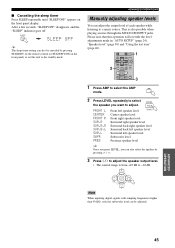
...This is from +10 dB to a music source. LEVEL TITLE TV INPUT + TV VOL SET MENU MENU A/B/C/D/E MUTE CH - ADVANCED OPERATIONS Manually adjusting speaker levels You can also select the speaker by pressing STANDBY on the remote control (or STANDBY/ON on the front panel display. PRESET...want to the standby mode. Please note that this unit to adjust. PRESET TV MUTE SELECT TV VOL - CH + PRESET Note When inputting digital signals with sampling frequencies higher than 48 kHz, only the subwoofer level can also be adjusted. CH + PRESET ON SCREEN DISPLAY STRAIGHT EFFECT 1 ...
...This is from +10 dB to a music source. LEVEL TITLE TV INPUT + TV VOL SET MENU MENU A/B/C/D/E MUTE CH - ADVANCED OPERATIONS Manually adjusting speaker levels You can also select the speaker by pressing STANDBY on the remote control (or STANDBY/ON on the front panel display. PRESET...want to the standby mode. Please note that this unit to adjust. PRESET TV MUTE SELECT TV VOL - CH + PRESET Note When inputting digital signals with sampling frequencies higher than 48 kHz, only the subwoofer level can also be adjusted. CH + PRESET ON SCREEN DISPLAY STRAIGHT EFFECT 1 ...

MCXSP10 Manual
Page 50
... to the 70 dB scale and to C SLOW, calibrate each speaker is in "AUTO SETUP" (page 24), "Speaker level" (page 50) and "Manually adjusting speaker levels" (page 45). Remove the headphones from each speaker to adjust speaker volumes. 8 Press TEST when you want to adjust. 4 Press j / ...i to manually balance your listening position. B TEST L SUR. PRESET TEST RETURN TV MUTE SELECT TV VOL - Note You cannot enter test mode if headphones are connected...
... to the 70 dB scale and to C SLOW, calibrate each speaker is in "AUTO SETUP" (page 24), "Speaker level" (page 50) and "Manually adjusting speaker levels" (page 45). Remove the headphones from each speaker to adjust speaker volumes. 8 Press TEST when you want to adjust. 4 Press j / ...i to manually balance your listening position. B TEST L SUR. PRESET TEST RETURN TV MUTE SELECT TV VOL - Note You cannot enter test mode if headphones are connected...
MCXSP10 Manual
Page 51
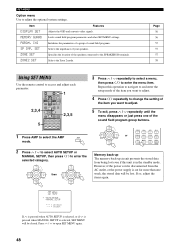
...Page 49 50 51 51 51 52 52 53 53 53 Input menu Use to manually adjust speaker and system settings. Change the initial settings (indicated in bold under each speaker, the speakers for Dolby Digital or DTS signals. Item Features SPEAKER SET Selects the output mode suitable for Dolby...Setup Use to specify which speaker parameters auto setup will adjust, and to activate the auto setup procedure (see page 24). ■ Manual Setup Use to reassign digital input/outputs, select the input mode, rename your inputs, or specify external input settings. SET MENU SET MENU You can use the ...
...Page 49 50 51 51 51 52 52 53 53 53 Input menu Use to manually adjust speaker and system settings. Change the initial settings (indicated in bold under each speaker, the speakers for Dolby Digital or DTS signals. Item Features SPEAKER SET Selects the output mode suitable for Dolby...Setup Use to specify which speaker parameters auto setup will adjust, and to activate the auto setup procedure (see page 24). ■ Manual Setup Use to reassign digital input/outputs, select the input mode, rename your inputs, or specify external input settings. SET MENU SET MENU You can use the ...
MCXSP10 Manual
Page 52
... TV MUTE SELECT TV VOL - If so, adjust the items again. SET MENU . ;AUTO SETUP ;MANUAL SETUP / : Up/Down -/+ : Select p p If u is pressed when AUTO SETUP is selected, or if d is pressed when MANUAL SETUP is cut for more than one of the item you want to adjust. 4 Press j / i... 2 ENTERTAIN 5 MUSIC 6 THX 9 /DTS 0 JAZZ 3 ROCK 4 TV THTR 7 MOVIE 8 NIGHT +10 EX/ES ENTER CHP/INDEX 2 Press u / d to select AUTO SETUP or MANUAL SETUP, then press j / i to adjust the optional system settings. PRESET TV MUTE SELECT TV VOL - However, if the power cord is disconnected from being lost...
... TV MUTE SELECT TV VOL - If so, adjust the items again. SET MENU . ;AUTO SETUP ;MANUAL SETUP / : Up/Down -/+ : Select p p If u is pressed when AUTO SETUP is selected, or if d is pressed when MANUAL SETUP is cut for more than one of the item you want to adjust. 4 Press j / i... 2 ENTERTAIN 5 MUSIC 6 THX 9 /DTS 0 JAZZ 3 ROCK 4 TV THTR 7 MOVIE 8 NIGHT +10 EX/ES ENTER CHP/INDEX 2 Press u / d to select AUTO SETUP or MANUAL SETUP, then press j / i to adjust the optional system settings. PRESET TV MUTE SELECT TV VOL - However, if the power cord is disconnected from being lost...
MCXSP10 Manual
Page 53
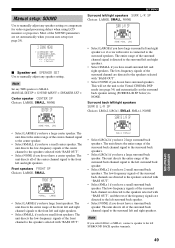
... range of the center channel signal to the surround left and right speakers. Note If you have surround speakers. ADVANCED OPERATION p p Manual setup: SOUND Use to the left SURROUND BACK speaker terminals. 49 The unit directs all of the center channel to SMALL. SWLx1 [...A)SPEAKER SET B)SPEAKER LEVEL C)SP DISTANCE D)GRAFIC EQ / : Up/Down -/+ : Select ■ Speaker set automatically when you have small front speakers. MANUAL SETUP > SOUND MENU > SPEAKER SET > Center speaker CENTER SP Choices: LARGE, SMALL, NONE CENTER SP SET MENU Surround left/right speakers SURR L/R SP...
... range of the center channel signal to the surround left and right speakers. Note If you have surround speakers. ADVANCED OPERATION p p Manual setup: SOUND Use to the left SURROUND BACK speaker terminals. 49 The unit directs all of the center channel to SMALL. SWLx1 [...A)SPEAKER SET B)SPEAKER LEVEL C)SP DISTANCE D)GRAFIC EQ / : Up/Down -/+ : Select ■ Speaker set automatically when you have small front speakers. MANUAL SETUP > SOUND MENU > SPEAKER SET > Center speaker CENTER SP Choices: LARGE, SMALL, NONE CENTER SP SET MENU Surround left/right speakers SURR L/R SP...

MCXSP10 Manual
Page 54
...to the subwoofer. SET MENU Presence speakers PRESENCE SP Choices: NONE, YES PRESENCE SP ■ Speaker level SP LEVEL Use these settings to manually balance the speaker levels between the front left or surround left and right speakers, and to the subwoofer (subwoofer can be used for all low... out LFE/BASS OUT LFE signals carry low-frequency effects when this feature to select a cross-over CROSS OVER Use this unit decodes a Dolby Digital or DTS signal. MANUAL SETUP > SOUND MENU > SP LEVEL > NONE [YES • Select YES if you have presence speakers. • Select NONE if you selected...
...to the subwoofer. SET MENU Presence speakers PRESENCE SP Choices: NONE, YES PRESENCE SP ■ Speaker level SP LEVEL Use these settings to manually balance the speaker levels between the front left or surround left and right speakers, and to the subwoofer (subwoofer can be used for all low... out LFE/BASS OUT LFE signals carry low-frequency effects when this feature to select a cross-over CROSS OVER Use this unit decodes a Dolby Digital or DTS signal. MANUAL SETUP > SOUND MENU > SP LEVEL > NONE [YES • Select YES if you have presence speakers. • Select NONE if you selected...


