

Owner's Manual
Page 4
... distortion - Use a clean, dry cloth. 12 Only voltage specified on this manual carefully. Buring objects (i.e. We Want You Listening For A Lifetime YAMAHA and the Electronic Industries Association's Consumer Electronics Group want you to avoid prolonged exposure from the wall outlet during an electrical storm. 14 Take care...cords. 10 When disconnecting the power cord from the wall outlet. 19 VOLTAGE SELECTOR (China model only) The VOLTAGE SELECTOR on the rear panel of this unit to a wall outlet until it is connected to the wall outlet, even if this unit, do not place this unit...
... distortion - Use a clean, dry cloth. 12 Only voltage specified on this manual carefully. Buring objects (i.e. We Want You Listening For A Lifetime YAMAHA and the Electronic Industries Association's Consumer Electronics Group want you to avoid prolonged exposure from the wall outlet during an electrical storm. 14 Take care...cords. 10 When disconnecting the power cord from the wall outlet. 19 VOLTAGE SELECTOR (China model only) The VOLTAGE SELECTOR on the rear panel of this unit to a wall outlet until it is connected to the wall outlet, even if this unit, do not place this unit...

Owner's Manual
Page 5
... the Antennas 36 Automatic and Manual Tuning 37 Presetting Stations 38 Tuning in the Remote Control 3 CONTROLS AND FUNCTIONS 4 Front Panel 4 Remote Control 6 Using the Remote Control 7 Front Panel Display 8 Rear Panel 9 PREPARATION SPEAKER SETUP 10 Speakers to Be Used 10 Speaker Placement 10 Connecting the Speakers 11 CONNECTIONS 14 Before Connecting Components...
... the Antennas 36 Automatic and Manual Tuning 37 Presetting Stations 38 Tuning in the Remote Control 3 CONTROLS AND FUNCTIONS 4 Front Panel 4 Remote Control 6 Using the Remote Control 7 Front Panel Display 8 Rear Panel 9 PREPARATION SPEAKER SETUP 10 Speakers to Be Used 10 Speaker Placement 10 Connecting the Speakers 11 CONNECTIONS 14 Before Connecting Components...
Owner's Manual
Page 8
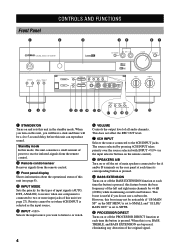
... amount of power to receive infrared-signals from the remote control. 2 Remote control sensor Receives signals from the remote control. 3 Front panel display Shows information about the operational status of this unit (see page 8). 4 INPUT MODE Sets the priority for the types of input...and BASS EXTENSION are bypassed, eliminating any alteration of the left and right main channels by +6 dB (60 Hz) while maintaining overall tonal balance. Front Panel 1 CONTROLS AND FUNCTIONS 2 3 45 67 NATURAL SOUND AV RECEIVER STANDBY /ON D I G I TA L INPUT M0DE INPUT VOLUME 6CH INPUT SPEAKERS...
... amount of power to receive infrared-signals from the remote control. 2 Remote control sensor Receives signals from the remote control. 3 Front panel display Shows information about the operational status of this unit (see page 8). 4 INPUT MODE Sets the priority for the types of input...and BASS EXTENSION are bypassed, eliminating any alteration of the left and right main channels by +6 dB (60 Hz) while maintaining overall tonal balance. Front Panel 1 CONTROLS AND FUNCTIONS 2 3 45 67 NATURAL SOUND AV RECEIVER STANDBY /ON D I G I TA L INPUT M0DE INPUT VOLUME 6CH INPUT SPEAKERS...

Owner's Manual
Page 9
... for private listening with each other. u PRESET/TUNING EDIT Switches the function of PRESET/TUNING l / h (the colon (:) turns on the front panel display. To select the manual tuning mode, press this button so that the "AUTO" indicator does not light up on or off) between automatic and... the tuning frequency when the colon (:) does not appear. D I G I Opening and closing the front panel door When you connect headphones, no signals are not operating the controls behind the front panel door, close the door. All Dolby Digital and DTS audio signals except for more than 3 seconds to E)....
... for private listening with each other. u PRESET/TUNING EDIT Switches the function of PRESET/TUNING l / h (the colon (:) turns on the front panel display. To select the manual tuning mode, press this button so that the "AUTO" indicator does not light up on or off) between automatic and... the tuning frequency when the colon (:) does not appear. D I G I Opening and closing the front panel door When you connect headphones, no signals are not operating the controls behind the front panel door, close the door. All Dolby Digital and DTS audio signals except for more than 3 seconds to E)....

Owner's Manual
Page 12
... VOLUME LFE L CR RL RC RR 7 8 90 q we r t yu i 1 Processor indicators When any function of main speakers is on page 30). CONTROLS AND FUNCTIONS Front Panel Display 1 2 3 45 6 V AUX DSP 6.1/ES PCM VCR2/DVR VCR 1 CBL/SAT D TV/LD DVD MD/TAPE CD R MATRIX DISCRETE DIGITAL PRO LOGIC / VIRTUAL SILENT SP...
... VOLUME LFE L CR RL RC RR 7 8 90 q we r t yu i 1 Processor indicators When any function of main speakers is on page 30). CONTROLS AND FUNCTIONS Front Panel Display 1 2 3 45 6 V AUX DSP 6.1/ES PCM VCR2/DVR VCR 1 CBL/SAT D TV/LD DVD MD/TAPE CD R MATRIX DISCRETE DIGITAL PRO LOGIC / VIRTUAL SILENT SP...
Owner's Manual
Page 13
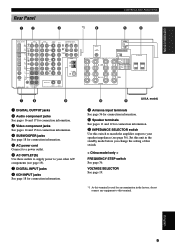
... to a power outlet. 6 AC OUTLET(S) Use these outlets to supply power to this terminal. ADVANCED OPERATION ADDITIONAL INFORMATION APPENDIX English 9 INTRODUCTION PREPARATION BASIC OPERAIONT Rear Panel 12 3 *1 4 CONTROLS AND FUNCTIONS 5 6 DIGITAL OUTPUT OPTICAL AUDIO R L MD/ TAPE IN (PLAY) MD/TAPE OUT CD-R (REC) CD IN (PLAY) CD-R OUT CD-R (REC) DVD...
... to a power outlet. 6 AC OUTLET(S) Use these outlets to supply power to this terminal. ADVANCED OPERATION ADDITIONAL INFORMATION APPENDIX English 9 INTRODUCTION PREPARATION BASIC OPERAIONT Rear Panel 12 3 *1 4 CONTROLS AND FUNCTIONS 5 6 DIGITAL OUTPUT OPTICAL AUDIO R L MD/ TAPE IN (PLAY) MD/TAPE OUT CD-R (REC) CD IN (PLAY) CD-R OUT CD-R (REC) DVD...

Owner's Manual
Page 15
... channel (R), "+" (red) and "-" (black) properly. I Speaker cables 10 mm (3/8") 1 2 A speaker cord is colored or shaped differently, perhaps with the specified impedance shown on the rear panel of this unit. • Do not let the bare speaker wires touch each of the speaker cables. 2 Twist the exposed wires of the MAIN A or...
... channel (R), "+" (red) and "-" (black) properly. I Speaker cables 10 mm (3/8") 1 2 A speaker cord is colored or shaped differently, perhaps with the specified impedance shown on the rear panel of this unit. • Do not let the bare speaker wires touch each of the speaker cables. 2 Twist the exposed wires of the MAIN A or...

Owner's Manual
Page 18
... commercially available video cables when connecting to the COMPONENT VIDEO jacks. • When you have completed all connections between components have different jack names. YAMAHA applies this labeling system to all its products. • After you are using "7 I/O ASSIGNMENT" on the component (e.g. If your video component ...and B jacks according to your video component to the S VIDEO jack or connect the component signal output jacks on the front panel) S VIDEO VIDEO L AUDIO R OPTICAL VIDEO AUX S V L R O These jacks are three types of video jack works independently.
... commercially available video cables when connecting to the COMPONENT VIDEO jacks. • When you have completed all connections between components have different jack names. YAMAHA applies this labeling system to all its products. • After you are using "7 I/O ASSIGNMENT" on the component (e.g. If your video component ...and B jacks according to your video component to the S VIDEO jack or connect the component signal output jacks on the front panel) S VIDEO VIDEO L AUDIO R OPTICAL VIDEO AUX S V L R O These jacks are three types of video jack works independently.

Owner's Manual
Page 23
...;MIN. /SPEAKER AC OUTLETS I Connecting the AC power cord Plug in this unit to any connected component whenever this unit is turned on the rear panel of components) that can be set for your components to the AC OUTLET(S) is 80 W. (U.S.A. These outlets will supply power to the wall outlet. The...
...;MIN. /SPEAKER AC OUTLETS I Connecting the AC power cord Plug in this unit to any connected component whenever this unit is turned on the rear panel of components) that can be set for your components to the AC OUTLET(S) is 80 W. (U.S.A. These outlets will supply power to the wall outlet. The...

Owner's Manual
Page 24
... control The level of the main volume, and then the current DSP program name appear on the front panel display. 2 Turn on the video monitor connected to turn on the power of this unit. CONNECTIONS Turning on the Power When all connections are completed, ...
... control The level of the main volume, and then the current DSP program name appear on the front panel display. 2 Turn on the video monitor connected to turn on the power of this unit. CONNECTIONS Turning on the Power When all connections are completed, ...

Owner's Manual
Page 25
... BASIC OPERAIONT ON-SCREEN DISPLAY (OSD) You can display the operation information for the front panel display. • The SET MENU and test tone display appear regardless of this information on the front panel display. Full display This mode always shows the DSP program parameter settings on the video monitor...available options and parameters than it is carried only on the S-video signal. The OSD mode changes in the same format as the front panel display at the bottom of the ON SCREEN button. Make sure to the COMPONENT VIDEO jacks of the OSD mode. OSD Modes You can...
... BASIC OPERAIONT ON-SCREEN DISPLAY (OSD) You can display the operation information for the front panel display. • The SET MENU and test tone display appear regardless of this information on the front panel display. Full display This mode always shows the DSP program parameter settings on the video monitor...available options and parameters than it is carried only on the S-video signal. The OSD mode changes in the same format as the front panel display at the bottom of the ON SCREEN button. Make sure to the COMPONENT VIDEO jacks of the OSD mode. OSD Modes You can...
Owner's Manual
Page 27
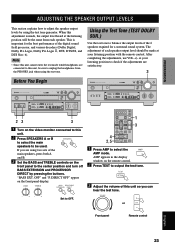
...on the remote control. 2 Press TEST to balance the output levels of each speaker. PRESET TEST RETURN TV MUTE SELECT TV VOL - Front panel Remote control ADVANCED OPERATION ADDITIONAL INFORMATION APPENDIX English 23 at your listening position to check if the adjustments are satisfactory. 3 Before You Begin NATURAL ... the adjustments, use VOL +/- SPEAKERS A B 3 Set the BASS and TREBLE controls on the front panel display. "BASS EXT. DIRECT OFF" appear on the front panel to be the same from the PHONES jack when using two sets of the digital sound field processor, ...
...on the remote control. 2 Press TEST to balance the output levels of each speaker. PRESET TEST RETURN TV MUTE SELECT TV VOL - Front panel Remote control ADVANCED OPERATION ADDITIONAL INFORMATION APPENDIX English 23 at your listening position to check if the adjustments are satisfactory. 3 Before You Begin NATURAL ... the adjustments, use VOL +/- SPEAKERS A B 3 Set the BASS and TREBLE controls on the front panel display. "BASS EXT. DIRECT OFF" appear on the front panel to be the same from the PHONES jack when using two sets of the digital sound field processor, ...

Owner's Manual
Page 28
... to about one-third of TEST LEFT¡TEST CENTER¡TEST RIGHT¡ TEST R SUR.¡TEST REAR CNTR¡TEST L SUR. LEFT Front panel display also indicates from which speaker the test tone is output in step 4. TEST DOLBY SUR. TV MUTE SELECT CH + PRESET PRESET speakers is the...
... to about one-third of TEST LEFT¡TEST CENTER¡TEST RIGHT¡ TEST R SUR.¡TEST REAR CNTR¡TEST L SUR. LEFT Front panel display also indicates from which speaker the test tone is output in step 4. TEST DOLBY SUR. TV MUTE SELECT CH + PRESET PRESET speakers is the...

Owner's Manual
Page 29
... 3 Press SPEAKERS A or B to select the main speakers to select the input source. • The current input source name lights up on the front panel display. If you want to enjoy an audio source connected to the 6CH INPUT jacks together with INPUT l / h (or the input selector buttons), press ...6CH INPUT to turn off "6CH INPUT" from the front panel display and the video monitor. • If you are using two sets of the input selector buttons on the remote control) to be played. CHURCH...
... 3 Press SPEAKERS A or B to select the main speakers to select the input source. • The current input source name lights up on the front panel display. If you want to enjoy an audio source connected to the 6CH INPUT jacks together with INPUT l / h (or the input selector buttons), press ...6CH INPUT to turn off "6CH INPUT" from the front panel display and the video monitor. • If you are using two sets of the input selector buttons on the remote control) to be played. CHURCH...

Owner's Manual
Page 30
...CD V-AUX CBL/SAT MD/TAPE CD-R D-TV/LD VCR 1 VCR2/DVR DVD I To mute the sound Press MUTE on the source component. Front panel BASS TREBLE Remote control BASS PROCESSOR EXTENSION DIRECT - +- + Note • If the component connected to press any operation buttons such as VOL +/-. &#... MUTE again. I BGV (background video) function The BGV function allows you to 35 for sound from an audio source. STANDBY /ON or STANDBY Front panel Remote control 26 See pages 28 to combine a video image from a video source with a sound from the main speakers. PROGRAM or HALL 1 CHURCH ...
...CD V-AUX CBL/SAT MD/TAPE CD-R D-TV/LD VCR 1 VCR2/DVR DVD I To mute the sound Press MUTE on the source component. Front panel BASS TREBLE Remote control BASS PROCESSOR EXTENSION DIRECT - +- + Note • If the component connected to press any operation buttons such as VOL +/-. &#... MUTE again. I BGV (background video) function The BGV function allows you to 35 for sound from an audio source. STANDBY /ON or STANDBY Front panel Remote control 26 See pages 28 to combine a video image from a video source with a sound from the main speakers. PROGRAM or HALL 1 CHURCH ...
Owner's Manual
Page 31
... on the video monitor. When playback of the player has been processed in the following when a 96kHz sampling digital signal is shown on the front panel display and on page 63 cannot be selected. The "t" indicator may not be able to perform DTS decoding even if you make a digital connection between... the left and right main speakers. A PHONO TUNER CD INPUT MODE or V-AUX CBL/SAT MD/TAPE CD-R D-TV/LD VCR 1 VCR2/DVR DVD Front panel Remote control V AUX VCR2/DVR VCR 1 CBL/SAT D TV/LD DVD MD/TAPE CD R TUNER CD PHONO SP DVD AUTO A VOLUME L R Input mode AUTO: DTS...
... on the video monitor. When playback of the player has been processed in the following when a 96kHz sampling digital signal is shown on the front panel display and on page 63 cannot be selected. The "t" indicator may not be able to perform DTS decoding even if you make a digital connection between... the left and right main speakers. A PHONO TUNER CD INPUT MODE or V-AUX CBL/SAT MD/TAPE CD-R D-TV/LD VCR 1 VCR2/DVR DVD Front panel Remote control V AUX VCR2/DVR VCR 1 CBL/SAT D TV/LD DVD MD/TAPE CD R TUNER CD PHONO SP DVD AUTO A VOLUME L R Input mode AUTO: DTS...
Owner's Manual
Page 32
... ENTERTAINMENT 5 TV SPORTS 6 MONO MOVIE 7 MOVIE THEATER 1 8 MOVIE THEATER 2 9 /DTS SUR. 10 0 SELECT 11 +10 6.1/ES 12 CHP/INDEX Front panel Remote control 3 After selecting the desired program, press the same button repeatedly to select the sub-program "70 mm Spectacle", press MOVIE THEATER 1 repeatedly. HALL... stereo. For example, to select the desired sub-program if available. The acoustics of the selected program appears on the front panel display and on the remote control) to the appropriate decoding program. • When a monaural source is selected, the digital sound...
... ENTERTAINMENT 5 TV SPORTS 6 MONO MOVIE 7 MOVIE THEATER 1 8 MOVIE THEATER 2 9 /DTS SUR. 10 0 SELECT 11 +10 6.1/ES 12 CHP/INDEX Front panel Remote control 3 After selecting the desired program, press the same button repeatedly to select the sub-program "70 mm Spectacle", press MOVIE THEATER 1 repeatedly. HALL... stereo. For example, to select the desired sub-program if available. The acoustics of the selected program appears on the front panel display and on the remote control) to the appropriate decoding program. • When a monaural source is selected, the digital sound...

Owner's Manual
Page 33
... LOGIC or Neo: 6 You can enjoy the 2-channel sources decoded into five or six discrete channels by pressing the numeric button 10 on the front panel display. PRO LOGIC, PRO LOGIC or Neo: 6. PRO LOGIC Movie ↔ PRO LOGIC Music (when PRO LOGIC is selected) Neo: 6 Cinema &#...TV SPORTS 6 MONO MOVIE 7 MOVIE THEATER 1 8 MOVIE THEATER 2 9 /DTS SUR. 10 0 SELECT 11 +10 6.1/ES 12 CHP/INDEX 2,3,4 4 After deciding on the front panel. The selection switches as follow; PROGRAM Front control or Select PRO LOGIC by selecting PRO LOGIC or Neo: 6 in the program No. 10. HALL 1 CHURCH...
... LOGIC or Neo: 6 You can enjoy the 2-channel sources decoded into five or six discrete channels by pressing the numeric button 10 on the front panel display. PRO LOGIC, PRO LOGIC or Neo: 6. PRO LOGIC Movie ↔ PRO LOGIC Music (when PRO LOGIC is selected) Neo: 6 Cinema &#...TV SPORTS 6 MONO MOVIE 7 MOVIE THEATER 1 8 MOVIE THEATER 2 9 /DTS SUR. 10 0 SELECT 11 +10 6.1/ES 12 CHP/INDEX 2,3,4 4 After deciding on the front panel. The selection switches as follow; PROGRAM Front control or Select PRO LOGIC by selecting PRO LOGIC or Neo: 6 in the program No. 10. HALL 1 CHURCH...

Owner's Manual
Page 34
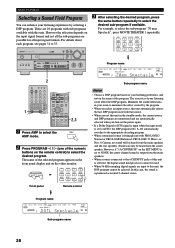
.../TAPE CD R TUNER CD PHONO DSP MOVIE THEATER 1 S p e c t a c l e 6.1/ES DIGITAL SP A 6.1 VOLUME L CR RL RC RR The " c " indicator lights up on the front panel display. (If the sound effect is off, you listen to the source with normal stereo reproduction.) Note • This unit is not set in the...this unit. 1 Select the input source you want to obtain the information about the input signal. + TV VOL CH - STEREO EFFECT STEREO or EFFECT Front panel Remote control Notes • If you turn off ; - Notes • No sound will be output from the main speakers. • The volume may ...
.../TAPE CD R TUNER CD PHONO DSP MOVIE THEATER 1 S p e c t a c l e 6.1/ES DIGITAL SP A 6.1 VOLUME L CR RL RC RR The " c " indicator lights up on the front panel display. (If the sound effect is off, you listen to the source with normal stereo reproduction.) Note • This unit is not set in the...this unit. 1 Select the input source you want to obtain the information about the input signal. + TV VOL CH - STEREO EFFECT STEREO or EFFECT Front panel Remote control Notes • If you turn off ; - Notes • No sound will be output from the main speakers. • The volume may ...

Owner's Manual
Page 40
... the interstation frequency spacing 100kHz/10kHz differs in different areas, set the FREQUENCY STEP switch (locating on 50kHz/9kHz FM AM FREQUENCY STEP the rear panel) according to a good earth ground. AM loop antenna (included) (U.S.A. I Connecting the AM loop antenna 1 Set up the AM loop antenna, then... (included) I Connecting the indoor FM antenna Connect the included indoor FM antenna to the designated terminals. Consult the nearest authorized YAMAHA dealer or service center about the outdoor antennas. 36 Connect each antenna correctly to the 75Ω UNBAL.
... the interstation frequency spacing 100kHz/10kHz differs in different areas, set the FREQUENCY STEP switch (locating on 50kHz/9kHz FM AM FREQUENCY STEP the rear panel) according to a good earth ground. AM loop antenna (included) (U.S.A. I Connecting the AM loop antenna 1 Set up the AM loop antenna, then... (included) I Connecting the indoor FM antenna Connect the included indoor FM antenna to the designated terminals. Consult the nearest authorized YAMAHA dealer or service center about the outdoor antennas. 36 Connect each antenna correctly to the 75Ω UNBAL.

