Quick Reference Guide
Page 3
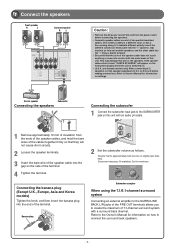
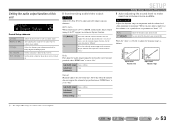
... anything or come into contact with the metal areas of the terminal. One of two parallel insulated cables. Refer to the Owner's Manual for information on how to Owner's Manual for information on this unit or the speakers. If the speaker cables short circuit, "CHECK SP WIRES!" FRONT Banana plug Connecting the...
... anything or come into contact with the metal areas of the terminal. One of two parallel insulated cables. Refer to the Owner's Manual for information on how to Owner's Manual for information on this unit or the speakers. If the speaker cables short circuit, "CHECK SP WIRES!" FRONT Banana plug Connecting the...
Quick Reference Guide
Page 4
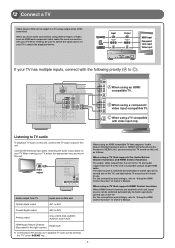
... of the same kind. For the connections and settings, refer to "Using the HDMI Control function" in Owner's Manual. For the connections and settings, refer to "Using the HDMI Control function" in Owner's Manual. - 4 - O O V Listening to TV audio To playback TV audio on this unit, connect the TV audio output to use...
... of the same kind. For the connections and settings, refer to "Using the HDMI Control function" in Owner's Manual. For the connections and settings, refer to "Using the HDMI Control function" in Owner's Manual. - 4 - O O V Listening to TV audio To playback TV audio on this unit, connect the TV audio output to use...

Quick Reference Guide
Page 5
... power cable 4 (Asia and General models) Connect the AC power cable (Other models) (Asia and General models only) Select the switch position according to Owner's Manual for your playback device has multiple audio/video outputs, connect with analog audio AUDIO L output) only R OO O HDMI DOCK COMPONENT VIDEO PR PR PB PB...
... power cable 4 (Asia and General models) Connect the AC power cable (Other models) (Asia and General models only) Select the switch position according to Owner's Manual for your playback device has multiple audio/video outputs, connect with analog audio AUDIO L output) only R OO O HDMI DOCK COMPONENT VIDEO PR PR PB PB...
Quick Reference Guide
Page 7
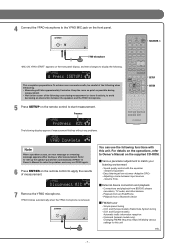
Keep the room as quiet as possible during measurement. • Wait in Owner's Manual to solve the problem, and carry out YPAO again. 6 Press ENTER on the supplied CD-ROM. ˙ Various parameter adjustment to match your listening environment - ... 0 10 TV TV VOL TV CH ENT The following when measuring. • Measuring will take approximately 3 minutes. For details on the operations, refer to Owner's Manual on the remote control to apply the results of the following display appears if measurement finishes without any problems. YPAO VOL. DECODE MUSIC STEREO STRAIGHT...
Keep the room as quiet as possible during measurement. • Wait in Owner's Manual to solve the problem, and carry out YPAO again. 6 Press ENTER on the supplied CD-ROM. ˙ Various parameter adjustment to match your listening environment - ... 0 10 TV TV VOL TV CH ENT The following when measuring. • Measuring will take approximately 3 minutes. For details on the operations, refer to Owner's Manual on the remote control to apply the results of the following display appears if measurement finishes without any problems. YPAO VOL. DECODE MUSIC STEREO STRAIGHT...
Owners Manual
Page 2
... Setup menu 65 Displaying/Setting the Advanced Setup menu 65 Setting the impedance of speakers (U.S.A. CONTENTS INTRODUCTION Features and capabilities 3 About this manual 4 Supplied accessories 4 Part names and functions 5 Front panel 5 Rear panel 6 Front panel display 7 Remote control 8 CONNECTIONS Connecting speakers...stations 37 Radio Data System tuning (U.K. and Canada models only 65 Avoiding crossing remote control signals when using multiple Yamaha receivers 66 Changing FM/AM frequency steps (Asia and General models only 66 Initializing various settings for this unit 66...
... Setup menu 65 Displaying/Setting the Advanced Setup menu 65 Setting the impedance of speakers (U.S.A. CONTENTS INTRODUCTION Features and capabilities 3 About this manual 4 Supplied accessories 4 Part names and functions 5 Front panel 5 Rear panel 6 Front panel display 7 Remote control 8 CONNECTIONS Connecting speakers...stations 37 Radio Data System tuning (U.K. and Canada models only 65 Avoiding crossing remote control signals when using multiple Yamaha receivers 66 Changing FM/AM frequency steps (Asia and General models only 66 Initializing various settings for this unit 66...

Owners Manual
Page 4
...to the "Part names and functions" (☞p. 5) for more than 2 minutes, or leaving exhausted batteries in certain regions. • This manual is in the remote control, remove the battery compartment cover from the reverse side of the remote control, and insert two AAA batteries into the... a narrow range. • bTRANSMIT does not light up, or only lights dimly. Refer to change in "Part names and functions." If this manual • Some features are subject to the corresponding numbers on the bottom of the page. • ☞ indicates the page describing the related ...
...to the "Part names and functions" (☞p. 5) for more than 2 minutes, or leaving exhausted batteries in certain regions. • This manual is in the remote control, remove the battery compartment cover from the reverse side of the remote control, and insert two AAA batteries into the... a narrow range. • bTRANSMIT does not light up, or only lights dimly. Refer to change in "Part names and functions." If this manual • Some features are subject to the corresponding numbers on the bottom of the page. • ☞ indicates the page describing the related ...
Owners Manual
Page 28
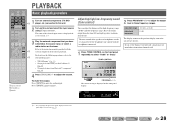
... RECEIVER HDMI 2 3 4 AV 2 3 4 AUDIO 6 1 2 V-AUX [ A ] [ B ] DOCK TUNER FM AM PRESET TUNING INFO MEMORY MOVIE ENHANCER SUR. to mute the audio output. Refer to the instruction manuals provided with the headphones connected. 1 Press TONE CONTROL on the front panel display as the source input, or select a radio station on the tuner. To...
... RECEIVER HDMI 2 3 4 AV 2 3 4 AUDIO 6 1 2 V-AUX [ A ] [ B ] DOCK TUNER FM AM PRESET TUNING INFO MEMORY MOVIE ENHANCER SUR. to mute the audio output. Refer to the instruction manuals provided with the headphones connected. 1 Press TONE CONTROL on the front panel display as the source input, or select a radio station on the tuner. To...

Owners Manual
Page 35
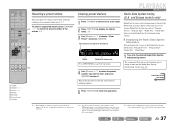
... and hold this unit to close the Option menu. J2 For example, enter as preset stations. FM Mode:Mono 5 When setting is correct. Use manual station preset (☞p. 36). 1 Press dTUNER to switch to the tuner input. 2 Press qOPTION to select "FM Mode." SOURCE 1 1 5 ...2 Press qOPTION to search automatically for a station, release the key once the search has started. Use one of presetting stations, "Auto Preset" and "Manual Preset." J3 3 Use jCursor B / C to register stations. ■ Presetting FM stations automatically (Auto Preset) The tuner detects FM stations with strong ...
... and hold this unit to close the Option menu. J2 For example, enter as preset stations. FM Mode:Mono 5 When setting is correct. Use manual station preset (☞p. 36). 1 Press dTUNER to switch to the tuner input. 2 Press qOPTION to select "FM Mode." SOURCE 1 1 5 ...2 Press qOPTION to search automatically for a station, release the key once the search has started. Use one of presetting stations, "Auto Preset" and "Manual Preset." J3 3 Use jCursor B / C to register stations. ■ Presetting FM stations automatically (Auto Preset) The tuner detects FM stations with strong ...

Owners Manual
Page 36
... station to, and then press eMEMORY to start the Auto Preset function. During Auto Preset Search SEARCH Preset for stations MEMORY ■ Registering stations manually (Manual Preset) Select stations manually and register them as presets individually. 1 Tune in to the station you want to register, referring to "Selecting a frequency for 3 seconds or longer... TOP MENU REC POP-UP MENU MUTE 1 2 3 4 5 6 7 8 9 INPUT MUTE 0 10 TV TV VOL TV CH ENT 4 Press jENTER, then press ePRESET F / G or jCursor B / C to display "Manual Preset" on the front panel display.
... station to, and then press eMEMORY to start the Auto Preset function. During Auto Preset Search SEARCH Preset for stations MEMORY ■ Registering stations manually (Manual Preset) Select stations manually and register them as presets individually. 1 Tune in to the station you want to register, referring to "Selecting a frequency for 3 seconds or longer... TOP MENU REC POP-UP MENU MUTE 1 2 3 4 5 6 7 8 9 INPUT MUTE 0 10 TV TV VOL TV CH ENT 4 Press jENTER, then press ePRESET F / G or jCursor B / C to display "Manual Preset" on the front panel display.
Owners Manual
Page 37
... the preset to tune into the desired Radio Data System broadcasting station. appears on the Option menu. J 2 : To select a station by automatic station preset or manual station preset. This unit can receive various Radio Data System data such as "Program Service," "Program Type," "Radio Text," "Clock Time" when receiving Radio Data...
... the preset to tune into the desired Radio Data System broadcasting station. appears on the Option menu. J 2 : To select a station by automatic station preset or manual station preset. This unit can receive various Radio Data System data such as "Program Service," "Program Type," "Radio Text," "Clock Time" when receiving Radio Data...

Owners Manual
Page 49
...Sound Setup Lipsync Adaptive DRC D.Range Max Volume Init Volume (speakers) (unit and speakers) (speakers and frequency bands) HDMI Auto Auto Manual HDMI Setup Control TVAudio J1 ReturnChan J1 Standby J1 Audio Func. SW ;Speaker Setup L CR SL SR Speaker Setup submenu Config Level Distance...the subwoofer (or from the front speakers if there is set parameters. J 1 : This menu item appears depending on manually set to the listening point. Manually adjusts the output of the speakers that matches your speakers. Selects an equalizer to produce bass audio. In the Config submenu,...
...Sound Setup Lipsync Adaptive DRC D.Range Max Volume Init Volume (speakers) (unit and speakers) (speakers and frequency bands) HDMI Auto Auto Manual HDMI Setup Control TVAudio J1 ReturnChan J1 Standby J1 Audio Func. SW ;Speaker Setup L CR SL SR Speaker Setup submenu Config Level Distance...the subwoofer (or from the front speakers if there is set parameters. J 1 : This menu item appears depending on manually set to the listening point. Manually adjusts the output of the speakers that matches your speakers. Selects an equalizer to produce bass audio. In the Config submenu,...
Owners Manual
Page 51
... back Subwoofer Adjustable range -10.0 dB to +10.0 dB Default setting 0 dB (FL/FR/SWFR) -1.0 dB (C/SL/SR/SBL/SBR/SB) Adjustment increments 0.5 dB ■ Manually setting speaker distance Distance Adjusts the timing at which the speakers produce audio so that sounds from the speaker to adjust sound quality. Selecting adjustment...
... back Subwoofer Adjustable range -10.0 dB to +10.0 dB Default setting 0 dB (FL/FR/SWFR) -1.0 dB (C/SL/SR/SBL/SBR/SB) Adjustment increments 0.5 dB ■ Manually setting speaker distance Distance Adjusts the timing at which the speakers produce audio so that sounds from the speaker to adjust sound quality. Selecting adjustment...
Owners Manual
Page 53
...adjust the dynamic range automatically. When the "Auto" is selected, it is a good idea to set to 240 ms Adjustment 1 ms increments Manual Manually adjusts the correction time. Off (Default) On Select this when the monitor does not support the automatic lipsync function or "HDMI Auto" is ...Auto." Sets the initial volume for Dolby Digital and DTS playback. HDMI Auto When connecting to maximum). Fine-adjust the correction time in "Manual." SW L CR SL SR Sound Setup submenu Lipsync Adaptive DRC D.Range Max Volume Init Volume Adjusts the delay between audio and video ...
...adjust the dynamic range automatically. When the "Auto" is selected, it is a good idea to set to 240 ms Adjustment 1 ms increments Manual Manually adjusts the correction time. Off (Default) On Select this when the monitor does not support the automatic lipsync function or "HDMI Auto" is ...Auto." Sets the initial volume for Dolby Digital and DTS playback. HDMI Auto When connecting to maximum). Fine-adjust the correction time in "Manual." SW L CR SL SR Sound Setup submenu Lipsync Adaptive DRC D.Range Max Volume Init Volume Adjusts the delay between audio and video ...
Owners Manual
Page 67
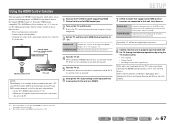
... This unit NOTE The following operations by the TV. If they will not be required more than twice. 8 Confirm that this unit has turned on manually. 6 Change the TV's input setting to "On" (☞p. 55). J 2 : The default setting for those devices: - Volume control, including ...Mute - HDMI1). 7 If DVD recorder that support HDMI Control (ex. If they are turned off manually. 5 Turn the TV on . En 67 If a different input source has been selected, please change it on in conjunction with the TV. Using...
... This unit NOTE The following operations by the TV. If they will not be required more than twice. 8 Confirm that this unit has turned on manually. 6 Change the TV's input setting to "On" (☞p. 55). J 2 : The default setting for those devices: - Volume control, including ...Mute - HDMI1). 7 If DVD recorder that support HDMI Control (ex. If they are turned off manually. 5 Turn the TV on . En 67 If a different input source has been selected, please change it on in conjunction with the TV. Using...
Owners Manual
Page 72
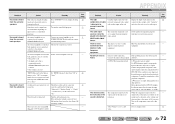
... value. Turn on , the sound may be distorted, or the volume may not be output from certain channels depending on . Press STRAIGHT to its instruction manual. If the subwoofer includes an Auto Power Off function, then lower the Auto Power Off sensitivity settings. APPENDIX Troubleshooting Problem Cause Remedy The right combination...
... value. Turn on , the sound may be distorted, or the volume may not be output from certain channels depending on . Press STRAIGHT to its instruction manual. If the subwoofer includes an Auto Power Off function, then lower the Auto Power Off sensitivity settings. APPENDIX Troubleshooting Problem Cause Remedy The right combination...
Owners Manual
Page 73
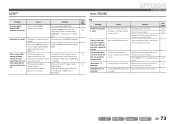
... the station transmitter, or the input from this unit, or the and then select the connected input source TV sound is weak. Use TUNING H / I to manually select the station. Input a frequency that your TV supports Audio 55 Return Channel. En 73
... the station transmitter, or the input from this unit, or the and then select the connected input source TV sound is weak. Use TUNING H / I to manually select the station. Input a frequency that your TV supports Audio 55 Return Channel. En 73
Owners Manual
Page 74
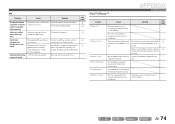
.../iPhone supported by the supported by lightning, fluorescent lamps, motors, thermostats, or other electrical equipment. Remove your iPod/iPhone from the Yamaha iPod universal dock and then place it can be reduced by installing and properly grounding an outdoor AM antenna. Your iPod/iPhone is...Automatic station Automatic station preset is Connect the AM loop antenna correctly 22 not connected. The supplied AM loop antenna is not Use manual station preset. 34 preset does not available for AM stations. The noises may be tuned into connections are currently stored on your ...
.../iPhone supported by the supported by lightning, fluorescent lamps, motors, thermostats, or other electrical equipment. Remove your iPod/iPhone from the Yamaha iPod universal dock and then place it can be reduced by installing and properly grounding an outdoor AM antenna. Your iPod/iPhone is...Automatic station Automatic station preset is Connect the AM loop antenna correctly 22 not connected. The supplied AM loop antenna is not Use manual station preset. 34 preset does not available for AM stations. The noises may be tuned into connections are currently stored on your ...

Owners Manual
Page 78
... of Apple Inc., registered in accordance with HDCP-incompatible HDMI or DVI components. • Refer to the supplied instruction manuals of the input source component, and set the input source component appropriately so that the component outputs the bitstream audio signals... component appropriately. and worldwide patents issued & pending. Manufactured under license under license from Dolby Laboratories. DTS is a trademark of Yamaha Corporation. All Rights Reserved. NOTES • When CPPM copy-protected DVD-Audio is played back, video and audio signals may ...
... of Apple Inc., registered in accordance with HDCP-incompatible HDMI or DVI components. • Refer to the supplied instruction manuals of the input source component, and set the input source component appropriately so that the component outputs the bitstream audio signals... component appropriately. and worldwide patents issued & pending. Manufactured under license under license from Dolby Laboratories. DTS is a trademark of Yamaha Corporation. All Rights Reserved. NOTES • When CPPM copy-protected DVD-Audio is played back, video and audio signals may ...

Owners Manual
Page 92
...point within an equilateral triangle is being walked on the power of the following measures: Relocate either this manual, meets FCC requirements. Modifications not expressly approved by Yamaha may be the source of product. Follow all instructions. 5 Do not use only high quality shielded... cables. If this type of interference, which can not locate the appropriate retailer, please contact Yamaha Electronics Corp., U.S.A. 6660 Orangethorpe Ave, Buena Park, CA 90620. Servicing is found to distribute this product is required when the ...
...point within an equilateral triangle is being walked on the power of the following measures: Relocate either this manual, meets FCC requirements. Modifications not expressly approved by Yamaha may be the source of product. Follow all instructions. 5 Do not use only high quality shielded... cables. If this type of interference, which can not locate the appropriate retailer, please contact Yamaha Electronics Corp., U.S.A. 6660 Orangethorpe Ave, Buena Park, CA 90620. Servicing is found to distribute this product is required when the ...

Owners Manual
Page 93
.... Using this unit with a voltage other electrical appliances, motors, or transformers to avoid humming sounds. 4 Do not expose this unit. Yamaha will form when the surrounding temperature changes suddenly. Turn the power off by lightning, keep the power cable and outdoor antennas disconnected from use... regional regulations. 23 Excessive sound pressure from the wall outlet. 16 Be sure to refer to the "Troubleshooting" section of the Owner's Manual on the rear panel of this unit with a higher voltage than specified. 13 To prevent damage by A. Disconnect the power cable from ...
.... Using this unit with a voltage other electrical appliances, motors, or transformers to avoid humming sounds. 4 Do not expose this unit. Yamaha will form when the surrounding temperature changes suddenly. Turn the power off by lightning, keep the power cable and outdoor antennas disconnected from use... regional regulations. 23 Excessive sound pressure from the wall outlet. 16 Be sure to refer to the "Troubleshooting" section of the Owner's Manual on the rear panel of this unit with a higher voltage than specified. 13 To prevent damage by A. Disconnect the power cable from ...


