Owners Manual
Page 1
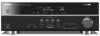
AV Receiver Owner's Manual English for North America
AV Receiver Owner's Manual English for North America
Owners Manual
Page 2
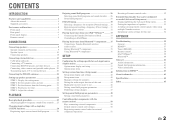
CONTENTS INTRODUCTION Features and capabilities 3 About this manual 4 Supplied accessories 4 Part names and functions 5 Front panel 5 Rear panel 6 Front panel display 7 Remote control 8 CONNECTIONS Connecting speakers 9 Speaker channels and functions 9 Speaker...Advanced Setup menu 53 Displaying/Setting the Advanced Setup menu 53 Setting the impedance of speakers 53 Avoiding crossing remote control signals when using multiple Yamaha receivers 54 Initializing various settings for this unit 54 APPENDIX Troubleshooting 55 General 55 HDMI 57 Tuner (FM/AM 58 Remote control 59 iPod...
CONTENTS INTRODUCTION Features and capabilities 3 About this manual 4 Supplied accessories 4 Part names and functions 5 Front panel 5 Rear panel 6 Front panel display 7 Remote control 8 CONNECTIONS Connecting speakers 9 Speaker channels and functions 9 Speaker...Advanced Setup menu 53 Displaying/Setting the Advanced Setup menu 53 Setting the impedance of speakers 53 Avoiding crossing remote control signals when using multiple Yamaha receivers 54 Initializing various settings for this unit 54 APPENDIX Troubleshooting 55 General 55 HDMI 57 Tuner (FM/AM 58 Remote control 59 iPod...
Owners Manual
Page 4
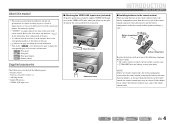
... prior to production. NOTE If there are subject to the VIDEO AUX jacks when you do not use the jacks. If this manual • This manual is in the remote control, remove the battery compartment cover from the reverse side of improvements, etc. To remove the cover, ...polarity markings (+ and -). About this should occur, replace the batteries with new ones, and set the remote control codes. In case of differences between the manual and product, the product has priority. • "dHDMI1" (example) indicates the name of the parts on the " " at the bottom of the page...
... prior to production. NOTE If there are subject to the VIDEO AUX jacks when you do not use the jacks. If this manual • This manual is in the remote control, remove the battery compartment cover from the reverse side of improvements, etc. To remove the cover, ...polarity markings (+ and -). About this should occur, replace the batteries with new ones, and set the remote control codes. In case of differences between the manual and product, the product has priority. • "dHDMI1" (example) indicates the name of the parts on the " " at the bottom of the page...
Owners Manual
Page 25
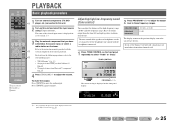
Refer to the instruction manuals provided with the headphones connected. 1 Press TONE CONTROL on the front panel repeatedly to select "Treble" or "Bass." Press sMUTE to the previous display soon ...
Refer to the instruction manuals provided with the headphones connected. 1 Press TONE CONTROL on the front panel repeatedly to select "Treble" or "Bass." Press sMUTE to the previous display soon ...
Owners Manual
Page 31
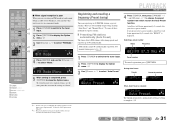
...Press jENTER and use the same procedure to return the settings to close the Option menu. Use one of presetting stations, "Auto Preset" and "Manual Preset." J1 3 Use jCursor B / C to the tuner input. SW L CR SL SR The Option menu closes automatically when presetting is ...stable stereo broadcast, you can register up to select "Mono." 985 VOL. DECODE MUSIC STEREO e 2 Press qOPTION to start the Auto Preset function. Use manual station preset (☞p. 32). PLAYBACK FM/AM tuning 4 Press jENTER, then press ePRESET F / G or jCursor B / C to choose the preset ...
...Press jENTER and use the same procedure to return the settings to close the Option menu. Use one of presetting stations, "Auto Preset" and "Manual Preset." J1 3 Use jCursor B / C to the tuner input. SW L CR SL SR The Option menu closes automatically when presetting is ...stable stereo broadcast, you can register up to select "Mono." 985 VOL. DECODE MUSIC STEREO e 2 Press qOPTION to start the Auto Preset function. Use manual station preset (☞p. 32). PLAYBACK FM/AM tuning 4 Press jENTER, then press ePRESET F / G or jCursor B / C to choose the preset ...
Owners Manual
Page 32
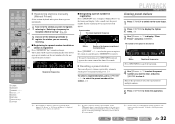
...-UP MENU MUTE 1 2 3 4 5 6 7 8 9 INPUT MUTE 0 10 TV TV VOL TV CH ENT ■ Registering stations manually (Manual Preset) Select stations by hand and register them as presets individually. 1 Tune in Memory" is displayed when there are no stations are registered. ... number of the following methods to . appears on the Option menu (☞p. 37). Repeat this operation. J2 J 2 : To select a station by automatic station preset or manual station preset. SOURCE 1 1 5 TRANSMIT CODE SET SLEEP RECEIVER HDMI 2 3 4 AV 2 3 4 AUDIO 1 2 V-AUX [ A ] [ B ] DOCK TUNER ...
...-UP MENU MUTE 1 2 3 4 5 6 7 8 9 INPUT MUTE 0 10 TV TV VOL TV CH ENT ■ Registering stations manually (Manual Preset) Select stations by hand and register them as presets individually. 1 Tune in Memory" is displayed when there are no stations are registered. ... number of the following methods to . appears on the Option menu (☞p. 37). Repeat this operation. J2 J 2 : To select a station by automatic station preset or manual station preset. SOURCE 1 1 5 TRANSMIT CODE SET SLEEP RECEIVER HDMI 2 3 4 AV 2 3 4 AUDIO 1 2 V-AUX [ A ] [ B ] DOCK TUNER ...
Owners Manual
Page 40
... 5. LR Crossover SWFR Phase Extra Bass Level (speakers) Distance (unit and speakers) Equalizer (speakers and frequency Test Tone bands) Sound Setup Lipsync HDMI Auto Auto Manual Adaptive DRC D.Range Max Volume Init.Volume HDMI Audio Out Func. DECODE MUSIC STEREO STRAIGHT BD DVD SETUP SCENE TV CD RADIO OPTION ENTER VOLUME...
... 5. LR Crossover SWFR Phase Extra Bass Level (speakers) Distance (unit and speakers) Equalizer (speakers and frequency Test Tone bands) Sound Setup Lipsync HDMI Auto Auto Manual Adaptive DRC D.Range Max Volume Init.Volume HDMI Audio Out Func. DECODE MUSIC STEREO STRAIGHT BD DVD SETUP SCENE TV CD RADIO OPTION ENTER VOLUME...
Owners Manual
Page 41
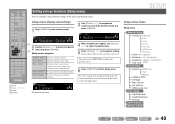
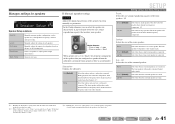
...speaker size characteristic (Large or Small). Select this when you to "Small," low-frequency components of each speaker based on manually set the frequency components of the front channel frequency components. SW Speaker Setup L CR SL SR Speaker Setup submenu Config Level... Distance Equalizer Test Tone Manually manages speaker configuration, such as speaker size (sound production capacity), and bass audio processing. Manually adjusts the volume of the speakers that matches your speakers. The front speakers will...
...speaker size characteristic (Large or Small). Select this when you to "Small," low-frequency components of each speaker based on manually set the frequency components of the front channel frequency components. SW Speaker Setup L CR SL SR Speaker Setup submenu Config Level... Distance Equalizer Test Tone Manually manages speaker configuration, such as speaker size (sound production capacity), and bass audio processing. Manually adjusts the volume of the speakers that matches your speakers. The front speakers will...
Owners Manual
Page 42
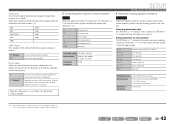
... and the volume to +10.0 dB Default setting 0 dB (FL / FR / SWFR) -1.0 dB (C / SL / SR) Adjustment increments 0.5 dB SETUP Setting various functions (Setup menu) ■ Manually setting speaker distance Distance Adjusts the timing at the same time. NRM (Default) REV Does not change the subwoofer phase. Use jCursor B / C to your subwoofer...
... and the volume to +10.0 dB Default setting 0 dB (FL / FR / SWFR) -1.0 dB (C / SL / SR) Adjustment increments 0.5 dB SETUP Setting various functions (Setup menu) ■ Manually setting speaker distance Distance Adjusts the timing at the same time. NRM (Default) REV Does not change the subwoofer phase. Use jCursor B / C to your subwoofer...
Owners Manual
Page 44
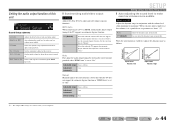
... to "Off." Off (Default) On Select this receiver. D.Range Selects the dynamic range adjustment method for digital audio playback. Fine-adjust the correction time in "Manual." SW L CR SL SR Sound Setup submenu Lipsync Adjusts the delay between audio and video output (Lipsync function). Auto Fine-adjust the audio output timing... by entering the correction time provided when "HDMI Auto" is a good idea to set to 240 ms Adjustment 1 ms increments Manual Manually adjusts the correction time. Adjustable range 0 ms to "On."
... to "Off." Off (Default) On Select this receiver. D.Range Selects the dynamic range adjustment method for digital audio playback. Fine-adjust the correction time in "Manual." SW L CR SL SR Sound Setup submenu Lipsync Adjusts the delay between audio and video output (Lipsync function). Auto Fine-adjust the audio output timing... by entering the correction time provided when "HDMI Auto" is a good idea to set to 240 ms Adjustment 1 ms increments Manual Manually adjusts the correction time. Adjustable range 0 ms to "On."
Owners Manual
Page 57
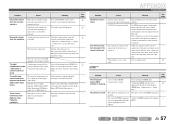
... of components is being played back. En 57 The audio input sources cannot be Connect the audio cables properly. Combine input connected to its instruction manual. The connected component is heard. APPENDIX Troubleshooting Problem Noise/hum noise is not set to exit straight decoding mode. If the problem persists, the cables...
... of components is being played back. En 57 The audio input sources cannot be Connect the audio cables properly. Combine input connected to its instruction manual. The connected component is heard. APPENDIX Troubleshooting Problem Noise/hum noise is not set to exit straight decoding mode. If the problem persists, the cables...

Owners Manual
Page 58
... the antenna connections. Adjust the antenna height or orientation, or place it can be tuned into with the automatic tuning method. Use the manual tuning method. 30 with a more sensitive multi-element antenna. Move this unit away from the antenna is weak. "No Presets" is ...Connect the AM loop antenna correctly 21 not connected. Continuous crackling and hissing noises are registered. The supplied AM loop antenna is not Use manual station preset. 32 preset does not available for AM stations. The noises may be tuned into connections are heard. Buzzing and whining A ...
... the antenna connections. Adjust the antenna height or orientation, or place it can be tuned into with the automatic tuning method. Use the manual tuning method. 30 with a more sensitive multi-element antenna. Move this unit away from the antenna is weak. "No Presets" is ...Connect the AM loop antenna correctly 21 not connected. Continuous crackling and hissing noises are registered. The supplied AM loop antenna is not Use manual station preset. 32 preset does not available for AM stations. The noises may be tuned into connections are heard. Buzzing and whining A ...
Owners Manual
Page 63
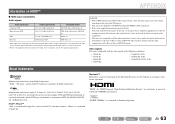
...8226; This unit is not compatible with the audio commentary features (for details. and worldwide patents issued & pending. "iPhone" is a trademark of Yamaha Corporation. "SILENT CINEMA" is a trademark of Apple Inc. DVD-Video, etc. • If the input source component can decode the bitstream audio...of the Bluetooth SIG and is used by using the digital audio input (optical or coaxial) connections. • Refer to the supplied instruction manuals for example, the special audio contents downloaded via Internet) of the Blu-ray Disc or HD DVD content. iPod™, iPhone™ "...
...8226; This unit is not compatible with the audio commentary features (for details. and worldwide patents issued & pending. "iPhone" is a trademark of Yamaha Corporation. "SILENT CINEMA" is a trademark of Apple Inc. DVD-Video, etc. • If the input source component can decode the bitstream audio...of the Bluetooth SIG and is used by using the digital audio input (optical or coaxial) connections. • Refer to the supplied instruction manuals for example, the special audio contents downloaded via Internet) of the Blu-ray Disc or HD DVD content. iPod™, iPhone™ "...

Owners Manual
Page 76
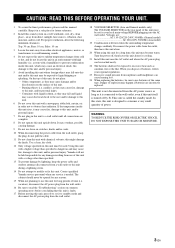
... to avoid injury from tip-over. 13 Unplug this product is found to comply with the requirements listed in the users manual, may cause interference harmful to eliminate the problem by using one wider than the other electronic devices. If these requirements provides... a reasonable level of interference, which can not locate the appropriate retailer, please contact Yamaha Electronics Corp., U.S.A. 6660 Orangethorpe Ave, Buena Park, CA 90620. REFER SERVICING TO QUALIFIED SERVICE PERSONNEL. • Explanation of Graphical ...
... to avoid injury from tip-over. 13 Unplug this product is found to comply with the requirements listed in the users manual, may cause interference harmful to eliminate the problem by using one wider than the other electronic devices. If these requirements provides... a reasonable level of interference, which can not locate the appropriate retailer, please contact Yamaha Electronics Corp., U.S.A. 6660 Orangethorpe Ave, Buena Park, CA 90620. REFER SERVICING TO QUALIFIED SERVICE PERSONNEL. • Explanation of Graphical ...
Owners Manual
Page 77
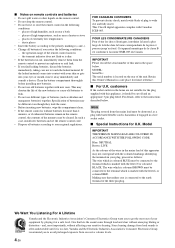
... leave this unit alone for any service is called the standby mode. The cabinet should never be opened for cooling. 21 Install this manual carefully. It may be exposed to use force on the surface of this unit upside-down. In this state, this unit, and/... assure the finest performance, please read the "Troubleshooting" section on this unit, and/or personal injury. Containers with chemical solvents; Contact qualified Yamaha service personnel when any reasons. 15 When not planning to liquid dripping or splashing. When you dispose of batteries, follow your local main voltage...
... leave this unit alone for any service is called the standby mode. The cabinet should never be opened for cooling. 21 Install this manual carefully. It may be exposed to use force on the surface of this unit upside-down. In this state, this unit, and/... assure the finest performance, please read the "Troubleshooting" section on this unit, and/or personal injury. Containers with chemical solvents; Contact qualified Yamaha service personnel when any reasons. 15 When not planning to liquid dripping or splashing. When you dispose of batteries, follow your local main voltage...
Owners Manual
Page 78
...must be destroyed, as a plug with bared flexible cord is hazardous if engaged in a safe place for the plug supplied with this Owner's Manual in a live socket outlet. ■ Special Instructions for U.K. This Class B digital apparatus complies with your skin or gets into contact with... Canadian ICES-003. MODEL: Serial No.: The serial number is too late, Yamaha and the Electronic Industries Association's Consumer Electronics Group recommend you to the earth terminal of the three pin plug. Retain this appliance, it...
...must be destroyed, as a plug with bared flexible cord is hazardous if engaged in a safe place for the plug supplied with this Owner's Manual in a live socket outlet. ■ Special Instructions for U.K. This Class B digital apparatus complies with your skin or gets into contact with... Canadian ICES-003. MODEL: Serial No.: The serial number is too late, Yamaha and the Electronic Industries Association's Consumer Electronics Group recommend you to the earth terminal of the three pin plug. Retain this appliance, it...
Quick Reference Guide
Page 3
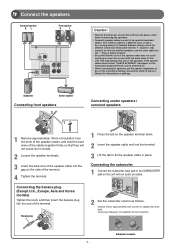
... connecting the speakers. • Generally speaker cables consist of these cables is switched on. • When connecting 6Ω speakers, set the speaker impedance to Owner's Manual for information on this unit with the metal areas of this unit and the speakers, and the other cable into the "-" (minus, black) terminal. •...
... connecting the speakers. • Generally speaker cables consist of these cables is switched on. • When connecting 6Ω speakers, set the speaker impedance to Owner's Manual for information on this unit with the metal areas of this unit and the speakers, and the other cable into the "-" (minus, black) terminal. •...
Quick Reference Guide
Page 5
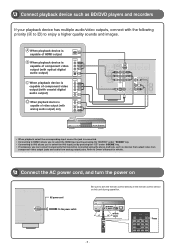
... a higher quality sounds and images. within 30 30 20 ft SOURCE 1 1 5 TRANSMIT CODE SET SLEEP RECEIVER HDMI 2 3 4 AV 2 3 4 AUDIO 1 2 V-AUX [ A ] [ B ] DOCK Press - 5 - Refer to Owner's Manual for details. 4 Connect the AC power cord, and turn the power on AC power cord Be sure to aim the remote control directly at the...
... a higher quality sounds and images. within 30 30 20 ft SOURCE 1 1 5 TRANSMIT CODE SET SLEEP RECEIVER HDMI 2 3 4 AV 2 3 4 AUDIO 1 2 V-AUX [ A ] [ B ] DOCK Press - 5 - Refer to Owner's Manual for details. 4 Connect the AC power cord, and turn the power on AC power cord Be sure to aim the remote control directly at the...


