
Owner's Manual
Page 2
... force, and uneven surfaces may block the ventilation openings; The unit should be connected to operate normally or exhibits a marked change in the operating instructions or as recommended by qualified service personnel when: A. The unit does not appear to a power supply only of this Owner's Manual in the literature accompanying the appliance. All other instructions should be followed. 5 Water and Moisture - CAUTION...
... force, and uneven surfaces may block the ventilation openings; The unit should be connected to operate normally or exhibits a marked change in the operating instructions or as recommended by qualified service personnel when: A. The unit does not appear to a power supply only of this Owner's Manual in the literature accompanying the appliance. All other instructions should be followed. 5 Water and Moisture - CAUTION...
Owner's Manual
Page 3
... follow instructions could void your FCC authorization to use the product. 2. Compliance with regard to proper grounding of the mast and supporting structure, grounding of the lead-in wire to an antenna discharge unit, size of grounding conductors, location of other electronic devices. The above statements apply ONLY to the operation of antenna discharge unit, connection to coaxial type cable. PART H) FCC...
... follow instructions could void your FCC authorization to use the product. 2. Compliance with regard to proper grounding of the mast and supporting structure, grounding of the lead-in wire to an antenna discharge unit, size of grounding conductors, location of other electronic devices. The above statements apply ONLY to the operation of antenna discharge unit, connection to coaxial type cable. PART H) FCC...
Owner's Manual
Page 4
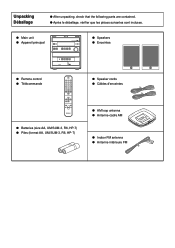
.../TUNING/BAND A/B/C/D/E / DIGITAL AUDIO YMERSION B.BOOST MUSIC UP DOWN VOLUME MINI COMPONENT SYSTEM GX-505 DIRECTION AUTO REVERSE CASSETTE DECK DOLBY B NR OPEN/ CLOSE q Remote control q Télécommande POWER 1 2 3 1 2 3 4 5 6 4 5 6 7 8 9 7 8 0 TUNER +I0 PRESET PRESET TIME PROG R.TIME A EDIT B C DISC SKIP MODE D E CD / DIRECTION TAPE REC/ PAUSE YMERSION SLEEP MUSIC INPUT VOLUME q Batteries (size AA, UM/SUM-3, R6, HP-7) q Piles (format AA, UM/SUM-3, R6, HP-7) q Speakers q Enceintes q Speaker cords q Câbles d'enceintes q AM loop antenna...
.../TUNING/BAND A/B/C/D/E / DIGITAL AUDIO YMERSION B.BOOST MUSIC UP DOWN VOLUME MINI COMPONENT SYSTEM GX-505 DIRECTION AUTO REVERSE CASSETTE DECK DOLBY B NR OPEN/ CLOSE q Remote control q Télécommande POWER 1 2 3 1 2 3 4 5 6 4 5 6 7 8 9 7 8 0 TUNER +I0 PRESET PRESET TIME PROG R.TIME A EDIT B C DISC SKIP MODE D E CD / DIRECTION TAPE REC/ PAUSE YMERSION SLEEP MUSIC INPUT VOLUME q Batteries (size AA, UM/SUM-3, R6, HP-7) q Piles (format AA, UM/SUM-3, R6, HP-7) q Speakers q Enceintes q Speaker cords q Câbles d'enceintes q AM loop antenna...
Owner's Manual
Page 10
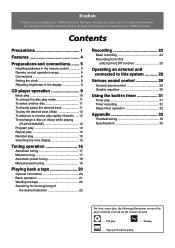
... tape 22 Searching for purchasing this YAMAHA product. Tuning ...... We hope it will guide you in the remote control 5 Remote control operation range 5 Connections 6 Setting the clock 8 Adjusting brightness of the desired selection 22 Recording 23 Basic recording 23 Recording from CDs utilizing the EDIT function 25 Operating an external unit connected to this manual carefully. English Thank you for the beginning of the display 8 CD player operation 9 Basic play 10 To change the disc play mode...
... tape 22 Searching for purchasing this YAMAHA product. Tuning ...... We hope it will guide you in the remote control 5 Remote control operation range 5 Connections 6 Setting the clock 8 Adjusting brightness of the desired selection 22 Recording 23 Basic recording 23 Recording from CDs utilizing the EDIT function 25 Operating an external unit connected to this manual carefully. English Thank you for the beginning of the display 8 CD player operation 9 Basic play 10 To change the disc play mode...
Owner's Manual
Page 11
...; Tape head Leave the power on switches, controls or connection wires. s To prevent lightning damage, disconnect the AC power plug and the antenna cable when there is not defeated. s Choose the installation location of time (ie., vacation, etc.), disconnect the AC power plug from use this system for any damage resulting from the wall outlet. It may cause damage to clean this system with the volume control setting at a given volume setting...
...; Tape head Leave the power on switches, controls or connection wires. s To prevent lightning damage, disconnect the AC power plug and the antenna cable when there is not defeated. s Choose the installation location of time (ie., vacation, etc.), disconnect the AC power plug from use this system for any damage resulting from the wall outlet. It may cause damage to clean this system with the volume control setting at a given volume setting...
Owner's Manual
Page 12
... not disconnected from the AC power source as long as it . After you confirm that "NO DISC" lights up on the display, turn this system into the standby mode by pressing the OPEN/ CLOSE button. To avoid electric shock, do not expose this system to rain or moisture. This state is designed to consume a certain amount of plug to disassemble the cabinet. CAUTION...
... not disconnected from the AC power source as long as it . After you confirm that "NO DISC" lights up on the display, turn this system into the standby mode by pressing the OPEN/ CLOSE button. To avoid electric shock, do not expose this system to rain or moisture. This state is designed to consume a certain amount of plug to disassemble the cabinet. CAUTION...
Owner's Manual
Page 15
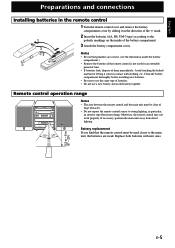
Remote control operation range 3-DISC CD CHANGER STANDBY / ON STANDBY TIMER INPUT DISC1 DISC2 DISC3 DISC CHANGE OPEN/CLOSE PRESET/TUNING/BAND A/B/C/D/E / DIGITAL AUDIO YMERSION B.BOOST MUSIC UP DOWN VOLUME MINI COMPONENT SYSTEM GX-505 DIRECTION AUTO REVERSE CASSETTE DECK DOLBY B NR OPEN/ CLOSE 30° 30° Notes • The area between the remote control and the main unit must be clear of large obstacles. • Do not expose the remote control sensor to the main unit, the batteries are correct. (see the...
Remote control operation range 3-DISC CD CHANGER STANDBY / ON STANDBY TIMER INPUT DISC1 DISC2 DISC3 DISC CHANGE OPEN/CLOSE PRESET/TUNING/BAND A/B/C/D/E / DIGITAL AUDIO YMERSION B.BOOST MUSIC UP DOWN VOLUME MINI COMPONENT SYSTEM GX-505 DIRECTION AUTO REVERSE CASSETTE DECK DOLBY B NR OPEN/ CLOSE 30° 30° Notes • The area between the remote control and the main unit must be clear of large obstacles. • Do not expose the remote control sensor to the main unit, the batteries are correct. (see the...
Owner's Manual
Page 16
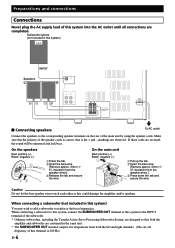
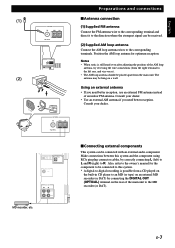
... system) INPUT Speakers L SUBWOOFER OUT R AUX/MD R L OUT IN R L 6 MIN./SPEAKER SEE OWNER'S MANUAL FOR CONNECTION. If these cords are observed. Make sure that the polarity of this system to the INPUT terminal of the subwoofer. * Ordinary subwoofers, including the Yamaha Active Servo Processing Subwoofer System, are designed so that is the + and - Preparations and connections Connections Never plug the AC supply lead of the speaker cords is correct, that both the left and right channels...
... system) INPUT Speakers L SUBWOOFER OUT R AUX/MD R L OUT IN R L 6 MIN./SPEAKER SEE OWNER'S MANUAL FOR CONNECTION. If these cords are observed. Make sure that the polarity of this system to the INPUT terminal of the subwoofer. * Ordinary subwoofers, including the Yamaha Active Servo Processing Subwoofer System, are designed so that is the + and - Preparations and connections Connections Never plug the AC supply lead of the speaker cords is correct, that both the left and right channels...
Owner's Manual
Page 17
... audio component. FREQUENCY STEP 50 KHZ 9 KHZ FM AM 100 KHZ 10 KHZ DIGITAL OUT OPTICAL SUBWOOFER OUT AUX/MD R L OUT IN R MD recorder, etc. Notes • When static is possible from a CD played on the built-in CD player to an MD (or tape) on a wall. Consult your dealer. • Use an external AM antenna if you need better reception. Make connections between this system. * A digital...
... audio component. FREQUENCY STEP 50 KHZ 9 KHZ FM AM 100 KHZ 10 KHZ DIGITAL OUT OPTICAL SUBWOOFER OUT AUX/MD R L OUT IN R MD recorder, etc. Notes • When static is possible from a CD played on the built-in CD player to an MD (or tape) on a wall. Consult your dealer. • Use an external AM antenna if you need better reception. Make connections between this system. * A digital...
Owner's Manual
Page 18
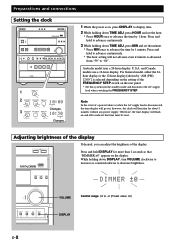
... DISPLAY E-8 Adjusting brightness of the display DISC CHANGE OPEN/CLOSE DIGITAL AUDIO If desired, you can adjust the brightness of a power failure or when the AC supply lead is on the display. U.S.A. and Canada models use a 12-hour display. Press and hold to advance continuously. * The hour setting will flash on the rear panel. * Set this system into the standby mode and disconnect the AC supply lead when switching the FREQUENCY STEP. While holding down DISPLAY, turn VOLUME...
... DISPLAY E-8 Adjusting brightness of the display DISC CHANGE OPEN/CLOSE DIGITAL AUDIO If desired, you can adjust the brightness of a power failure or when the AC supply lead is on the display. U.S.A. and Canada models use a 12-hour display. Press and hold to advance continuously. * The hour setting will flash on the rear panel. * Set this system into the standby mode and disconnect the AC supply lead when switching the FREQUENCY STEP. While holding down DISPLAY, turn VOLUME...

Owner's Manual
Page 19
... 1K 3.5K 10K TOTAL REM MUSIC PROGRAM RANDOM CD 123456 7 8 9 10 11 12 13 14 15 OVER 15 4 5 6 78 S F REP PROG VOLUME 90 1 TRACK (track number) 2 Time display 3 Disc indicator The number on the top of this indicator shows the currently selected disc. 4 CD (input source indicator) 5 (play) 6 RANDOM 7 Music calendar Track numbers on the currently selected disc will light up (up to the number 15). 8 OVER 15 This...
... 1K 3.5K 10K TOTAL REM MUSIC PROGRAM RANDOM CD 123456 7 8 9 10 11 12 13 14 15 OVER 15 4 5 6 78 S F REP PROG VOLUME 90 1 TRACK (track number) 2 Time display 3 Disc indicator The number on the top of this indicator shows the currently selected disc. 4 CD (input source indicator) 5 (play) 6 RANDOM 7 Music calendar Track numbers on the currently selected disc will light up (up to the number 15). 8 OVER 15 This...
Owner's Manual
Page 20
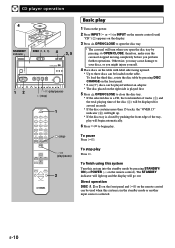
...the standby mode or another input source is selected. CD player operation 4 STANDBY indicator DISC (1, 2, 3) DISC1 DISC2 DISC3 4 DISC CHANGE OPEN/CLOSE 3, 5 3-DISC CD CHANGER STANDBY / ON STANDBY TIMER INPUT PRESET/TUNING/BAND A/B/C/D/E / DIGITAL AUDIO YMERSION B.BOOST MUSIC UP DOWN VOLUME 1 PHONES BASS TREBLE MODE DOLBY NR REC/ PAUSE AUTO/ MANUAL MEMORY RANDOM REPEAT TIME DISPLAY 2 / (play/pause) (stop) POWER 1 2 3 1 2 3 4 5 6 4 5 6 7 8 9 7 8 0 TUNER +I0 PRESET PRESET TIME PROG R.TIME A EDIT B C DISC SKIP MODE D E CD / DIRECTION TAPE...
...the standby mode or another input source is selected. CD player operation 4 STANDBY indicator DISC (1, 2, 3) DISC1 DISC2 DISC3 4 DISC CHANGE OPEN/CLOSE 3, 5 3-DISC CD CHANGER STANDBY / ON STANDBY TIMER INPUT PRESET/TUNING/BAND A/B/C/D/E / DIGITAL AUDIO YMERSION B.BOOST MUSIC UP DOWN VOLUME 1 PHONES BASS TREBLE MODE DOLBY NR REC/ PAUSE AUTO/ MANUAL MEMORY RANDOM REPEAT TIME DISPLAY 2 / (play/pause) (stop) POWER 1 2 3 1 2 3 4 5 6 4 5 6 7 8 9 7 8 0 TUNER +I0 PRESET PRESET TIME PROG R.TIME A EDIT B C DISC SKIP MODE D E CD / DIRECTION TAPE...
Owner's Manual
Page 21
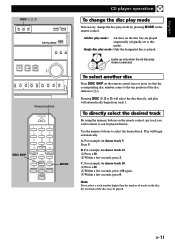
... DISC3 DISC CHANGE OPEN/CLOSE DIGITAL AUDIO YMERSION B.BOOST MUSIC PRESET/TUNING/BAND A/B/C/D/E / UP DOWN VOLUME ODE DOLBY NR REC/ PAUSE AUTO/ MANUAL MEMORY RANDOM REPEAT TIME DISPLAY TIMER TIME ADJ HOUR MIN Numeric buttons POWER DISC SKIP 1 2 3 1 2 3 4 5 6 4 5 6 7 8 9 7 8 0 TUNER +I0 PRESET PRESET TIME PROG R.TIME A EDIT B C DISC SKIP MODE D E CD / MODE CD player operation To change the disc play mode If necessary, change the disc play mode by pressing MODE on the remote control, any track you select a track number higher than the number of...
... DISC3 DISC CHANGE OPEN/CLOSE DIGITAL AUDIO YMERSION B.BOOST MUSIC PRESET/TUNING/BAND A/B/C/D/E / UP DOWN VOLUME ODE DOLBY NR REC/ PAUSE AUTO/ MANUAL MEMORY RANDOM REPEAT TIME DISPLAY TIMER TIME ADJ HOUR MIN Numeric buttons POWER DISC SKIP 1 2 3 1 2 3 4 5 6 4 5 6 7 8 9 7 8 0 TUNER +I0 PRESET PRESET TIME PROG R.TIME A EDIT B C DISC SKIP MODE D E CD / MODE CD player operation To change the disc play mode If necessary, change the disc play mode by pressing MODE on the remote control, any track you select a track number higher than the number of...

Owner's Manual
Page 25
... single disc play mode is selected, select the desired disc by pressing DISC SKIP. 2 Press RANDOM to begin random play. * The "RANDOM" indicator (6) will be displayed. TRACK TOTAL The total remaining play time of the disc will be displayed. English CD player operation DISC CHANGE OPEN/CLOSE DIGITAL AUDIO YMERSION B.BOOST MUSIC UP DOWN VOLUME RANDOM O/ UAL MEMORY RANDOM REPEAT TIME DISPLAY R TIME ADJ HOUR MIN Random play Tracks on a selected disc or all discs on the disc tray...
... single disc play mode is selected, select the desired disc by pressing DISC SKIP. 2 Press RANDOM to begin random play. * The "RANDOM" indicator (6) will be displayed. TRACK TOTAL The total remaining play time of the disc will be displayed. English CD player operation DISC CHANGE OPEN/CLOSE DIGITAL AUDIO YMERSION B.BOOST MUSIC UP DOWN VOLUME RANDOM O/ UAL MEMORY RANDOM REPEAT TIME DISPLAY R TIME ADJ HOUR MIN Random play Tracks on a selected disc or all discs on the disc tray...
Owner's Manual
Page 29
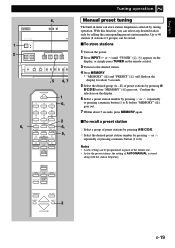
... preset stations by tuning operation. Notes • A new setting can be programmed in to 8). English 6, 2 DISC1 DISC2 DISC3 1 2 3-DISC CD CHANGER STANDBY / ON STANDBY TIMER INPUT PRESET/TUNING/BAND A/B/C/D/E / PHONES BASS TREBLE MODE DOLBY NR REC/ PAUSE AUTO/ MANUAL MEMORY RANDO TIMER TIME ADJ HOUR 1, 5 4, 7 6, 2 POWER 1 2 3 1 2 3 4 5 6 4 5 6 7 8 9 7 8 0 TUNER +I0 PRESET PRESET TIME PROG R.TIME A EDIT B C DISC SKIP MODE D E 1 6, 2 2 6, 2 5, 1 CD / DIRECTION TAPE REC/ PAUSE Tuning operation Manual preset tuning The built-in tuner can...
... preset stations by tuning operation. Notes • A new setting can be programmed in to 8). English 6, 2 DISC1 DISC2 DISC3 1 2 3-DISC CD CHANGER STANDBY / ON STANDBY TIMER INPUT PRESET/TUNING/BAND A/B/C/D/E / PHONES BASS TREBLE MODE DOLBY NR REC/ PAUSE AUTO/ MANUAL MEMORY RANDO TIMER TIME ADJ HOUR 1, 5 4, 7 6, 2 POWER 1 2 3 1 2 3 4 5 6 4 5 6 7 8 9 7 8 0 TUNER +I0 PRESET PRESET TIME PROG R.TIME A EDIT B C DISC SKIP MODE D E 1 6, 2 2 6, 2 5, 1 CD / DIRECTION TAPE REC/ PAUSE Tuning operation Manual preset tuning The built-in tuner can...
Owner's Manual
Page 33
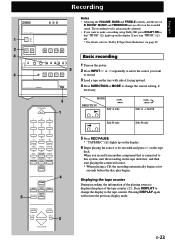
... PAUSE AUTO/ MANUAL MEMORY RAN TIMER TIME ADJ H 5 AUTO REVERSE CASSETTE DECK DOLBY B NR OPEN/ CLOSE POWER 1 2 3 1 2 3 4 5 6 4 5 6 7 8 9 7 8 0 TUNER +I0 PRESET PRESET TIME PROG R.TIME A EDIT B C DISC SKIP MODE D E CD / 3 1 4 DIRECTION TAPE 5 REC/ PAUSE Notes • Adjusting the VOLUME, BASS and TREBLE controls, and the use of the tape counter (1). The recording level is automatically adjusted. • If you want to record. 3 Load a tape on the tray with side A facing upward. 4 Press DIRECTION or MODE to change the display to this system, start...
... PAUSE AUTO/ MANUAL MEMORY RAN TIMER TIME ADJ H 5 AUTO REVERSE CASSETTE DECK DOLBY B NR OPEN/ CLOSE POWER 1 2 3 1 2 3 4 5 6 4 5 6 7 8 9 7 8 0 TUNER +I0 PRESET PRESET TIME PROG R.TIME A EDIT B C DISC SKIP MODE D E CD / 3 1 4 DIRECTION TAPE 5 REC/ PAUSE Notes • Adjusting the VOLUME, BASS and TREBLE controls, and the use of the tape counter (1). The recording level is automatically adjusted. • If you want to record. 3 Load a tape on the tray with side A facing upward. 4 Press DIRECTION or MODE to change the display to this system, start...

Owner's Manual
Page 38
... INPUT on the remote control) until "AUX/MD" appears on the display. 2 Play the source. 3 Adjust the volume to the AUX/MD terminals on the rear of the main unit to confirm the input source. 3 Begin recording on this system DISC1 DISC2 DISC3 DISC CHANGE OPEN/CLOSE 3-DISC CD CHANGER STANDBY / ON STANDBY TIMER INPUT PRESET/TUNING/BAND A/B/C/D/E / DIGITAL AUDIO YMERSION B.BOOST MUSIC UP DOWN VOLUME PHONES BASS TREBLE MODE DOLBY NR REC/ PAUSE AUTO/ MANUAL MEMORY RANDOM REPEAT TIME DISPLAY TIMER TIME ADJ HOUR MIN DIRECTION AUTO REVERSE CASSETTE DECK DOLBY B NR OPEN...
... INPUT on the remote control) until "AUX/MD" appears on the display. 2 Play the source. 3 Adjust the volume to the AUX/MD terminals on the rear of the main unit to confirm the input source. 3 Begin recording on this system DISC1 DISC2 DISC3 DISC CHANGE OPEN/CLOSE 3-DISC CD CHANGER STANDBY / ON STANDBY TIMER INPUT PRESET/TUNING/BAND A/B/C/D/E / DIGITAL AUDIO YMERSION B.BOOST MUSIC UP DOWN VOLUME PHONES BASS TREBLE MODE DOLBY NR REC/ PAUSE AUTO/ MANUAL MEMORY RANDOM REPEAT TIME DISPLAY TIMER TIME ADJ HOUR MIN DIRECTION AUTO REVERSE CASSETTE DECK DOLBY B NR OPEN...
Owner's Manual
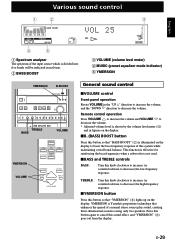
Page 39
... 3-DISC CD CHANGER STANDBY / ON STANDBY TIMER INPUT PRESET/TUNING/BAND A/B/C/D/E / DIGITAL AUDIO YMERSION B.BOOST MUSIC UP DOWN VOLUME PHONES BASS TREBLE MODE DOLBY NR REC/ PAUSE AUTO/ MANUAL MEMORY RANDOM REPEAT TIME DISPLAY TIMER TIME ADJ HOUR MIN DIRECTION TREBLE BASS VOLUME DIRECTION YMERSION VOLUME TAPE REC/ PAUSE YMERSION SLEEP MUSIC INPUT VOLUME General sound control s VOLUME control Front panel operation Rotate VOLUME in figures on the display. TREBLE : Turn this button so that "BASS BOOST" (2) is not used. Remote control operation Press VOLUME to...
... 3-DISC CD CHANGER STANDBY / ON STANDBY TIMER INPUT PRESET/TUNING/BAND A/B/C/D/E / DIGITAL AUDIO YMERSION B.BOOST MUSIC UP DOWN VOLUME PHONES BASS TREBLE MODE DOLBY NR REC/ PAUSE AUTO/ MANUAL MEMORY RANDOM REPEAT TIME DISPLAY TIMER TIME ADJ HOUR MIN DIRECTION TREBLE BASS VOLUME DIRECTION YMERSION VOLUME TAPE REC/ PAUSE YMERSION SLEEP MUSIC INPUT VOLUME General sound control s VOLUME control Front panel operation Rotate VOLUME in figures on the display. TREBLE : Turn this button so that "BASS BOOST" (2) is not used. Remote control operation Press VOLUME to...
Owner's Manual
Page 41
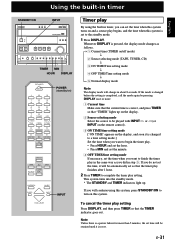
...DISC2 DISC3 INPUT DISC CHANGE OPEN/CLOSE 3-DISC CD CHANGER STANDBY / ON STANDBY TIMER INPUT PRESET/TUNING/BAND A/B/C/D/E / DIGITAL AUDIO YMERSION B.BOOST MUSIC UP DOWN VOLUME PHONES BASS TREBLE MODE DOLBY NR REC/ PAUSE AUTO/ MANUAL MEMORY RANDOM REPEAT TIME DISPLAY TIMER TIME ADJ HOUR MIN TIMER MIN HOUR DISPLAY POWER 1 2 3 1 2 3 4 5 6 4 5 6 7 8 9 7 8 0 TUNER +I0 PRESET PRESET TIME PROG R.TIME A EDIT B C DISC SKIP MODE D E CD / POWER (standby/on) DIRECTION TAPE REC/ PAUSE YMERSION SLEEP MUSIC INPUT INPUT VOLUME Timer play By using the...
...DISC2 DISC3 INPUT DISC CHANGE OPEN/CLOSE 3-DISC CD CHANGER STANDBY / ON STANDBY TIMER INPUT PRESET/TUNING/BAND A/B/C/D/E / DIGITAL AUDIO YMERSION B.BOOST MUSIC UP DOWN VOLUME PHONES BASS TREBLE MODE DOLBY NR REC/ PAUSE AUTO/ MANUAL MEMORY RANDOM REPEAT TIME DISPLAY TIMER TIME ADJ HOUR MIN TIMER MIN HOUR DISPLAY POWER 1 2 3 1 2 3 4 5 6 4 5 6 7 8 9 7 8 0 TUNER +I0 PRESET PRESET TIME PROG R.TIME A EDIT B C DISC SKIP MODE D E CD / POWER (standby/on) DIRECTION TAPE REC/ PAUSE YMERSION SLEEP MUSIC INPUT INPUT VOLUME Timer play By using the...
Owner's Manual
Page 43
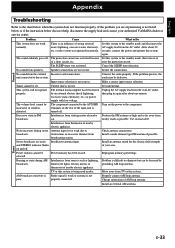
... circuit, etc. Install a multi-element type FM antenna if possible. Problem is being used nearby. Speaker connections are noisy Insufficient antenna input. The component connected to the AUX/MD terminals on to reset the protection circuit. Set this system. Use coaxial cable. Check antenna connections. The protection circuit was activated because of nearby electric appliance. No sound from broadcasting station. Stereo broadcasts are not secure. Turn on and off . English Appendix Troubleshooting Refer to...
... circuit, etc. Install a multi-element type FM antenna if possible. Problem is being used nearby. Speaker connections are noisy Insufficient antenna input. The component connected to the AUX/MD terminals on to reset the protection circuit. Set this system. Use coaxial cable. Check antenna connections. The protection circuit was activated because of nearby electric appliance. No sound from broadcasting station. Stereo broadcasts are not secure. Turn on and off . English Appendix Troubleshooting Refer to...


