
Owner's Manual
Page 4
... OPEN. CAUTION: READ THIS BEFORE OPERATING YOUR UNIT 1 To assure the finest performance, please read the "TROUBLESHOOTING" section on a flat, hard and stable surface. 19 There must be connected to this unit, and/or personal injury.YAMAHA will be opened for any service is needed.The cabinet should remove the cover or attempt to obstruct heat radiation. Never make or change connections...
... OPEN. CAUTION: READ THIS BEFORE OPERATING YOUR UNIT 1 To assure the finest performance, please read the "TROUBLESHOOTING" section on a flat, hard and stable surface. 19 There must be connected to this unit, and/or personal injury.YAMAHA will be opened for any service is needed.The cabinet should remove the cover or attempt to obstruct heat radiation. Never make or change connections...
Owner's Manual
Page 5
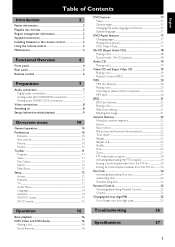
...four-digit code 25 Operation 16 Troubleshooting 26 Basic playback 16 DVD-Video and DVD-Audio 16 Specifications 27 Playing a disc 16 Smart Resume 16 1 English Table of Contents Introduction 2 Patent information 2 Playable disc formats 2 Region management information 2 Supplied accessories 3 Installing batteries in the remote control 3 Using the remote control 3 Maintenance 3 Functional Overview 4 Front panel 4 Rear panel 5 Remote control 6 Preparation 7 Audio connection 7 Digital audio connections 7 Analog audio (6CH DISCRETE) connection 7 Analog audio...
...four-digit code 25 Operation 16 Troubleshooting 26 Basic playback 16 DVD-Video and DVD-Audio 16 Specifications 27 Playing a disc 16 Smart Resume 16 1 English Table of Contents Introduction 2 Patent information 2 Playable disc formats 2 Region management information 2 Supplied accessories 3 Installing batteries in the remote control 3 Using the remote control 3 Maintenance 3 Functional Overview 4 Front panel 4 Rear panel 5 Remote control 6 Preparation 7 Audio connection 7 Digital audio connections 7 Analog audio (6CH DISCRETE) connection 7 Analog audio...
Owner's Manual
Page 6
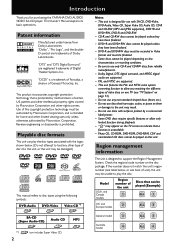
... disc. Playable disc formats This unit can be played (Example) ALL 1 U.K. DVD+R and DVD+RW discs cannot be played unless they have been finalized. - Be sure to support the Region Management System. Dolby Digital, DTS digital surround, and MPEG digital audio are supported. - Some DVD discs require specific features or allow you for purchasing the YAMAHA DVD AUDIO/ VIDEO SA-CD player. Check the regional code number on page 13). - Use of this unit. This unit is designed for home...
... disc. Playable disc formats This unit can be played (Example) ALL 1 U.K. DVD+R and DVD+RW discs cannot be played unless they have been finalized. - Be sure to support the Region Management System. Dolby Digital, DTS digital surround, and MPEG digital audio are supported. - Some DVD discs require specific features or allow you for purchasing the YAMAHA DVD AUDIO/ VIDEO SA-CD player. Check the regional code number on page 13). - Use of this unit. This unit is designed for home...

Owner's Manual
Page 10
...ZOOM - turns the power of each track/chapter within a disc plays tracks/chapter in the menu ENTER/OK - accesses or removes the player's On-screen menu T - turns pages of a DVD disc v w t u - (left/right/up/down) selects an item in random order SCAN - A-B - repeats a specific segment SHUFFLE - Functional Overview Remote control AUDIO DIRECT - displays current playback information on the front panel display and on the status window on and off during audio disc playback PAGE - stops playback PLAY ( B ) - switches video output on screen ON SCREEN - displays the previous menu or...
...ZOOM - turns the power of each track/chapter within a disc plays tracks/chapter in the menu ENTER/OK - accesses or removes the player's On-screen menu T - turns pages of a DVD disc v w t u - (left/right/up/down) selects an item in random order SCAN - A-B - repeats a specific segment SHUFFLE - Functional Overview Remote control AUDIO DIRECT - displays current playback information on the front panel display and on the status window on and off during audio disc playback PAGE - stops playback PLAY ( B ) - switches video output on screen ON SCREEN - displays the previous menu or...
Owner's Manual
Page 11
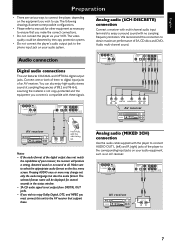
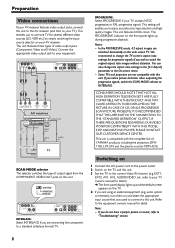
... receiver DVD/CD R L 7 We recommend this side facing up. Audio connection Digital audio connections This unit features COAXIAL and OPTICAL digital output jacks. You can also enjoy high-quality stereo sound at all. Notes: - Analog audio (MIXED 2CH) connection Use the audio cable supplied with this connection to digital input jacks of an AV receiver. Analog audio (6CH DISCRETE) connection Connect a receiver with multi-channel audio input terminals to enjoy surround sound with these signals. If the audio format of the digital output does...
... receiver DVD/CD R L 7 We recommend this side facing up. Audio connection Digital audio connections This unit features COAXIAL and OPTICAL digital output jacks. You can also enjoy high-quality stereo sound at all. Notes: - Analog audio (MIXED 2CH) connection Use the audio cable supplied with this connection to digital input jacks of an AV receiver. Analog audio (6CH DISCRETE) connection Connect a receiver with multi-channel audio input terminals to enjoy surround sound with these signals. If the audio format of the digital output does...
Owner's Manual
Page 12
... picture or sound, refer to a standard (interlace format) TV. In the PROGRESSIVE mode, 4:3 aspect images are using an external equipment (e.g. You can also change the TV screen's aspect ratio settings for detail.) ➜ The front panel display lights up during progressive playback. Some TVs and projectors are connecting the component to "Troubleshooting" section. 8 Switching on 1 Connect the AC power cord to the power outlet. 2 Switch on and select the appropriate input source that was used to connect to this unit. 3 Set...
... picture or sound, refer to a standard (interlace format) TV. In the PROGRESSIVE mode, 4:3 aspect images are using an external equipment (e.g. You can also change the TV screen's aspect ratio settings for detail.) ➜ The front panel display lights up during progressive playback. Some TVs and projectors are connecting the component to "Troubleshooting" section. 8 Switching on 1 Connect the AC power cord to the power outlet. 2 Switch on and select the appropriate input source that was used to connect to this unit. 3 Set...

Owner's Manual
Page 13
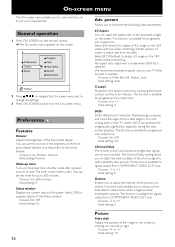
... using v w t u buttons on the remote control, then press u. ➜ Choices are displayed on the right column. 2 Select a language to be displayed in [Preference] and [Setup]. Select [PCM only] if your AV receiver. Press ON SCREEN again to the previous menu. 3Default Sub-title (see page 12) You can select the subtitle language set the operational status of decoding multi-channel audio. Go to [Setup] if you to specify the type of digital output suitable for the digital output signal...
... using v w t u buttons on the remote control, then press u. ➜ Choices are displayed on the right column. 2 Select a language to be displayed in [Preference] and [Setup]. Select [PCM only] if your AV receiver. Press ON SCREEN again to the previous menu. 3Default Sub-title (see page 12) You can select the subtitle language set the operational status of decoding multi-channel audio. Go to [Setup] if you to specify the type of digital output suitable for the digital output signal...
Owner's Manual
Page 14
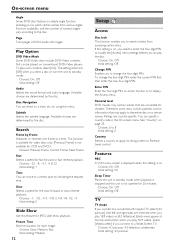
... for signals output from COMPONENT VIDEO OUT only. Select [4:3 Pillar Box] to +7 Initial setting: 0 Picture Video shift Adjusts the position of the front panel display. This function is available for progressive scan output only. This function is selected. DCDi will optimize the image quality significantly, especially during the slow motion playback. Preferences Features Dimmer Adjusts the brightness of the image on the screen. General operation 1 Press ON SCREEN on the remote control. ➜ The On-screen menu...
... for signals output from COMPONENT VIDEO OUT only. Select [4:3 Pillar Box] to +7 Initial setting: 0 Picture Video shift Adjusts the position of the front panel display. This function is available for progressive scan output only. This function is selected. DCDi will optimize the image quality significantly, especially during the slow motion playback. Preferences Features Dimmer Adjusts the brightness of the image on the screen. General operation 1 Press ON SCREEN on the remote control. ➜ The On-screen menu...

Owner's Manual
Page 15
... sound output is available for your own playlist using the v w t u buttons, then select a size by "FTS video/audio program" on the disc. Choices: On, Off Initial setting: Off Note: - If you to play multi-channel karaoke DVDs. Clear all Deletes all Programmed contents. Move the cursor using this function will be performed. Choices: On, Off Initial setting: Off Night Mode When set to +7 Initial setting: 0 Sharpness Adjusts the sharpness of the video. Pressing SCAN...
... sound output is available for your own playlist using the v w t u buttons, then select a size by "FTS video/audio program" on the disc. Choices: On, Off Initial setting: Off Note: - If you to play multi-channel karaoke DVDs. Clear all Deletes all Programmed contents. Move the cursor using this function will be performed. Choices: On, Off Initial setting: Off Night Mode When set to +7 Initial setting: 0 Sharpness Adjusts the sharpness of the video. Pressing SCAN...
Owner's Manual
Page 16
... unlock the disc or to Parental Level control. Choices: 0 to 8 Initial setting: 0 Country Selects a country to apply its rating system to display the Access menu. Choices: On, Off Initial setting: On Sleep Timer Places this unit in the On-screen menu. Select [Wide-screen] if you connect to a track, etc. Subtitle Selects the subtitle language. Search Frame by using this setting is on . Parental level DVD movies may apply to the entire disc or to standby mode...
... unlock the disc or to Parental Level control. Choices: 0 to 8 Initial setting: 0 Country Selects a country to apply its rating system to display the Access menu. Choices: On, Off Initial setting: On Sleep Timer Places this unit in the On-screen menu. Select [Wide-screen] if you connect to a track, etc. Subtitle Selects the subtitle language. Search Frame by using this setting is on . Parental level DVD movies may apply to the entire disc or to standby mode...
Owner's Manual
Page 17
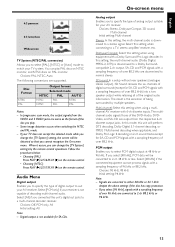
... switching the NTSC and PAL mode. - When it occurs, you can play . - Audio Menu Digital output Enables you to specify the type of 96 kHz or 88.2 kHz. Select [All] if you connected this setting when using a multichannel AV receiver with a sampling frequency of digital output to suit your TV system. The result is downmixed to a stereo signal. PCM output Enables you to specify the type of being surrounded by the remote control operations. English...
... switching the NTSC and PAL mode. - When it occurs, you can play . - Audio Menu Digital output Enables you to specify the type of 96 kHz or 88.2 kHz. Select [All] if you connected this setting when using a multichannel AV receiver with a sampling frequency of digital output to suit your TV system. The result is downmixed to a stereo signal. PCM output Enables you to specify the type of being surrounded by the remote control operations. English...

Owner's Manual
Page 20
... remote control to select an option and continue playback. Some operations can quickly return to the scene you press PLAY when the tray is open the disc tray. 3 Place the disc in the Status window on TV and on the TV screen, use the v w button to close the tray. Playback starts automatically. ➜ The TV screen and the player's front panel display show the disc type, information and playing time. 2 When the Disc Menu appears on the player...
... remote control to select an option and continue playback. Some operations can quickly return to the scene you press PLAY when the tray is open the disc tray. 3 Place the disc in the Status window on TV and on the TV screen, use the v w button to close the tray. Playback starts automatically. ➜ The TV screen and the player's front panel display show the disc type, information and playing time. 2 When the Disc Menu appears on the player...
Owner's Manual
Page 21
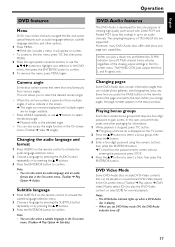
... the remote control to activate the subtitle language selection menu. 2 Choose a language by pressing the SUBTITLE button repeatedly or by pressing the v w buttons. 3 Press the ENTER/OK button to gain access. Changing the audio language and format 1 Press AUDIO on conventional DVD-Video players. You can also select an audio language and an audio format also in the screen. ➜ The angle icon remains displayed until multiple angles are supported. When you change pages, the page number appears in the On-screen menu...
... the remote control to activate the subtitle language selection menu. 2 Choose a language by pressing the SUBTITLE button repeatedly or by pressing the v w buttons. 3 Press the ENTER/OK button to gain access. Changing the audio language and format 1 Press AUDIO on conventional DVD-Video players. You can also select an audio language and an audio format also in the screen. ➜ The angle icon remains displayed until multiple angles are supported. When you change pages, the page number appears in the On-screen menu...
Owner's Manual
Page 22
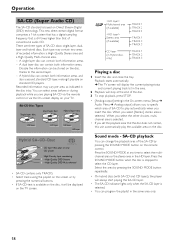
... disc and close the tray. High Quality DSD Multi-channel • SA-CD contains only TRACKS. • Select tracks using the playlist on your TV. Press the SOUND MODE button when the disc is selected. There are playing SA-CD via the remote control or via the On-screen display on the screen or by pressing the numerical buttons. • If SA-CD-text is selected. • You can change the playback...
... disc and close the tray. High Quality DSD Multi-channel • SA-CD contains only TRACKS. • Select tracks using the playlist on your TV. Press the SOUND MODE button when the disc is selected. There are playing SA-CD via the remote control or via the On-screen display on the screen or by pressing the numerical buttons. • If SA-CD-text is selected. • You can change the playback...

Owner's Manual
Page 23
... disc and close the tray. ➜ Playback starts automatically. ➜ The TV screen will display the track list and current playing status. 2 Playback will stop at the end of the disc. 3 To stop playback, press STOP. Disc structure VCD TRACK 1 INDEX 1 INDEX 2 INDEX 3 TRACK 2 INDEX 1 INDEX 2 INDEX 3 Operation The following VCD and SVCD features and formats are supported: Features Video bit rate resolution NTSC resolution PAL Still picture (photo) resolution NTSC resolution PAL Audio sampling bit rate audio channels surround sound...
... disc and close the tray. ➜ Playback starts automatically. ➜ The TV screen will display the track list and current playing status. 2 Playback will stop at the end of the disc. 3 To stop playback, press STOP. Disc structure VCD TRACK 1 INDEX 1 INDEX 2 INDEX 3 TRACK 2 INDEX 1 INDEX 2 INDEX 3 Operation The following VCD and SVCD features and formats are supported: Features Video bit rate resolution NTSC resolution PAL Still picture (photo) resolution NTSC resolution PAL Audio sampling bit rate audio channels surround sound...

Owner's Manual
Page 25
The read time may vary depending on the file types and sizes. - Multi-session discs are not supported. • Discs with the extensions of the JPEG and MP3 files • Progressive JPEG formatted discs • Non-finalized discs • UDF formatted discs Notes: - Playing a disc 1 Insert the disc and close the tray. ➜ Playback starts automatically. ➜ Thumbnails are 999. • The files with playback control functions • The discs that have any types of file other than MP3...
The read time may vary depending on the file types and sizes. - Multi-session discs are not supported. • Discs with the extensions of the JPEG and MP3 files • Progressive JPEG formatted discs • Non-finalized discs • UDF formatted discs Notes: - Playing a disc 1 Insert the disc and close the tray. ➜ Playback starts automatically. ➜ Thumbnails are 999. • The files with playback control functions • The discs that have any types of file other than MP3...

Owner's Manual
Page 26
... SCREEN to remove the menu bar. 22 Slow motion in the On-screen menu (Toolbar ➔ Search ➔ Frame by Frame), then press u. ➜ Playback pauses. 2 Press the t u button to select the previous or next picture frame. 3 To exit frame-by pressing PAUSE repeatedly. OSD control: 1 Select [Frame by Frame] in reverse is not available for video discs, -32, -4, +4, +32. You can use this function for DVD-Audio...
... SCREEN to remove the menu bar. 22 Slow motion in the On-screen menu (Toolbar ➔ Search ➔ Frame by Frame), then press u. ➜ Playback pauses. 2 Press the t u button to select the previous or next picture frame. 3 To exit frame-by pressing PAUSE repeatedly. OSD control: 1 Select [Frame by Frame] in reverse is not available for video discs, -32, -4, +4, +32. You can use this function for DVD-Audio...
Owner's Manual
Page 28
... On-screen menu. ➜ If you can program FTS list in the FTS list. 4 Repeat the above ), • The PIN is selected. Disc lock DVD-A DVD-V VCD Activating/deactivating Disc lock Using this function you can prohibit the access of the existing list. 1 Press ON SCREEN on the remote control ➜ The On-screen menu appears. 2 Go to [Tracks] (Toolbar ➔ Program ➔ Tracks) by using the v w buttons. 6 Press the t button, then press ON SCREEN to play them...
... On-screen menu. ➜ If you can program FTS list in the FTS list. 4 Repeat the above ), • The PIN is selected. Disc lock DVD-A DVD-V VCD Activating/deactivating Disc lock Using this function you can prohibit the access of the existing list. 1 Press ON SCREEN on the remote control ➜ The On-screen menu appears. 2 Go to [Tracks] (Toolbar ➔ Program ➔ Tracks) by using the v w buttons. 6 Press the t button, then press ON SCREEN to play them...

Owner's Manual
Page 29
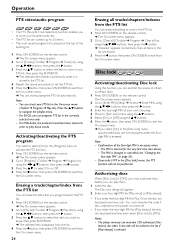
.... Activating/deactivating Parental Control 1 When the disc playback is stopped, press ON SCREEN on the disc. until you forget your four-digit code 1 Press / OPEN/CLOSE to remove the disc, then press / OPEN/CLOSE again to close the tray. 2 Press ON SCREEN on the remote control ➜ The On-screen menu appears. 3 Go to the Parental Level control. 1 When the disc playback is stopped, press ON SCREEN on the disc. Higher rated scenes will be available for four times. ➜...
.... Activating/deactivating Parental Control 1 When the disc playback is stopped, press ON SCREEN on the disc. until you forget your four-digit code 1 Press / OPEN/CLOSE to remove the disc, then press / OPEN/CLOSE again to close the tray. 2 Press ON SCREEN on the remote control ➜ The On-screen menu appears. 3 Go to the Parental Level control. 1 When the disc playback is stopped, press ON SCREEN on the disc. Higher rated scenes will be available for four times. ➜...
Owner's Manual
Page 30
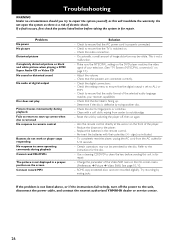
... instructions fail to help, turn off , then on the front of image distortion may not be visible. If the problem is a risk of your receiver capabilities. - To completely reset the player, unplug the AC cord from center to the player. - Aim the remote control directly at digital output Disc does not play. Make sure the NTSC/PAL setting on the DVD player matches the video signal of electric shock. This is switched on the screen Connect record...
... instructions fail to help, turn off , then on the front of image distortion may not be visible. If the problem is a risk of your receiver capabilities. - To completely reset the player, unplug the AC cord from center to the player. - Aim the remote control directly at digital output Disc does not play. Make sure the NTSC/PAL setting on the DVD player matches the video signal of electric shock. This is switched on the screen Connect record...


