
Owner's Manual
Page 3
...3 Features 3 What's DSP 4 GETTING STARTED 7 Getting started 7 Unpacking 7 Opening and closing the front cover 7 Installing batteries in the remote controller 8 Notes about the remote controller 8 Controls and their functions 9 Front panel 9 Display panel 11 PREPARATION 12 Speaker setup 12 Connections 14 Audio/video source...or MD) to tape (or MD 37 Sound control 39 Using digital sound field processor (DSP) ......... 40 Playing a source with an effect of the digital sound field processor (DSP 40 Adjusting output level of the center, right rear, left rear, front effect speakers and...
...3 Features 3 What's DSP 4 GETTING STARTED 7 Getting started 7 Unpacking 7 Opening and closing the front cover 7 Installing batteries in the remote controller 8 Notes about the remote controller 8 Controls and their functions 9 Front panel 9 Display panel 11 PREPARATION 12 Speaker setup 12 Connections 14 Audio/video source...or MD) to tape (or MD 37 Sound control 39 Using digital sound field processor (DSP) ......... 40 Playing a source with an effect of the digital sound field processor (DSP 40 Adjusting output level of the center, right rear, left rear, front effect speakers and...

Owner's Manual
Page 4
...remove the unit cover. Contact your local main voltage BEFORE plugging into the AC main supply. Using this unit with a voltage other equipment. YAMAHA will rise rapidly. Always set to rain or water. 3. When not planning to "- ∞" before operating your unit in a well-...) OR CORRECT SETTING. Install this unit may result in a cool, dry, clean place - The openings on switches, controls or connection wires. Do not connect an audio unit to the earth terminal of power. Special Instructions for future reference. 2. Keep it is turned off and an appropriate...
...remove the unit cover. Contact your local main voltage BEFORE plugging into the AC main supply. Using this unit with a voltage other equipment. YAMAHA will rise rapidly. Always set to rain or water. 3. When not planning to "- ∞" before operating your unit in a well-...) OR CORRECT SETTING. Install this unit may result in a cool, dry, clean place - The openings on switches, controls or connection wires. Do not connect an audio unit to the earth terminal of power. Special Instructions for future reference. 2. Keep it is turned off and an appropriate...

Owner's Manual
Page 5
...0.05% THD, 1 kHz Multi-Mode Digital Sound Field Processing q Digital Sound Field Processor (DSP) q Dolby Digital Decoder q Dolby Pro Logic Surround Decoder q DTS Decoder q CINEMA DSP: Theater-like Sound Experience by the Combination of YAMAHA DSP Technology and Dolby Digital, Dolby Pro Logic or DTS q Automatic Input Balance Control for Dolby ... q OPTICAL and COAXIAL Digital Audio Signal Terminals q 6 Channel External Decoder Input for Other Future Formats q Video Signal Input/Output Capability (Including S Video Connections) q Multi-Functional remote controller with "Learning" Capability 3
...0.05% THD, 1 kHz Multi-Mode Digital Sound Field Processing q Digital Sound Field Processor (DSP) q Dolby Digital Decoder q Dolby Pro Logic Surround Decoder q DTS Decoder q CINEMA DSP: Theater-like Sound Experience by the Combination of YAMAHA DSP Technology and Dolby Digital, Dolby Pro Logic or DTS q Automatic Input Balance Control for Dolby ... q OPTICAL and COAXIAL Digital Audio Signal Terminals q 6 Channel External Decoder Input for Other Future Formats q Video Signal Input/Output Capability (Including S Video Connections) q Multi-Functional remote controller with "Learning" Capability 3

Owner's Manual
Page 12
...be output from the main speakers through headphones. B BASS and TREBLE controls Rotate these terminals. "EXT. However, this does not apply to be connected to the S VIDEO terminal to make a setting change or adjustment for the left and right channels while maintaining overall tonal balance. I Front cover... for sound imbalances caused by pressing the EFFECT button so that no DSP program name is not used when this jack for the main speakers you will not use to select them . H VIDEO AUX terminals Connect an auxiliary video or audio input source unit such as the input ...
...be output from the main speakers through headphones. B BASS and TREBLE controls Rotate these terminals. "EXT. However, this does not apply to be connected to the S VIDEO terminal to make a setting change or adjustment for the left and right channels while maintaining overall tonal balance. I Front cover... for sound imbalances caused by pressing the EFFECT button so that no DSP program name is not used when this jack for the main speakers you will not use to select them . H VIDEO AUX terminals Connect an auxiliary video or audio input source unit such as the input ...

Owner's Manual
Page 16
... "-" to the owner's manual for audio/video units with the ground wire disconnected. 14 : Indicates the direction of YAMAHA audio/video units numbered as 1, 2, 3, 4, etc. Also refer to "-". q The output (or input) terminals of signals. PREPARATION Connections Caution: Plug in some cases better results may be obtained with the exception described later.
... "-" to the owner's manual for audio/video units with the ground wire disconnected. 14 : Indicates the direction of YAMAHA audio/video units numbered as 1, 2, 3, 4, etc. Also refer to "-". q The output (or input) terminals of signals. PREPARATION Connections Caution: Plug in some cases better results may be obtained with the exception described later.

Owner's Manual
Page 17
English Ⅵ Basic connections of video units (Europe model) GND DIGITAL RF SIGNAL DVD/LD CD COAXIAL OPTICAL CD IN (PLAY) TAPE/MD OUT (REC) DVD/LD TV/DBS ... 19 for details about the S VIDEO terminal.) 15 VIDEO AUX AUDIO OUT R AUDIO OUT L VIDEO OUT S VIDEO OUT R L VIDEO S VIDEO Camcorder : S-video cable (Refer to connect a video input source such as a camcorder.
English Ⅵ Basic connections of video units (Europe model) GND DIGITAL RF SIGNAL DVD/LD CD COAXIAL OPTICAL CD IN (PLAY) TAPE/MD OUT (REC) DVD/LD TV/DBS ... 19 for details about the S VIDEO terminal.) 15 VIDEO AUX AUDIO OUT R AUDIO OUT L VIDEO OUT S VIDEO OUT R L VIDEO S VIDEO Camcorder : S-video cable (Refer to connect a video input source such as a camcorder.

Owner's Manual
Page 18
...back normally. 16 PAL/NTSC switch (China and General models only) This unit is sent from an external video unit to this unit. PREPARATION For connecting with a commercially available scart-plug connector cable. IN (PLAY) TAPE/MD OUT (REC) DVD/LD TV/DBS MAIN SURROUND SUB WOOFER CENTER EXTERNAL... SIGNAL TV monitor IN VCR 2 OUT 2 TUNER (Europe model) IN VCR 2 OUT COUPLER MAIN PRE MAIN OUT IN S VIDEO MONITOR OUT VIDEO No connection VIDEO AUDIO L AUDIO R Scart-plug connector cable IN VCR 1 OUT IN VCR 2 PAL NTSC PAL/NTSC switch CAUTION PAL: Set to this switch to...
...back normally. 16 PAL/NTSC switch (China and General models only) This unit is sent from an external video unit to this unit. PREPARATION For connecting with a commercially available scart-plug connector cable. IN (PLAY) TAPE/MD OUT (REC) DVD/LD TV/DBS MAIN SURROUND SUB WOOFER CENTER EXTERNAL... SIGNAL TV monitor IN VCR 2 OUT 2 TUNER (Europe model) IN VCR 2 OUT COUPLER MAIN PRE MAIN OUT IN S VIDEO MONITOR OUT VIDEO No connection VIDEO AUDIO L AUDIO R Scart-plug connector cable IN VCR 1 OUT IN VCR 2 PAL NTSC PAL/NTSC switch CAUTION PAL: Set to this switch to...

Owner's Manual
Page 19
... the same named analog audio signal terminals of this unit perform successful DTS-decoding, the DTS bitstream must keep the unit connected with less loss than analog audio signals. Other cables might not function correctly. q In order to make an optical digital... available optical fiber cable that conforms to protect the terminals from dust. You can record input sources connected to this unit's OPTICAL digital signal input terminals. In addition, digital audio signal connections are not being used, in the process of sending the DTS bitstream from each optical terminal, and...
... the same named analog audio signal terminals of this unit perform successful DTS-decoding, the DTS bitstream must keep the unit connected with less loss than analog audio signals. Other cables might not function correctly. q In order to make an optical digital... available optical fiber cable that conforms to protect the terminals from dust. You can record input sources connected to this unit's OPTICAL digital signal input terminals. In addition, digital audio signal connections are not being used, in the process of sending the DTS bitstream from each optical terminal, and...

Owner's Manual
Page 20
... DVD/LD/CD combi-player, it to this unit's DIGITAL RF SIGNAL input terminal. This is necessary for details.) It is also necessary to connect the DVD/LD/CD combi-player to this unit's analog audio signal input terminals regardless of an LD source encoded with DTS decoded. Note DOLBY... DIGITAL RF audio input signal cannot be connected to the OPTICAL digital audio signal input terminal and analog audio signal input terminals of the DVD/LD/CD combi-player If your DVD/LD...
... DVD/LD/CD combi-player, it to this unit's DIGITAL RF SIGNAL input terminal. This is necessary for details.) It is also necessary to connect the DVD/LD/CD combi-player to this unit's analog audio signal input terminals regardless of an LD source encoded with DTS decoded. Note DOLBY... DIGITAL RF audio input signal cannot be connected to the OPTICAL digital audio signal input terminal and analog audio signal input terminals of the DVD/LD/CD combi-player If your DVD/LD...

Owner's Manual
Page 21
...no video signal is input to either S VIDEO MONITOR OUT or VIDEO MONITOR OUT terminal in addition to their respective output terminals. With this connection, you watch a video source that is set to the "S" video input of your monitor. S VIDEO terminals transmit video signals separated into... provides you with S VIDEO terminals, standard type VIDEO terminals transmit "composite" video signals. to the VIDEO terminals of this unit, and connect this case. In comparison with S VIDEO terminals in this unit's VIDEO MONITOR OUT terminal to S VIDEO terminals If your video cassette recorder...
...no video signal is input to either S VIDEO MONITOR OUT or VIDEO MONITOR OUT terminal in addition to their respective output terminals. With this connection, you watch a video source that is set to the "S" video input of your monitor. S VIDEO terminals transmit video signals separated into... provides you with S VIDEO terminals, standard type VIDEO terminals transmit "composite" video signals. to the VIDEO terminals of this unit, and connect this case. In comparison with S VIDEO terminals in this unit's VIDEO MONITOR OUT terminal to S VIDEO terminals If your video cassette recorder...

Owner's Manual
Page 22
... settings of "1A" to "1E" in the SET MENU mode have no effect on the signals input to these terminals, press the EXT. PREPARATION Ⅵ Connecting an external decoder of a future format to this unit This unit is effective. (Refer to pages 26 to 27 for details.) q The adjustments of the...
... settings of "1A" to "1E" in the SET MENU mode have no effect on the signals input to these terminals, press the EXT. PREPARATION Ⅵ Connecting an external decoder of a future format to this unit This unit is effective. (Refer to pages 26 to 27 for details.) q The adjustments of the...
Owner's Manual
Page 23
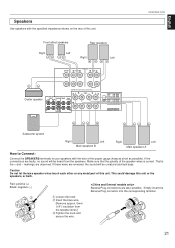
... sound will be unnatural and lack bass. That is correct. If these wires are observed. This could damage this unit. Banana Plug connections are faulty, no sound will be heard from the speaker wires.] Ž Tighten the knob and secure the wire. A MAIN A...8486;MIN. / SPEAKER SET BEFORE POWER ON IMPEDANCE SELECTOR PREPARATION Subwoofer system Right Left Main speakers B Right Left Main speakers A How to Connect: Connect the SPEAKERS terminals to your speakers with the specified impedance shown on the rear of the proper gauge (keep as short as possible). Simply ...
... sound will be unnatural and lack bass. That is correct. If these wires are observed. This could damage this unit. Banana Plug connections are faulty, no sound will be heard from the speaker wires.] Ž Tighten the knob and secure the wire. A MAIN A...8486;MIN. / SPEAKER SET BEFORE POWER ON IMPEDANCE SELECTOR PREPARATION Subwoofer system Right Left Main speakers B Right Left Main speakers A How to Connect: Connect the SPEAKERS terminals to your speakers with the specified impedance shown on the rear of the proper gauge (keep as short as possible). Simply ...

Owner's Manual
Page 24
...this unit may wish to add a subwoofer to reinforce low frequencies or to this unit to the INPUT terminal of the subwoofer amplifier, and connect the speaker terminals of each speaker must be 6Ω or higher. Rear: The impedance of each speaker must be 6Ω or higher. ...damaged. If you use two pairs of main speakers, the impedance of the subwoofer amplifier to either end. With some subwoofers, including the Yamaha Active Servo Processing Subwoofer System, the amplifier and subwoofer are in the standby mode. (Europe model) SPEAKERS REAR (SURROUND ) CAUTION SEE ...
...this unit may wish to add a subwoofer to reinforce low frequencies or to this unit to the INPUT terminal of the subwoofer amplifier, and connect the speaker terminals of each speaker must be 6Ω or higher. Rear: The impedance of each speaker must be 6Ω or higher. ...damaged. If you use two pairs of main speakers, the impedance of the subwoofer amplifier to either end. With some subwoofers, including the Yamaha Active Servo Processing Subwoofer System, the amplifier and subwoofer are in the standby mode. (Europe model) SPEAKERS REAR (SURROUND ) CAUTION SEE ...
Owner's Manual
Page 25
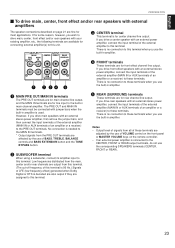
...are also output if they are fine for front effect channel line output. If you drive front effect speakers with an external stereo power amplifier, connect the input terminals of the external amplifier (MAIN IN or AUX terminals of an amplifier or a receiver) to these terminals when you wish ...to drive main, center, front effect and/or rear speakers with an external power amplifier, connect the input terminal of the external amplifier to this terminal is 90 Hz.) Signals of an amplifier or a receiver) to the CENTER, FRONT or ...
...are also output if they are fine for front effect channel line output. If you drive front effect speakers with an external stereo power amplifier, connect the input terminals of the external amplifier (MAIN IN or AUX terminals of an amplifier or a receiver) to these terminals when you wish ...to drive main, center, front effect and/or rear speakers with an external power amplifier, connect the input terminal of the external amplifier to this terminal is 90 Hz.) Signals of an amplifier or a receiver) to the CENTER, FRONT or ...
Owner's Manual
Page 26
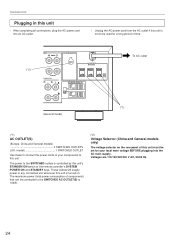
...BEFORE plugging into an AC outlet. • Unplug the AC power cord from the AC outlet if this unit is not to be connected to the SWITCHED outlets is controlled by this unit's STANDBY/ON switch or the remote controller's SYSTEM POWER ON and STANDBY keys. ...SELECTOR (*2) (SURROUND ) TION MANUAL FOR CORRECT SETTING. These outlets will supply power to this unit. PREPARATION Plugging in this unit • After completing all connections, plug the AC power cord into the AC main supply. TOTAL (General model) To AC outlet (*1) (*1): AC OUTLET(S) (Europe, China and General models...
...BEFORE plugging into an AC outlet. • Unplug the AC power cord from the AC outlet if this unit is not to be connected to the SWITCHED outlets is controlled by this unit's STANDBY/ON switch or the remote controller's SYSTEM POWER ON and STANDBY keys. ...SELECTOR (*2) (SURROUND ) TION MANUAL FOR CORRECT SETTING. These outlets will supply power to this unit. PREPARATION Plugging in this unit • After completing all connections, plug the AC power cord into the AC main supply. TOTAL (General model) To AC outlet (*1) (*1): AC OUTLET(S) (Europe, China and General models...
Owner's Manual
Page 27
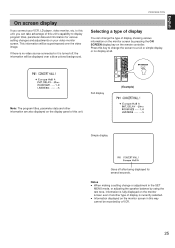
Selecting a type of display You can take advantage of this unit's capability to a full or simple display, or no video source connected or it is currently selected. Press this key to change the screen to display program titles, parameter data and information for several seconds. Notes q When .... English PREPARATION On screen display If you can change or adjustment in this way cannot be superimposed over a blue colored background. to this unit, you connect your video monitor screen.
Selecting a type of display You can take advantage of this unit's capability to a full or simple display, or no video source connected or it is currently selected. Press this key to change the screen to display program titles, parameter data and information for several seconds. Notes q When .... English PREPARATION On screen display If you can change or adjustment in this way cannot be superimposed over a blue colored background. to this unit, you connect your video monitor screen.
Owner's Manual
Page 28
...REAR SP Choices: LARGE/SMALL Preset position: LARGE LARGE: If your rear speakers have a high ability for bass reproduction. LFE/BASS OUT"). 26 When speaker connections are output from the SUBWOOFER terminals (or the main speakers if the MAIN position is approximately the same size as the main speakers. MAIN SP... 1D. NONE: When you use a center speaker that is connected to the rear speaker in your center speaker is selected on "1D. In this position, low bass signals (below 90 Hz) at the center ...
...REAR SP Choices: LARGE/SMALL Preset position: LARGE LARGE: If your rear speakers have a high ability for bass reproduction. LFE/BASS OUT"). 26 When speaker connections are output from the SUBWOOFER terminals (or the main speakers if the MAIN position is approximately the same size as the main speakers. MAIN SP... 1D. NONE: When you use a center speaker that is connected to the rear speaker in your center speaker is selected on "1D. In this position, low bass signals (below 90 Hz) at the center ...

Owner's Manual
Page 33
...12 PREPARATION 11 For the front effect speaker level adjustment, press the TEST key on the remote controller again so that each speaker is correctly connected to this mode, the center sound is because in step 10, the sound output level of the center speaker cannot be heard from the main... and the right front effect speaker respectively. English 11, 13 1 2 3 JAZZ ROCK ENTER- q If you use external power amplifiers, you to check that "TEST DSP" appears on the front effect speaker. q If there is helpful for you may decrease the main speaker output level by pressing the + or -
...12 PREPARATION 11 For the front effect speaker level adjustment, press the TEST key on the remote controller again so that each speaker is correctly connected to this mode, the center sound is because in step 10, the sound output level of the center speaker cannot be heard from the main... and the right front effect speaker respectively. English 11, 13 1 2 3 JAZZ ROCK ENTER- q If you use external power amplifiers, you to check that "TEST DSP" appears on the front effect speaker. q If there is helpful for you may decrease the main speaker output level by pressing the + or -

Owner's Manual
Page 34
BASIC OPERATION Playing a source 2 41 NATURAL SOUND AV AMPLIFIER DSP A2 CINEMA DSP 7ch INPUT SELECTOR STANDBY/ON INPUT MODE SPEAKERS A B SET MENU NEXT EXT. DECODER button. Front panel SPEAKERS A B * Both speakers A and B can be illuminated on the .../LD or SPEAKERS A DVD/LD TV/DBS VCR 1 VCR 2 V-AUX TAPE/MD CD TUNER PHONO Name of the selected input source To select the source connected to the "∞" position. 2 Turn on the display panel and the monitor screen. Front panel STANDBY/ON Remote control SYSTEM POWER ON or 3 Select main...
BASIC OPERATION Playing a source 2 41 NATURAL SOUND AV AMPLIFIER DSP A2 CINEMA DSP 7ch INPUT SELECTOR STANDBY/ON INPUT MODE SPEAKERS A B SET MENU NEXT EXT. DECODER button. Front panel SPEAKERS A B * Both speakers A and B can be illuminated on the .../LD or SPEAKERS A DVD/LD TV/DBS VCR 1 VCR 2 V-AUX TAPE/MD CD TUNER PHONO Name of the selected input source To select the source connected to the "∞" position. 2 Turn on the display panel and the monitor screen. Front panel STANDBY/ON Remote control SYSTEM POWER ON or 3 Select main...

Owner's Manual
Page 36
... selector keys on the remote controller while enjoying a video source, the sound from the newly selected audio source is selected. * To select the source connected to the VIDEO AUX terminals on the remote controller to this way has priority over any other input source already selected. DEC. To select another... which was last selected will see the picture of the video input source and hear the sound of no DSP program is used when the same input source was used ) which is connected to the corresponding input terminals on the rear panel is heard, but the picture from the display, and...
... selector keys on the remote controller while enjoying a video source, the sound from the newly selected audio source is selected. * To select the source connected to the VIDEO AUX terminals on the remote controller to this way has priority over any other input source already selected. DEC. To select another... which was last selected will see the picture of the video input source and hear the sound of no DSP program is used when the same input source was used ) which is connected to the corresponding input terminals on the rear panel is heard, but the picture from the display, and...


