Operation Manual
Page 2
...service. However, you do so unless specifically authorized by the manufacturer's warranty, and are not covered by Yamaha. NAME PLATE LOCATION: The graphic below and retain this manual is believed to how a function or effect works (when the unit is required by applicable laws. ... for some areas, the servicer is operating as designed) are therefore the owners responsibility. Keep all local, state, and federal regulations that our products and the production methods used in the manual, on this unit or commission others to update existing units. We sincerely ...
...service. However, you do so unless specifically authorized by the manufacturer's warranty, and are not covered by Yamaha. NAME PLATE LOCATION: The graphic below and retain this manual is believed to how a function or effect works (when the unit is required by applicable laws. ... for some areas, the servicer is operating as designed) are therefore the owners responsibility. Keep all local, state, and federal regulations that our products and the production methods used in the manual, on this unit or commission others to update existing units. We sincerely ...
Operation Manual
Page 20
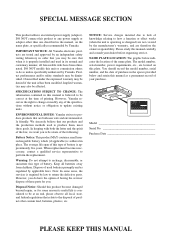
... screwdriver. 6 Connect monitor speakers to the OUTPUT jacks on the rear panel of the Disklavier control unit. 7 Connect the supplied AC adaptor to your piano's owner's manual. 2 Turn off your piano, and disconnect the power cable from the AC wall outlet. 3 Disconnect the control cable from your control unit. Use the supplied...
... screwdriver. 6 Connect monitor speakers to the OUTPUT jacks on the rear panel of the Disklavier control unit. 7 Connect the supplied AC adaptor to your piano's owner's manual. 2 Turn off your piano, and disconnect the power cable from the AC wall outlet. 3 Disconnect the control cable from your control unit. Use the supplied...
Operation Manual
Page 22
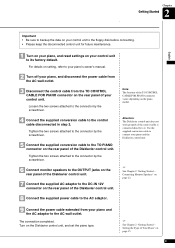
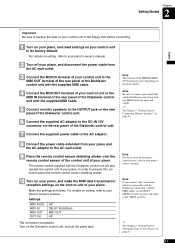
... speakers to the DC-IN 12V connector on page 15. 11 Make the settings as follows. For details on your control unit to your piano's owner's manual. Note: If you connect your control unit, which is replaceable with the Disklavier control unit, with the MIDI cables, set the piano type. Settings...(500ms) KBD OUT HP The connection completed. Note: Be sure to its factory default. In order to prevent this, be sure to your piano's owner's manual. Turn on the control unit of the MIDI IN/MIDI OUT terminals varies depending on page 12. Note: The location of your piano. The remote...
... speakers to the DC-IN 12V connector on page 15. 11 Make the settings as follows. For details on your control unit to your piano's owner's manual. Note: If you connect your control unit, which is replaceable with the Disklavier control unit, with the MIDI cables, set the piano type. Settings...(500ms) KBD OUT HP The connection completed. Note: Be sure to its factory default. In order to prevent this, be sure to your piano's owner's manual. Turn on the control unit of the MIDI IN/MIDI OUT terminals varies depending on page 12. Note: The location of your piano. The remote...


