Operation Manual
Page 7
... licensed under the GNU General Public License by writing to suit your Disklavier control unit, please read this product by a third party other than Yamaha (or party authorized by the OpenSSL Project for purchasing the Yamaha Disklavier control unit! This control unit is unguaranteed, and Yamaha shall not bear any responsibility whatsoever for the source code. ■ Trademarks...
... licensed under the GNU General Public License by writing to suit your Disklavier control unit, please read this product by a third party other than Yamaha (or party authorized by the OpenSSL Project for purchasing the Yamaha Disklavier control unit! This control unit is unguaranteed, and Yamaha shall not bear any responsibility whatsoever for the source code. ■ Trademarks...
Operation Manual
Page 8
... minimum before applying power. • Do not play the Disklavier control unit at a high volume for a long period of the Disklavier control unit can damage the Disklavier control unit. • Use a soft, dry cloth to clean the Disklavier control unit. • Do not place metal objects with your ... you notice any abnormality - ii Consult your hearing. that is damaged (i.e. Use of electric shock. • Do not use the Disklavier control unit for extended periods; you think your hearing ability is exposed), ask your dealer for a replacement. This is a potential fire and...
... minimum before applying power. • Do not play the Disklavier control unit at a high volume for a long period of the Disklavier control unit can damage the Disklavier control unit. • Use a soft, dry cloth to clean the Disklavier control unit. • Do not place metal objects with your ... you notice any abnormality - ii Consult your hearing. that is damaged (i.e. Use of electric shock. • Do not use the Disklavier control unit for extended periods; you think your hearing ability is exposed), ask your dealer for a replacement. This is a potential fire and...
Operation Manual
Page 9
... electrolyte may leak, resulting in damage to excessive heat such as sunshine, fire or the like. English ■ Interference • The Disklavier control unit uses high-frequency digital circuits that may cause interference to radios and TVs placed close to nearby objects or in burns, injury or... Replace all the dry batteries at the same time. If interference does occur, relocate the affected equipment. ■ Handling Batteries The remote control of this manual for a prolonged period of time, remove the dry batteries from dry batteries has found its way inside your skin or ...
... electrolyte may leak, resulting in damage to excessive heat such as sunshine, fire or the like. English ■ Interference • The Disklavier control unit uses high-frequency digital circuits that may cause interference to radios and TVs placed close to nearby objects or in burns, injury or... Replace all the dry batteries at the same time. If interference does occur, relocate the affected equipment. ■ Handling Batteries The remote control of this manual for a prolonged period of time, remove the dry batteries from dry batteries has found its way inside your skin or ...
Operation Manual
Page 10
... the Type of Your Piano 7 Replacing the Existing Control Unit with the Disklavier Control Unit 8 Connecting the Disklavier Control Unit with the MIDI Cables 10 Connecting Monitor Speakers 12 Using the Remote Control 13 Turning On the Disklavier Control Unit 14 Setting the Type of Your Piano 15 ...Setting the Internal Calendar 16 Turning Off the Disklavier Control Unit (Standby Mode 19 Shutting Down the Disklavier Control Unit ...........19 Compatible Media Format...
... the Type of Your Piano 7 Replacing the Existing Control Unit with the Disklavier Control Unit 8 Connecting the Disklavier Control Unit with the MIDI Cables 10 Connecting Monitor Speakers 12 Using the Remote Control 13 Turning On the Disklavier Control Unit 14 Setting the Type of Your Piano 15 ...Setting the Internal Calendar 16 Turning Off the Disklavier Control Unit (Standby Mode 19 Shutting Down the Disklavier Control Unit ...........19 Compatible Media Format...
Operation Manual
Page 11
...Contents in a Medium 99 Deleting the Entire Contents in a Medium .........100 Copying Song File from a Personal Computer to the Disklavier Control Unit 101 Refreshing the Contents in [FromToPC 105 Formatting the Floppy Disk (Optional 106 Making Backups of Songs 107 Restoring the ...Access 126 Adjusting the Brightness of the Display 128 Switching the Languages for the Screen .......... 129 Resetting the Disklavier Control Unit 130 Updating the Disklavier Control Unit 132 Chapter 14 Troubleshooting 134 Chapter 15 Error Messages 137 Chapter 16 Glossary 139 Chapter 17 Internal Tone...
...Contents in a Medium 99 Deleting the Entire Contents in a Medium .........100 Copying Song File from a Personal Computer to the Disklavier Control Unit 101 Refreshing the Contents in [FromToPC 105 Formatting the Floppy Disk (Optional 106 Making Backups of Songs 107 Restoring the ...Access 126 Adjusting the Brightness of the Display 128 Switching the Languages for the Screen .......... 129 Resetting the Disklavier Control Unit 130 Updating the Disklavier Control Unit 132 Chapter 14 Troubleshooting 134 Chapter 15 Error Messages 137 Chapter 16 Glossary 139 Chapter 17 Internal Tone...

Operation Manual
Page 12
... Your Musical Memories • Total 128 megabytes of internal memory comes with the Disklavier control unit to preserve your valuable data. • Connecting external USB devices to the Disklavier control unit allows you to record your performance directly onto them, or even make backups... data on the floppy disk can listen to over 11 music channel by Yamaha) • 1 Power cable • 1 Operation manual • 1 PianoSoft CD song list 1 English 1Chapter Introduction Features The Disklavier control unit offers the valuable features that the following items are brief explanations of...
... Your Musical Memories • Total 128 megabytes of internal memory comes with the Disklavier control unit to preserve your valuable data. • Connecting external USB devices to the Disklavier control unit allows you to record your performance directly onto them, or even make backups... data on the floppy disk can listen to over 11 music channel by Yamaha) • 1 Power cable • 1 Operation manual • 1 PianoSoft CD song list 1 English 1Chapter Introduction Features The Disklavier control unit offers the valuable features that the following items are brief explanations of...
Operation Manual
Page 13
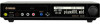
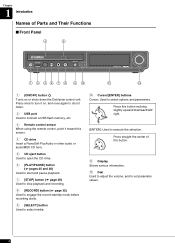
...Functions ■ Front Panel 4 5 1 2 36 7 8 9 10 11 12 1 [ON/OFF] button Turns on , and once again to shut it down the Disklavier control unit. Chapter 1 Introduction Names of this button. 11 Display Shows various information. 12 Dial Used to adjust the volume, and to execute the selection. Press... and parameters. Press once to turn it on or shuts down . 2 USB port Used to connect a USB flash memory, etc. 3 Remote control sensor When using the remote control, point it toward this button inclining slightly upward/downward/left/ right. [ENTER]: Used to set parameter values. 2
...Functions ■ Front Panel 4 5 1 2 36 7 8 9 10 11 12 1 [ON/OFF] button Turns on , and once again to shut it down the Disklavier control unit. Chapter 1 Introduction Names of this button. 11 Display Shows various information. 12 Dial Used to adjust the volume, and to execute the selection. Press... and parameters. Press once to turn it on or shuts down . 2 USB port Used to connect a USB flash memory, etc. 3 Remote control sensor When using the remote control, point it toward this button inclining slightly upward/downward/left/ right. [ENTER]: Used to set parameter values. 2

Operation Manual
Page 14
For models to be replaced with Disklavier control unit: Used to connect external MIDI equipment. For models to be connected with the MIDI cables: Used to connect the existing control unit. 11 MIDI IN terminal For models to be connected with the MIDI cables: Used to connect external MIDI equipment. ■ Rear Panel 1 2 3456... supplied AC adaptor. 9 USB TO HOST port Used to connect the USB cable from a computer. 10 MIDI OUT terminal For models to be replaced with Disklavier control unit: Used to connect the existing...
For models to be replaced with Disklavier control unit: Used to connect external MIDI equipment. For models to be connected with the MIDI cables: Used to connect the existing control unit. 11 MIDI IN terminal For models to be connected with the MIDI cables: Used to connect external MIDI equipment. ■ Rear Panel 1 2 3456... supplied AC adaptor. 9 USB TO HOST port Used to connect the USB cable from a computer. 10 MIDI OUT terminal For models to be replaced with Disklavier control unit: Used to connect the existing...
Operation Manual
Page 15
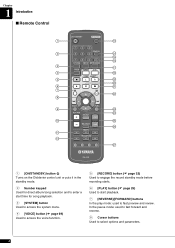
... 2 14 15 16 3 17 4 18 5 19 20 6 21 7 22 8 9 23 24 10 25 26 11 12 27 1 [ON/STANDBY] button Turns on the Disklavier control unit or puts it in the standby mode. 2 Number keypad Used for direct album/song selection and to enter a start time for song playback. 3 [SYSTEM] ...
... 2 14 15 16 3 17 4 18 5 19 20 6 21 7 22 8 9 23 24 10 25 26 11 12 27 1 [ON/STANDBY] button Turns on the Disklavier control unit or puts it in the standby mode. 2 Number keypad Used for direct album/song selection and to enter a start time for song playback. 3 [SYSTEM] ...
Operation Manual
Page 17
... generator expressing various instruments. MIDI An acronym for a PianoSoft catalog. See your Disklavier dealer for Musical Instrument Digital Interface. XG Yamaha XG is an extension of prerecorded song disks made by Yamaha for use with each other. Internal Flash Memory The Disklavier control unit has a total of 128 megabytes of internal flash memory that allow...
... generator expressing various instruments. MIDI An acronym for a PianoSoft catalog. See your Disklavier dealer for Musical Instrument Digital Interface. XG Yamaha XG is an extension of prerecorded song disks made by Yamaha for use with each other. Internal Flash Memory The Disklavier control unit has a total of 128 megabytes of internal flash memory that allow...
Operation Manual
Page 18
... when connected with the MIDI cables. ■ Models to the Disklavier control unit with the MIDI cables. Connecting the Disklavier Control Unit with the Disklavier Control Unit" on the piano model. Note: The model number of the control unit is on the upper part of the Yamaha Disklavier pianos, however, connections and setup procedures vary depending on page 8. Models...
... when connected with the MIDI cables. ■ Models to the Disklavier control unit with the MIDI cables. Connecting the Disklavier Control Unit with the Disklavier Control Unit" on the piano model. Note: The model number of the control unit is on the upper part of the Yamaha Disklavier pianos, however, connections and setup procedures vary depending on page 8. Models...
Operation Manual
Page 19
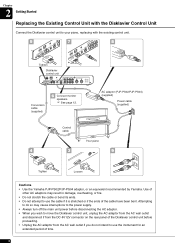
...period of the cable have been bent. Attempting to do not intend to your piano, replacing with the Disklavier Control Unit Connect the Disklavier control unit to use the cable if it is stretched or if the ends of time. 8 Chapter 2 Getting... Replacing the Existing Control Unit with the existing control unit. 5 7 8 Tighten Disklavier control unit Conversion cable (supplied) 6 Connect monitor speakers. See page 12. AC adaptor (PJP-PS02/PJP-PS04) (supplied) Power cable (supplied) Control cable Your piano 4 3 9 Tighten Loosen Cautions • Use the Yamaha PJP-PS02/PJP-...
...period of the cable have been bent. Attempting to do not intend to your piano, replacing with the Disklavier Control Unit Connect the Disklavier control unit to use the cable if it is stretched or if the ends of time. 8 Chapter 2 Getting... Replacing the Existing Control Unit with the existing control unit. 5 7 8 Tighten Disklavier control unit Conversion cable (supplied) 6 Connect monitor speakers. See page 12. AC adaptor (PJP-PS02/PJP-PS04) (supplied) Power cable (supplied) Control cable Your piano 4 3 9 Tighten Loosen Cautions • Use the Yamaha PJP-PS02/PJP-...
Operation Manual
Page 20
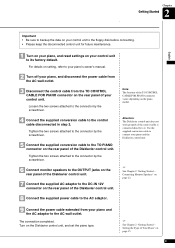
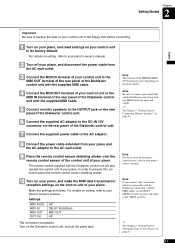
... PIANO connector on the rear panel of your piano and the AC adaptor to the AC wall outlet. Turn on the rear panel of the Disklavier control unit. 8 Connect the supplied power cable to it. For details on setting, refer to your piano's owner's manual. 2 Turn off your piano, .... 7 Connect the supplied AC adaptor to the DC-IN 12V connector on the rear panel of the Disklavier control unit. Attention: The Disklavier control unit does not work properly if the control cable is connected directly to the AC adaptor. Tighten the two screws attached to the connector by the screwdriver. 4 Connect ...
... PIANO connector on the rear panel of your piano and the AC adaptor to the AC wall outlet. Turn on the rear panel of the Disklavier control unit. 8 Connect the supplied power cable to it. For details on setting, refer to your piano's owner's manual. 2 Turn off your piano, .... 7 Connect the supplied AC adaptor to the DC-IN 12V connector on the rear panel of the Disklavier control unit. Attention: The Disklavier control unit does not work properly if the control cable is connected directly to the AC adaptor. Tighten the two screws attached to the connector by the screwdriver. 4 Connect ...
Operation Manual
Page 21
... of the cable have been bent. Disklavier control unit MIDI cable (supplied) 6 Your piano AC adaptor 7 (PJP-PS02/PJP-PS04) (supplied) Power cable (supplied) 9 Backing paper 8 Adhesive tape Remote control sensor shielding sticker Remote control sensor Cautions • Use the Yamaha PJP-PS02/PJP-PS04 adaptor, or... an equivalent recommended by Yamaha. Use of other AC adaptors may cause interruptions to the power supply. • Always turn off the main unit power before disconnecting the AC adaptor. • When you wish to move the Disklavier control unit, unplug the AC adaptor...
... of the cable have been bent. Disklavier control unit MIDI cable (supplied) 6 Your piano AC adaptor 7 (PJP-PS02/PJP-PS04) (supplied) Power cable (supplied) 9 Backing paper 8 Adhesive tape Remote control sensor shielding sticker Remote control sensor Cautions • Use the Yamaha PJP-PS02/PJP-PS04 adaptor, or... an equivalent recommended by Yamaha. Use of other AC adaptors may cause interruptions to the power supply. • Always turn off the main unit power before disconnecting the AC adaptor. • When you wish to move the Disklavier control unit, unplug the AC adaptor...
Operation Manual
Page 22
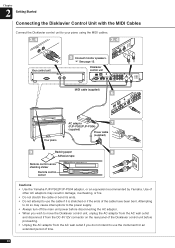
...connection completed. Note: The location of the MIDI IN/MIDI OUT terminals varies depending on page 15. 11 Note: Be sure to connect your control unit and the Disklavier control unit with the supplied MIDI cable. 5 Connect monitor speakers to the OUTPUT jack on the rear panel of the... Disklavier control unit. 6 Connect the supplied AC adaptor to the DC-IN 12V connector on the rear panel of the Disklavier control unit. 7 Connect the supplied power cable to the AC adaptor. 8 Connect the power cable ...
...connection completed. Note: The location of the MIDI IN/MIDI OUT terminals varies depending on page 15. 11 Note: Be sure to connect your control unit and the Disklavier control unit with the supplied MIDI cable. 5 Connect monitor speakers to the OUTPUT jack on the rear panel of the... Disklavier control unit. 6 Connect the supplied AC adaptor to the DC-IN 12V connector on the rear panel of the Disklavier control unit. 7 Connect the supplied power cable to the AC adaptor. 8 Connect the power cable ...
Operation Manual
Page 23
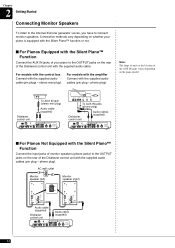
...Silent Piano™ Function Connect the input jacks of monitor speakers (phone jacks) to the OUTPUT jacks on the rear of the Disklavier control unit with the supplied audio cable. For models with the amplifier Connect with the supplied audio cable (pin plugs - phone plug... 2 (--4dB) POWER ON OFF Monitor speaker (right) POWER ON OFF INPUT LINE 1 (--10dB) PARALLEL LINE 2 (--4dB) Audio cable (supplied) Disklavier control unit Audio cable (supplied) 12 stereo mini plug). Chapter 2 Getting Started Connecting Monitor Speakers To listen to the internal XG tone generator voices, you ...
...Silent Piano™ Function Connect the input jacks of monitor speakers (phone jacks) to the OUTPUT jacks on the rear of the Disklavier control unit with the supplied audio cable. For models with the amplifier Connect with the supplied audio cable (pin plugs - phone plug... 2 (--4dB) POWER ON OFF Monitor speaker (right) POWER ON OFF INPUT LINE 1 (--10dB) PARALLEL LINE 2 (--4dB) Audio cable (supplied) Disklavier control unit Audio cable (supplied) 12 stereo mini plug). Chapter 2 Getting Started Connecting Monitor Speakers To listen to the internal XG tone generator voices, you ...
Operation Manual
Page 24
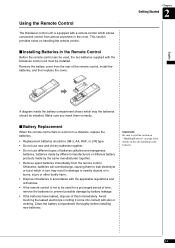
... in accordance with the applicable regulations and ordinances. • If the remote control is equipped with a remote control which allows convenient control from the rear of the remote control, install the batteries, and then replace the cover. Using the Remote Control The Disklavier control unit is not to be used , the two batteries supplied with skin or...
... in accordance with the applicable regulations and ordinances. • If the remote control is equipped with a remote control which allows convenient control from the rear of the remote control, install the batteries, and then replace the cover. Using the Remote Control The Disklavier control unit is not to be used , the two batteries supplied with skin or...
Operation Manual
Page 25
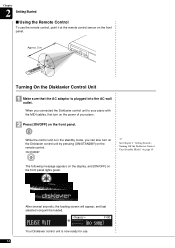
...screen will appear, and last selected song will be loaded. Chapter 2 Getting Started ■ Using the Remote Control To use . 14 While the control unit is in the standby mode, you connected the Disklavier control unit to your piano. 2 Press [ON/OFF] on the front panel. Approx. 5 m 30°...° 30° Turning On the Disklavier Control Unit 1 Make sure that the AC adaptor is now ready for use the remote control, point it at the remote control sensor on the front panel. PLEASE WAIT =Memory= V+00 (no song) Your Disklavier control unit is plugged into the AC wall outlet...
...screen will appear, and last selected song will be loaded. Chapter 2 Getting Started ■ Using the Remote Control To use . 14 While the control unit is in the standby mode, you connected the Disklavier control unit to your piano. 2 Press [ON/OFF] on the front panel. Approx. 5 m 30°...° 30° Turning On the Disklavier Control Unit 1 Make sure that the AC adaptor is now ready for use the remote control, point it at the remote control sensor on the front panel. PLEASE WAIT =Memory= V+00 (no song) Your Disklavier control unit is plugged into the AC wall outlet...
Operation Manual
Page 26
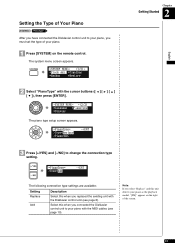
... [SYSTEM] on the right of your piano as the playback model, "[PB]" appears on the remote control. Setting the Type of Your Piano [SYSTEM] "PianoType" After you have connected the Disklavier control unit to your piano, you must set the type of the screen. 15 Note: If you connected the... Disklavier control unit to your piano with the Disklavier control unit (see page 10). Select this when you select "Replace" and...
... [SYSTEM] on the right of your piano as the playback model, "[PB]" appears on the remote control. Setting the Type of Your Piano [SYSTEM] "PianoType" After you have connected the Disklavier control unit to your piano, you must set the type of the screen. 15 Note: If you connected the... Disklavier control unit to your piano with the Disklavier control unit (see page 10). Select this when you select "Replace" and...
Operation Manual
Page 27
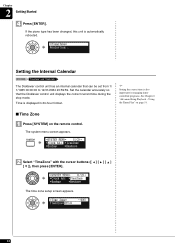
... important for engaging timercontrolled programs. See Chapter 6 "Advanced Song Playback - Setting the Internal Calendar [SYSTEM] "TimeZone" and "Clock Adj." Chapter 2 Getting Started 4 Press [ENTER]. The Disklavier control unit has an internal calendar that the Disklavier control unit displays the correct current time during the stop mode.
... important for engaging timercontrolled programs. See Chapter 6 "Advanced Song Playback - Setting the Internal Calendar [SYSTEM] "TimeZone" and "Clock Adj." Chapter 2 Getting Started 4 Press [ENTER]. The Disklavier control unit has an internal calendar that the Disklavier control unit displays the correct current time during the stop mode.


