Operation Manual
Page 7
... The source code will be provided at no responsibility whatsoever for any damage arising from Yamaha the source code for any responsibility whatsoever for use in the U.S. English Welcome to reimburse Yamaha for purchasing the Yamaha Disklavier control unit! Before using your entertainment, educational, and creative needs, while retaining the tone, touch and long-term value...
... The source code will be provided at no responsibility whatsoever for any damage arising from Yamaha the source code for any responsibility whatsoever for use in the U.S. English Welcome to reimburse Yamaha for purchasing the Yamaha Disklavier control unit! Before using your entertainment, educational, and creative needs, while retaining the tone, touch and long-term value...
Operation Manual
Page 8
.... • The cover of the cable. • If the AC adaptor cable is not compatible with rubber feet on the Disklavier control unit. Using the Disklavier control unit in this way is exposed), ask your hearing. you may damage your dealer for a long period of the AC adaptor to... containers such as smoke, odor, or noise - This could lead to fire or electric shock hazard. • When moving the Disklavier control unit to the Disklavier control unit. The thermal relay will present a fire and electric shock hazard. Consult your dealer. • Do not plug several devices into ...
.... • The cover of the cable. • If the AC adaptor cable is not compatible with rubber feet on the Disklavier control unit. Using the Disklavier control unit in this way is exposed), ask your hearing. you may damage your dealer for a long period of the AC adaptor to... containers such as smoke, odor, or noise - This could lead to fire or electric shock hazard. • When moving the Disklavier control unit to the Disklavier control unit. The thermal relay will present a fire and electric shock hazard. Consult your dealer. • Do not plug several devices into ...
Operation Manual
Page 9
English ■ Interference • The Disklavier control unit uses high-frequency digital circuits that may cause interference to radios and TVs placed close to the unit. • Remove spent batteries immediately from equipment. Improper use or misuse of dry batteries can lead ... does occur, relocate the affected equipment. ■ Handling Batteries The remote control of batteries together. This can cause them to heat up , ignite or leak electrolyte. • When the battery-powered unit is powered by the same manufacturer) together: this manual for a prolonged period...
English ■ Interference • The Disklavier control unit uses high-frequency digital circuits that may cause interference to radios and TVs placed close to the unit. • Remove spent batteries immediately from equipment. Improper use or misuse of dry batteries can lead ... does occur, relocate the affected equipment. ■ Handling Batteries The remote control of batteries together. This can cause them to heat up , ignite or leak electrolyte. • When the battery-powered unit is powered by the same manufacturer) together: this manual for a prolonged period...
Operation Manual
Page 10
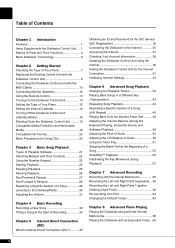
... Piano 7 Replacing the Existing Control Unit with the Disklavier Control Unit 8 Connecting the Disklavier Control Unit with the MIDI Cables 10 Connecting Monitor Speakers 12 Using the Remote Control 13 Turning On the Disklavier Control Unit 14 Setting the Type of Your Piano 15 Setting the Internal Calendar 16 Turning Off the Disklavier Control Unit (Standby Mode 19 Shutting Down the Disklavier Control Unit ...........19 Compatible Media Format...
... Piano 7 Replacing the Existing Control Unit with the Disklavier Control Unit 8 Connecting the Disklavier Control Unit with the MIDI Cables 10 Connecting Monitor Speakers 12 Using the Remote Control 13 Turning On the Disklavier Control Unit 14 Setting the Type of Your Piano 15 Setting the Internal Calendar 16 Turning Off the Disklavier Control Unit (Standby Mode 19 Shutting Down the Disklavier Control Unit ...........19 Compatible Media Format...
Operation Manual
Page 11
... Speakers 111 Setting the Disklavier Control Unit for Audio Data Reception/Transmission 113 Hooking Up MIDI Devices 115 Setting the Disklavier Control Unit for MIDI Data Reception 116 Setting the Disklavier Control Unit for MIDI Data Transmission 118 Setting the Disklavier Control Unit for Keyboard Playing Data... the Brightness of the Display 128 Switching the Languages for the Screen .......... 129 Resetting the Disklavier Control Unit 130 Updating the Disklavier Control Unit 132 Chapter 14 Troubleshooting 134 Chapter 15 Error Messages 137 Chapter 16 Glossary 139 Chapter 17 ...
... Speakers 111 Setting the Disklavier Control Unit for Audio Data Reception/Transmission 113 Hooking Up MIDI Devices 115 Setting the Disklavier Control Unit for MIDI Data Reception 116 Setting the Disklavier Control Unit for MIDI Data Transmission 118 Setting the Disklavier Control Unit for Keyboard Playing Data... the Brightness of the Display 128 Switching the Languages for the Screen .......... 129 Resetting the Disklavier Control Unit 130 Updating the Disklavier Control Unit 132 Chapter 14 Troubleshooting 134 Chapter 15 Error Messages 137 Chapter 16 Glossary 139 Chapter 17 ...

Operation Manual
Page 12
... adaptor (PJP-PS02/PJP-PS04 or an equivalent recommended by streaming broadcasts over 11 music channel by Yamaha) • 1 Power cable • 1 Operation manual • 1 PianoSoft CD song list 1 English 1Chapter Introduction Features The Disklavier control unit offers the valuable features that the following items are brief explanations of such features: Advanced Features for...
... adaptor (PJP-PS02/PJP-PS04 or an equivalent recommended by streaming broadcasts over 11 music channel by Yamaha) • 1 Power cable • 1 Operation manual • 1 PianoSoft CD song list 1 English 1Chapter Introduction Features The Disklavier control unit offers the valuable features that the following items are brief explanations of such features: Advanced Features for...
Operation Manual
Page 13
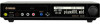
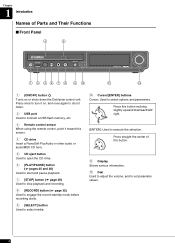
... select options and parameters. Press once to turn it on or shuts down . 2 USB port Used to connect a USB flash memory, etc. 3 Remote control sensor When using the remote control, point it down the Disklavier control unit. Chapter 1 Introduction Names of this button inclining slightly upward/downward/left/ right. [ENTER]: Used to execute the selection.
... select options and parameters. Press once to turn it on or shuts down . 2 USB port Used to connect a USB flash memory, etc. 3 Remote control sensor When using the remote control, point it down the Disklavier control unit. Chapter 1 Introduction Names of this button inclining slightly upward/downward/left/ right. [ENTER]: Used to execute the selection.

Operation Manual
Page 14
For models to be connected with the MIDI cables: Used to connect the existing control unit. 11 MIDI IN terminal For models to be replaced with Disklavier control unit: Used to connect the existing control unit. 3 For models to be replaced with Disklavier control unit: Used to connect external MIDI equipment. ■ Rear Panel 1 2 3456 Chapter 1 Introduction English 7 8 9 10 11 1 USB...
For models to be connected with the MIDI cables: Used to connect the existing control unit. 11 MIDI IN terminal For models to be replaced with Disklavier control unit: Used to connect the existing control unit. 3 For models to be replaced with Disklavier control unit: Used to connect external MIDI equipment. ■ Rear Panel 1 2 3456 Chapter 1 Introduction English 7 8 9 10 11 1 USB...
Operation Manual
Page 15
... 2 14 15 16 3 17 4 18 5 19 20 6 21 7 22 8 9 23 24 10 25 26 11 12 27 1 [ON/STANDBY] button Turns on the Disklavier control unit or puts it in the standby mode. 2 Number keypad Used for direct album/song selection and to enter a start time for song playback. 3 [SYSTEM] button ...
... 2 14 15 16 3 17 4 18 5 19 20 6 21 7 22 8 9 23 24 10 25 26 11 12 27 1 [ON/STANDBY] button Turns on the Disklavier control unit or puts it in the standby mode. 2 Number keypad Used for direct album/song selection and to enter a start time for song playback. 3 [SYSTEM] button ...
Operation Manual
Page 17
... Instrument Digital Interface. However, in the Yamaha XG format is played on track 2 (R). XG Yamaha XG is an extension of music with lyrics. The disk includes songs for listening enjoyment, piano study disks for the piano student, and accompaniment disks for use with the Disklavier series. The Disklavier control unit has an internal XG tone generator...
... Instrument Digital Interface. However, in the Yamaha XG format is played on track 2 (R). XG Yamaha XG is an extension of music with lyrics. The disk includes songs for listening enjoyment, piano study disks for the piano student, and accompaniment disks for use with the Disklavier series. The Disklavier control unit has an internal XG tone generator...
Operation Manual
Page 18
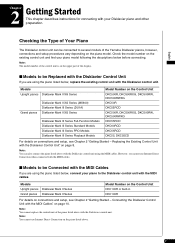
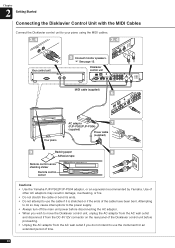
... 2 "Getting Started - Connecting the Disklavier Control Unit with the MIDI cables. Note: The model number of the control unit is on the upper part of the display. ■ Models to be connected to several models of the Yamaha Disklavier pianos, however, connections and setup procedures... vary depending on the piano model. Note: You cannot replace the control unit of Your Piano The Disklavier control unit can also connect the piano listed above . 7 Note:...
... 2 "Getting Started - Connecting the Disklavier Control Unit with the MIDI cables. Note: The model number of the control unit is on the upper part of the display. ■ Models to be connected to several models of the Yamaha Disklavier pianos, however, connections and setup procedures... vary depending on the piano model. Note: You cannot replace the control unit of Your Piano The Disklavier control unit can also connect the piano listed above . 7 Note:...
Operation Manual
Page 19
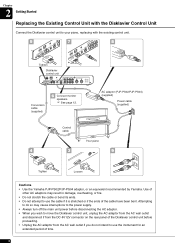
.... Chapter 2 Getting Started Replacing the Existing Control Unit with the Disklavier Control Unit Connect the Disklavier control unit to use the cable if it is stretched or if the ends of time. 8 AC adaptor (PJP-PS02/PJP-PS04) (supplied) Power cable (supplied) Control cable Your piano 4 3 9 Tighten Loosen Cautions • Use the Yamaha PJP-PS02/PJP-PS04 adaptor, or an...
.... Chapter 2 Getting Started Replacing the Existing Control Unit with the Disklavier Control Unit Connect the Disklavier control unit to use the cable if it is stretched or if the ends of time. 8 AC adaptor (PJP-PS02/PJP-PS04) (supplied) Power cable (supplied) Control cable Your piano 4 3 9 Tighten Loosen Cautions • Use the Yamaha PJP-PS02/PJP-PS04 adaptor, or an...
Operation Manual
Page 20
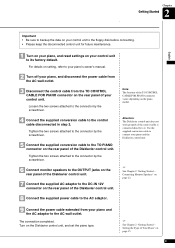
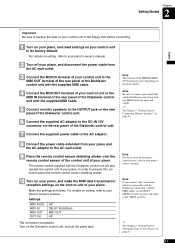
...8226; Be sure to backup the data on your control unit to the floppy disk before connecting. • Please keep the disconnected control unit for future maintenance. 1 Turn on your piano, and reset settings on your control unit to connect your piano and the Disklavier control unit. See Chapter 2 "Getting Started - ... two screws attached to the connector by the screwdriver. 6 Connect monitor speakers to the OUTPUT jacks on the rear panel of the Disklavier control unit. 7 Connect the supplied AC adaptor to the DC-IN 12V connector on page 15. 9 Connecting Monitor Speakers" on page 12...
...8226; Be sure to backup the data on your control unit to the floppy disk before connecting. • Please keep the disconnected control unit for future maintenance. 1 Turn on your piano, and reset settings on your control unit to connect your piano and the Disklavier control unit. See Chapter 2 "Getting Started - ... two screws attached to the connector by the screwdriver. 6 Connect monitor speakers to the OUTPUT jacks on the rear panel of the Disklavier control unit. 7 Connect the supplied AC adaptor to the DC-IN 12V connector on page 15. 9 Connecting Monitor Speakers" on page 12...
Operation Manual
Page 21
...the AC adaptor from the AC wall outlet and disconnect if from the DC-IN 12V connector on the rear panel of the Disklavier control unit before proceeding. • Unplug the AC adaptor from the AC wall outlet if you do not intend to use the cable...the ends of time. 10 See page 12. Disklavier control unit MIDI cable (supplied) 6 Your piano AC adaptor 7 (PJP-PS02/PJP-PS04) (supplied) Power cable (supplied) 9 Backing paper 8 Adhesive tape Remote control sensor shielding sticker Remote control sensor Cautions • Use the Yamaha PJP-PS02/PJP-PS04 adaptor, or an equivalent ...
...the AC adaptor from the AC wall outlet and disconnect if from the DC-IN 12V connector on the rear panel of the Disklavier control unit before proceeding. • Unplug the AC adaptor from the AC wall outlet if you do not intend to use the cable...the ends of time. 10 See page 12. Disklavier control unit MIDI cable (supplied) 6 Your piano AC adaptor 7 (PJP-PS02/PJP-PS04) (supplied) Power cable (supplied) 9 Backing paper 8 Adhesive tape Remote control sensor shielding sticker Remote control sensor Cautions • Use the Yamaha PJP-PS02/PJP-PS04 adaptor, or an equivalent ...
Operation Manual
Page 22
... for input and output. See Chapter 2 "Getting Started - For details on the piano model. Note: Be sure to connect your control unit and the Disklavier control unit with the Disklavier control unit will also operate the control unit of the MIDI IN/MIDI OUT terminals varies depending on setting, refer to your piano's owner's manual. 2 Turn off your piano...
... for input and output. See Chapter 2 "Getting Started - For details on the piano model. Note: Be sure to connect your control unit and the Disklavier control unit with the Disklavier control unit will also operate the control unit of the MIDI IN/MIDI OUT terminals varies depending on setting, refer to your piano's owner's manual. 2 Turn off your piano...
Operation Manual
Page 23
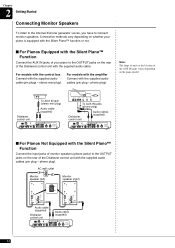
...the Silent Piano™ Function Connect the input jacks of monitor speakers (phone jacks) to the OUTPUT jacks on the rear of the Disklavier control unit with the supplied audio cables (pin plug - stereo mini plug). AC wall outlet Monitor speaker (left) POWER ON OFF INPUT LINE ...2 (--4dB) POWER ON OFF Monitor speaker (right) POWER ON OFF INPUT LINE 1 (--10dB) PARALLEL LINE 2 (--4dB) Audio cable (supplied) Disklavier control unit Audio cable (supplied) 12 Connection methods vary depending on whether your piano is equipped with the Silent Piano™ function or not. ■ For...
...the Silent Piano™ Function Connect the input jacks of monitor speakers (phone jacks) to the OUTPUT jacks on the rear of the Disklavier control unit with the supplied audio cables (pin plug - stereo mini plug). AC wall outlet Monitor speaker (left) POWER ON OFF INPUT LINE ...2 (--4dB) POWER ON OFF Monitor speaker (right) POWER ON OFF INPUT LINE 1 (--10dB) PARALLEL LINE 2 (--4dB) Audio cable (supplied) Disklavier control unit Audio cable (supplied) 12 Connection methods vary depending on whether your piano is equipped with the Silent Piano™ function or not. ■ For...
Operation Manual
Page 24
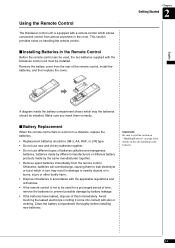
... burns, injury or other bodily harm. • Dispose of dry batteries. 13 Using the Remote Control The Disklavier control unit is not to be installed. This section provides notes on the safe handling of batteries in accordance with the Disklavier control unit must be used , the two batteries supplied with the applicable regulations and ordinances. • If...
... burns, injury or other bodily harm. • Dispose of dry batteries. 13 Using the Remote Control The Disklavier control unit is not to be installed. This section provides notes on the safe handling of batteries in accordance with the Disklavier control unit must be used , the two batteries supplied with the applicable regulations and ordinances. • If...
Operation Manual
Page 25
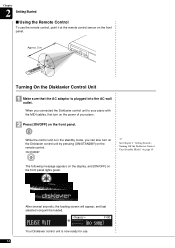
...5 m 30° 30° 30° 30° Turning On the Disklavier Control Unit 1 Make sure that the AC adaptor is now ready for use the remote control, point it at the remote control sensor on the front panel. The following message appears on the display, and [ON.../OFF] on the front panel. PLEASE WAIT =Memory= V+00 (no song) Your Disklavier control unit is plugged into the AC wall outlet. Turning Off the Disklavier Control Unit (Standby Mode)" on the remote control. See Chapter 2 "Getting Started - After several seconds, the loading screen will appear,...
...5 m 30° 30° 30° 30° Turning On the Disklavier Control Unit 1 Make sure that the AC adaptor is now ready for use the remote control, point it at the remote control sensor on the front panel. The following message appears on the display, and [ON.../OFF] on the front panel. PLEASE WAIT =Memory= V+00 (no song) Your Disklavier control unit is plugged into the AC wall outlet. Turning Off the Disklavier Control Unit (Standby Mode)" on the remote control. See Chapter 2 "Getting Started - After several seconds, the loading screen will appear,...
Operation Manual
Page 26
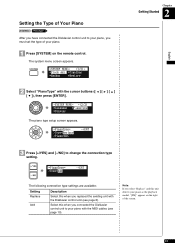
Note: If you select "Replace" and this when you connected the Disklavier control unit to your piano with the Disklavier control unit (see page 10). The system menu screen appears. =SYSTEM MENU= (1/2){ *Clock Adj. *TimeZone *Backup *Restore 2 Select "PianoType" with the ...Press [SYSTEM] on the right of the screen. 15 Setting the Type of Your Piano [SYSTEM] "PianoType" After you have connected the Disklavier control unit to change the connection type setting. =PianoType= >Type=Add -+ENT The following connection type settings are available: Setting Replace Add Description Select ...
Note: If you select "Replace" and this when you connected the Disklavier control unit to your piano with the Disklavier control unit (see page 10). The system menu screen appears. =SYSTEM MENU= (1/2){ *Clock Adj. *TimeZone *Backup *Restore 2 Select "PianoType" with the ...Press [SYSTEM] on the right of the screen. 15 Setting the Type of Your Piano [SYSTEM] "PianoType" After you have connected the Disklavier control unit to change the connection type setting. =PianoType= >Type=Add -+ENT The following connection type settings are available: Setting Replace Add Description Select ...
Operation Manual
Page 27
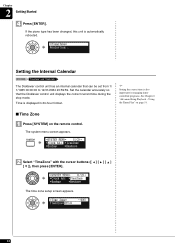
...Setting the correct time is automatically rebooted. =PianoType= Restarting... Using the Timer Play" on page 51. ■ Time Zone 1 Press [SYSTEM] on the remote control. The system menu screen appears. =SYSTEM MENU= (1/2){ *Clock Adj. *TimeZone *Backup *Restore 2 Select "TimeZone" with the cursor buttons then press [ENTER]. =... so that can be set from 1/ 1/1985 00:00:00 to 12/31/2084 23:59:59. The Disklavier control unit has an internal calendar that the Disklavier control unit displays the correct current time during the stop mode. If the piano type has been changed, this...
...Setting the correct time is automatically rebooted. =PianoType= Restarting... Using the Timer Play" on page 51. ■ Time Zone 1 Press [SYSTEM] on the remote control. The system menu screen appears. =SYSTEM MENU= (1/2){ *Clock Adj. *TimeZone *Backup *Restore 2 Select "TimeZone" with the cursor buttons then press [ENTER]. =... so that can be set from 1/ 1/1985 00:00:00 to 12/31/2084 23:59:59. The Disklavier control unit has an internal calendar that the Disklavier control unit displays the correct current time during the stop mode. If the piano type has been changed, this...


