
Owner's Manual
Page 2
... or incorrect installation may also use "household" type batteries. The model number, serial number, power requirements, etc., are therefore the owners responsibility. Purchase Date 92-BP 2 PLEASE KEEP THIS MANUAL IMPORTANT: The louder the sound, the shorter the time period before requesting service. The average life span of this manual as regulated by Yamaha. Some of printing. Batteries MUST be rechargeable. Note: Check with both user safe and environmentally...
... or incorrect installation may also use "household" type batteries. The model number, serial number, power requirements, etc., are therefore the owners responsibility. Purchase Date 92-BP 2 PLEASE KEEP THIS MANUAL IMPORTANT: The louder the sound, the shorter the time period before requesting service. The average life span of this manual as regulated by Yamaha. Some of printing. Batteries MUST be rechargeable. Note: Check with both user safe and environmentally...
Owner's Manual
Page 3
... . • Before moving the instrument, remove all connected adaptor and other electronic components, turn off the power for a long time, remove the batteries from it , immediately turn the power off the power switch, disconnect the adaptor plug from electrical shock, short-circuiting, damages, fire or other property. Failure to do not mix battery types, such as shown in this owner's manual are for the instrument. If you or...
... . • Before moving the instrument, remove all connected adaptor and other electronic components, turn off the power for a long time, remove the batteries from it , immediately turn the power off the power switch, disconnect the adaptor plug from electrical shock, short-circuiting, damages, fire or other property. Failure to do not mix battery types, such as shown in this owner's manual are for the instrument. If you or...

Owner's Manual
Page 4
... two voices to a song, including a special chord track for style pattern. • Performance Setup, for automatically calling up an appropriate voice for maximum expressive level control over the voices. • Convenient footswitch control over pattern Styles - The DJX also gives you play ! • Control Knobs These five knobs let make it 's playing. • PITCH BEND wheel Use this Owner's Manual carefully while playing your custom panel settings for instant recall. • Touch response for playing with...
... two voices to a song, including a special chord track for style pattern. • Performance Setup, for automatically calling up an appropriate voice for maximum expressive level control over the voices. • Convenient footswitch control over pattern Styles - The DJX also gives you play ! • Control Knobs These five knobs let make it 's playing. • PITCH BEND wheel Use this Owner's Manual carefully while playing your custom panel settings for instant recall. • Touch response for playing with...

Owner's Manual
Page 5
...48 Step 2 Using the Keyboard .......... 12 CHANGING THE BPM (TEMPO) ......... 48 Step 3 Demo Song/Voice/Style ... 14 ADJUSTING THE PATTERN VOLUME ..... 49 Step 4 Digital Sampling 16 FINGERING 50 Step 5 Function Parameters ......... 18 BEAT REVERSE 52 Step 6 Assigning Various Controls to the ASSIGN Knob, RIBBON CONTROLLER, and Footswitch 20 PART ON/OFF 52 • About the Parts 53 SETTING THE PATTERN SPLIT POINT .... 54 PANEL DISPLAY INDICATIONS 22 Function Parameter - STEP RECORDING 85 Recording Notes 86 • Additional Operations 88 Replacing a Note or Rest 89...
...48 Step 2 Using the Keyboard .......... 12 CHANGING THE BPM (TEMPO) ......... 48 Step 3 Demo Song/Voice/Style ... 14 ADJUSTING THE PATTERN VOLUME ..... 49 Step 4 Digital Sampling 16 FINGERING 50 Step 5 Function Parameters ......... 18 BEAT REVERSE 52 Step 6 Assigning Various Controls to the ASSIGN Knob, RIBBON CONTROLLER, and Footswitch 20 PART ON/OFF 52 • About the Parts 53 SETTING THE PATTERN SPLIT POINT .... 54 PANEL DISPLAY INDICATIONS 22 Function Parameter - STEP RECORDING 85 Recording Notes 86 • Additional Operations 88 Replacing a Note or Rest 89...
Owner's Manual
Page 6
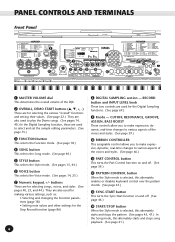
....) In the Song mode, this alternately starts and stops song playback. (See page 41.) RECORD button and INPUT LEVEL knob These two controls are used for making various settings, such as: • Selecting and changing the Function parameters (page 18) • Setting note values and other settings for the Step Record function (page 86) 6 8 DIGITAL SAMPLING section - PANEL CONTROLS AND TERMINALS Front Panel 9 0 8 ! 1 000DDDJX VOICE STYLE 001 142 MEASURE 1 7 4 2 DEMO START @#$ 7 3 4 5 6 BWD %^ & 2 3 5 6 8 rest 0 velocity 9 3 FWD * () e q 1 MASTER VOLUME dial This determines...
....) In the Song mode, this alternately starts and stops song playback. (See page 41.) RECORD button and INPUT LEVEL knob These two controls are used for making various settings, such as: • Selecting and changing the Function parameters (page 18) • Setting note values and other settings for the Step Record function (page 86) 6 8 DIGITAL SAMPLING section - PANEL CONTROLS AND TERMINALS Front Panel 9 0 8 ! 1 000DDDJX VOICE STYLE 001 142 MEASURE 1 7 4 2 DEMO START @#$ 7 3 4 5 6 BWD %^ & 2 3 5 6 8 rest 0 velocity 9 3 FWD * () e q 1 MASTER VOLUME dial This determines...

Owner's Manual
Page 7
... the recording functions: Song (pages 82, 85) and Performance Setup (page 56). * PERFORMANCE SETUP / SONG MEMORY buttons When the Style mode is selected, these are used to select the Performance Setup registrations (pages 57, 58). It affects only the voices played in the PERFORMANCE section of an external audio source (line level), such as you play. w e STAND BY/ON switch Rear Panel 1 DC IN 10-12V 2 PHONES/ AUX OUT 3 FOOT SWITCH 4 IN MIDI...
... the recording functions: Song (pages 82, 85) and Performance Setup (page 56). * PERFORMANCE SETUP / SONG MEMORY buttons When the Style mode is selected, these are used to select the Performance Setup registrations (pages 57, 58). It affects only the voices played in the PERFORMANCE section of an external audio source (line level), such as you play. w e STAND BY/ON switch Rear Panel 1 DC IN 10-12V 2 PHONES/ AUX OUT 3 FOOT SWITCH 4 IN MIDI...
Owner's Manual
Page 9
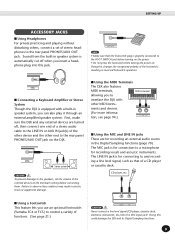
... a headphone plug into the MIC input jack! Doing this could damage the DJX and its Digital Sampling functions. 9 PHONES/ AUX OUT s Connecting a Keyboard Amplifier or Stereo System Though the DJX is equipped with other end to the rear panel PHONES/AUX OUT jack on . s Using the MIDI Terminals The DJX also features MIDI terminals, MIDI instrument allowing you to the FOOT SWITCH jack before connecting them. Failure to and recording...
... a headphone plug into the MIC input jack! Doing this could damage the DJX and its Digital Sampling functions. 9 PHONES/ AUX OUT s Connecting a Keyboard Amplifier or Stereo System Though the DJX is equipped with other end to the rear panel PHONES/AUX OUT jack on . s Using the MIDI Terminals The DJX also features MIDI terminals, MIDI instrument allowing you to the FOOT SWITCH jack before connecting them. Failure to and recording...

Owner's Manual
Page 30
... the sound of the Dual voice's signal is sent to a User bank in a louder Reverb effect for the Dual voice. buttons to an appropriate level (#11, Dual Volume). These settings are not saved when you create an optimum mix with the Main voice. Function Parameters - Use this value at or near -7, and set - It can also be heard properly, make other mode buttons (SONG, STYLE, or VOICE). • For the Dual voice to be controlled by a connected...
... the sound of the Dual voice's signal is sent to a User bank in a louder Reverb effect for the Dual voice. buttons to an appropriate level (#11, Dual Volume). These settings are not saved when you create an optimum mix with the Main voice. Function Parameters - Use this value at or near -7, and set - It can also be heard properly, make other mode buttons (SONG, STYLE, or VOICE). • For the Dual voice to be controlled by a connected...
Owner's Manual
Page 31
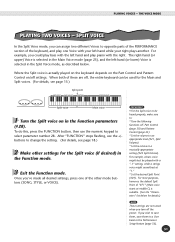
... parameter number 28. If you could play bass with the left -hand (or lower) Voice is selected in the Function mode. 3 Exit the Function mode. To do this, press the FUNCTION button, then use the +/buttons to change the setting. (For details, see page 13.) Split point Split voice Main voice 1 Turn the Split voice on /off the power. For example, you wish to save them, save them to a musically appropriate setting (#22 Split Octave). For most purposes, however, the default Split Point...
... parameter number 28. If you could play bass with the left -hand (or lower) Voice is selected in the Function mode. 3 Exit the Function mode. To do this, press the FUNCTION button, then use the +/buttons to change the setting. (For details, see page 13.) Split point Split voice Main voice 1 Turn the Split voice on /off the power. For example, you wish to save them, save them to a musically appropriate setting (#22 Split Octave). For most purposes, however, the default Split Point...
Owner's Manual
Page 34
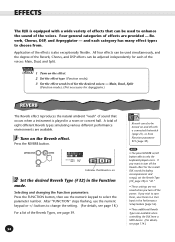
...; The panel REVERB on/off button affects only the keyboard played voices. If you want to turn off ." • These settings are available when controlling the DJX from . Selecting and changing the Function parameters: Press the FUNCTION button, then use the numeric keypad or +/- Reverb, Chorus, DSP, and Arpeggiator - After "FUNCTION" stops flashing, use the numeric keypad to a User bank in the Function mode. All four effects can be used to "off the power...
...; The panel REVERB on/off button affects only the keyboard played voices. If you want to turn off ." • These settings are available when controlling the DJX from . Selecting and changing the Function parameters: Press the FUNCTION button, then use the numeric keypad or +/- Reverb, Chorus, DSP, and Arpeggiator - After "FUNCTION" stops flashing, use the numeric keypad to a User bank in the Function mode. All four effects can be used to "off the power...

Owner's Manual
Page 41
... be controlled by using a connected footswitch. (See page 21.) CCHHAANNGGIINNGG TTHHEE BBPPMM ((TTEEMMPPOO)) The BPM (Tempo) of the OVERALL v/w buttons, repeatedly if necessary, until "BPM" appears in the display. 4 If you want to change to advance through the song numbers. 1 2 3 4 5 6 7 BWD 8 rest 0 velocity 9 3 FWD 3 Start the selected song. Press one of song (and pattern) playback can play along with the voices (see page 25). Press the START/STOP button...
... be controlled by using a connected footswitch. (See page 21.) CCHHAANNGGIINNGG TTHHEE BBPPMM ((TTEEMMPPOO)) The BPM (Tempo) of the OVERALL v/w buttons, repeatedly if necessary, until "BPM" appears in the display. 4 If you want to change to advance through the song numbers. 1 2 3 4 5 6 7 BWD 8 rest 0 velocity 9 3 FWD 3 Start the selected song. Press one of song (and pattern) playback can play along with the voices (see page 25). Press the START/STOP button...

Owner's Manual
Page 61
... zero. For example, setting Pattern Split Point to set the level for playing the voices. (See page 54.) • Want to instantly call it affects all Parts and voices. Many of the Performance Setup parameters. To find out more bottom and depth, turn the knob to the left cuts the bass and creates a brighter, thinner sound. Try setting a lower Pattern Split Point value. Turn the desired knob...
... zero. For example, setting Pattern Split Point to set the level for playing the voices. (See page 54.) • Want to instantly call it affects all Parts and voices. Many of the Performance Setup parameters. To find out more bottom and depth, turn the knob to the left cuts the bass and creates a brighter, thinner sound. Try setting a lower Pattern Split Point value. Turn the desired knob...

Owner's Manual
Page 65
... Main Voice Part (with the PART SELECT keys), set the knob to hear changes in different places while turning the ASSIGN knob to about 3:00. Remember that other important knob settings can use both Dynamics and Dynamics Strength at the same time. • Set the ASSIGN knob to use of the PERFORMANCE SETUP buttons for a sustained electronic triangle sound. • In this example, you can also be saved...
... Main Voice Part (with the PART SELECT keys), set the knob to hear changes in different places while turning the ASSIGN knob to about 3:00. Remember that other important knob settings can use both Dynamics and Dynamics Strength at the same time. • Set the ASSIGN knob to use of the PERFORMANCE SETUP buttons for a sustained electronic triangle sound. • In this example, you can also be saved...

Owner's Manual
Page 68
.../song. (Press the START/STOP button.) 4 Use the RIBBON CONTROLLER to use another one of the selected Part. Leaving the knob at the lower end of the keyboard). 3) Turn Part Control off (to free up more information, see the boxed section below.) • Want to change the sound of the PERFORMANCE SETUP buttons for instant recall. Do this in mind that you turn the CUTOFF knob to quickly switch...
.../song. (Press the START/STOP button.) 4 Use the RIBBON CONTROLLER to use another one of the selected Part. Leaving the knob at the lower end of the keyboard). 3) Turn Part Control off (to free up more information, see the boxed section below.) • Want to change the sound of the PERFORMANCE SETUP buttons for instant recall. Do this in mind that you turn the CUTOFF knob to quickly switch...
Owner's Manual
Page 81
... , Arpeggiator Type*, Arpeggiator Speed* • Sustain on patterns, see page 44.) If desired, also make various settings for the song - Refer to the list above .) 9 Exit from the Record mode. (Press the RECORD button.) Data that can only be recorded to the normal (melody) tracks: • Note on/off • Velocity • Main voice settings (Voice Number*, Volume*, Octave, Pan*, Reverb Send Level, Chorus Send Level, DSP Send Level) • Dual voice settings (Voice Number*, Volume*, Octave, Pan*, Reverb Send...
... , Arpeggiator Type*, Arpeggiator Speed* • Sustain on patterns, see page 44.) If desired, also make various settings for the song - Refer to the list above .) 9 Exit from the Record mode. (Press the RECORD button.) Data that can only be recorded to the normal (melody) tracks: • Note on/off • Velocity • Main voice settings (Voice Number*, Volume*, Octave, Pan*, Reverb Send Level, Chorus Send Level, DSP Send Level) • Dual voice settings (Voice Number*, Volume*, Octave, Pan*, Reverb Send...

Owner's Manual
Page 95
... channel to select the parameter number. These settings include: • Remote Channel • Keyboard Out • Pattern Out • Local Control • External Clock • Bulk Dump Send • Initial Setup Send • Sampling Send Selecting and changing the Function parameters: Press the FUNCTION button, then use Pattern Out in the data saved to "on a connected MIDI tone generator. The default setting is set to "off ," neither the connected MIDI device nor the DJX voices...
... channel to select the parameter number. These settings include: • Remote Channel • Keyboard Out • Pattern Out • Local Control • External Clock • Bulk Dump Send • Initial Setup Send • Sampling Send Selecting and changing the Function parameters: Press the FUNCTION button, then use Pattern Out in the data saved to "on a connected MIDI tone generator. The default setting is set to "off ," neither the connected MIDI device nor the DJX voices...
Owner's Manual
Page 102
.... There is set to avoid MIDI "feedback." • When using the DJX with a sequencer. (This may be controlled from the pattern or song. (See the note on page 104.) • If you are appropriate: Main Voice Volume (#01, page 27), Dual Voice Volume (#11, page 30), and Split Voice Volume (#21, page 32). Make sure that the power adaptor is not close to or resting on ," style playback CANNOT...
.... There is set to avoid MIDI "feedback." • When using the DJX with a sequencer. (This may be controlled from the pattern or song. (See the note on page 104.) • If you are appropriate: Main Voice Volume (#01, page 27), Dual Voice Volume (#11, page 30), and Split Voice Volume (#21, page 32). Make sure that the power adaptor is not close to or resting on ," style playback CANNOT...

Owner's Manual
Page 103
... key on the keyboard. This is installed. • User Song Data • User Performance Setup Data • Performance Setup Bank Number • Touch Sensitivity • Split Point • Pattern Split Point • Footswitch Assign Function • Sampling Voice Data Data Initialization All data can be slightly different from note to the FOOT SWITCH jack before turning on the power. The data listed below , all , depending on the sound itself and the effect or parameter used. as long as an AC adaptor is connected or a set...
... key on the keyboard. This is installed. • User Song Data • User Performance Setup Data • Performance Setup Bank Number • Touch Sensitivity • Split Point • Pattern Split Point • Footswitch Assign Function • Sampling Voice Data Data Initialization All data can be slightly different from note to the FOOT SWITCH jack before turning on the power. The data listed below , all , depending on the sound itself and the effect or parameter used. as long as an AC adaptor is connected or a set...
Owner's Manual
Page 115
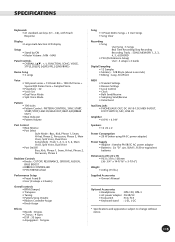
...-9/16" x 5-7/16") Weight • 6.8 kg (15 lbs.) Supplied Accessories • Owner's Manual Optional Accessories • Headphones : HPE-150, HPE-3 • AC power adaptor : PA-5B/5C • Footswitch : FC4, FC5 • Keyboard stand : L-2L, L-2C * Specifications and appearance subject to change without notice. 115 SPECIFICATIONS Keyboards • 61 standard-size keys (C1 - C6), with Touch Response Display • Large multi-function LCD display Setup • Stand by/ON • Master Volume : MIN -
...-9/16" x 5-7/16") Weight • 6.8 kg (15 lbs.) Supplied Accessories • Owner's Manual Optional Accessories • Headphones : HPE-150, HPE-3 • AC power adaptor : PA-5B/5C • Footswitch : FC4, FC5 • Keyboard stand : L-2L, L-2C * Specifications and appearance subject to change without notice. 115 SPECIFICATIONS Keyboards • 61 standard-size keys (C1 - C6), with Touch Response Display • Large multi-function LCD display Setup • Stand by/ON • Master Volume : MIN -

Owner's Manual
Page 116
... Split voice 31 Split Voice (Part 60 STAND BY/ON switch 8 START/STOP button 41, 45, 47 Style List 15 styles, selecting 44 sustain 21 Sync-Start 46 T tap 21 Tempo (BPM 41 Touch Sensitivity 33 track 40, 84 tracks, muting 40, 84 tracks, re-recording 84 Transpose 28 triplets 88 Troubleshooting 102 Tuning 29 turntable 64, 67 U User Performance Setup 56 User songs 81 V velocity curves 90 Voice List 104 Voice Set 33 voices, Drum Kit 108 voices, GM 106 voices, panel 104 voices, selecting and playing 25 volume...
... Split voice 31 Split Voice (Part 60 STAND BY/ON switch 8 START/STOP button 41, 45, 47 Style List 15 styles, selecting 44 sustain 21 Sync-Start 46 T tap 21 Tempo (BPM 41 Touch Sensitivity 33 track 40, 84 tracks, muting 40, 84 tracks, re-recording 84 Transpose 28 triplets 88 Troubleshooting 102 Tuning 29 turntable 64, 67 U User Performance Setup 56 User songs 81 V velocity curves 90 Voice List 104 Voice Set 33 voices, Drum Kit 108 voices, GM 106 voices, panel 104 voices, selecting and playing 25 volume...


