
Owner's Manual
Page 2
..., etc. Disposal Notice: Should this plate. If a cart, etc., is used batteries promptly and as designed) are not covered by Yamaha. IMPORTANT: The louder the sound, the shorter the time period before requesting service. NOTICE: Service charges incurred due to be rechargeable. NAME...etc., are both the letter and the spirit of the law, we want you , please contact Yamaha directly. a cart, rack, or stand that accompany the accessory product. However, Yamaha reserves the right to the disposal of used , please observe all batteries away from children. In keeping...
..., etc. Disposal Notice: Should this plate. If a cart, etc., is used batteries promptly and as designed) are not covered by Yamaha. IMPORTANT: The louder the sound, the shorter the time period before requesting service. NOTICE: Service charges incurred due to be rechargeable. NAME...etc., are both the letter and the spirit of the law, we want you , please contact Yamaha directly. a cart, rack, or stand that accompany the accessory product. However, Yamaha reserves the right to the disposal of used , please observe all batteries away from children. In keeping...
Owner's Manual
Page 4
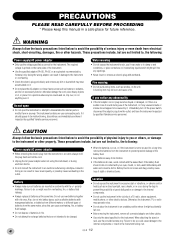
... in the vicinity of the instrument. • Use the specified adaptor (PA-5D, PA-5C or an equivalent recommended by qualified Yamaha service personnel. The required voltage is printed on , trip over, or roll anything over . 4 (4)-8 1/2 If you or others, or damage to... markings. Do not use the provided screws only. Battery • Always make sure all batteries are inserted in the outlet. When attaching the stand or rack, use new batteries together with the +/- Using the wrong adaptor can result in damage to the instrument or overheating. • Check...
... in the vicinity of the instrument. • Use the specified adaptor (PA-5D, PA-5C or an equivalent recommended by qualified Yamaha service personnel. The required voltage is printed on , trip over, or roll anything over . 4 (4)-8 1/2 If you or others, or damage to... markings. Do not use the provided screws only. Battery • Always make sure all batteries are inserted in the outlet. When attaching the stand or rack, use new batteries together with the +/- Using the wrong adaptor can result in damage to the instrument or overheating. • Check...
Owner's Manual
Page 7
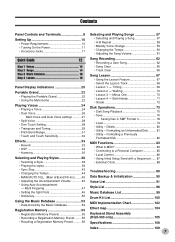
... Backup & Initialization 90 Voice List 91 Style List 98 Music Database List 99 Drum Kit List 100 MIDI Implementation Chart 102 Effect map 104 Keyboard Stand Assembly (DGX-500 only 105 Specifications 108 Index 109 7 Waiting 70 • Lesson 3 - Timing 69 • Lesson 2 - Delete 80 • Utility - Both Hands 71 • Grade...
... Backup & Initialization 90 Voice List 91 Style List 98 Music Database List 99 Drum Kit List 100 MIDI Implementation Chart 102 Effect map 104 Keyboard Stand Assembly (DGX-500 only 105 Specifications 108 Index 109 7 Waiting 70 • Lesson 3 - Timing 69 • Lesson 2 - Delete 80 • Utility - Both Hands 71 • Grade...
Owner's Manual
Page 10
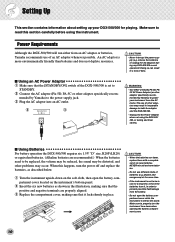
... the battery. • Do not open the battery compartment cover located on the stand. I Using Batteries For battery operation the DGX-500/300 requires six 1.5V "D" size, R20P (LR20) or equivalent batteries. (Alkaline batteries are properly aligned. w e • Use ONLY a Yamaha PA-5D, PA5C AC Power Adaptor (or other adaptors may occur. The use...
... the battery. • Do not open the battery compartment cover located on the stand. I Using Batteries For battery operation the DGX-500/300 requires six 1.5V "D" size, R20P (LR20) or equivalent batteries. (Alkaline batteries are properly aligned. w e • Use ONLY a Yamaha PA-5D, PA5C AC Power Adaptor (or other adaptors may occur. The use...
Owner's Manual
Page 40
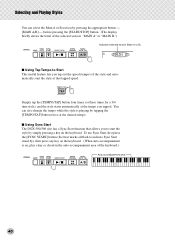
... the [TEMPO/TAP] button four times (or three times for a 3/4 time style), and the style starts automatically at the tempo you to indicate Sync Start stand-by), then press any key on the keyboard. You can select the Main A or B section by tapping the [TEMPO/TAP] button twice at that allows.... before pressing the [START/STOP] button. (The display briefly shows the letter of the keyboard.) Auto accompaniment area 40 MAIN A I Using Sync Start The DGX-500/300 also has a Sync Start function that tapped speed.
... the [TEMPO/TAP] button four times (or three times for a 3/4 time style), and the style starts automatically at the tempo you to indicate Sync Start stand-by), then press any key on the keyboard. You can select the Main A or B section by tapping the [TEMPO/TAP] button twice at that allows.... before pressing the [START/STOP] button. (The display briefly shows the letter of the keyboard.) Auto accompaniment area 40 MAIN A I Using Sync Start The DGX-500/300 also has a Sync Start function that tapped speed.
Owner's Manual
Page 84
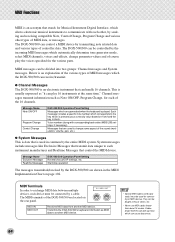
...bought at the same time." MIDI messages can be divided into two groups: Channel messages and System messages. G Channel Messages The DGX-500/300 is used to MIDI devices. Each message includes a specific note number which corresponds to communicate with corresponding bank select MSB/LSB settings,... to the key which are used in the MIDI Implementation Chart on the rear panel. MIDI Functions MIDI is an acronym that stands for Musical Instrument Digital Interface, which automatically determine tone generator mode, select MIDI channels, voices and effects, change some aspect of...
...bought at the same time." MIDI messages can be divided into two groups: Channel messages and System messages. G Channel Messages The DGX-500/300 is used to MIDI devices. Each message includes a specific note number which corresponds to communicate with corresponding bank select MSB/LSB settings,... to the key which are used in the MIDI Implementation Chart on the rear panel. MIDI Functions MIDI is an acronym that stands for Musical Instrument Digital Interface, which automatically determine tone generator mode, select MIDI channels, voices and effects, change some aspect of...
Owner's Manual
Page 105
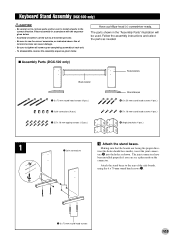
Please assemble in the "Assembly Parts" illustration will be used. I Assembly Parts (DGX-500 only) Side boards Back board q 6 x 70 mm round head screws (4 pcs.) Stand bases r 6 x 30 mm round head screws (4 pcs.) w Joint connectors (4 pcs.) t 5 x 16 mm round head screws (4 pcs.) e 3.5 x 16 mm tapping screws (12 pcs.) y... persons. • Be sure to use the correct screw size, as indicated above. tors w into the holes as needed. Keyboard Stand Assembly (DGX-500 only) • Be careful not to confuse parts, and be sure to install all screws upon completing assembly of the side ...
Please assemble in the "Assembly Parts" illustration will be used. I Assembly Parts (DGX-500 only) Side boards Back board q 6 x 70 mm round head screws (4 pcs.) Stand bases r 6 x 30 mm round head screws (4 pcs.) w Joint connectors (4 pcs.) t 5 x 16 mm round head screws (4 pcs.) e 3.5 x 16 mm tapping screws (12 pcs.) y... persons. • Be sure to use the correct screw size, as indicated above. tors w into the holes as needed. Keyboard Stand Assembly (DGX-500 only) • Be careful not to confuse parts, and be sure to install all screws upon completing assembly of the side ...
Owner's Manual
Page 107
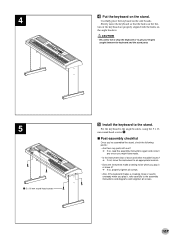
... keyboard on the angle brackets. • Be careful not to drop the keyboard or to get your fingers caught between the keyboard and the stand parts. 5 t 5 x 16 mm round head screws B Install the keyboard to the angle brackets, using the 5 x 16 mm round head screws t. Slowly move ...it? ➔ If so, properly tighten all screws. 107 Fix the keyboard to the stand. I Post-assembly checklist Once you've assembled the stand, check the following points: • Are there any parts left over? ➔ If so, read the assembly instructions again and...
... keyboard on the angle brackets. • Be careful not to drop the keyboard or to get your fingers caught between the keyboard and the stand parts. 5 t 5 x 16 mm round head screws B Install the keyboard to the angle brackets, using the 5 x 16 mm round head screws t. Slowly move ...it? ➔ If so, properly tighten all screws. 107 Fix the keyboard to the stand. I Post-assembly checklist Once you've assembled the stand, check the following points: • Are there any parts left over? ➔ If so, read the assembly instructions again and...
Owner's Manual
Page 108
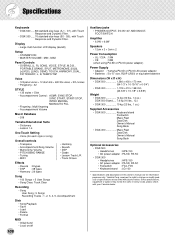
... : Yamaha PA-5D or PA-5C AC power adaptor • Batteries : Six "D" size, R20P (LR20) or equivalent batteries Dimensions (W x D x H) • DGX-500 1,380 x 430 x 173 mm (54-1/3" x 16-15/16" x 6-3/4") • DGX-300 1,178 x 410 x 168 mm (46-3/8" x 16-1/8" x 6-5/8") Weight • DGX-500 14 kg (30 lbs., 14 oz.) DGX-500 Stand..... 7.6 kg (16 lbs., 12.) • DGX-300...
... : Yamaha PA-5D or PA-5C AC power adaptor • Batteries : Six "D" size, R20P (LR20) or equivalent batteries Dimensions (W x D x H) • DGX-500 1,380 x 430 x 173 mm (54-1/3" x 16-15/16" x 6-3/4") • DGX-300 1,178 x 410 x 168 mm (46-3/8" x 16-1/8" x 6-5/8") Weight • DGX-500 14 kg (30 lbs., 14 oz.) DGX-500 Stand..... 7.6 kg (16 lbs., 12.) • DGX-300...
Owner's Manual
Page 109
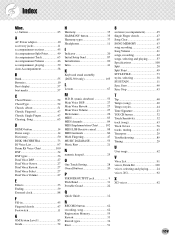
... 1 83 Grade 72 H Harmony 35 HARMONY button 35 Harmony types 37 Headphones 11 I Indicator 20 Initial Setup Send 87 Initialization 90 Intro 41 K Keyboard stand assembly (DGX-500 only 105 L Lesson 67 M M.D.B. (music database 53 Main Voice DSP 27 Main Voice Reverb 27 Main Voice Volume 27 Metronome 22 MIDI 83 MIDI...
... 1 83 Grade 72 H Harmony 35 HARMONY button 35 Harmony types 37 Headphones 11 I Indicator 20 Initial Setup Send 87 Initialization 90 Intro 41 K Keyboard stand assembly (DGX-500 only 105 L Lesson 67 M M.D.B. (music database 53 Main Voice DSP 27 Main Voice Reverb 27 Main Voice Volume 27 Metronome 22 MIDI 83 MIDI...


