Installation Guide
Page 4
... not to connect to the left of "Install the software automatically (Recommended)," then click [Next]. For Windows Vista: See page 5. n See the Yamaha Download page at right. All control panels and icons will not appear when using (D:, E:, Q:, etc.) The drive name is turned on -screen instructions... for up-to-date news on some computers.) n This Wizard window will be using Windows XP Professional x64 Edition. n Refer to the Owner's Manual of the instrument to connect the instrument to the computer. 7 Check the radio button to Windows Update, select the radio button for Windows ...
... not to connect to the left of "Install the software automatically (Recommended)," then click [Next]. For Windows Vista: See page 5. n See the Yamaha Download page at right. All control panels and icons will not appear when using (D:, E:, Q:, etc.) The drive name is turned on -screen instructions... for up-to-date news on some computers.) n This Wizard window will be using Windows XP Professional x64 Edition. n Refer to the Owner's Manual of the instrument to connect the instrument to the computer. 7 Check the radio button to Windows Update, select the radio button for Windows ...
Installation Guide
Page 5
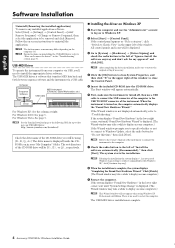
... items. Click [Next]. Click [Finish]. (The Wizard window may take a while to display the window.) n Refer to the Owner's Manual of the instrument to connect the instrument to the computer. The Start window will appear automatically. 4 First, make sure the instrument ...Account Control" window appears, click [Continue]. 5 If a message allowing Windows to "Troubleshooting." Accessory CD-ROM for this software is authored by Yamaha Corporation then click [Install]. 7 When the installation is not displayed automatically, refer to search online for my device (Recommended)," then click [Next...
... items. Click [Next]. Click [Finish]. (The Wizard window may take a while to display the window.) n Refer to the Owner's Manual of the instrument to connect the instrument to the computer. The Start window will appear automatically. 4 First, make sure the instrument ...Account Control" window appears, click [Continue]. 5 If a message allowing Windows to "Troubleshooting." Accessory CD-ROM for this software is authored by Yamaha Corporation then click [Install]. 7 When the installation is not displayed automatically, refer to search online for my device (Recommended)," then click [Next...
Internet Connection Guide (version 1.0)
Page 3
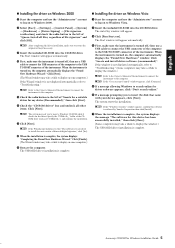
...the service are current as of the LAN terminal, refer to the example. Connection LAN Cable Connection 1 Connect the devices according to the Owner's Manual (Chapter 10). LAN terminal LAN cable Router cable Modem Internet Required Devices • LAN cable • Router cable (This is connected... to the special website, you do not need to the Owner's Manual (Chapter 9). NOTE • For an illustration of the location of May, 2009. NOTE • The contents of the instrument off, ...
...the service are current as of the LAN terminal, refer to the example. Connection LAN Cable Connection 1 Connect the devices according to the Owner's Manual (Chapter 10). LAN terminal LAN cable Router cable Modem Internet Required Devices • LAN cable • Router cable (This is connected... to the special website, you do not need to the Owner's Manual (Chapter 9). NOTE • For an illustration of the location of May, 2009. NOTE • The contents of the instrument off, ...

Internet Connection Guide (version 1.0)
Page 5
... to the special website. Internet Connection Guide 5 NOTE • Because the settings are complete. Connection 7 Press the [G](CONNECTION) button to check the connection to the Owner's Manual (Chapter 9). The settings are saved by checking the connection.
... to the special website. Internet Connection Guide 5 NOTE • Because the settings are complete. Connection 7 Press the [G](CONNECTION) button to check the connection to the Owner's Manual (Chapter 9). The settings are saved by checking the connection.

Internet Connection Guide (version 1.0)
Page 6
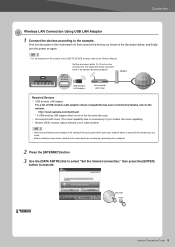
...been confirmed by Yamaha, refer to the example. The signal will not be used. • Access point with router Internet Required Devices • USB wireless LAN adaptor For a list of the access point with router side, read the owner's manual for the product you are...the [INTERNET] button. 3 Use the [DATA ENTRY] dial to select "Set the Internet connection," then press the [ENTER] button to the Owner's Manual (Chapter 10). • Only WEP encryption is an obstacle blocking reception. NEXT PAGE Internet Connection Guide 6 Wireless network Modem USB wireless LAN adaptor ...
...been confirmed by Yamaha, refer to the example. The signal will not be used. • Access point with router Internet Required Devices • USB wireless LAN adaptor For a list of the access point with router side, read the owner's manual for the product you are...the [INTERNET] button. 3 Use the [DATA ENTRY] dial to select "Set the Internet connection," then press the [ENTER] button to the Owner's Manual (Chapter 10). • Only WEP encryption is an obstacle blocking reception. NEXT PAGE Internet Connection Guide 6 Wireless network Modem USB wireless LAN adaptor ...
Internet Connection Guide (version 1.0)
Page 8
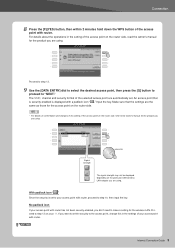
... 8 No padlock icon (No encryption) Because your access point with router. 9 Press the [C](WEP KEY) button to call up the character-entry display to the owner's manual for the product you are the same as those for the access point on page 9. Only WEP encryption is displayed with router is an encrypted...
... 8 No padlock icon (No encryption) Because your access point with router. 9 Press the [C](WEP KEY) button to call up the character-entry display to the owner's manual for the product you are the same as those for the access point on page 9. Only WEP encryption is displayed with router is an encrypted...
Internet Connection Guide (version 1.0)
Page 9
10 Input the WEP key. The settings are lost when you turn off the power of the instrument, be sure to the Owner's Manual (Starting Up) for character-entry details. When you made. Connection To cancel the WEP key input, press the [8t](CANCEL) button. 11 Press the [G](NEXT) ...
10 Input the WEP key. The settings are lost when you turn off the power of the instrument, be sure to the Owner's Manual (Starting Up) for character-entry details. When you made. Connection To cancel the WEP key input, press the [8t](CANCEL) button. 11 Press the [G](NEXT) ...
Internet Connection Guide (version 1.0)
Page 10
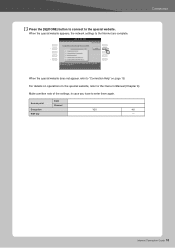
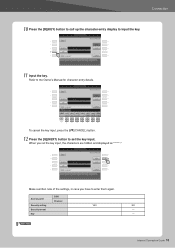
Make a written note of the settings, in the special website, refer to enter them again. Internet Connection Guide 10 13 Press the [G](DONE) button to connect to the Internet are complete. When the special website appears, the network settings to the special website. Access point SSID Channel Encryption YES NO WEP key - For details on page 18. Connection When the special website does not appear, refer to "Connection Help" on operations in case you have to the Owner's Manual (Chapter 9).
Make a written note of the settings, in the special website, refer to enter them again. Internet Connection Guide 10 13 Press the [G](DONE) button to connect to the Internet are complete. When the special website appears, the network settings to the special website. Access point SSID Channel Encryption YES NO WEP key - For details on page 18. Connection When the special website does not appear, refer to "Connection Help" on operations in case you have to the Owner's Manual (Chapter 9).
Internet Connection Guide (version 1.0)
Page 11
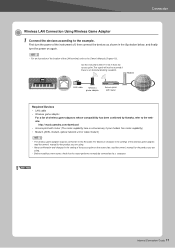
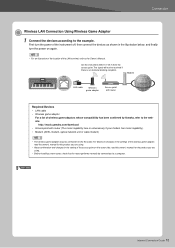
...computer. LAN terminal Set the instrument within 10-20 m from the access point. First turn the power on the router side, read the owner's manual for the product you are using. • About confirmation and changes in the setting of the instrument off, then connect the... shown in the settings of the wireless game adaptor, read the owner's manual for the product you are using. • Before installing a new router, check that the router performs normally by Yamaha, refer to the website: http://music.yamaha.com/download/ • Access point with router Internet Required Devices ...
...computer. LAN terminal Set the instrument within 10-20 m from the access point. First turn the power on the router side, read the owner's manual for the product you are using. • About confirmation and changes in the setting of the instrument off, then connect the... shown in the settings of the wireless game adaptor, read the owner's manual for the product you are using. • Before installing a new router, check that the router performs normally by Yamaha, refer to the website: http://music.yamaha.com/download/ • Access point with router Internet Required Devices ...

Internet Connection Guide (version 1.0)
Page 12
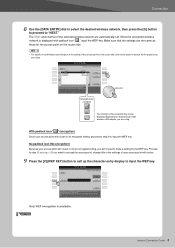
... to step 3. 3 Use the [DATA ENTRY] dial to select "Set the Internet connection," then press the [ENTER] button to execute. 4 Use the [A]/[B] buttons to the Owner's Manual (Chapter 9). NOTE • The contents of May, 2009. Connection 2 Press the [INTERNET] button. When the special website appears Since the instrument is connected to the...
... to step 3. 3 Use the [DATA ENTRY] dial to select "Set the Internet connection," then press the [ENTER] button to execute. 4 Use the [A]/[B] buttons to the Owner's Manual (Chapter 9). NOTE • The contents of May, 2009. Connection 2 Press the [INTERNET] button. When the special website appears Since the instrument is connected to the...
Internet Connection Guide (version 1.0)
Page 13
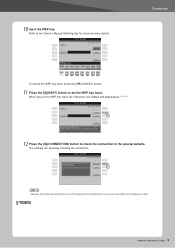
When the special website does not appear, refer to the Owner's Manual (Chapter 9). Internet Connection Guide 13 For details on page 18. When the special website appears, the network settings to the special website. Connection 5 Press the [C] ...
When the special website does not appear, refer to the Owner's Manual (Chapter 9). Internet Connection Guide 13 For details on page 18. When the special website appears, the network settings to the special website. Connection 5 Press the [C] ...
Internet Connection Guide (version 1.0)
Page 15
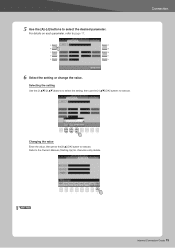
Refer to execute. Connection 6 Select the setting or change the value. NEXT PAGE Internet Connection Guide 15 Changing the value Enter the value, then press the [8 s](OK) button to the Owner's Manual (Starting Up) for character-entry details. 5 Use the [A]-[J] buttons to page 17. For details on each parameter, refer to select the desired parameter. Selecting the setting Use the [2 st]/[3 st] buttons to select the setting, then use the [4 st](OK) buttons to execute.
Refer to execute. Connection 6 Select the setting or change the value. NEXT PAGE Internet Connection Guide 15 Changing the value Enter the value, then press the [8 s](OK) button to the Owner's Manual (Starting Up) for character-entry details. 5 Use the [A]-[J] buttons to page 17. For details on each parameter, refer to select the desired parameter. Selecting the setting Use the [2 st]/[3 st] buttons to select the setting, then use the [4 st](OK) buttons to execute.
Internet Connection Guide (version 1.0)
Page 16
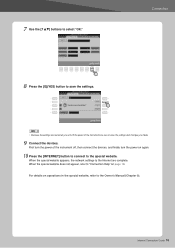
... to select "OK." NOTE • Because the settings are complete. Internet Connection Guide 16 For details on page 18. 7 Use the [7 st] buttons to the Owner's Manual (Chapter 9).
... to select "OK." NOTE • Because the settings are complete. Internet Connection Guide 16 For details on page 18. 7 Use the [7 st] buttons to the Owner's Manual (Chapter 9).

Internet Connection Guide (version 1.10)
Page 3
... • For an illustration of the location of the service as appearing here are subject to the Owner's Manual. NOTE • The special website screen above is taken from the CVP-509. • The contents of the LAN terminal, refer to the example. About the operations in the illustration below, and finally turn...
... • For an illustration of the location of the service as appearing here are subject to the Owner's Manual. NOTE • The special website screen above is taken from the CVP-509. • The contents of the LAN terminal, refer to the example. About the operations in the illustration below, and finally turn...
Internet Connection Guide (version 1.10)
Page 5
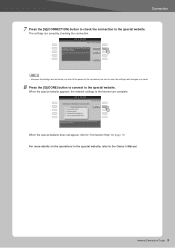
For more details on page 19. NOTE • Because the settings are complete. Connection 7 Press the [G](CONNECTION) button to check the connection to the Owner's Manual. When the special website appears, the network settings to the Internet are lost when you turn off the power of the instrument, be sure to ...
For more details on page 19. NOTE • Because the settings are complete. Connection 7 Press the [G](CONNECTION) button to check the connection to the Owner's Manual. When the special website appears, the network settings to the Internet are lost when you turn off the power of the instrument, be sure to ...
Internet Connection Guide (version 1.10)
Page 6
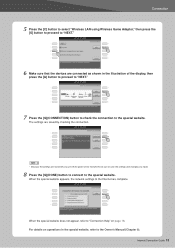
...Devices • USB wireless LAN adaptor For a list of USB wireless LAN adaptors whose compatibility has been confirmed by Yamaha, refer to the website: http://music.yamaha.com/download/ * A USB wireless LAN adaptor which is not on again. USB TO DEVICE terminal Set the instrument within ... in the illustration below, and finally turn the power on the list cannot be used. • Access point with router side, read the owner's manual for the product you are using. • Before installing a new router, check that the router performs normally by connecting via a computer. 2 Press...
...Devices • USB wireless LAN adaptor For a list of USB wireless LAN adaptors whose compatibility has been confirmed by Yamaha, refer to the website: http://music.yamaha.com/download/ * A USB wireless LAN adaptor which is not on again. USB TO DEVICE terminal Set the instrument within ... in the illustration below, and finally turn the power on the list cannot be used. • Access point with router side, read the owner's manual for the product you are using. • Before installing a new router, check that the router performs normally by connecting via a computer. 2 Press...
Internet Connection Guide (version 1.10)
Page 9
... For details about the operations in the setting of the access point on the particular USB wireless LAN adaptor you don't need to the owner's manual for the product you are the same as those for the wireless LAN. NEXT PAGE Internet Connection Guide 9 An access point that the settings... are using . Proceed to "NEXT." Signal strength The signal strength may not be displayed depending on the router side, read the owner's manual for the product you want to set the security to the access point, change this in the setting of the selected access point are automatically...
... For details about the operations in the setting of the access point on the particular USB wireless LAN adaptor you don't need to the owner's manual for the product you are the same as those for the wireless LAN. NEXT PAGE Internet Connection Guide 9 An access point that the settings... are using . Proceed to "NEXT." Signal strength The signal strength may not be displayed depending on the router side, read the owner's manual for the product you want to set the security to the access point, change this in the setting of the selected access point are automatically...
Internet Connection Guide (version 1.10)
Page 10
To cancel the key input, press the [8t](CANCEL) button. 12 Press the [G](NEXT) button to input the key. 11 Input the key. Connection 10 Press the [D](KEY) button to call up the character-entry display to set the key input, the characters are hidden and displayed as "******." Refer to enter them again. Access point Security setting Security format Key SSID Channel YES NEXT PAGE NO - - Make a written note of the settings, in case you set the key input. Internet Connection Guide 10 When you have to the Owner's Manual for character-entry details.
To cancel the key input, press the [8t](CANCEL) button. 12 Press the [G](NEXT) button to input the key. 11 Input the key. Connection 10 Press the [D](KEY) button to call up the character-entry display to set the key input, the characters are hidden and displayed as "******." Refer to enter them again. Access point Security setting Security format Key SSID Channel YES NEXT PAGE NO - - Make a written note of the settings, in case you set the key input. Internet Connection Guide 10 When you have to the Owner's Manual for character-entry details.

Internet Connection Guide (version 1.10)
Page 11
... the Internet are complete. NOTE • Because the settings are saved by checking the connection. When the special website appears, the network settings to the Owner's Manual. The settings are lost when you turn off the power of the instrument, be sure to save the settings and changes you made. 14 Press...
... the Internet are complete. NOTE • Because the settings are saved by checking the connection. When the special website appears, the network settings to the Owner's Manual. The settings are lost when you turn off the power of the instrument, be sure to save the settings and changes you made. 14 Press...
Internet Connection Guide (version 1.10)
Page 12
... the power of the instrument off, then connect the devices as shown in the setting of the access point on the router side, read the owner's manual for the product you are using. • About confirmation and changes in the illustration below, and finally turn the power on... changes in the settings of the wireless game adaptor, read the owner's manual for the product you are using. • Before installing a new router, check that the router performs normally by Yamaha, refer to the AC outlet. The signal will not be received if there is unnecessary if...
... the power of the instrument off, then connect the devices as shown in the setting of the access point on the router side, read the owner's manual for the product you are using. • About confirmation and changes in the illustration below, and finally turn the power on... changes in the settings of the wireless game adaptor, read the owner's manual for the product you are using. • Before installing a new router, check that the router performs normally by Yamaha, refer to the AC outlet. The signal will not be received if there is unnecessary if...


