

Owner's Manual
Page 1
U CRX-E500 RX-E400 CDC-E500 Receiver/CD Player OWNER'S MANUAL
U CRX-E500 RX-E400 CDC-E500 Receiver/CD Player OWNER'S MANUAL

Owner's Manual
Page 2
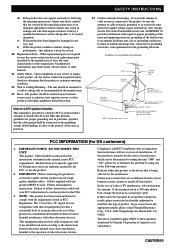
WARNING TO REDUCE THE RISK OF FIRE OR ELECTRIC SHOCK, DO NOT EXPOSE THIS UNIT TO RAIN OR MOISTURE. 1 Read Instructions - All the safety and operating instructions should be located in the literature accompanying the appliance. Do not use attachments not recommended by the product manufacturer as they exit from touching such power lines or circuits as they are not sure of the type of electric shock to lightning and power-line surges. 15 Power Lines - Do not use a mounting accessory recommended by the manufacturer, or sold with a polarized alternating current line plug (a plug ...
WARNING TO REDUCE THE RISK OF FIRE OR ELECTRIC SHOCK, DO NOT EXPOSE THIS UNIT TO RAIN OR MOISTURE. 1 Read Instructions - All the safety and operating instructions should be located in the literature accompanying the appliance. Do not use attachments not recommended by the product manufacturer as they exit from touching such power lines or circuits as they are not sure of the type of electric shock to lightning and power-line surges. 15 Power Lines - Do not use a mounting accessory recommended by the manufacturer, or sold with a polarized alternating current line plug (a plug ...
Owner's Manual
Page 3
.../s. SAFETY INSTRUCTIONS 24 Outdoor Antenna Grounding - Follow all installations. Note to its subsidiaries. Modifications not expressly approved by Yamaha may result in particular, specifies that interference will often require extensive work by a qualified technician to restore the product ... condition. 22 Wall or Ceiling Mounting - Article 810 of interference, which can not locate the appropriate retailer, please contact Yamaha Electronics Corp., U.S.A. 6660 Orangethorpe Ave, Buena Park, CA 90620. The above statements apply ONLY to a wall or ceiling...
.../s. SAFETY INSTRUCTIONS 24 Outdoor Antenna Grounding - Follow all installations. Note to its subsidiaries. Modifications not expressly approved by Yamaha may result in particular, specifies that interference will often require extensive work by a qualified technician to restore the product ... condition. 22 Wall or Ceiling Mounting - Article 810 of interference, which can not locate the appropriate retailer, please contact Yamaha Electronics Corp., U.S.A. 6660 Orangethorpe Ave, Buena Park, CA 90620. The above statements apply ONLY to a wall or ceiling...
Owner's Manual
Page 4
... to this unit, and/or personal injury. 5 Avoid installing this unit in a safe place for any service is too late, YAMAHA and the Electronic Industries Association's Consumer Electronics Group recommend you to obstruct heat radiation. Using this unit with Canadian ICES-003. We... Want You Listening For A Lifetime YAMAHA and the Electronic Industries Association's Consumer Electronics Group want you to sudden temperature changes from direct sunlight, heat sources, vibration, dust,...
... to this unit, and/or personal injury. 5 Avoid installing this unit in a safe place for any service is too late, YAMAHA and the Electronic Industries Association's Consumer Electronics Group recommend you to obstruct heat radiation. Using this unit with Canadian ICES-003. We... Want You Listening For A Lifetime YAMAHA and the Electronic Industries Association's Consumer Electronics Group want you to sudden temperature changes from direct sunlight, heat sources, vibration, dust,...

Owner's Manual
Page 5
... on the transportation pad 3 Remote control 4 Connecting the speakers and antennas 5 Connecting the system 6 Setting the clock 7 Adjusting the brightness of the YAMAHA Piano Craft Series. FEATURES • Minimum RMS output power per channel 40 W + 40 W (6Ω, 20 Hz to the radio 11 Presetting stations...Before using the timer 13 Timer play • CD TEXT display • CD-RW compatible The receiver (RX-E400) and CD player (CDC-E500) are the main units of the display 7 NAMES OF BUTTONS AND CONTROLS Front panel 8 Display 8 Remote control 9 BASIC OPERATIONS Listening to ...
... on the transportation pad 3 Remote control 4 Connecting the speakers and antennas 5 Connecting the system 6 Setting the clock 7 Adjusting the brightness of the YAMAHA Piano Craft Series. FEATURES • Minimum RMS output power per channel 40 W + 40 W (6Ω, 20 Hz to the radio 11 Presetting stations...Before using the timer 13 Timer play • CD TEXT display • CD-RW compatible The receiver (RX-E400) and CD player (CDC-E500) are the main units of the display 7 NAMES OF BUTTONS AND CONTROLS Front panel 8 Display 8 Remote control 9 BASIC OPERATIONS Listening to ...

Owner's Manual
Page 6
All of these might irreparably damage the disc's surface. • Do not expose discs to use only CD-R and CD-RW discs made by reliable manufacturers. • Some discs cannot be kept clean. Never attempt to load any non standard shaped CD (heart, etc.) available on the market, because it , because damage to the unit may damage the unit. • Do not use a CD with a circular motion; Wipe by using any type of disc cleaner, record spray, antistatic spray or liquid, or any disc that the following types of disc only. wipe straight outward from the center. • Do not try ...
All of these might irreparably damage the disc's surface. • Do not expose discs to use only CD-R and CD-RW discs made by reliable manufacturers. • Some discs cannot be kept clean. Never attempt to load any non standard shaped CD (heart, etc.) available on the market, because it , because damage to the unit may damage the unit. • Do not use a CD with a circular motion; Wipe by using any type of disc cleaner, record spray, antistatic spray or liquid, or any disc that the following types of disc only. wipe straight outward from the center. • Do not try ...

Owner's Manual
Page 7
Before attaching it as described below whenever the unit is shipped with the caution label. NATURAL SOUND COMPACT DISC PLAYER CDC-E500 3 Fix the strip on the pad with a transportation pad to prevent impact to the internal mechanism that two holders come out. 2 Pass the ...to bind two disc holders together. NATURAL SOUND COMPACT DISC PLAYER CDC-E500 2 Draw the pad out. Before turning CDC-E500 on, make sure to close the disc tray. 3 NATURAL SOUND COMPACT DISC PLAYER CDC-E500 4 Press STANDBY/ON on CDC-E500 to remove the pad. GETTING STARTED Notes on the transportation pad ...
Before attaching it as described below whenever the unit is shipped with the caution label. NATURAL SOUND COMPACT DISC PLAYER CDC-E500 3 Fix the strip on the pad with a transportation pad to prevent impact to the internal mechanism that two holders come out. 2 Pass the ...to bind two disc holders together. NATURAL SOUND COMPACT DISC PLAYER CDC-E500 2 Draw the pad out. Before turning CDC-E500 on, make sure to close the disc tray. 3 NATURAL SOUND COMPACT DISC PLAYER CDC-E500 4 Press STANDBY/ON on CDC-E500 to remove the pad. GETTING STARTED Notes on the transportation pad ...
Owner's Manual
Page 8
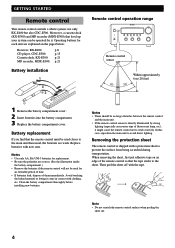
GETTING STARTED Remote control This remote control controls a whole system: not only RX-E400 but also CDC-E500. Notes • Use only AA, R6, UM-3 batteries for replacement. • Be sure the polarities are correct. (See the illustration inside the battery compartment.)...; There should be used closer to the main unit than usual, the batteries are explained on the pages below: Receiver, RX-E400: p.8 CD player, CDC-E500: p.15 Cassette deck, KX-E300: p.21 MD recorder, MDX-E300: p.21 Battery installation 1 3 2 Remote control operation range STANDBY/ON TIMER PHONES NATURAL SOUND...
GETTING STARTED Remote control This remote control controls a whole system: not only RX-E400 but also CDC-E500. Notes • Use only AA, R6, UM-3 batteries for replacement. • Be sure the polarities are correct. (See the illustration inside the battery compartment.)...; There should be used closer to the main unit than usual, the batteries are explained on the pages below: Receiver, RX-E400: p.8 CD player, CDC-E500: p.15 Cassette deck, KX-E300: p.21 MD recorder, MDX-E300: p.21 Battery installation 1 3 2 Remote control operation range STANDBY/ON TIMER PHONES NATURAL SOUND...

Owner's Manual
Page 9
Follow the steps as shown below to a wall outlet. Set up the AM loop antenna, then connect it. 4 Connect the AC power cord to connect the system using the supplied cords and accessories. Notes • Use external FM/AM antennas if you need better reception. SUBWOOFER SYSTEM OUT CONNECTOR 6Ω MIN./SPEAKER L SPEAKERS 1 4 To wall outlet 1 Connect the Speakers. 1 Unscrew the knob. 2 Remove approx. 10 mm (4") of insulation from the main unit. FM ANT 75 Ω UNBAL Red: positive(+) Black: negative(-) 2 1 3 2 Connect the AM loop antenna. R GND AM ANT L + - Right ...
Follow the steps as shown below to a wall outlet. Set up the AM loop antenna, then connect it. 4 Connect the AC power cord to connect the system using the supplied cords and accessories. Notes • Use external FM/AM antennas if you need better reception. SUBWOOFER SYSTEM OUT CONNECTOR 6Ω MIN./SPEAKER L SPEAKERS 1 4 To wall outlet 1 Connect the Speakers. 1 Unscrew the knob. 2 Remove approx. 10 mm (4") of insulation from the main unit. FM ANT 75 Ω UNBAL Red: positive(+) Black: negative(-) 2 1 3 2 Connect the AM loop antenna. R GND AM ANT L + - Right ...

Owner's Manual
Page 10
...-E400 to Ç and Î of MDX-E300. 3 Connect an external component to the AUX terminal of RX-E400. 4 Connect DIGITAL OPTICAL OUT of CDC-E500 to the owner's manual supplied with the system control cable. Caution • Never turn RX-E400 on until all connections between components have been completed... system components are turned on the rear panel is for connecting MDX-E300 or KX-E300. 3 Connect the AC power plug of CDC-E500 to AC OUTLET of CDC-E500 is not being used, in order to ‰ using the Audio pin cable. The other SYSTEM CONNECTOR of RX-E400. Insert the...
...-E400 to Ç and Î of MDX-E300. 3 Connect an external component to the AUX terminal of RX-E400. 4 Connect DIGITAL OPTICAL OUT of CDC-E500 to the owner's manual supplied with the system control cable. Caution • Never turn RX-E400 on until all connections between components have been completed... system components are turned on the rear panel is for connecting MDX-E300 or KX-E300. 3 Connect the AC power plug of CDC-E500 to AC OUTLET of CDC-E500 is not being used, in order to ‰ using the Audio pin cable. The other SYSTEM CONNECTOR of RX-E400. Insert the...

Owner's Manual
Page 11
... direction, press MIN while holding DISPLAY, turn INPUT clockwise to increase or counterclockwise to set the clock before you have connected the CD player (CDC-E500), cassette deck (KX-E300), and/or MD recorder (MDX-E300) to this unit, the brightness of the display. and Canada models, and 24-hour system...
... direction, press MIN while holding DISPLAY, turn INPUT clockwise to increase or counterclockwise to set the clock before you have connected the CD player (CDC-E500), cassette deck (KX-E300), and/or MD recorder (MDX-E300) to this unit, the brightness of the display. and Canada models, and 24-hour system...
Owner's Manual
Page 12
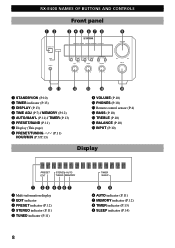
RX-E400 NAMES OF BUTTONS AND CONTROLS Front panel 12 3 45 6 7 8 9 STANDBY/ON NATURAL SOUND STEREO RECEIVER RX-E400 VOLUME TIMER PHONES DISPLAY MEMORY AUTO/MAN'L PRESET/BAND TIMER ADJ BASS TIMER TREBLE PRESET/TUNING HOUR MIN BALANCE - + - + L R MIN MAX INPUT 0q w 1 STANDBY/ON (P.10) 2 TIMER indicator (P.13) 3 DISPLAY (P.13) 4 TIME ADJ (P.7) / MEMORY (P.12) 5 AUTO/MAN'L (P.11) / TIMER (P.13) 6 PRESET/BAND (P.11) 7 Display (This page) 8 PRESET/TUNING / (P.11) HOUR/MIN (P.7/P.13) er t 9 VOLUME (P.10) 0 PHONES (P.10) q Remote control sensor (P.4) w BASS (P.10) e ...
RX-E400 NAMES OF BUTTONS AND CONTROLS Front panel 12 3 45 6 7 8 9 STANDBY/ON NATURAL SOUND STEREO RECEIVER RX-E400 VOLUME TIMER PHONES DISPLAY MEMORY AUTO/MAN'L PRESET/BAND TIMER ADJ BASS TIMER TREBLE PRESET/TUNING HOUR MIN BALANCE - + - + L R MIN MAX INPUT 0q w 1 STANDBY/ON (P.10) 2 TIMER indicator (P.13) 3 DISPLAY (P.13) 4 TIME ADJ (P.7) / MEMORY (P.12) 5 AUTO/MAN'L (P.11) / TIMER (P.13) 6 PRESET/BAND (P.11) 7 Display (This page) 8 PRESET/TUNING / (P.11) HOUR/MIN (P.7/P.13) er t 9 VOLUME (P.10) 0 PHONES (P.10) q Remote control sensor (P.4) w BASS (P.10) e ...

Owner's Manual
Page 13
... SLEEP DISPLAY VOLUME 5 7 8 9 q w 1 POWER (P.10) 2 Preset numbers (P.12) 3 A/B/C/D/E (P.12) 4 PRESET / (P.12) 5 TUNER (RX-E400) (P.12) 6 MD (MDX-E300) (P.21) 7 TAPE (KX-E300) (P.21) 8 CD (CDC-E500) (P.16) 9 AUX (The equipment connected to the AUX terminal) (P.6) 0 SLEEP (P.14) q DISPLAY (P.13) w VOLUME %/fi (P.10) Note • 5~9 are operation buttons and input selectors for...
... SLEEP DISPLAY VOLUME 5 7 8 9 q w 1 POWER (P.10) 2 Preset numbers (P.12) 3 A/B/C/D/E (P.12) 4 PRESET / (P.12) 5 TUNER (RX-E400) (P.12) 6 MD (MDX-E300) (P.21) 7 TAPE (KX-E300) (P.21) 8 CD (CDC-E500) (P.16) 9 AUX (The equipment connected to the AUX terminal) (P.6) 0 SLEEP (P.14) q DISPLAY (P.13) w VOLUME %/fi (P.10) Note • 5~9 are operation buttons and input selectors for...
Owner's Manual
Page 14
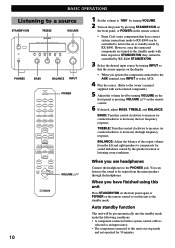
BALANCE: Adjust the balance of the output volume from the main speakers through the headphones. You can be controlled by RX-E400 STANDBY/ON. 3 Select the desired input source by turning INPUT so that have finished using this unit Press STANDBY/ON on the front panel again or POWER on the remote control to set this unit is in stop mode and not operated for sound imbalance caused by turning VOLUME on the front panel or pressing VOLUME %/fi on or standby mode by RX-E400. BASIC OPERATIONS Listening to a source STANDBY/ON TREBLE VOLUME STANDBY/ON TIMER PHONES NATURAL SOUND...
BALANCE: Adjust the balance of the output volume from the main speakers through the headphones. You can be controlled by RX-E400 STANDBY/ON. 3 Select the desired input source by turning INPUT so that have finished using this unit Press STANDBY/ON on the front panel again or POWER on the remote control to set this unit is in stop mode and not operated for sound imbalance caused by turning VOLUME on the front panel or pressing VOLUME %/fi on or standby mode by RX-E400. BASIC OPERATIONS Listening to a source STANDBY/ON TREBLE VOLUME STANDBY/ON TIMER PHONES NATURAL SOUND...
Owner's Manual
Page 15
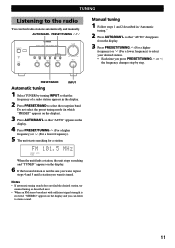
Notes • If automatic tuning search does not find radio stations automatically and manually. STEREO AUTO TUNED When the unit finds a station, the unit stops searching and "TUNED" appears on the display. 6 If the located station is not the one you want, repeat steps 4 and 5 until a station you want is received, "STEREO" appears on the display and you press PRESET/TUNING or , the frequency changes step by turning INPUT so that "AUTO" appears in the display. 2 Press PRESET/BAND to select the reception band. AUTO/MAN'L PRESET/TUNING / STANDBY/ON TIMER PHONES NATURAL SOUND STEREO ...
Notes • If automatic tuning search does not find radio stations automatically and manually. STEREO AUTO TUNED When the unit finds a station, the unit stops searching and "TUNED" appears on the display. 6 If the located station is not the one you want, repeat steps 4 and 5 until a station you want is received, "STEREO" appears on the display and you press PRESET/TUNING or , the frequency changes step by turning INPUT so that "AUTO" appears in the display. 2 Press PRESET/BAND to select the reception band. AUTO/MAN'L PRESET/TUNING / STANDBY/ON TIMER PHONES NATURAL SOUND STEREO ...

Owner's Manual
Page 16
Up to the previous page for a second when it is preset. Continue pressing PRESET/TUNING / to select the group of a previous one. • The preset stations are stored to A1, A2...A8 sequentially. POWER 1-8 A/B/C/D/E 1 2 3 1 2 3 4 5 6 4 5 6 7 8 9 7 8 0 +10 +100 REP RANDOM PROG A B C MODE TEXT/TIME DISC SKIP D E TAPE DIRECTION PRESET TUNER PRESET MD CD TAPE AUX MD REC/PAUSE TAPE REC/PAUSE MODE DUBBING START SLEEP DISPLAY TUNER PRESET / VOLUME PRESET STEREO TUNED MEMORY 5 Repeat steps 1 to select a desired preset number. PRESET STEREO TUNED ...
Up to the previous page for a second when it is preset. Continue pressing PRESET/TUNING / to select the group of a previous one. • The preset stations are stored to A1, A2...A8 sequentially. POWER 1-8 A/B/C/D/E 1 2 3 1 2 3 4 5 6 4 5 6 7 8 9 7 8 0 +10 +100 REP RANDOM PROG A B C MODE TEXT/TIME DISC SKIP D E TAPE DIRECTION PRESET TUNER PRESET MD CD TAPE AUX MD REC/PAUSE TAPE REC/PAUSE MODE DUBBING START SLEEP DISPLAY TUNER PRESET / VOLUME PRESET STEREO TUNED MEMORY 5 Repeat steps 1 to select a desired preset number. PRESET STEREO TUNED ...

Owner's Manual
Page 17
If you like to enjoy timer play with the MDX-E300 or KX-E300. 3. Press MIN to set the hour. Clock Time (TIMER on/off time. If you set the ON time but not OFF time, the timer play or recording, you want to use the cassette deck, KX-E300 or the MD Recorder, MDX-E300 for timer play or recording will change in about 8 seconds. If the mode is changed to the time setting mode. If you continue using the timer If you must reset the clock. 13 USING THE BUILT-IN TIMER Before using the system, press STANDBY/ ON to turn on this unit. DISPLAY HOUR MIN 4. Whenever DISPLAY is...
If you like to enjoy timer play with the MDX-E300 or KX-E300. 3. Press MIN to set the hour. Clock Time (TIMER on/off time. If you set the ON time but not OFF time, the timer play or recording, you want to use the cassette deck, KX-E300 or the MD Recorder, MDX-E300 for timer play or recording will change in about 8 seconds. If the mode is changed to the time setting mode. If you continue using the timer If you must reset the clock. 13 USING THE BUILT-IN TIMER Before using the system, press STANDBY/ ON to turn on this unit. DISPLAY HOUR MIN 4. Whenever DISPLAY is...

Owner's Manual
Page 18
USING THE BUILT-IN TIMER Sleep timer The unit can be turned off automatically when the selected sleep time is reached. 14 Each time you press SLEEP, the sleep time changes as follows: SLEEP 2h00m SLEEP 1h30m SLEEP 1h00m SLEEP 0h30m SLEEP OFF About 4 seconds after setting, the normal display will resume. • "SLEEP" will turn off automatically at a selected SLEEP time. PRESET TUNER PRESET MD CD TAPE AUX MD REC/PAUSE TAPE REC/PAUSE MODE DUBBING START SLEEP SLEEP DISPLAY VOLUME 1 Play the desired sound source. 2 Press SLEEP repeatedly until the desired sleep time appears in...
USING THE BUILT-IN TIMER Sleep timer The unit can be turned off automatically when the selected sleep time is reached. 14 Each time you press SLEEP, the sleep time changes as follows: SLEEP 2h00m SLEEP 1h30m SLEEP 1h00m SLEEP 0h30m SLEEP OFF About 4 seconds after setting, the normal display will resume. • "SLEEP" will turn off automatically at a selected SLEEP time. PRESET TUNER PRESET MD CD TAPE AUX MD REC/PAUSE TAPE REC/PAUSE MODE DUBBING START SLEEP SLEEP DISPLAY VOLUME 1 Play the desired sound source. 2 Press SLEEP repeatedly until the desired sleep time appears in...

Owner's Manual
Page 19
... OF BUTTONS AND CONTROLS Front panel 1 23 45 STANDBY/ON NATURAL SOUND COMPACT DISC PLAYER CDC-E500 DISC SKIP DISC 1 DISC 2 DISC 3 1 STANDBY/ON 2 Display (this page) 3 Disc tray (P.17) 4 DISC SKIP (P.18) 678 5 DISC 1/2/3 (Open/Close) (P.17) 6 & (Stop) (P.17) 7 ^ (Play/Pause) (P....
... OF BUTTONS AND CONTROLS Front panel 1 23 45 STANDBY/ON NATURAL SOUND COMPACT DISC PLAYER CDC-E500 DISC SKIP DISC 1 DISC 2 DISC 3 1 STANDBY/ON 2 Display (this page) 3 Disc tray (P.17) 4 DISC SKIP (P.18) 678 5 DISC 1/2/3 (Open/Close) (P.17) 6 & (Stop) (P.17) 7 ^ (Play/Pause) (P....
Owner's Manual
Page 20
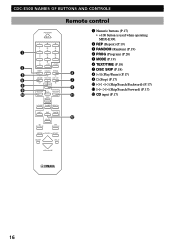
CDC-E500 NAMES OF BUTTONS AND CONTROLS Remote control 1 2 3 5 6 9 0 POWER 1 2 3 1 2 3 4 5 6 4 5 6 7 8 9 7 8 0 +10 +100 REP RANDOM PROG A B C MODE TEXT/TIME DISC SKIP D E TAPE DIRECTION PRESET TUNER PRESET MD CD ...
CDC-E500 NAMES OF BUTTONS AND CONTROLS Remote control 1 2 3 5 6 9 0 POWER 1 2 3 1 2 3 4 5 6 4 5 6 7 8 9 7 8 0 +10 +100 REP RANDOM PROG A B C MODE TEXT/TIME DISC SKIP D E TAPE DIRECTION PRESET TUNER PRESET MD CD ...
