
Owner's Manual
Page 2
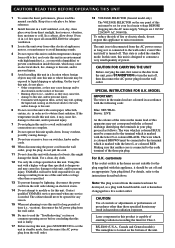
...vacation), disconnect the AC power plug from the wall outlet. 16 Be sure to read this manual carefully. Note: The plug severed from the wall outlet during an electrical storm. 14 Do... of this apparatus may not correspond with a newspaper, tablecloth, curtain, etc. Contact qualified YAMAHA service personnel when any damage resulting from use this unit for Class 1. Voltages are not suitable...personal injury. 7 Do not plug in this unit to a wall outlet until all around RX-E400 for future reference. 2 Install this unit in hazardous radiation exposure. Using this unit is located ...
...vacation), disconnect the AC power plug from the wall outlet. 16 Be sure to read this manual carefully. Note: The plug severed from the wall outlet during an electrical storm. 14 Do... of this apparatus may not correspond with a newspaper, tablecloth, curtain, etc. Contact qualified YAMAHA service personnel when any damage resulting from use this unit for Class 1. Voltages are not suitable...personal injury. 7 Do not plug in this unit to a wall outlet until all around RX-E400 for future reference. 2 Install this unit in hazardous radiation exposure. Using this unit is located ...
Owner's Manual
Page 7
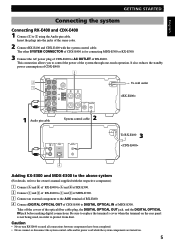
...CONNECTOR 6Ω MIN./SPEAKER L SPEAKERS 2 System control cable To wall outlet ANALOG E OUT L DIGITAL OPTICAL OUT R SYSTEM CONNECTOR 3 To RX-E400 Adding KX-E300 and MDX-E300 to the above system (For details, refer to control the power of MDX-E300. This connection allows you to... the owner's manual supplied with the system control cable. R GND AM ANT L + - It also reduces the standby power consumption of the same color. 2 Connect RX-E400 and CDX-E400 with the respective component.) 1 Connect Å and ı of RX-E400 to Å and ı of...
...CONNECTOR 6Ω MIN./SPEAKER L SPEAKERS 2 System control cable To wall outlet ANALOG E OUT L DIGITAL OPTICAL OUT R SYSTEM CONNECTOR 3 To RX-E400 Adding KX-E300 and MDX-E300 to the above system (For details, refer to control the power of MDX-E300. This connection allows you to... the owner's manual supplied with the system control cable. R GND AM ANT L + - It also reduces the standby power consumption of the same color. 2 Connect RX-E400 and CDX-E400 with the respective component.) 1 Connect Å and ı of RX-E400 to Å and ı of...
Owner's Manual
Page 11
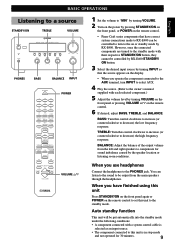
...control to set this control clockwise to increase (or counterclockwise to a source STANDBY/ON TREBLE VOLUME STANDBY/ON TIMER PHONES NATURAL SOUND STEREO RECEIVER RX-E400 VOLUME DISPLAY MEMORY AUTO/MAN'L PRESET/BAND TIMER ADJ BASS TIMER TREBLE PRESET/TUNING HOUR MIN BALANCE - + - + L R MIN MAX INPUT...to the PHONES jack. When you have correct system connections made to RX-E400 can listen to the sound to be controlled to turn INPUT to select AUX. 4 Play the source. (Refer to the owner's manual supplied with a system control cable is selected as an input source. &#...
...control to set this control clockwise to increase (or counterclockwise to a source STANDBY/ON TREBLE VOLUME STANDBY/ON TIMER PHONES NATURAL SOUND STEREO RECEIVER RX-E400 VOLUME DISPLAY MEMORY AUTO/MAN'L PRESET/BAND TIMER ADJ BASS TIMER TREBLE PRESET/TUNING HOUR MIN BALANCE - + - + L R MIN MAX INPUT...to the PHONES jack. When you have correct system connections made to RX-E400 can listen to the sound to be controlled to turn INPUT to select AUX. 4 Play the source. (Refer to the owner's manual supplied with a system control cable is selected as an input source. &#...
Owner's Manual
Page 12
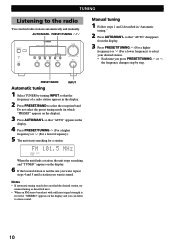
AUTO/MAN'L PRESET/TUNING / STANDBY/ON TIMER PHONES NATURAL SOUND STEREO RECEIVER RX-E400 VOLUME DISPLAY MEMORY AUTO/MAN'L PRESET/BAND TIMER ADJ BASS TIMER TREBLE PRESET/TUNING HOUR MIN BALANCE - + - + L R MIN MAX INPUT Manual tuning 1 Follow steps 1 and 2 described in the display. 4 Press PRESET/TUNING... appears on the display and you want , repeat steps 4 and 5 until a station you can find the desired station, try manual tuning as described next. • When an FM stereo broadcast with sufficient signal strength is tuned. TUNING Listening to the radio You...
AUTO/MAN'L PRESET/TUNING / STANDBY/ON TIMER PHONES NATURAL SOUND STEREO RECEIVER RX-E400 VOLUME DISPLAY MEMORY AUTO/MAN'L PRESET/BAND TIMER ADJ BASS TIMER TREBLE PRESET/TUNING HOUR MIN BALANCE - + - + L R MIN MAX INPUT Manual tuning 1 Follow steps 1 and 2 described in the display. 4 Press PRESET/TUNING... appears on the display and you want , repeat steps 4 and 5 until a station you can find the desired station, try manual tuning as described next. • When an FM stereo broadcast with sufficient signal strength is tuned. TUNING Listening to the radio You...

Owner's Manual
Page 13
...previous page for a second when it is preset. PRESET/TUNING / STANDBY/ON TIMER PHONES NATURAL SOUND STEREO RECEIVER RX-E400 VOLUME DISPLAY MEMORY AUTO/MAN'L PRESET/BAND TIMER ADJ BASS TIMER TREBLE PRESET/TUNING HOUR MIN BALANCE - + - +... L R MIN MAX INPUT MEMORY PRESET/BAND INPUT To preset stations manually 1 Tune in place of the preset stations (A, B, C, D, and E). POWER 1-8 A/B/C/D/E 1 2 3 1 2 3 4 5 6 4 5 6 7 8 9 7 8 0 +10 +100 FREQ/...
...previous page for a second when it is preset. PRESET/TUNING / STANDBY/ON TIMER PHONES NATURAL SOUND STEREO RECEIVER RX-E400 VOLUME DISPLAY MEMORY AUTO/MAN'L PRESET/BAND TIMER ADJ BASS TIMER TREBLE PRESET/TUNING HOUR MIN BALANCE - + - +... L R MIN MAX INPUT MEMORY PRESET/BAND INPUT To preset stations manually 1 Tune in place of the preset stations (A, B, C, D, and E). POWER 1-8 A/B/C/D/E 1 2 3 1 2 3 4 5 6 4 5 6 7 8 9 7 8 0 +10 +100 FREQ/...

Owner's Manual
Page 27
...Select the desired track number using numeric buttons. • Repeat step 4 to continue programming tracks. • The remaining time is shown on CDX-E400 when dubbing is done in the display for 3 seconds. 3 Press PROG to confirm the program. 4 Choose CD = TAPE by pressing DUBBING ...Choose CD = TAPE by pressing DUBBING MODE, and press DUBBING START to start recording. 3 Random tape programming 1 Repeat steps 1 and 2 of "Manual tape programming". 2 Press RANDOM to continue programming tracks on KX-E300. TIME D E PROG R.TIME DUBBING MODE TAPE DIRECTION PRESET TUNER PRESET MD CD...
...Select the desired track number using numeric buttons. • Repeat step 4 to continue programming tracks. • The remaining time is shown on CDX-E400 when dubbing is done in the display for 3 seconds. 3 Press PROG to confirm the program. 4 Choose CD = TAPE by pressing DUBBING ...Choose CD = TAPE by pressing DUBBING MODE, and press DUBBING START to start recording. 3 Random tape programming 1 Repeat steps 1 and 2 of "Manual tape programming". 2 Press RANDOM to continue programming tracks on KX-E300. TIME D E PROG R.TIME DUBBING MODE TAPE DIRECTION PRESET TUNER PRESET MD CD...


