

Owner's Manual
Page 5
... INFORMATION CD preventive care 23 Troubleshooting 23 Specifications 25 E-1 You could upgrade the system by adding the cassette deck (KX-E100) and MD recorder (MDX-E100)*. *MD recorder (MDX-E100) may not be available for purchasing this manual carefully. English ENGLISH INTRODUCTION Thank you for some areas. CONTENTS PRECAUTIONS 2 ...8226; Optical Digital Output • Random, Repeat, and Program Play • CD TEXT Display • Peak Level Search • Tape Programming The receiver (RX-E100) and CD player (CDX-E100) are the main units of the YAMAHA E100 series.
... INFORMATION CD preventive care 23 Troubleshooting 23 Specifications 25 E-1 You could upgrade the system by adding the cassette deck (KX-E100) and MD recorder (MDX-E100)*. *MD recorder (MDX-E100) may not be available for purchasing this manual carefully. English ENGLISH INTRODUCTION Thank you for some areas. CONTENTS PRECAUTIONS 2 ...8226; Optical Digital Output • Random, Repeat, and Program Play • CD TEXT Display • Peak Level Search • Tape Programming The receiver (RX-E100) and CD player (CDX-E100) are the main units of the YAMAHA E100 series.

Owner's Manual
Page 6
... the eyes, do not pull the cord. • Do not plug the AC power plug to use of procedures other electrical appliances, motors, and transformers. YAMAHA will not be held responsible for any connection to this unit, the internal fan starts running. • Sudden temperature changes and storage or operation in... might damage the finish. As the laser beam used must be correctly set the FREQUENCY STEP switch (located on left, right, and back sides of RX-E100. • Do not operate the unit upside-down.
... the eyes, do not pull the cord. • Do not plug the AC power plug to use of procedures other electrical appliances, motors, and transformers. YAMAHA will not be held responsible for any connection to this unit, the internal fan starts running. • Sudden temperature changes and storage or operation in... might damage the finish. As the laser beam used must be correctly set the FREQUENCY STEP switch (located on left, right, and back sides of RX-E100. • Do not operate the unit upside-down.
Owner's Manual
Page 7
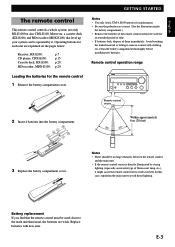
...main unit than usual, the batteries are explained on the pages below: Receiver, RX-E100: p.7 CD player, CDX-E100: p.15 Cassette deck, KX-E100: p.20 MD recorder, MDX-E100: p.20 Loading the batteries for an extended period of time. • If...by strong lighting (especially an inverter type of them immediately. Remote control operation range NATURAL SOUND STEREO RECEIVER RX-E100 VOLUME DISPLAY MEMORY AUTO/MAN'L PRESET/BAND PRESET/TUNING STANDBY/ON PHONES TIME ADJ TIMER BASS HOUR TREBLE ... This remote control controls a whole system: not only RX-E100 but also CDX-E100.
...main unit than usual, the batteries are explained on the pages below: Receiver, RX-E100: p.7 CD player, CDX-E100: p.15 Cassette deck, KX-E100: p.20 MD recorder, MDX-E100: p.20 Loading the batteries for an extended period of time. • If...by strong lighting (especially an inverter type of them immediately. Remote control operation range NATURAL SOUND STEREO RECEIVER RX-E100 VOLUME DISPLAY MEMORY AUTO/MAN'L PRESET/BAND PRESET/TUNING STANDBY/ON PHONES TIME ADJ TIMER BASS HOUR TREBLE ... This remote control controls a whole system: not only RX-E100 but also CDX-E100.

Owner's Manual
Page 9
... an external component to the AUX terminal of RX-E100. 4 Connect DIGITAL OPTICAL OUT of CDX-E100 to AC OUTLET of the same colour. 2 Connect RX-E100 and CDX-E100 with the system control cable. E-5 Insert the plugs into the jacks of RX-E100. English GETTING STARTED Connecting the system Connecting RX-E100 and CDX-E100 1 Connect ‰ to replace the terminal's cover when...
... an external component to the AUX terminal of RX-E100. 4 Connect DIGITAL OPTICAL OUT of CDX-E100 to AC OUTLET of the same colour. 2 Connect RX-E100 and CDX-E100 with the system control cable. E-5 Insert the plugs into the jacks of RX-E100. English GETTING STARTED Connecting the system Connecting RX-E100 and CDX-E100 1 Connect ‰ to replace the terminal's cover when...
Owner's Manual
Page 10
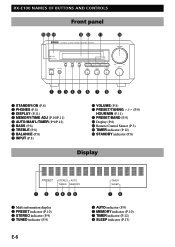
... BUTTONS AND CONTROLS Front panel NATURAL SOUND STEREO RECEIVER RX-E100 VOLUME TIMER STANDBY DISPLAY MEMORY AUTO/MAN'L PRESET/BAND PRESET/TUNING STANDBY/ON PHONES TIME ADJ TIMER BASS HOUR TREBLE MIN BALANCE MIN MAX INPUT -+ -+ ...
... BUTTONS AND CONTROLS Front panel NATURAL SOUND STEREO RECEIVER RX-E100 VOLUME TIMER STANDBY DISPLAY MEMORY AUTO/MAN'L PRESET/BAND PRESET/TUNING STANDBY/ON PHONES TIME ADJ TIMER BASS HOUR TREBLE MIN BALANCE MIN MAX INPUT -+ -+ ...

Owner's Manual
Page 11
...) $ AUX (The equipment connected to the AUX terminal) (P.5) › CD (CDX-E100) (P.16) % TUNER (RX-E100) (P.10) fi PRESET / (P.10) Note • #~fi are operation buttons and input selectors for each component. MODE DUBBING START E-7 English RX-E100 NAMES OF BUTTONS AND CONTROLS Remote control SLEEP A REP D PEAK TIME B RNDM DISP C PROG E TAPE MODE START VOLUME...
...) $ AUX (The equipment connected to the AUX terminal) (P.5) › CD (CDX-E100) (P.16) % TUNER (RX-E100) (P.10) fi PRESET / (P.10) Note • #~fi are operation buttons and input selectors for each component. MODE DUBBING START E-7 English RX-E100 NAMES OF BUTTONS AND CONTROLS Remote control SLEEP A REP D PEAK TIME B RNDM DISP C PROG E TAPE MODE START VOLUME...

Owner's Manual
Page 12
...ON on the front panel again or POWER on the remote control. 6 If desired, adjust BASS, TREBLE, and BALANCE. Auto power off function RX-E100 will be used to turn on or put automatically into the standby mode under the following conditions: • The component connected to select AUX.... not operated for the sound from the main speakers through the headphones. When you operate the component connected to the AUX terminal, turn INPUT to RX-E100 is not selected as an input source. TREBLE: Turn this control clockwise to increase (or counterclockwise to the PHONES jack. E-8 4 Play the ...
...ON on the front panel again or POWER on the remote control. 6 If desired, adjust BASS, TREBLE, and BALANCE. Auto power off function RX-E100 will be used to turn on or put automatically into the standby mode under the following conditions: • The component connected to select AUX.... not operated for the sound from the main speakers through the headphones. When you operate the component connected to the AUX terminal, turn INPUT to RX-E100 is not selected as an input source. TREBLE: Turn this control clockwise to increase (or counterclockwise to the PHONES jack. E-8 4 Play the ...
Owner's Manual
Page 13
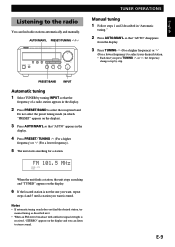
AUTO/MAN'L PRESET/TUNING / NATURAL SOUND STEREO RECEIVER RX-E100 VOLUME DISPLAY MEMORY AUTO/MAN'L PRESET/BAND PRESET/TUNING STANDBY/ON PHONES TIME ADJ TIMER BASS HOUR TREBLE MIN BALANCE MIN MAX INPUT -+ -+ LR TUNER ...
AUTO/MAN'L PRESET/TUNING / NATURAL SOUND STEREO RECEIVER RX-E100 VOLUME DISPLAY MEMORY AUTO/MAN'L PRESET/BAND PRESET/TUNING STANDBY/ON PHONES TIME ADJ TIMER BASS HOUR TREBLE MIN BALANCE MIN MAX INPUT -+ -+ LR TUNER ...
Owner's Manual
Page 14
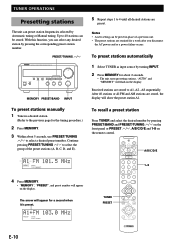
... selected by pressing PRESET/BAND and PRESET/TUNING / on the front panel or PRESET / , A/B/C/D/E and 1-8 on the remote control. PRESET/TUNING / NATURAL SOUND STEREO RECEIVER RX-E100 VOLUME DISPLAY MEMORY AUTO/MAN'L PRESET/BAND PRESET/TUNING STANDBY/ON PHONES TIME ADJ TIMER BASS HOUR TREBLE MIN BALANCE MIN MAX INPUT -+ -+ LR MEMORY...
... selected by pressing PRESET/BAND and PRESET/TUNING / on the front panel or PRESET / , A/B/C/D/E and 1-8 on the remote control. PRESET/TUNING / NATURAL SOUND STEREO RECEIVER RX-E100 VOLUME DISPLAY MEMORY AUTO/MAN'L PRESET/BAND PRESET/TUNING STANDBY/ON PHONES TIME ADJ TIMER BASS HOUR TREBLE MIN BALANCE MIN MAX INPUT -+ -+ LR MEMORY...

Owner's Manual
Page 15
... 3 While holding TIME ADJ, press HOUR to set the minutes. • If you use the timer functions. DISPLAY NATURAL SOUND STEREO RECEIVER RX-E100 VOLUME DISPLAY MEMORY AUTO/MAN'L PRESET/BAND PRESET/TUNING STANDBY/ON PHONES TIME ADJ TIMER BASS HOUR TREBLE MIN BALANCE MIN MAX INPUT -+ -+ LR... INPUT Press and hold DISPLAY for more than five minutes, you have connected the CD player (CDX-E100), cassette deck (KX-E100), and/or MD recorder (MDX-E100) to this unit, the brightness of a power failure or when the AC power cord is automatically adjusted to move ...
... 3 While holding TIME ADJ, press HOUR to set the minutes. • If you use the timer functions. DISPLAY NATURAL SOUND STEREO RECEIVER RX-E100 VOLUME DISPLAY MEMORY AUTO/MAN'L PRESET/BAND PRESET/TUNING STANDBY/ON PHONES TIME ADJ TIMER BASS HOUR TREBLE MIN BALANCE MIN MAX INPUT -+ -+ LR... INPUT Press and hold DISPLAY for more than five minutes, you have connected the CD player (CDX-E100), cassette deck (KX-E100), and/or MD recorder (MDX-E100) to this unit, the brightness of a power failure or when the AC power cord is automatically adjusted to move ...

Owner's Manual
Page 16
... REC Select the recording component by pressing DISPLAY once or more than TUNER and AUX on /off time. DISPLAY MIN NATURAL SOUND STEREO RECEIVER RX-E100 VOLUME DISPLAY MEMORY AUTO/MAN'L PRESET/BAND PRESET/TUNING STANDBY/ON PHONES TIME ADJ TIMER BASS HOUR TREBLE MIN BALANCE MIN MAX INPUT -+ -+...described on this unit. Notes • The display mode will change in timer, you want to use the cassette deck, KX-E100 or the MD Recorder, MDX-E100 for a second, and changed before the setting is pressed, the display mode changes as above. USING THE BUILT-IN TIMER ...
... REC Select the recording component by pressing DISPLAY once or more than TUNER and AUX on /off time. DISPLAY MIN NATURAL SOUND STEREO RECEIVER RX-E100 VOLUME DISPLAY MEMORY AUTO/MAN'L PRESET/BAND PRESET/TUNING STANDBY/ON PHONES TIME ADJ TIMER BASS HOUR TREBLE MIN BALANCE MIN MAX INPUT -+ -+...described on this unit. Notes • The display mode will change in timer, you want to use the cassette deck, KX-E100 or the MD Recorder, MDX-E100 for a second, and changed before the setting is pressed, the display mode changes as above. USING THE BUILT-IN TIMER ...

Owner's Manual
Page 20
... 5.) Skip play Press › to skip forward or $ to open the disc tray, and place a CD on the tray. &^ NATURAL SOUND COMPACT DISC PLAYER CDX-E100 STANDBY/ON STANDBY/ON $/! ⁄/› SLEEP A REP D PEAK TIME B RNDM DISP C PROG E TAPE POWER Numeric buttons $/!/›/⁄ VOLUME TAPE MD ... TUNER PRESET MD REC TAPE REC TAPE MODE DUBBING START CD ^ & To play CDs 1 Press STANDBY/ON to turn on this unit and also RX-E100. 2 Press CD on the remote control in the pause or stop mode. • During stop playback Press &. COMPACT DISC PLAYER OPERATIONS CD playback ...
... 5.) Skip play Press › to skip forward or $ to open the disc tray, and place a CD on the tray. &^ NATURAL SOUND COMPACT DISC PLAYER CDX-E100 STANDBY/ON STANDBY/ON $/! ⁄/› SLEEP A REP D PEAK TIME B RNDM DISP C PROG E TAPE POWER Numeric buttons $/!/›/⁄ VOLUME TAPE MD ... TUNER PRESET MD REC TAPE REC TAPE MODE DUBBING START CD ^ & To play CDs 1 Press STANDBY/ON to turn on this unit and also RX-E100. 2 Press CD on the remote control in the pause or stop mode. • During stop playback Press &. COMPACT DISC PLAYER OPERATIONS CD playback ...
Owner's Manual
Page 25
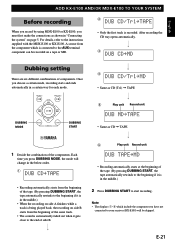
... will be recorded on side B starts from the beginning of components. Each time you have not connected to the instructions supplied with the MDX-E100 or KX-E100. MD REC TAPE REC TAPE 4 • Same as CD (Tr1) = TAPE 5 Play unit Record unit DUBBING MODE MODE DUBBING START DUBBING START... choose a certain mode, recording starts and ends automatically in a certain way for each mode. For details, refer to your receiver (RX-E100) will change in the below order. 1 • Recording automatically starts from the beginning of the same track. • The sound is automatically ...
... will be recorded on side B starts from the beginning of components. Each time you have not connected to the instructions supplied with the MDX-E100 or KX-E100. MD REC TAPE REC TAPE 4 • Same as CD (Tr1) = TAPE 5 Play unit Record unit DUBBING MODE MODE DUBBING START DUBBING START... choose a certain mode, recording starts and ends automatically in a certain way for each mode. For details, refer to your receiver (RX-E100) will change in the below order. 1 • Recording automatically starts from the beginning of the same track. • The sound is automatically ...
Owner's Manual
Page 27
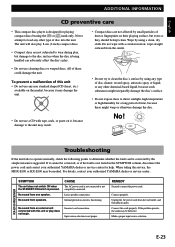
.... No sound from an external unit connected with a circular motion; Connect the cords properly. wipe straight outward from one speaker. RX-E100 RECEIVER SYMPTOM The unit does not switch ON when the STANDBY/ON switch is functioning. Internal protection circuit is pressed. If the problem... Input source selection is not connected or not completely connected. REMEDY Securely connect the power cord. E-23 For details, contact your authorized YAMAHA dealer or service center for help. Wipe by using a clean, dry cloth. Do not wipe with this unit • Do not...
.... No sound from an external unit connected with a circular motion; Connect the cords properly. wipe straight outward from one speaker. RX-E100 RECEIVER SYMPTOM The unit does not switch ON when the STANDBY/ON switch is functioning. Internal protection circuit is pressed. If the problem... Input source selection is not connected or not completely connected. REMEDY Securely connect the power cord. E-23 For details, contact your authorized YAMAHA dealer or service center for help. Wipe by using a clean, dry cloth. Do not wipe with this unit • Do not...

Owner's Manual
Page 28
... with low voltage. The disc may be warped. Remote control is too far away or is being used at the wrong place. CDX-E100 CD PLAYER REMOTE CONTROL E-24 RX-E100 RECEIVER ADDITIONAL INFORMATION SYMPTOM Excessive static in again after switching the unit ON before trying to 30 minutes after about one minute. The...
... with low voltage. The disc may be warped. Remote control is too far away or is being used at the wrong place. CDX-E100 CD PLAYER REMOTE CONTROL E-24 RX-E100 RECEIVER ADDITIONAL INFORMATION SYMPTOM Excessive static in again after switching the unit ON before trying to 30 minutes after about one minute. The...
Owner's Manual
Page 29
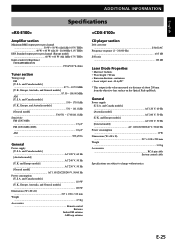
and Europe models AC 230 V, 50 Hz [General model AC 110/120/220/240 V, 50/60 Hz Power consumption [U.S.A. General Power supply [U.S.A. E-25 and Canada models AC 120 V, 60 Hz [Australia model AC 240 V, 50 Hz [U.K. and Canada models AC 120 V, 60 Hz [Australia model AC 240 V, 50 Hz [U.K. and Europe models AC 230 V, 50 Hz [General model AC 110/120/220/240 V, 50/60 Hz Power consumption 13 W Dimensions (W x H x D 217 x 108 x 290 mm Weight 3.0 kg Accessories RCA pin cable System control cable Specifications are subject to change without notice. and Canada models 530 - 1710 kHz...
and Europe models AC 230 V, 50 Hz [General model AC 110/120/220/240 V, 50/60 Hz Power consumption [U.S.A. General Power supply [U.S.A. E-25 and Canada models AC 120 V, 60 Hz [Australia model AC 240 V, 50 Hz [U.K. and Canada models AC 120 V, 60 Hz [Australia model AC 240 V, 50 Hz [U.K. and Europe models AC 230 V, 50 Hz [General model AC 110/120/220/240 V, 50/60 Hz Power consumption 13 W Dimensions (W x H x D 217 x 108 x 290 mm Weight 3.0 kg Accessories RCA pin cable System control cable Specifications are subject to change without notice. and Canada models 530 - 1710 kHz...


