
Owner's Manual
Page 2
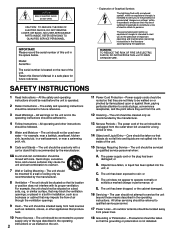
...connected to the presence of time. 14 Object and Liquid Entry - The power cord of the unit should not be read before the unit is located on the rear of the type described in the operating instructions or as marked on the unit. 2 11 Power-Cord Protection - or B. The user... you to qualified service personnel. 17 Power Lines - The power-supply cord or the plug has been damaged; Please record the serial number of air through the ventilation openings. 9 Heat - Quick stops, excessive force, and uneven surfaces may impede the flow of this Owner's Manual in performance; or...
...connected to the presence of time. 14 Object and Liquid Entry - The power cord of the unit should not be read before the unit is located on the rear of the type described in the operating instructions or as marked on the unit. 2 11 Power-Cord Protection - or B. The user... you to qualified service personnel. 17 Power Lines - The power-supply cord or the plug has been damaged; Please record the serial number of air through the ventilation openings. 9 Heat - Quick stops, excessive force, and uneven surfaces may impede the flow of this Owner's Manual in performance; or...
Owner's Manual
Page 3
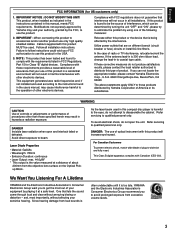
... of radio or TV interference, relocate/reorient the antenna. DANGER: The use the product. 2. If you to beam. Avoid direct exposure to avoid prolonged exposure from loud sounds is the value measured at a safe level. This Class B digital apparatus complies with other than those products distributed by playing it is 300 ohm ribbon lead, change the lead-in the users manual, may...
... of radio or TV interference, relocate/reorient the antenna. DANGER: The use the product. 2. If you to beam. Avoid direct exposure to avoid prolonged exposure from loud sounds is the value measured at a safe level. This Class B digital apparatus complies with other than those products distributed by playing it is 300 ohm ribbon lead, change the lead-in the users manual, may...
Owner's Manual
Page 4
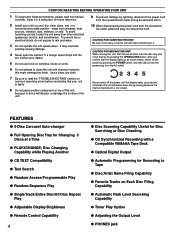
... Tracks on Each Disc Filing Capability q Automatic Peak Level Searching Capability q Timer Play Option q Adjusting the Output Level q PHONES jack FEATURES q 5-Disc Carousel Auto-changer q Full Opening Disc Tray for Recording to clean the unit with a Compatible YAMAHA Tape Deck q Optical Digital Output q Automatic Programming for Changing 5 Discs at a Time q PLAYXCHANGE; away from other electrical appliances, motors, and transformers. Never switch off the power by lightning, disconnect the power cord from the AC outlet...
... Tracks on Each Disc Filing Capability q Automatic Peak Level Searching Capability q Timer Play Option q Adjusting the Output Level q PHONES jack FEATURES q 5-Disc Carousel Auto-changer q Full Opening Disc Tray for Recording to clean the unit with a Compatible YAMAHA Tape Deck q Optical Digital Output q Automatic Programming for Changing 5 Discs at a Time q PLAYXCHANGE; away from other electrical appliances, motors, and transformers. Never switch off the power by lightning, disconnect the power cord from the AC outlet...
Owner's Manual
Page 5
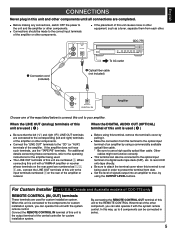
... component, you can also be connected to the optical input terminal of this unit to your amplifier. Connect the REMOTE CONTROL IN terminal of a digital audio tape deck (DAT), etc. q The LINE OUT terminals of this unit are numbered as a tuner, separate them from dust. Other cables might not function correctly. q Set the level of the amplifier. For Custom Installer For U.S.A., Canada and Australia models of an amplifier by using the OUTPUT LEVEL buttons. If the amplifier...
... component, you can also be connected to the optical input terminal of this unit to your amplifier. Connect the REMOTE CONTROL IN terminal of a digital audio tape deck (DAT), etc. q The LINE OUT terminals of this unit are numbered as a tuner, separate them from dust. Other cables might not function correctly. q Set the level of the amplifier. For Custom Installer For U.S.A., Canada and Australia models of an amplifier by using the OUTPUT LEVEL buttons. If the amplifier...
Owner's Manual
Page 6
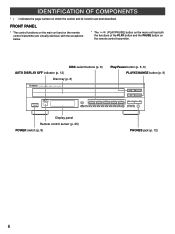
...DISC-select buttons (p. 8) AUTO DISPLAY OFF indicator (p. 12) Disc tray (p. 8) Play/Pause button (p. 8, 9) PLAYXCHANGE button (p. 9) NATURAL SOUND COMPACT DISC PLAYER POWER AUTO DISPLAY OFF / OPEN/CLOSE PLAYXCHANGE PROG 1 +10 1 2 3 DISC 2 3 4 4 5 6 7 8 5 9 0 PEAK SKIP/SEARCH OUTPUT LEVEL PHONES - + Display panel Remote control sensor (p. 25) POWER switch (p. 8) PHONES jack (p. 12) 6 IDENTIFICATION OF COMPONENTS * ( ) indicates the page number on which the control and its function are virtually identical, with the exceptions below. * The (PLAY/PAUSE) button...
...DISC-select buttons (p. 8) AUTO DISPLAY OFF indicator (p. 12) Disc tray (p. 8) Play/Pause button (p. 8, 9) PLAYXCHANGE button (p. 9) NATURAL SOUND COMPACT DISC PLAYER POWER AUTO DISPLAY OFF / OPEN/CLOSE PLAYXCHANGE PROG 1 +10 1 2 3 DISC 2 3 4 4 5 6 7 8 5 9 0 PEAK SKIP/SEARCH OUTPUT LEVEL PHONES - + Display panel Remote control sensor (p. 25) POWER switch (p. 8) PHONES jack (p. 12) 6 IDENTIFICATION OF COMPONENTS * ( ) indicates the page number on which the control and its function are virtually identical, with the exceptions below. * The (PLAY/PAUSE) button...
Owner's Manual
Page 8
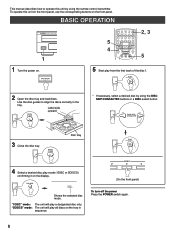
... panel, use the corresponding buttons on . DISC 2 3 4 (On the front panel) To turn off the power Press the POWER switch again. 8 OPEN/ CLOSE 4 Select a desired disc play a designated disc only. This manual describes how to align the discs correctly in sequence. POWER 5 4 SYNCHRO PEAK DIMMER TIME OPEN/ CLOSE REPEAT RANDOM TAPE CLEAR PROG 1 2 3 4 5 6 7 8 9 0 +10 FILE EDIT FILE MODE INDEX CAPS DISC SKIP/ CHARACTER DISC MODE TEXT MODE TEXT SRCH ENTER DISC SCAN SKIP/SEARCH OUTPUT LEVEL...
... panel, use the corresponding buttons on . DISC 2 3 4 (On the front panel) To turn off the power Press the POWER switch again. 8 OPEN/ CLOSE 4 Select a desired disc play a designated disc only. This manual describes how to align the discs correctly in sequence. POWER 5 4 SYNCHRO PEAK DIMMER TIME OPEN/ CLOSE REPEAT RANDOM TAPE CLEAR PROG 1 2 3 4 5 6 7 8 9 0 +10 FILE EDIT FILE MODE INDEX CAPS DISC SKIP/ CHARACTER DISC MODE TEXT MODE TEXT SRCH ENTER DISC SCAN SKIP/SEARCH OUTPUT LEVEL...

Owner's Manual
Page 9
... used to stop play temporarily or to the numbers of signals output into an amplifier or the headphones level adjusted by pressing the PLAYXCHANGE button on page 11.) Displays the numbers that contain discs light up after discs are selected. Ž Shows the selected track number. Shows the time displays. (Refer to "Selecting time displays" and "Selecting text displays" on the front panel without interrupting disc play . To play , press the PAUSE button again (or press the PLAY button...
... used to stop play temporarily or to the numbers of signals output into an amplifier or the headphones level adjusted by pressing the PLAYXCHANGE button on page 11.) Displays the numbers that contain discs light up after discs are selected. Ž Shows the selected track number. Shows the time displays. (Refer to "Selecting time displays" and "Selecting text displays" on the front panel without interrupting disc play . To play , press the PAUSE button again (or press the PLAY button...

Owner's Manual
Page 12
... illumination) by using the OUTPUT LEVEL buttons. * Note that the use of the OUTPUT LEVEL buttons will be checked in the display. 12 PHONES OUTPUT LEVEL or OUTPUT LEVEL - + (On the front panel) For optimum sound quality * When the DIGITAL AUDIO OUT (OPTICAL) terminal is used for the connection, set the level of output signals to an amplifier, etc. Changing brightness of the display You can change the brightness of the display (or turn off .) Adjusting the level of signals output into an amplifier, etc.
... illumination) by using the OUTPUT LEVEL buttons. * Note that the use of the OUTPUT LEVEL buttons will be checked in the display. 12 PHONES OUTPUT LEVEL or OUTPUT LEVEL - + (On the front panel) For optimum sound quality * When the DIGITAL AUDIO OUT (OPTICAL) terminal is used for the connection, set the level of output signals to an amplifier, etc. Changing brightness of the display You can change the brightness of the display (or turn off .) Adjusting the level of signals output into an amplifier, etc.
Owner's Manual
Page 13
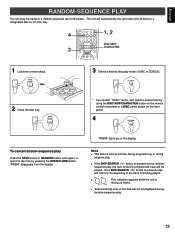
... the disc tray by using the DISC SKIP/CHARACTER button on the remote control transmitter or a DISC-select button on the disc will be displayed during random-sequence play will not function during programming, or during random- OPEN/ CLOSE 3 Select a desired disc play the tracks in a random sequence (up tracks. OPEN/ CLOSE * If you select "1DISC" mode, next select a desired disc by pressing the OPEN/CLOSE button. q Total remaining time on the front panel...
... the disc tray by using the DISC SKIP/CHARACTER button on the remote control transmitter or a DISC-select button on the disc will be displayed during random-sequence play will not function during programming, or during random- OPEN/ CLOSE 3 Select a desired disc play the tracks in a random sequence (up tracks. OPEN/ CLOSE * If you select "1DISC" mode, next select a desired disc by pressing the OPEN/CLOSE button. q Total remaining time on the front panel...

Owner's Manual
Page 14
... DISC SCAN SKIP/SEARCH OUTPUT LEVEL STOP PAUSE PLAY 3 7 1 Stop the unit. PLAY 14 STOP 2 If you will not be displayed during programming. You can enjoy listening to your favorite tracks selected from a disc (or discs) other than the disc on the Disc 1 tray, make this unit display the total recorded time of each disc to be used by pressing the DISC SKIP/CHARACTER buttons in turn. * Without this operation...
... DISC SCAN SKIP/SEARCH OUTPUT LEVEL STOP PAUSE PLAY 3 7 1 Stop the unit. PLAY 14 STOP 2 If you will not be displayed during programming. You can enjoy listening to your favorite tracks selected from a disc (or discs) other than the disc on the Disc 1 tray, make this unit display the total recorded time of each disc to be used by pressing the DISC SKIP/CHARACTER buttons in turn. * Without this operation...

Owner's Manual
Page 15
... TIME display mode-select button once again. Once that time, "ALL" lights up in the display. To check program data 1. Follow the procedure described in reverse order) by pressing the SKIP/SEARCH buttons. 3. After the correction has been completed, press the PROG button or PLAY button once again. 15 To cancel a programmed sequence There are several methods, as 40 tracks at one time. q Switch off the power...
... TIME display mode-select button once again. Once that time, "ALL" lights up in the display. To check program data 1. Follow the procedure described in reverse order) by pressing the SKIP/SEARCH buttons. 3. After the correction has been completed, press the PROG button or PLAY button once again. 15 To cancel a programmed sequence There are several methods, as 40 tracks at one time. q Switch off the power...

Owner's Manual
Page 17
... "PROGRAM" indicator in the display is turned off before this step.) DISC SKIP/ CHARACTER "ARTIST" appears in the unit's memory. You can easily search a disc using the filed text data. 2, 5, 7, 8 SYNCHRO PEAK DIMMER TIME OPEN/ CLOSE REPEAT RANDOM TAPE CLEAR PROG 1 2 3 4 5 6 7 8 9 0 +10 FILE EDIT FILE MODE INDEX CAPS DISC SKIP/ CHARACTER DISC MODE TEXT MODE TEXT SRCH ENTER DISC SCAN SKIP/SEARCH OUTPUT LEVEL STOP PAUSE PLAY...
... "PROGRAM" indicator in the display is turned off before this step.) DISC SKIP/ CHARACTER "ARTIST" appears in the unit's memory. You can easily search a disc using the filed text data. 2, 5, 7, 8 SYNCHRO PEAK DIMMER TIME OPEN/ CLOSE REPEAT RANDOM TAPE CLEAR PROG 1 2 3 4 5 6 7 8 9 0 +10 FILE EDIT FILE MODE INDEX CAPS DISC SKIP/ CHARACTER DISC MODE TEXT MODE TEXT SRCH ENTER DISC SCAN SKIP/SEARCH OUTPUT LEVEL STOP PAUSE PLAY...
Owner's Manual
Page 19
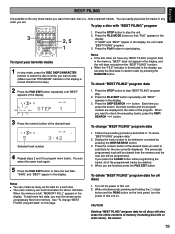
... as 32 edits for all discs 1. See "To change "BEST FILING" program data BEST EDIT 5 Selected track number 4 Repeat steps 2 and 3 to stop "BEST FILING" program play a disc with "BEST FILING" program 3 REPEAT RANDOM TAPE CLEAR PROG 1 2 3 4 5 6 7 8 9 0 +10 FILE EDIT FILE MODE INDEX CAPS DISC SKIP/ CHARACTER DISC MODE TEXT MODE TEXT SRCH ENTER DISC SCAN SKIP/SEARCH OUTPUT LEVEL STOP PAUSE PLAY 2, 5 1 1. Press the numeric button of the program. If you must first erase...
... as 32 edits for all discs 1. See "To change "BEST FILING" program data BEST EDIT 5 Selected track number 4 Repeat steps 2 and 3 to stop "BEST FILING" program play a disc with "BEST FILING" program 3 REPEAT RANDOM TAPE CLEAR PROG 1 2 3 4 5 6 7 8 9 0 +10 FILE EDIT FILE MODE INDEX CAPS DISC SKIP/ CHARACTER DISC MODE TEXT MODE TEXT SRCH ENTER DISC SCAN SKIP/SEARCH OUTPUT LEVEL STOP PAUSE PLAY 2, 5 1 1. Press the numeric button of the program. If you must first erase...
Owner's Manual
Page 20
... 3-5 again. q Programmed sequence of them can also be used together with this function Press the STOP button. DISC SKIP/ CHARACTER 2 Load a tape on this unit's remote control transmitter at the same time. 3 4 1 SYNCHRO PEAK DIMMER TIME OPEN/ CLOSE REPEAT RANDOM TAPE CLEAR PROG 1 2 3 4 5 6 7 8 9 0 +10 FILE EDIT FILE MODE INDEX CAPS DISC SKIP/ CHARACTER DISC MODE TEXT MODE TEXT SRCH ENTER DISC SCAN SKIP/SEARCH OUTPUT LEVEL STOP PAUSE PLAY 4 5 1 Select a disc. Notes...
... 3-5 again. q Programmed sequence of them can also be used together with this function Press the STOP button. DISC SKIP/ CHARACTER 2 Load a tape on this unit's remote control transmitter at the same time. 3 4 1 SYNCHRO PEAK DIMMER TIME OPEN/ CLOSE REPEAT RANDOM TAPE CLEAR PROG 1 2 3 4 5 6 7 8 9 0 +10 FILE EDIT FILE MODE INDEX CAPS DISC SKIP/ CHARACTER DISC MODE TEXT MODE TEXT SRCH ENTER DISC SCAN SKIP/SEARCH OUTPUT LEVEL STOP PAUSE PLAY 4 5 1 Select a disc. Notes...
Owner's Manual
Page 21
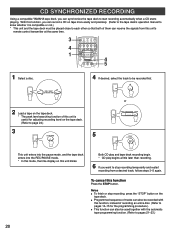
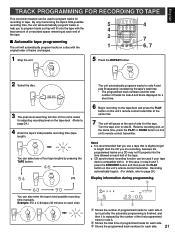
... DISC MODE TEXT MODE TEXT SRCH ENTER DISC SCAN SKIP/SEARCH OUTPUT LEVEL STOP PAUSE PLAY 4 7 6, 7 1 Stop the unit. STOP 5 Press the REPEAT button. Resume recording and, at the same time, press the PLAY or PAUSE button on this unit's remote control transmitter at the same time. 7 The unit will automatically program tracks on the tape deck. (Refer to page 20.) Display information during programming Ž You can select any...
... DISC MODE TEXT MODE TEXT SRCH ENTER DISC SCAN SKIP/SEARCH OUTPUT LEVEL STOP PAUSE PLAY 4 7 6, 7 1 Stop the unit. STOP 5 Press the REPEAT button. Resume recording and, at the same time, press the PLAY or PAUSE button on this unit's remote control transmitter at the same time. 7 The unit will automatically program tracks on the tape deck. (Refer to page 20.) Display information during programming Ž You can select any...
Owner's Manual
Page 22
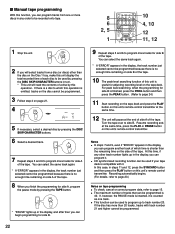
... PLAY button on this unit's remote control transmitter. Turn the tape over to page 15. s Manual tape programming With this function, you can program tracks from a disc (or discs) other track number lights up in the display, and after then you can begin programming for side B. 9 Repeat steps 5 and 6 to program more than 20 tracks, tracks with it. STOP 2 If you will pause at the same time, press the PLAY...
... PLAY button on this unit's remote control transmitter. Turn the tape over to page 15. s Manual tape programming With this function, you can program tracks from a disc (or discs) other track number lights up in the display, and after then you can begin programming for side B. 9 Repeat steps 5 and 6 to program more than 20 tracks, tracks with it. STOP 2 If you will pause at the same time, press the PLAY...

Owner's Manual
Page 23
... tape also changes accordingly. Recording automatically begins. (For details, refer to page 20.) Display information during programming, the TIME display mode-select button is pressed, the program number display can be used if your tape deck is slightly longer in length than the CD you use a tape that you are displayed for a short time. 3 Start recording on the tape deck and press the PLAY button on this unit's remote control transmitter. To return to side B. Turn...
... tape also changes accordingly. Recording automatically begins. (For details, refer to page 20.) Display information during programming, the TIME display mode-select button is pressed, the program number display can be used if your tape deck is slightly longer in length than the CD you use a tape that you are displayed for a short time. 3 Start recording on the tape deck and press the PLAY button on this unit's remote control transmitter. To return to side B. Turn...

Owner's Manual
Page 24
..., the part where the source level peaks is performed on the tape deck. 2 1 SYNCHRO PEAK DIMMER TIME OPEN/ CLOSE REPEAT RANDOM TAPE CLEAR PROG 1 2 3 4 5 6 7 8 9 0 +10 FILE EDIT FILE MODE INDEX CAPS DISC SKIP/ CHARACTER DISC MODE TEXT MODE TEXT SRCH ENTER DISC SCAN SKIP/SEARCH OUTPUT LEVEL STOP PAUSE PLAY 4 3 / OPEN/CLOSE PLAYXCHANGE DISC 2 3 4 4 5 6 7 8 5 9 0 PEAK SKIP/SEARCH OUTPUT LEVEL PHONES - + 4 1 Stop the unit. DISC MODE 4 0 PEAK or PEAK (On the front panel...
..., the part where the source level peaks is performed on the tape deck. 2 1 SYNCHRO PEAK DIMMER TIME OPEN/ CLOSE REPEAT RANDOM TAPE CLEAR PROG 1 2 3 4 5 6 7 8 9 0 +10 FILE EDIT FILE MODE INDEX CAPS DISC SKIP/ CHARACTER DISC MODE TEXT MODE TEXT SRCH ENTER DISC SCAN SKIP/SEARCH OUTPUT LEVEL STOP PAUSE PLAY 4 3 / OPEN/CLOSE PLAYXCHANGE DISC 2 3 4 4 5 6 7 8 5 9 0 PEAK SKIP/SEARCH OUTPUT LEVEL PHONES - + 4 1 Stop the unit. DISC MODE 4 0 PEAK or PEAK (On the front panel...
Owner's Manual
Page 25
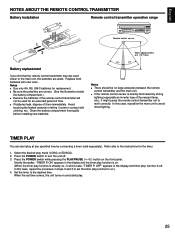
..., dispose of time. Select the desired play function to on the front panel. Press the POWER switch while pressing the PLAY/PAUSE ( ) button on .) 4. In this case, reposition the main unit to the main unit, the batteries are correct. (See the illustration inside the battery compartment.) q Remove the batteries if the remote control transmitter will not be used closer to avoid direct lighting. Avoid...
..., dispose of time. Select the desired play function to on the front panel. Press the POWER switch while pressing the PLAY/PAUSE ( ) button on .) 4. In this case, reposition the main unit to the main unit, the batteries are correct. (See the illustration inside the battery compartment.) q Remove the batteries if the remote control transmitter will not be used closer to avoid direct lighting. Avoid...
Owner's Manual
Page 27
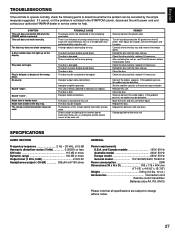
... obstructing the tray. Securely connect the audio cables. The disc tray does not close to the correct input selection. Move the tuner and this unit. Direct sunlight or lighting (of an inverter type of the main unit. If the problem persists, the cables may be corrected by the simple measures suggested. PROBABLE CAUSE The power cord is striking the remote control sensor of fluorescent lamp...
... obstructing the tray. Securely connect the audio cables. The disc tray does not close to the correct input selection. Move the tuner and this unit. Direct sunlight or lighting (of an inverter type of the main unit. If the problem persists, the cables may be corrected by the simple measures suggested. PROBABLE CAUSE The power cord is striking the remote control sensor of fluorescent lamp...


