

Owner's Manual
Page 2
... operated. 2 Retain Instructions - The unit should be used near water - The unit should be mounted to the presence of time. 14 Object and Liquid Entry - or placed in a built-in installation, such as a bookcase or cabinet that they exit from power lines. 18 Grounding or Polarization - or C. or E. Model: Serial No.: The serial number is not defeated. NO USER-SERVICEABLE PARTS...
... operated. 2 Retain Instructions - The unit should be used near water - The unit should be mounted to the presence of time. 14 Object and Liquid Entry - or placed in a built-in installation, such as a bookcase or cabinet that they exit from power lines. 18 Grounding or Polarization - or C. or E. Model: Serial No.: The serial number is not defeated. NO USER-SERVICEABLE PARTS...

Owner's Manual
Page 3
... storm. 10 When disconnecting the power cord from the objective lens surface on switches, knobs or cords. We Want You Listening For A Lifetime (for future reference. 2 Install your unit in hazardous radiation exposure. Then gently disconnect the power plug and the cords connecting to qualified personel only. WARNING CAUTION Use of controls or adjustments or performance of optical instrument with chemical solvents; Refer...
... storm. 10 When disconnecting the power cord from the objective lens surface on switches, knobs or cords. We Want You Listening For A Lifetime (for future reference. 2 Install your unit in hazardous radiation exposure. Then gently disconnect the power plug and the cords connecting to qualified personel only. WARNING CAUTION Use of controls or adjustments or performance of optical instrument with chemical solvents; Refer...

Owner's Manual
Page 4
...! This equipment generates/uses radio frequencies and, if not installed and used . Compliance with a Compatible YAMAHA Tape Deck CDC-765 and CDC-665 only q Automatic Programming for Class "B" digital devices. If you can be used according to distribute this manual, meets FCC requirements. Disc Changing Capability while Playing Another q Random Access Programmable Play q Random-Sequence Play q Single Track/Entire Disc/All Disc Repeat Play q Adjustable Display Brightness q Remote Control Capability q Disc Scanning Capability Useful for Disc Searching or Disc Checking q CD...
...! This equipment generates/uses radio frequencies and, if not installed and used . Compliance with a Compatible YAMAHA Tape Deck CDC-765 and CDC-665 only q Automatic Programming for Class "B" digital devices. If you can be used according to distribute this manual, meets FCC requirements. Disc Changing Capability while Playing Another q Random Access Programmable Play q Random-Sequence Play q Single Track/Entire Disc/All Disc Repeat Play q Adjustable Display Brightness q Remote Control Capability q Disc Scanning Capability Useful for Disc Searching or Disc Checking q CD...
Owner's Manual
Page 5
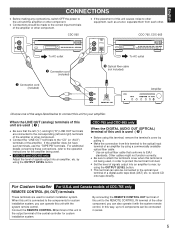
... the amplifier being used ( O–U)T (analog) terminals of the other component. For Custom Installer For U.S.A. and Canada models of CDC-765 only REMOTE CONTROL (IN, OUT) terminals These terminals are connected to the optical input terminal of signals output into an amplifier, etc. q Set the level of a digital audio tape deck (DAT) etc. by using the OUTPUT LEVEL button. Connect the REMOTE CONTROL IN terminal of signals output into an amplifier to max. q CDC-765 and CDC-665 only Adjust the level of this terminal to the optical input...
... the amplifier being used ( O–U)T (analog) terminals of the other component. For Custom Installer For U.S.A. and Canada models of CDC-765 only REMOTE CONTROL (IN, OUT) terminals These terminals are connected to the optical input terminal of signals output into an amplifier, etc. q Set the level of a digital audio tape deck (DAT) etc. by using the OUTPUT LEVEL button. Connect the REMOTE CONTROL IN terminal of signals output into an amplifier to max. q CDC-765 and CDC-665 only Adjust the level of this terminal to the optical input...
Owner's Manual
Page 6
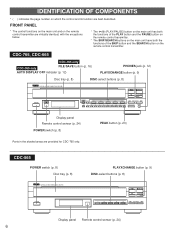
.../SEARCH Display panel Remote control sensor (p. 24) 6 CDC-765, CDC-665 CDC-765 only CDC-765 only FILE/SAVE button (p. 16) AUTO DISPLAY OFF indicater (p. 12) PHONES jack (p. 12) PLAYXCHANGE button (p. 9) Disc tray (p. 8) DISC-select buttons (p. 8) NATURAL SOUND COMPACT DISC PLAYER POWER AUTO DISPLAY OFF / OPEN/CLOSE PLAYXCHANGE FILE/ SAVE PROG 1 +10 1 2 3 DISC 2 3 4 4 5 6 7 8 5 SKIP/SEARCH PHONES 9 0 OUTPUT LEVEL PEAK - + Display panel Remote control sensor (p. 24) POWER switch (p. 8) PEAK button (p. 23) Parts in the shaded areas are best described...
.../SEARCH Display panel Remote control sensor (p. 24) 6 CDC-765, CDC-665 CDC-765 only CDC-765 only FILE/SAVE button (p. 16) AUTO DISPLAY OFF indicater (p. 12) PHONES jack (p. 12) PLAYXCHANGE button (p. 9) Disc tray (p. 8) DISC-select buttons (p. 8) NATURAL SOUND COMPACT DISC PLAYER POWER AUTO DISPLAY OFF / OPEN/CLOSE PLAYXCHANGE FILE/ SAVE PROG 1 +10 1 2 3 DISC 2 3 4 4 5 6 7 8 5 SKIP/SEARCH PHONES 9 0 OUTPUT LEVEL PEAK - + Display panel Remote control sensor (p. 24) POWER switch (p. 8) PEAK button (p. 23) Parts in the shaded areas are best described...

Owner's Manual
Page 7
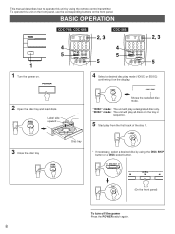
REMOTE CONTROL TRANSMITTER CDC-765 and CDC-665 only TAPE button (p. 20) DIMMER button (p. 12) TIME display mode-select button (p. 11) SYNCHRO button (p. 19) Numeric buttons (p. 10) Disc play MODE-select button (p. 8) DISC SCAN button (p. 11) DISC SKIP button (p. 8) CDC-765 and CDC-665 only OUTPUT LEVEL button (p. 12) STOP button (p. 9) SYNCHRO 1 4 DIMMER TIME OPEN/ CLOSE TAPE CLEAR PROG 2 3 INDEX 5 6 +10 7 8 9 0 DISC SCAN MODE REPEAT RANDOM DISC SKIP SEARCH - OUTPUT LEVEL + SKIP STOP PAUSE PLAY OPEN/CLOSE button (p. 8) PROG button (p. 14) CLEAR button (p. 15) INDEX ...
REMOTE CONTROL TRANSMITTER CDC-765 and CDC-665 only TAPE button (p. 20) DIMMER button (p. 12) TIME display mode-select button (p. 11) SYNCHRO button (p. 19) Numeric buttons (p. 10) Disc play MODE-select button (p. 8) DISC SCAN button (p. 11) DISC SKIP button (p. 8) CDC-765 and CDC-665 only OUTPUT LEVEL button (p. 12) STOP button (p. 9) SYNCHRO 1 4 DIMMER TIME OPEN/ CLOSE TAPE CLEAR PROG 2 3 INDEX 5 6 +10 7 8 9 0 DISC SCAN MODE REPEAT RANDOM DISC SKIP SEARCH - OUTPUT LEVEL + SKIP STOP PAUSE PLAY OPEN/CLOSE button (p. 8) PROG button (p. 14) CLEAR button (p. 15) INDEX ...
Owner's Manual
Page 8
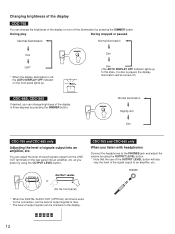
BASIC OPERATION POWER 1 CDC-765, CDC-665 4 5 SYNCHRO 1 4 DIMMER TIME OPEN/ CLOSE TAPE CLEAR PROG 2 3 INDEX 5 6 +I0 7 8 9 0 DISC SCAN MODE REPEAT RANDOM DISC SKIP SEARCH - PLAY Disc tray 3 Close the disc tray * If necessary, select a desired disc by using the DISC SKIP button or a DISC-select button. This manual describes how to operate this unit on the front panel, use the corresponding buttons on the tray in sequence. 5 Start play from the first track of the disc 1. To operate this...
BASIC OPERATION POWER 1 CDC-765, CDC-665 4 5 SYNCHRO 1 4 DIMMER TIME OPEN/ CLOSE TAPE CLEAR PROG 2 3 INDEX 5 6 +I0 7 8 9 0 DISC SCAN MODE REPEAT RANDOM DISC SKIP SEARCH - PLAY Disc tray 3 Close the disc tray * If necessary, select a desired disc by using the DISC SKIP button or a DISC-select button. This manual describes how to operate this unit on the front panel, use the corresponding buttons on the tray in sequence. 5 Start play from the first track of the disc 1. To operate this...

Owner's Manual
Page 9
... the unit. If the tray is played, its corresponding number disappears so the number of signals output into an amplifier or the headphone level adjusted by using the DISC SKIP button when this case, pressing the DISC SKIP button has no disc goes off. Ž Shows the selected track number. Shows the time displays. (Refer to "Selecting time displays" on , and whenever the disc tray rotates to change a disc selected, a tray number with no effect.
... the unit. If the tray is played, its corresponding number disappears so the number of signals output into an amplifier or the headphone level adjusted by using the DISC SKIP button when this case, pressing the DISC SKIP button has no disc goes off. Ž Shows the selected track number. Shows the time displays. (Refer to "Selecting time displays" on , and whenever the disc tray rotates to change a disc selected, a tray number with no effect.
Owner's Manual
Page 12
... adjust the level of sound signals output from the LINE OUT terminals on the rear panel into an amplifier, etc. as you can change the brightness of the display (or turn off the illumination) by pressing the DIMMER button. In this state, if a disc is played, the display illumination will also vary the level of the signal output to an amplifier, etc. PHONES * When the DIGITAL AUDIO OUT (OPTICAL) terminal is off .) CDC...
... adjust the level of sound signals output from the LINE OUT terminals on the rear panel into an amplifier, etc. as you can change the brightness of the display (or turn off the illumination) by pressing the DIMMER button. In this state, if a disc is played, the display illumination will also vary the level of the signal output to an amplifier, etc. PHONES * When the DIGITAL AUDIO OUT (OPTICAL) terminal is off .) CDC...
Owner's Manual
Page 13
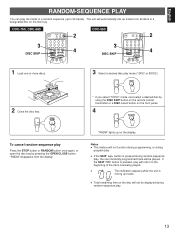
... button on the remote control transmitter or a DISC-select button on the front panel. 4 RANDOM "RNDM" lights up to the beginning of the track now being played. Notes q This feature will not be played. CDC-765, CDC-665 3 DISC SKIP SYNCHRO DIMMER TIME OPEN/ CLOSE TAPE CLEAR PROG 1 2 3 INDEX 4 5 6 +I0 7 8 9 0 DISC SCAN MODE REPEAT RANDOM DISC SKIP SEARCH - q If the SKIP button is pressed during random-sequence play, the next randomly programmed...
... button on the remote control transmitter or a DISC-select button on the front panel. 4 RANDOM "RNDM" lights up to the beginning of the track now being played. Notes q This feature will not be played. CDC-765, CDC-665 3 DISC SKIP SYNCHRO DIMMER TIME OPEN/ CLOSE TAPE CLEAR PROG 1 2 3 INDEX 4 5 6 +I0 7 8 9 0 DISC SCAN MODE REPEAT RANDOM DISC SKIP SEARCH - q If the SKIP button is pressed during random-sequence play, the next randomly programmed...

Owner's Manual
Page 14
... programming is completed; OUTPUT LEVEL + SKIP STOP PAUSE PLAY 3 7 5 2, 4 1 SYNCHRO 1 4 DIMMER TIME OPEN/ CLOSE CLEAR PROG 2 3 INDEX 5 6 +I0 7 8 9 0 DISC SCAN MODE REPEAT RANDOM DISC SKIP SEARCH SKIP STOP PAUSE PLAY 3 7 1 Stop the unit. STOP 2 If you will select tracks from one or more discs in turn. * Without this unit display the total recorded time of the programmed tracks will not be used by pressing the DISC SKIP button...
... programming is completed; OUTPUT LEVEL + SKIP STOP PAUSE PLAY 3 7 5 2, 4 1 SYNCHRO 1 4 DIMMER TIME OPEN/ CLOSE CLEAR PROG 2 3 INDEX 5 6 +I0 7 8 9 0 DISC SCAN MODE REPEAT RANDOM DISC SKIP SEARCH SKIP STOP PAUSE PLAY 3 7 1 Stop the unit. STOP 2 If you will select tracks from one or more discs in turn. * Without this unit display the total recorded time of the programmed tracks will not be used by pressing the DISC SKIP button...

Owner's Manual
Page 15
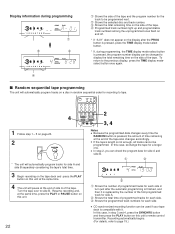
... be returned (sequentially in "To check program data". 2. The first programmed track number will be changed to be checked one displayed. Press the PROG button. 3. Each time the SKIP button is programmed. Display the track number to be displayed. English Display information during program play, press the STOP button. 2. q The SEARCH ( and ) button can be used during programming, the TIME display mode-select button is stopped. Play will begin from the memory and the new...
... be returned (sequentially in "To check program data". 2. The first programmed track number will be changed to be checked one displayed. Press the PROG button. 3. Each time the SKIP button is programmed. Display the track number to be displayed. English Display information during program play, press the STOP button. 2. q The SEARCH ( and ) button can be used during programming, the TIME display mode-select button is stopped. Play will begin from the memory and the new...

Owner's Manual
Page 16
...own choosing. OUTPUT LEVEL + SKIP STOP PAUSE PLAY OPEN/CLOSE PROG PLAY FILE/SAVE PROG DISC / (PLAY/PAUSE) NATURAL SOUND COMPACT DISC PLAYER CDC-765 POWER AUTO DISPLAY OFF / OPEN/CLOSE PLAYXCHANGE FILE/ SAVE PROG 1 +10 1 2 3 DISC 2 3 4 4 5 6 7 8 5 SKIP/SEARCH PHONES 9 0 OUTPUT LEVEL PEAK - + OPEN/CLOSE (STOP) POWER Numeric buttons 0 To file program data 1 Follow step 1 - 4 on the display. Numeric buttons DISC SKIP STOP SYNCHRO 1 4 DIMMER TIME OPEN/ CLOSE TAPE CLEAR PROG 2 3 INDEX 5 6 +I0 7 8 9 0 DISC SCAN MODE REPEAT RANDOM DISC SKIP...
...own choosing. OUTPUT LEVEL + SKIP STOP PAUSE PLAY OPEN/CLOSE PROG PLAY FILE/SAVE PROG DISC / (PLAY/PAUSE) NATURAL SOUND COMPACT DISC PLAYER CDC-765 POWER AUTO DISPLAY OFF / OPEN/CLOSE PLAYXCHANGE FILE/ SAVE PROG 1 +10 1 2 3 DISC 2 3 4 4 5 6 7 8 5 SKIP/SEARCH PHONES 9 0 OUTPUT LEVEL PEAK - + OPEN/CLOSE (STOP) POWER Numeric buttons 0 To file program data 1 Follow step 1 - 4 on the display. Numeric buttons DISC SKIP STOP SYNCHRO 1 4 DIMMER TIME OPEN/ CLOSE TAPE CLEAR PROG 2 3 INDEX 5 6 +I0 7 8 9 0 DISC SCAN MODE REPEAT RANDOM DISC SKIP...
Owner's Manual
Page 19
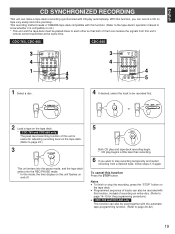
... tape-programming function. (Refer to page 23.) 3 SYNCHRO This unit enters into the pause mode, and the tape deck enters into the REC/PAUSE mode. * In this mode, the time display on this function. (Refer to the tape deck's operation manual to know whether it is useful for the programming procedure.) q CDC-765 and CDC-665 only This function can record a CD on and off. 5 PLAY Both CD play and tape deck recording begin. * CD play...
... tape-programming function. (Refer to page 23.) 3 SYNCHRO This unit enters into the pause mode, and the tape deck enters into the REC/PAUSE mode. * In this mode, the time display on this function. (Refer to the tape deck's operation manual to know whether it is useful for the programming procedure.) q CDC-765 and CDC-665 only This function can record a CD on and off. 5 PLAY Both CD play and tape deck recording begin. * CD play...

Owner's Manual
Page 20
... tape's total possible recording time manually. REPEAT 2 Select the disc. Resume recording and, at each side) 6 4 Π20 The unit automatically programs tracks for side A and side B separately considering the tape's total time. 7 Begin recording on the tape deck and press the PLAY button on a disc with it is useful for adjusting recording level on this unit's remote control transmitter. By only memorizing the tape's total possible recording time...
... tape's total possible recording time manually. REPEAT 2 Select the disc. Resume recording and, at each side) 6 4 Π20 The unit automatically programs tracks for side A and side B separately considering the tape's total time. 7 Begin recording on the tape deck and press the PLAY button on a disc with it is useful for adjusting recording level on this unit's remote control transmitter. By only memorizing the tape's total possible recording time...
Owner's Manual
Page 21
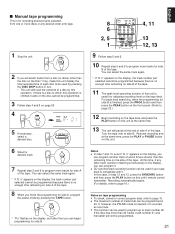
... The peak level searching function of this unit is useful for adjusting recording level on side A of the tape. 8 When you finish the programming for side A, program the pause mode by this operation. You can select the same track again. * If "E rr" appears on the display, the track number just selected cannot be programmed because there is no enough time remaining on the tape deck. TAPE * "Pu" flashes on the...
... The peak level searching function of this unit is useful for adjusting recording level on side A of the tape. 8 When you finish the programming for side A, program the pause mode by this operation. You can select the same track again. * If "E rr" appears on the display, the track number just selected cannot be programmed because there is no enough time remaining on the tape deck. TAPE * "Pu" flashes on the...
Owner's Manual
Page 22
... it . OUTPUT LEVEL + SKIP STOP PAUSE PLAY 2 3, 4 1 Follow step 1 - 5 on page 20. 2 RANDOM * The unit will pause at the end of side A of the tape also changes accordingly. Resume recording and, at the end of the tape. In this unit's remote control transmitter. In this case, in turn just after the PROG button is pressed, press the TIME display mode-select button. * If, during programming 1 2 3 4 5 6 7 8 9 10...
... it . OUTPUT LEVEL + SKIP STOP PAUSE PLAY 2 3, 4 1 Follow step 1 - 5 on page 20. 2 RANDOM * The unit will pause at the end of side A of the tape also changes accordingly. Resume recording and, at the end of the tape. In this unit's remote control transmitter. In this case, in turn just after the PROG button is pressed, press the TIME display mode-select button. * If, during programming 1 2 3 4 5 6 7 8 9 10...
Owner's Manual
Page 23
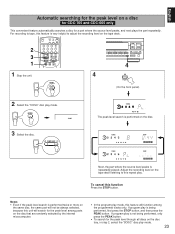
..." disc play mode. 23 STOP 4 0 PEAK (On the front panel) 2 Select the "1DISC" disc play . Notes • Even if the peak level search is repeatedly played. OUTPUT LEVEL + SKIP STOP PAUSE PLAY / OPEN/CLOSE PLAYXCHANGE DISC 2 3 4 4 5 6 7 8 5 SKIP/SEARCH PHONES 9 0 OUTPUT LEVEL PEAK - + 4 1 Stop the unit. Adjust the recording level on the tape deck listening to adjust the recording level on the tape deck. 2 3 1 SYNCHRO 1 4 DIMMER TIME OPEN/ CLOSE TAPE CLEAR PROG 2 3 INDEX 5 6 +I0 7 8 9 0 DISC SCAN MODE REPEAT...
..." disc play mode. 23 STOP 4 0 PEAK (On the front panel) 2 Select the "1DISC" disc play . Notes • Even if the peak level search is repeatedly played. OUTPUT LEVEL + SKIP STOP PAUSE PLAY / OPEN/CLOSE PLAYXCHANGE DISC 2 3 4 4 5 6 7 8 5 SKIP/SEARCH PHONES 9 0 OUTPUT LEVEL PEAK - + 4 1 Stop the unit. Adjust the recording level on the tape deck listening to adjust the recording level on the tape deck. 2 3 1 SYNCHRO 1 4 DIMMER TIME OPEN/ CLOSE TAPE CLEAR PROG 2 3 INDEX 5 6 +I0 7 8 9 0 DISC SCAN MODE REPEAT...
Owner's Manual
Page 24
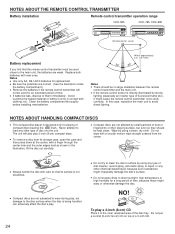
... not expose discs to direct sunlight, high temperature or high humidity for a long period of time. NOTES ABOUT THE REMOTE CONTROL TRANSMITTER Battery installation Remote control transmitter operation range CDC-565 CDC-765, CDC-665 2 1 3 Battery replacement If you find that its storage case, open the case and then press down at the center; q Be sure the polarities are weak. The unit will not be used for...
... not expose discs to direct sunlight, high temperature or high humidity for a long period of time. NOTES ABOUT THE REMOTE CONTROL TRANSMITTER Battery installation Remote control transmitter operation range CDC-565 CDC-765, CDC-665 2 1 3 Battery replacement If you find that its storage case, open the case and then press down at the center; q Be sure the polarities are weak. The unit will not be used for...
Owner's Manual
Page 25
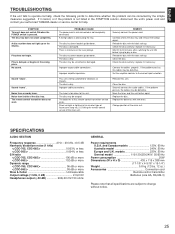
... The power cord is dirty. The disc is not connected or not completely connected. Wait 20 to 30 minutes after switching the unit ON before trying to the correct input selection. Direct sunlight or lighting (of an inverter type of the disc tray. If the problem persists, the cables may be corrected by the simple measures suggested. No sound. Sound "hums". The disc is striking the remote control...
... The power cord is dirty. The disc is not connected or not completely connected. Wait 20 to 30 minutes after switching the unit ON before trying to the correct input selection. Direct sunlight or lighting (of an inverter type of the disc tray. If the problem persists, the cables may be corrected by the simple measures suggested. No sound. Sound "hums". The disc is striking the remote control...


